
How to Make Chocolate Covered Coffee Beans
In this recipe tutorial, I will show you, step-by-step, how to make chocolate covered coffee beans. The result is a delicious, tiny morsel with a crunchy inside and melt in your mouth chocolate coating.
Servings: 6 ¼ cup servings
Calories: 191kcal
Equipment
Ingredients
- 1 cup coffee beans roasted
- 1 cup dark chocolate broken into pieces
- 3 tablespoons cocoa powder
Instructions
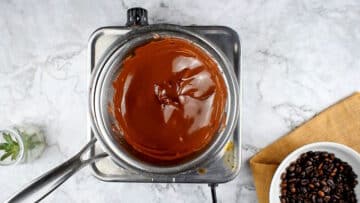
- In a double boiler (or in a metal bowl placed over a pot of simmering water), melt the chocolate bar chunks until smooth and creamy. Turn off the heat.
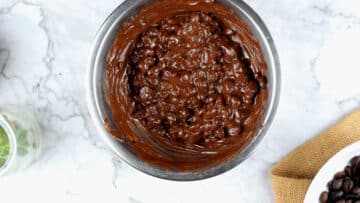
- Add the coffee beans to the melted chocolate and stir until completely coated.
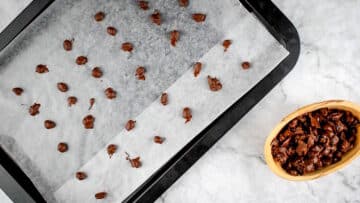
- Scoop the coffee beans up with a small spoon, allowing excess chocolate to drip off. Place them on waxed paper (try to place them individually, but if some stick together that's not a big problem).

- Let them cool and set. It will take about 1-2 hours, depending on room temperature. Once the chocolate is solid, break apart any big chunks.
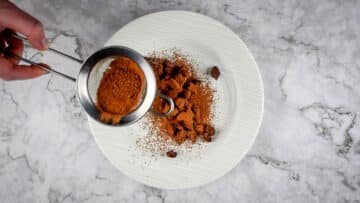
- Separate the chocolate-covered coffee beans in half. Dust one half with cocoa powder and leave the other half as they are.
- Serve & enjoy!

Video
Notes
- Type of coffee beans to use: I like to use arabica beans for this recipe as they have a better taste than robusta, are more sweet/less bitter and lower in caffeine.
- Cocoa powder option: Dusting the beans with cocoa powder is optional but it makes for a nice presentation and difference in taste and texture.
- Caffeine content: On average, one chocolate-covered coffee bean contains between 3 and 5 milligrams of caffeine.
- Chocolate type: You can use any chocolate type you desire: milk, dark, white or ruby.
- Pro Tip: Try using 2 spoons for the transferring step: one to pick up the bean and 1 to scrape it off of the other spoon. This will save you some time.
- Storage: It is ideal to keep them in an airtight container that you can slide into the refrigerator or freezer.
- In a cool dark cupboard or pantry: for up to 1 month for best results.
- Refrigerate: for up to 6 months.
- Freeze: for up to 1 year.
- Keep them where kids can't reach them.
Nutrition
Calories: 191kcal | Carbohydrates: 17g | Protein: 3g | Fat: 13g | Saturated Fat: 7g | Sodium: 7mg | Potassium: 321mg | Fiber: 5g | Sugar: 7g | Vitamin A: 10IU | Calcium: 31mg | Iron: 4.5mg