
Is there any greater joy in life than eating a fresh cinnamon roll right out of the pan? To answer that question: No, there really isn't, in my opinion.
Cinnamon rolls from scratch are one of those fantastic delicacies that not nearly enough people experience for themselves. This is made all the more tragic because of how easy it is to create them.

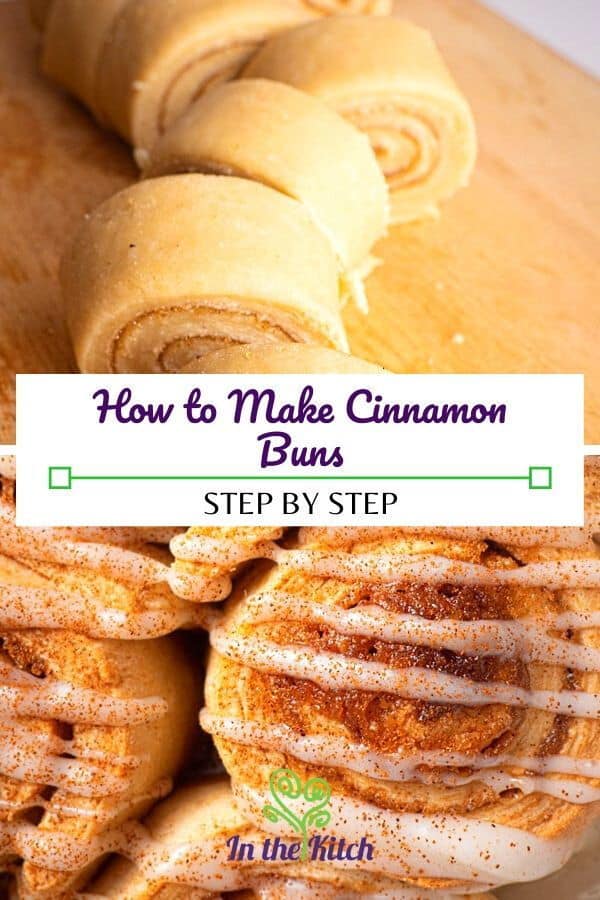
Let's right that wrong now and show you how to make cinnamon buns at home with cream cheese icing. This recipe uses quick yeast rising and simple ingredients to make a quality product at half the time you'd expect. The end result is so delicious you'll be kicking yourself for not trying this sooner.
Jump to:
- Step #1. Prepare Ingredients
- Step #2. Combine Dry Filling Ingredients
- Step #3. Prepare Cinnamon Bun Dough
- Step #4. Let the Dough Rest
- Step #5. Roll Out Dough
- Step #6. Brush Butter Over Dough
- Step #7. Sprinkle Sugar on & Roll
- Step #8. Cut Dough into Smaller Pieces
- Step #9. Let the Buns Rise
- Step #10. Bake the Cinnamon Buns
- Step #11. Prepare the Glaze
- Step #12. Drizzle the Glaze Over & Serve
- 📋Recipe
Step #1. Prepare Ingredients

- instant yeast - Unlike active dry yeast, instant yeast doesn't require proofing in warm water. You can mix it directly into dry ingredients. It works quicker than active dry yeast.
- flour - All purpose flour works great.
- cream cheese - This is for the cinnamon bun icing, which will make them taste more like Cinnabon rolls, which are irresistible!
- cinnamon - Cassia cinnamon is the most common cinnamon in the grocery stores so you'll have no trouble finding it, as it's probably already in your pantry. It has strong flavor so it's great for baking. Cinnabon uses Makara cinnamon in their rolls, which is really just high quality cassia cinnamon (Korintje).
*Check recipe card for ingredient amounts.
Step #2. Combine Dry Filling Ingredients

Mix brown sugar, cinnamon and nutmeg together and reserve.
Step #3. Prepare Cinnamon Bun Dough

Mix the flour, sugar and dry instant yeast together. Add all wet ingredients, except for the butter, and combine. Once you're at this point, it should look a bit flaky. Add the butter and incorporate with your hands until a dough ball forms.


Step #4. Let the Dough Rest

Cover the dough loosely with plastic film and let it rest for 10 minutes.
Step #5. Roll Out Dough

Roll the dough out into a rectangular shape on a floured surface, using a rolling pin (try to make it about 12" wide).

Step #6. Brush Butter Over Dough

Preheat oven to 375ºF (190ºC). Use a pastry brush to cover the dough with melted butter.
Step #7. Sprinkle Sugar on & Roll

Sprinkle the brown sugar mix on top and roll up the dough into a log.

Step #8. Cut Dough into Smaller Pieces

Cut the roll into smaller pieces (about 1.5 inches wide). You should get 8 individual pieces. Transfer to a baking pan.
Step #9. Let the Buns Rise

Let them sit, covered with a damp towel, until they double in size (about 1 hour).
Step #10. Bake the Cinnamon Buns

Bake in a 375ºF preheated oven for about 20 minutes - or until golden brown.
Step #11. Prepare the Glaze

While the cinnamon buns are baking, mix all of the glaze ingredients with an electric mixer or whisk until well combined and smooth. Set aside.

Step #12. Drizzle the Glaze Over & Serve

Drizzle the glaze over and sprinkle with some more cinnamon if desired. Serve and enjoy!


Cinnamon buns are one of the greatest desserts in the world. Now you've got the skills to craft some of these soft, pillowy, spicy, creamy, and amazing rolls of flavor all your own with minimal hassle. Take what you've learned here and explore all the possibilities this delectable dessert has to offer.
Before you bake, remember to account for spacing on the buns. Make sure they've got some breathing room and aren't touching prior to going in the oven. That lets them all bake and rise evenly and tear apart from each other without pinching all those flaky layers.


You can safely store these buns in the fridge for around a week in an airtight container. If you expect you're not going to eat them all shortly after they come out of the oven, one thing you can do to help preserve their integrity is to hold off on icing them until you're ready to eat.
That keeps the buns from getting soggy as they sit there while also making it easy to pop them back in the oven for a few minutes to heat them up after they've been in the fridge.
Did you enjoy these cinnamon buns? Let us know in the comments how they turned out!
Looking to further enhance your cooking skills? Check out...How to Make a London Fog
📋Recipe

Easy Homemade Cinnamon Buns
Ingredients
Filling
- ½ cup brown sugar
- 2 teaspoons cinnamon
- 1 teaspoon ground nutmeg
- ¼ cup butter - melted
Pastry
- 2 ¼ cups flour
- ¼ cup sugar
- 1 tablespoon instant yeast
- 3.5 ounces milk - (100 ml) heated to warm temperature
- 1 large egg
- 1 teaspoon vanilla
- ¼ cup butter - cubed
Icing
- ¾ cup cream cheese - softened
- ¾ cup icing sugar
- 2 tablespoons hot water
Instructions
Filling
- Mix the brown sugar, cinnamon and nutmeg together and reserve.½ cup brown sugar, 2 teaspoons cinnamon, 1 teaspoon ground nutmeg
Pastry
- Mix the flour, sugar and dry instant yeast together. Add all wet ingredients (milk, egg, vanilla) and combine. Once you're at this point, it should look a bit flaky.2 ¼ cups flour, ¼ cup sugar, 1 tablespoon instant yeast, 3.5 ounces milk, 1 large egg, 1 teaspoon vanilla
- Add the butter and incorporate with your hands until a dough ball forms. The dough should be slightly sticky but not too sticky that it's clinging to your hands. You can add a touch more flour if sticky.¼ cup butter
- Cover the dough loosely with plastic film and let it rest for 10 minutes.
- Roll the dough out into a rectangular shape on a floured surface, using a rolling pin (try to make it about 12" to 14" wide).
- Use a pastry brush to cover the dough with melted butter.¼ cup butter
- Sprinkle the brown sugar mix on top and roll up the dough into a log.
- Cut the roll into smaller pieces (about 1.5 inches wide). You should get 8 to 10 individual pieces. Transfer to a baking pan, 1" to 2" apart. Let them sit, covered with a damp towel, until they double in size (about 1 hour).
- Bake in a 375ºF preheated oven for about 18 to 20 minutes - or until golden brown. Let them cool for 10 to 15 minutes so they're warm but not hot.
Icing
- Mix all of the icing ingredients with an electric mixer or whisk until well combined and smooth.¾ cup cream cheese, ¾ cup icing sugar, 2 tablespoons hot water
- Push the cinnamon buns closer together so that they're touching and frost them with a spatula. Spread it out nice and even on top. Sprinkle with some more cinnamon. Serve and enjoy!
Equipment
Notes
- Frosting the buns: If the buns are too hot, especially for cream cheese frosting, the fat in the frosting can melt and separate, making it greasy and runny. Some bakeries frost while the buns are warm, then add another light layer after they've cooled for extra richness and aesthetic appeal!
- Storage: You can safely store the buns in the fridge for up to 4 to 5 days. Cool them first, wrap each individually in plastic wrap and transfer to an airtight container. If you expect you're not going to eat them all shortly after they come out of the oven, one thing you can do to help preserve their integrity is to hold off on icing them until you're ready to eat.
- Reheating: You can reheat them in the microwave for a short time (20 to 30 seconds), until warmed up.
- Even baking: Try to cut them close to the same size so that they bake evenly. Don't be afraid to pop out the ruler!
Nutrition
Nutrition information on In the Kitch is provided as a courtesy and is an estimate only. It may not include toppings and/or sauces.


Jeannie Laughlin says
Add raisins, dried cranberries or other dried fruits along with walnut or other nut pieces to buns,,,yummy
Joss Dyckson says
Indeed, sounds great Jeannie!
Roberto Davila says
Can you use wheat flour instead of regular flour?
Joss Dyckson says
Hi Roberto, if you are going to use whole wheat flour, I recommend a mix of whole wheat with all purpose so that the buns rise properly. You can try using 50% whole wheat flour and 50% all-purpose flour and see how that goes. Thanks for the question and I hope that helps!