
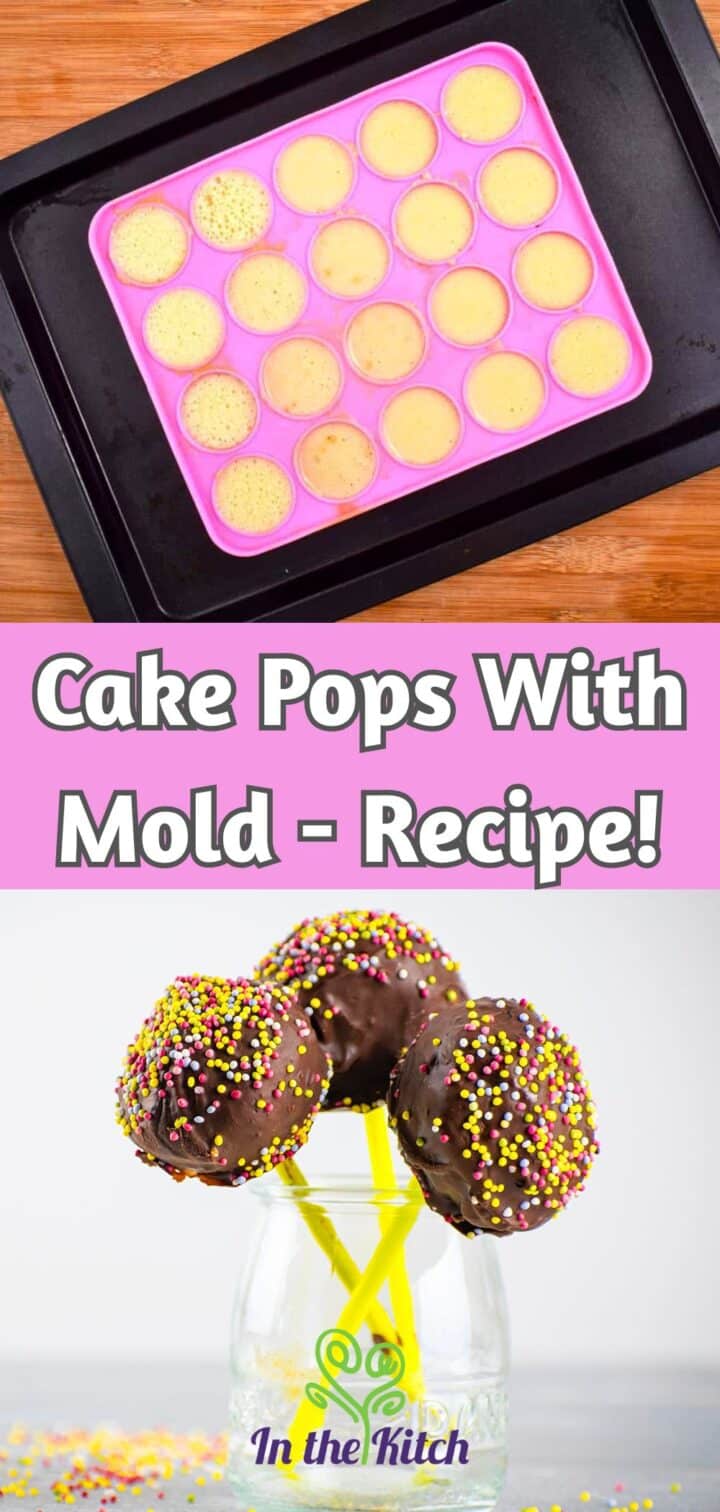
Thanks to the new market for molds made of silicone, it is now a breeze to put cake in the cute, single-serving form of a cake pop! Some people look at a cake mold and don't know where to start. I'm going to show you exactly how to make cake pops with a mold to make things a little easier for you.

After playing around with a silicone mold for years, I've found the best way to use it for making round cake pops with ease.
Unlike making them by hand, cake pops with mold units are simple to make and turn out great - so long as you know some tricks for making these beautiful treats.
Diving in blind? Good luck-you'll need it. Or just follow this tutorial and skip the hassle!
Jump to:
Ingredients
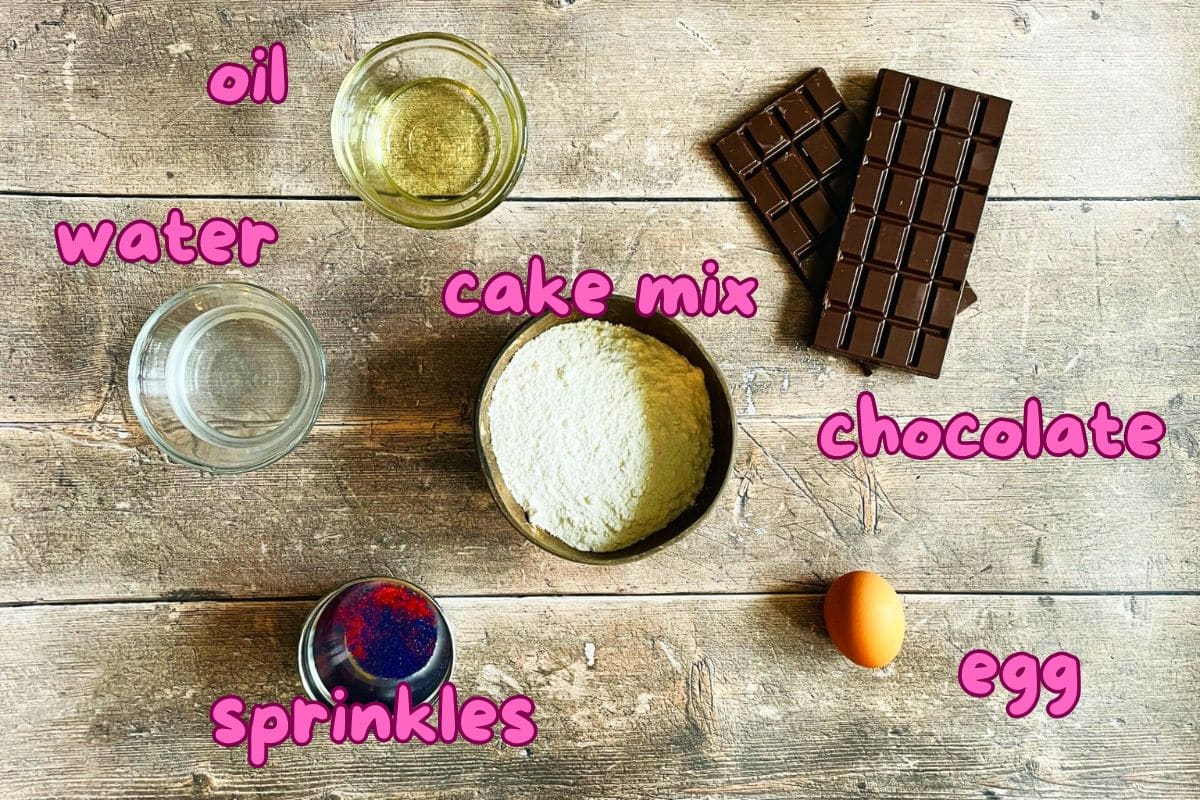
- vanilla cake mix - Pick up a box of cake mix from the grocery store as it's very easy to make cake pops with cake mix. You can also go with another flavor like decadent rich chocolate or funfetti. Some more, popular flavor choices include red velvet cream cheese cake pops, butter pecan, strawberry and lemon.
- water - You can also substitute with milk.
- chocolate - For the cake pop icing. When it comes to chocolate, I like to use either high quality chocolate bars or candy melts (chocolate wafers). You can also use chocolate chips but they might not melt as smoothly.
*Check recipe card for ingredient amounts.
Chef's Note: This recipe uses about ⅓ of a box of cake mix in order to make a smaller batch of cake pops. If you would like to use the entire box, prepare the batter as instructed on the box, proceed with filling the mold and baking, and you will end up with about 60 cake pops or more.
Equipment
You will need a silicone cake pop mold. Some tools that also come handy are:
Cake Pop Mold Recipe Instructions

Step 1. Make batter. Preheat oven to 350°F. In a large bowl, whisk together the cake pop batter ingredients.

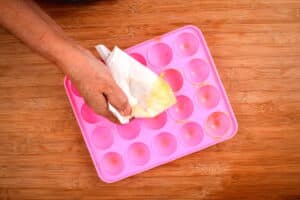
Step 2. Prep the cake pop mold. Lightly oil the inside of the cake pop mold (top and bottom piece) and place on a cookie sheet. This will make removing them easier later on.

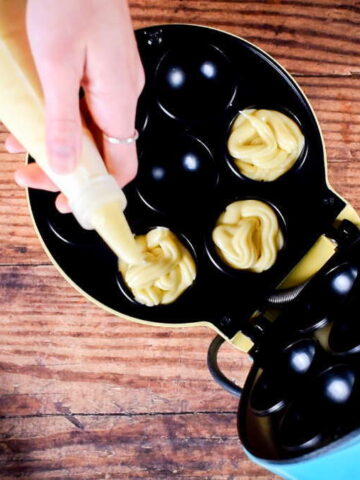
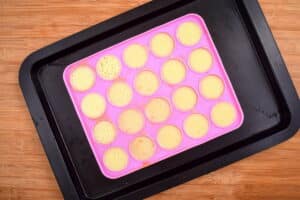
Step 3. Transfer batter to cake pop mold. Fill each of the cavities of the mold with cake batter using a spoon or piping bag.

Step 4. Close the mold. Cover with the top mold, making sure to press all parts of the molds together securely.

Chef's Note: If you're wondering how high to fill them, leave about 1 mm between the surface of the batter and the top of the mold (as seen in the above image). This is important so the cake pops don't overflow when baking, but also so that they don't end up flat (you should end up with a round cake ball)!
This is the tricky part for most people, but I've made many mistakes to figure out the perfect amount so that you don't have to guess. Check out my review of this silicone cake pop mold.

Step 5. Bake. Bake in the preheated oven for about 20 minutes. Stick a toothpick through a hole in the mold to determine if the cake pops are done. There is no need to open the mold to check. Remove from oven and let cool for 5 minutes. Open the silicone mold and let cool another 5 to 10 minutes.

Step 6. Insert treat sticks. Melt a little bit of chocolate. Dip one end of each cake pop stick into the melted chocolate. Then insert it into the cake pop. Repeat with the rest. Place in a stand and refrigerate for 30 minutes to seal them together.

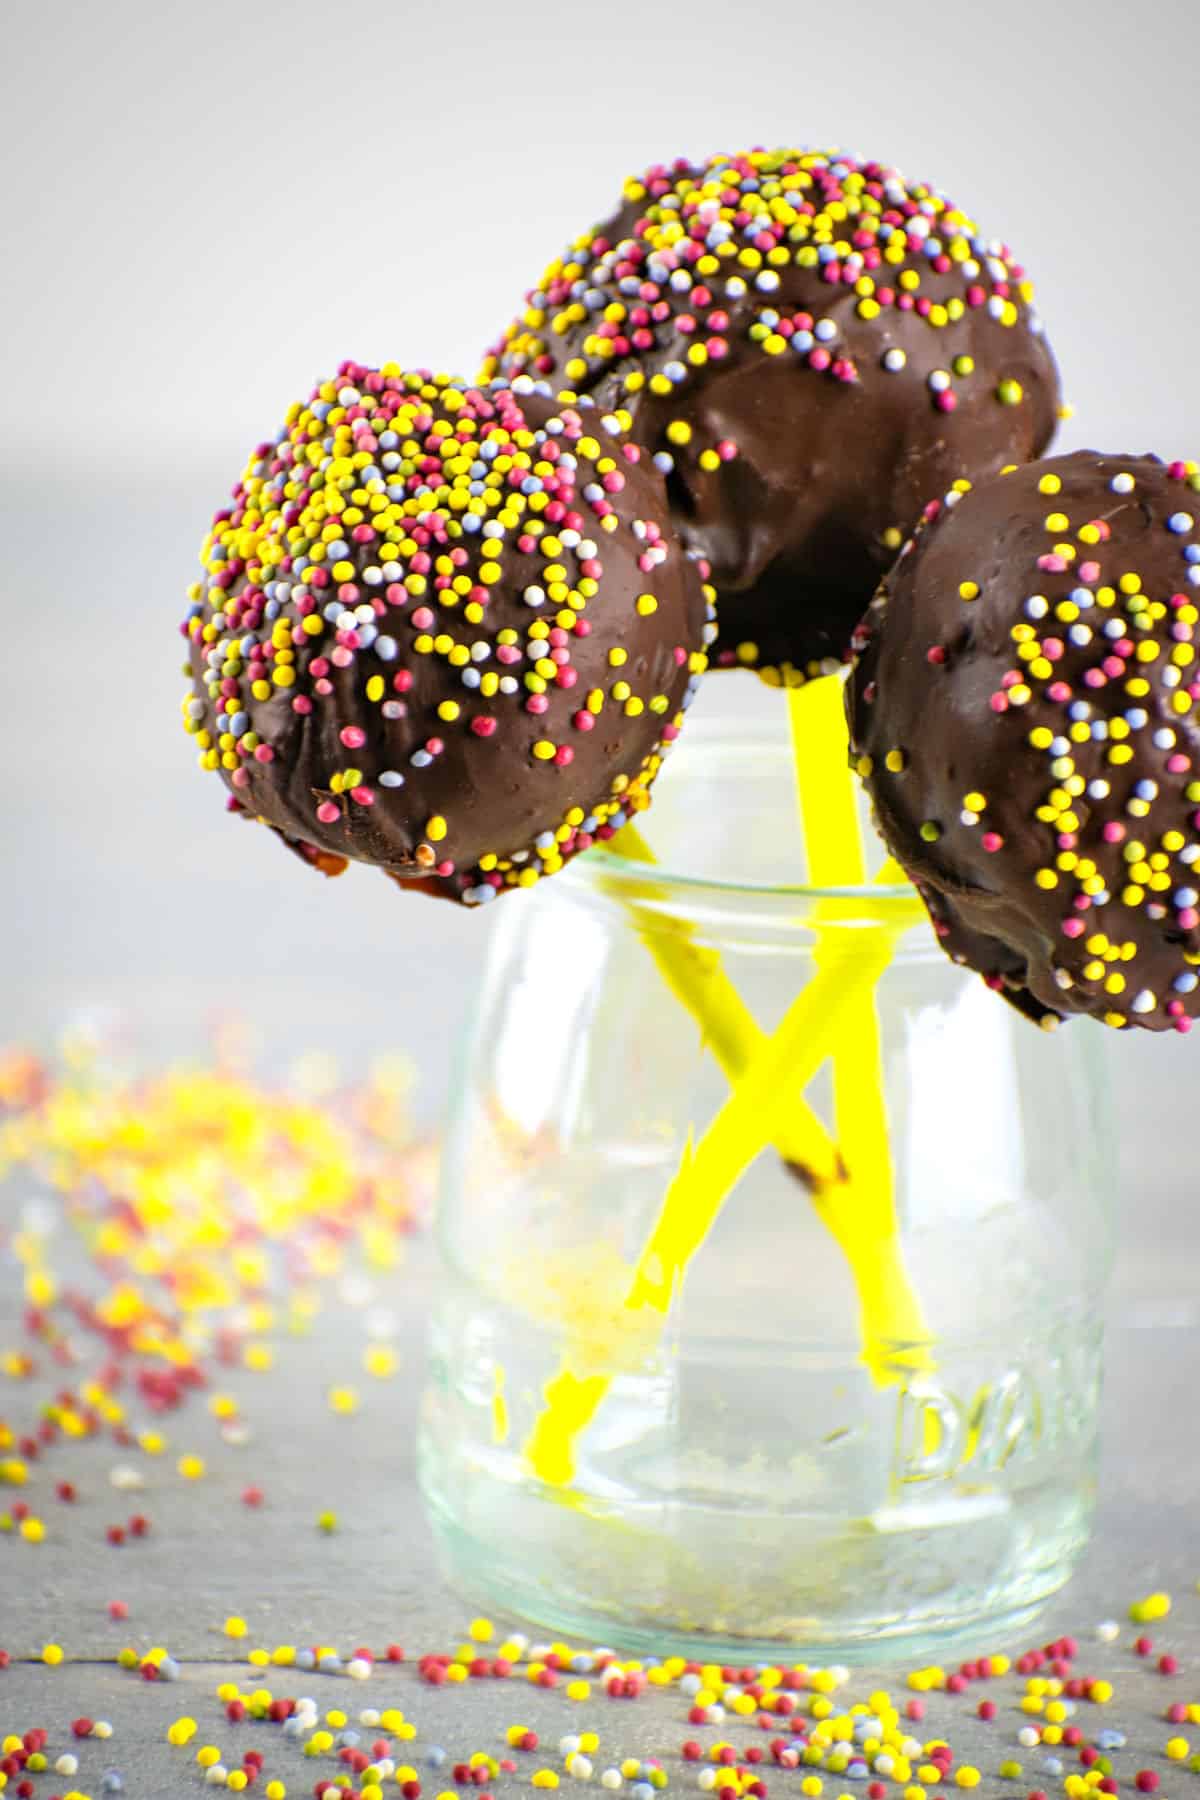
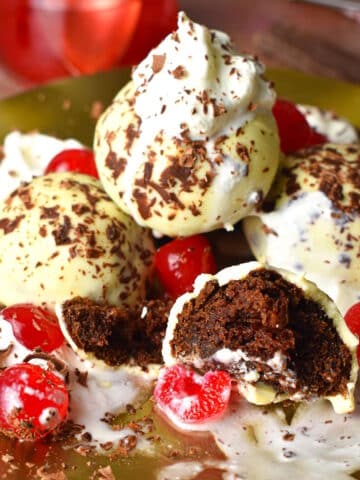
Step 7. Coat and decorate the cake pops. Melt the chocolate for the coating. Coat the cake pops with the melted chocolate by swirling them in the chocolate and decorate with the sprinkles while they are still wet.

Step 8. Let the chocolate set. Let the cake pops sit in a stand to harden the coating at room temperature or in the fridge. (Either poke holes in an egg carton to use as a stand or purchase an actual cake pop stand.)
Chef's Note: To melt the chocolate, you can use the microwave, mixing every 30 seconds so that it doesn't over-cook. Or you can place a heatproof bowl over a pot of simmering water - double boiler style.

Step 9. Serve and enjoy! As you can see, while they might seem intimidating at first, it is not too difficult learning how to make cake pops with a mold. On the contrary, trying time and time again to mold your own shapes by hand is a much harder task.
Joss' Top Tips
Mastering these molds makes baking so much more enjoyable. The trick to perfection each time is simply to make sure those silicone molds are lightly oiled properly before the batter is added to them and securely fitted together when baking.
Do not overfill the mold. If you overfill the mold even slightly, they will expand and lift the mold, which results in flat cake pops. If they are not overfilled, then your little dollops of cake will bake into perfect, naked chocolate cake pops, ready to be dipped in whatever topping you choose.
Excess cake around the pops can be removed. Try not to be hard on yourself if there is some cake baked in between the mold cavities; this is still a success and very easy to remove with a small knife once the cake pops have cooled.
Cake Pop Mold Recipe FAQs
You need to lightly grease the mold prior to adding the batter, making sure to get full coverage. Also, peel open the top mold SLOWLY.
You can store the finished cake pops, covered, up to 3 to 5 days at room temperature, up to 1 week in the fridge or up to 3 months in the freezer.
This can depend on the mold, but 20 minutes seems to be the perfect amount of time with the mold I use.
More Cake Pop Recipes to Try


If you tried this recipe tutorial for 🎂 How to Make Cake Pops with a Mold or any other recipe on my website, please leave a 🌟 star rating and let me know how it went in the 📝 comments below. And please share the recipe!
📋Recipe

How to Make Cake Pops with a Mold
Ingredients
For the Cake Pop Batter
- 5 ounces vanilla cake mix (from a box) - 144 g (about 1 cup)
- 2 eggs
- 2 ½ tablespoons vegetable oil
- ⅓ cup water - or milk
For the Coating
- 7 ounces chocolate - can use a chocolate bar, wafers or chocolate chips (about 1 ½ cups)
- sprinkles - to decorate
Instructions
- Preheat oven to 350°F. In a large bowl, whisk together the cake pop batter ingredients.

- Lightly oil the inside of the cake pop mold (top and bottom piece). This will make removing them easier later on. Place the bottom part of the mold on a cookie sheet.
- Fill each of the cavities of the mold with cake batter - leaving about 1 mm between the surface of the batter and the top of the mold (this is important so the cake pops don't overflow when baking, and also so that they don't end up flat). You can use a piping bag or a spoon. Cover with the top mold, making sure to press all parts of the mold together securely.
- Place the pan in the preheated oven and bake for about 20 minutes. Stick a toothpick through a hole in the mold to determine if the cake pops are done. There is no need to open the mold to check. Remove from oven and let cool for 10 to 15 minutes. Open the silicone mold and gently remove the cake balls.
- Melt a little bit of chocolate. Dip one end of each cake pop stick into the melted chocolate. Then insert it into the cake pop. Repeat with the rest. Place in a stand (you can use the cake pop mold) and refrigerate for 30 minutes to seal them together.
- Melt the chocolate for the coating (you can use the microwave, mixing every 30 seconds so that it doesn't over-cook. Or you can place a heatproof bowl over a pot of simmering water - double boiler style). Coat the cake pops with the melted chocolate by dipping them into the chocolate. Decorate with the sprinkles while they are still wet.
- Let the cake pops sit upright in a stand to harden the coating at room temperature or in the fridge. Serve & enjoy!


Notes
- If you have any leftover cake batter, it can be frozen for later use.
- To stop the cake pops from sticking to the cake pop mold, greasing the mold is a must. Also, peel open the top mold SLOWLY.
- If there is some cake baked in between the mold cavities, it's very easy to remove with a small knife once the cake pops have cooled.
- You can store the finished cake pops up to 3 to 5 days at room temperature, up to 1 week covered in the fridge or up to 3 months in the freezer.
Nutrition
Nutrition information on In the Kitch is provided as a courtesy and is an estimate only. It may not include toppings and/or sauces.


Joss says
The instructions are very easy to follow, especially if you’ve never used a mold before to make cake pops! They turn out nice and round.
Teresa Wood says
1st time here too. So am I understanding that you fill slightly less than full each side and bake, then put it together? If so what do you use to make it stay together? Frosting? I’m confused.
Joss Dyckson says
Hey Teresa, not quite. You fill one side (the side without the holes) to just below the top of the line, don't over fill them. Then you cover with the top mold and seal it together (as seen in the pictures in the post). When you bake them, the batter will rise and form into balls. There is no need to frost two pieces together to make one ball. Hope that helps!
Jerri says
Hi again. I did another batch filing to the top and they were perfectly round. Now my problem is they aren’t staying on the stick. Seems they are too soft?
Joss D says
Hi Jerri, that's exciting! I'm glad you figured out the first part. Sometimes I add an extra egg to the cake mix batter if it seems to come out too soft/crumbly. Also, did you seal the treat stick with the chocolate in the fridge first?
Jerri Meliso says
Hi,
Another first time came pop maker. I filled almost to the top and all I got was a half of a ball. Seems they aren’t rising enough. Need to get this right. Daughters Bridal Shower is coming up soon! How can I get these fuller and rise to the top of the tops of the silicone. I am using Betty Crocker.
Rebecca says
Hi I'm Rebecca, Making cake pops for the first time I have the silcoe pop moulder.Can I add instant Jello pudding mix or brownie mix to the ingredients to hold the cake balls together better please get back with me thank you.
Joss D says
Hi Rebecca, I have never tried that before with this recipe, so I can't say whether or not that would work. But if you are having issues with the cake balls staying together, then it might be worth experimenting with that or trying a different cake mix. Using milk instead of water in your cake mix can add more strength and structure. An extra egg might also help provide more structure. Hope that helps.
Xtina says
Are these supposed to come out perfectly rounded? I had to put two of the halves together to make it into a pop shape, I wasn’t sure if I was doing something wrong or if that is how it is supposed to be? Super easy and cute though 🙂
Joss D says
Hi Xtina, Yes they do come out round and yes you have to put the top part of the mold on the bottom part of the mold, making sure they are securely together. That way they come out round after baking, so you did it correctly. Thanks for the comment and question.
Xtina says
I must be doing something wrong then...I had the top part of the mold securely on and didn’t overfill and they still came out flat 🙁 so I stuck two pieces together and made larger than normal pops haha. Still delicious, but for some reason I can’t then to shape correctly. I’ll have to keep trying I guess. Thanks for the response!
Joss D says
Sorry to hear you are having some trouble! I would say that it does take some practice to get used to the mold and where to fill it to exactly. When closing it, pressing it together around each cavity should help. Sometimes under-filling the mold is the issue. The batter should be just slightly below the top of the cavity, about 1 mm. Also, the brand or type of cake mix can make a difference as well. If you want to email me through the contact form, maybe I can try to help you troubleshoot!
Xtina says
Thank you so much!! I may take you up on that before I make them again 🙂