
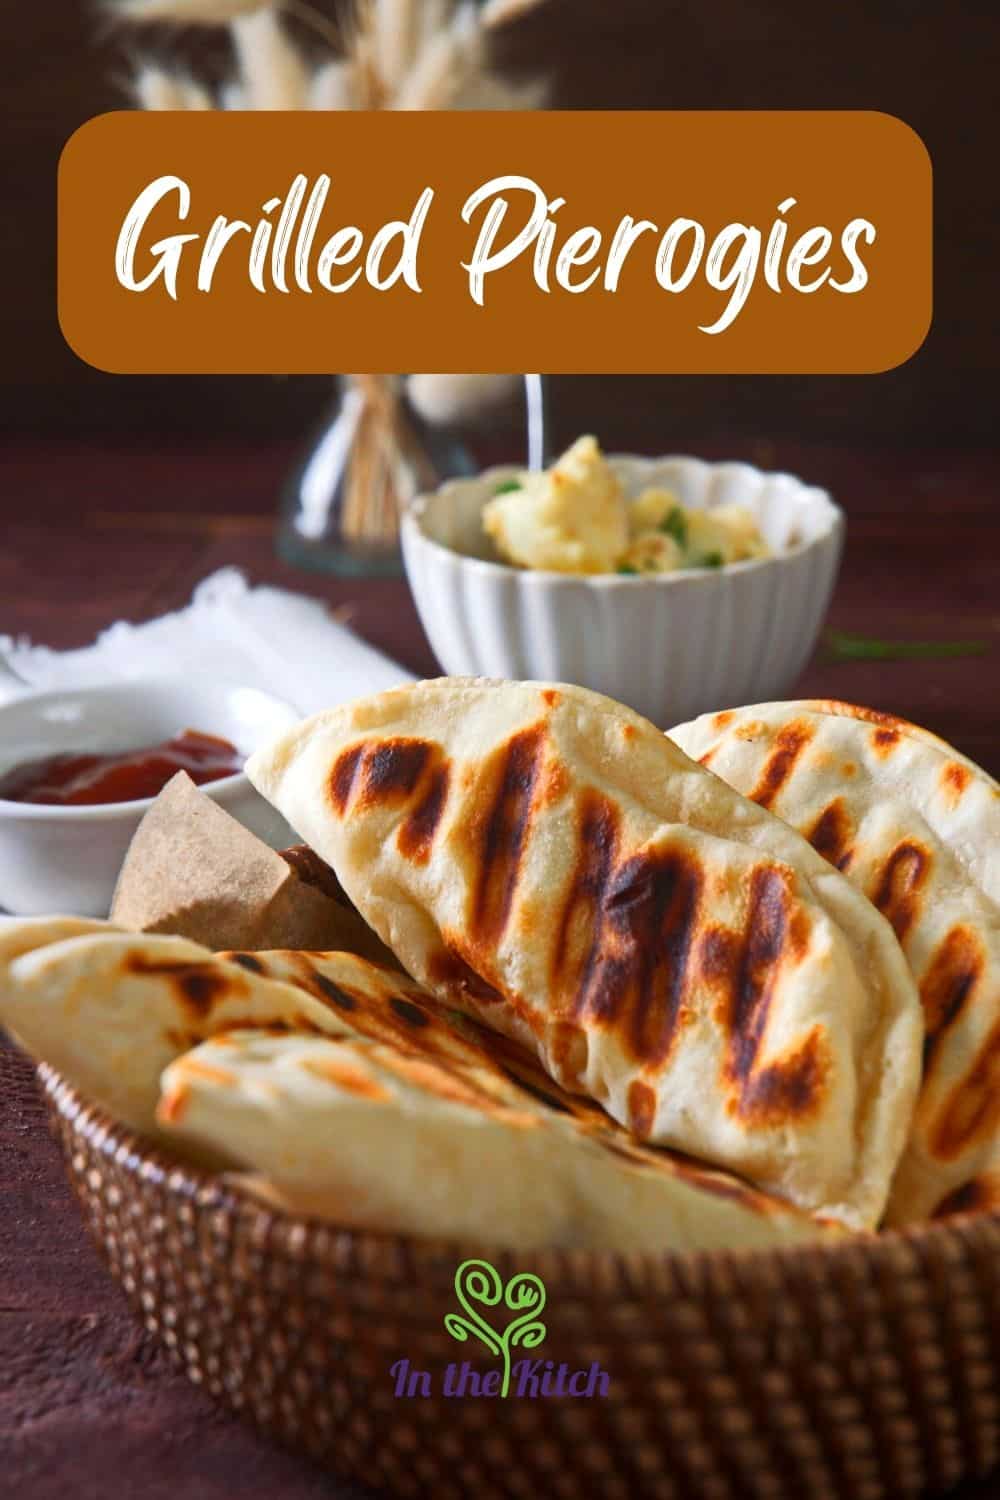
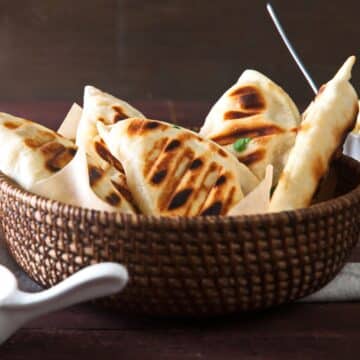
These grilled pierogies are made with dumpling wrappers to keep it simple and a cheesy, smooth potato filling. It's a great, summer side dish that can also be eaten alone as a snack, with a protein or with other sides, from dips to grains to vegetables.
Pierogi, a Polish word, can be spelled in different ways including: pierogy, pirogi, perogy, perogi, pyrogy, pyrogie, etc. Pierogi is actually plural, but the plural form is commonly called pierogies or perogies in North America, including in my household, so that is the spelling I am sticking with for this recipe.
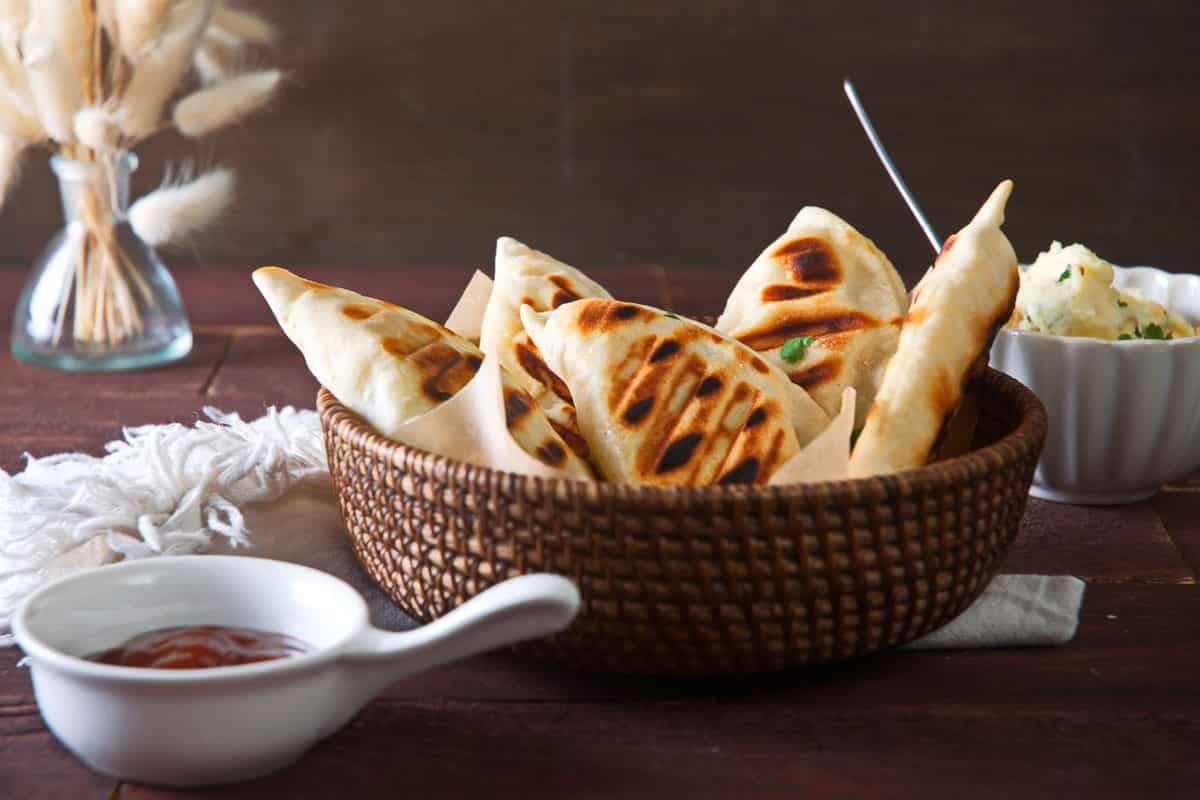
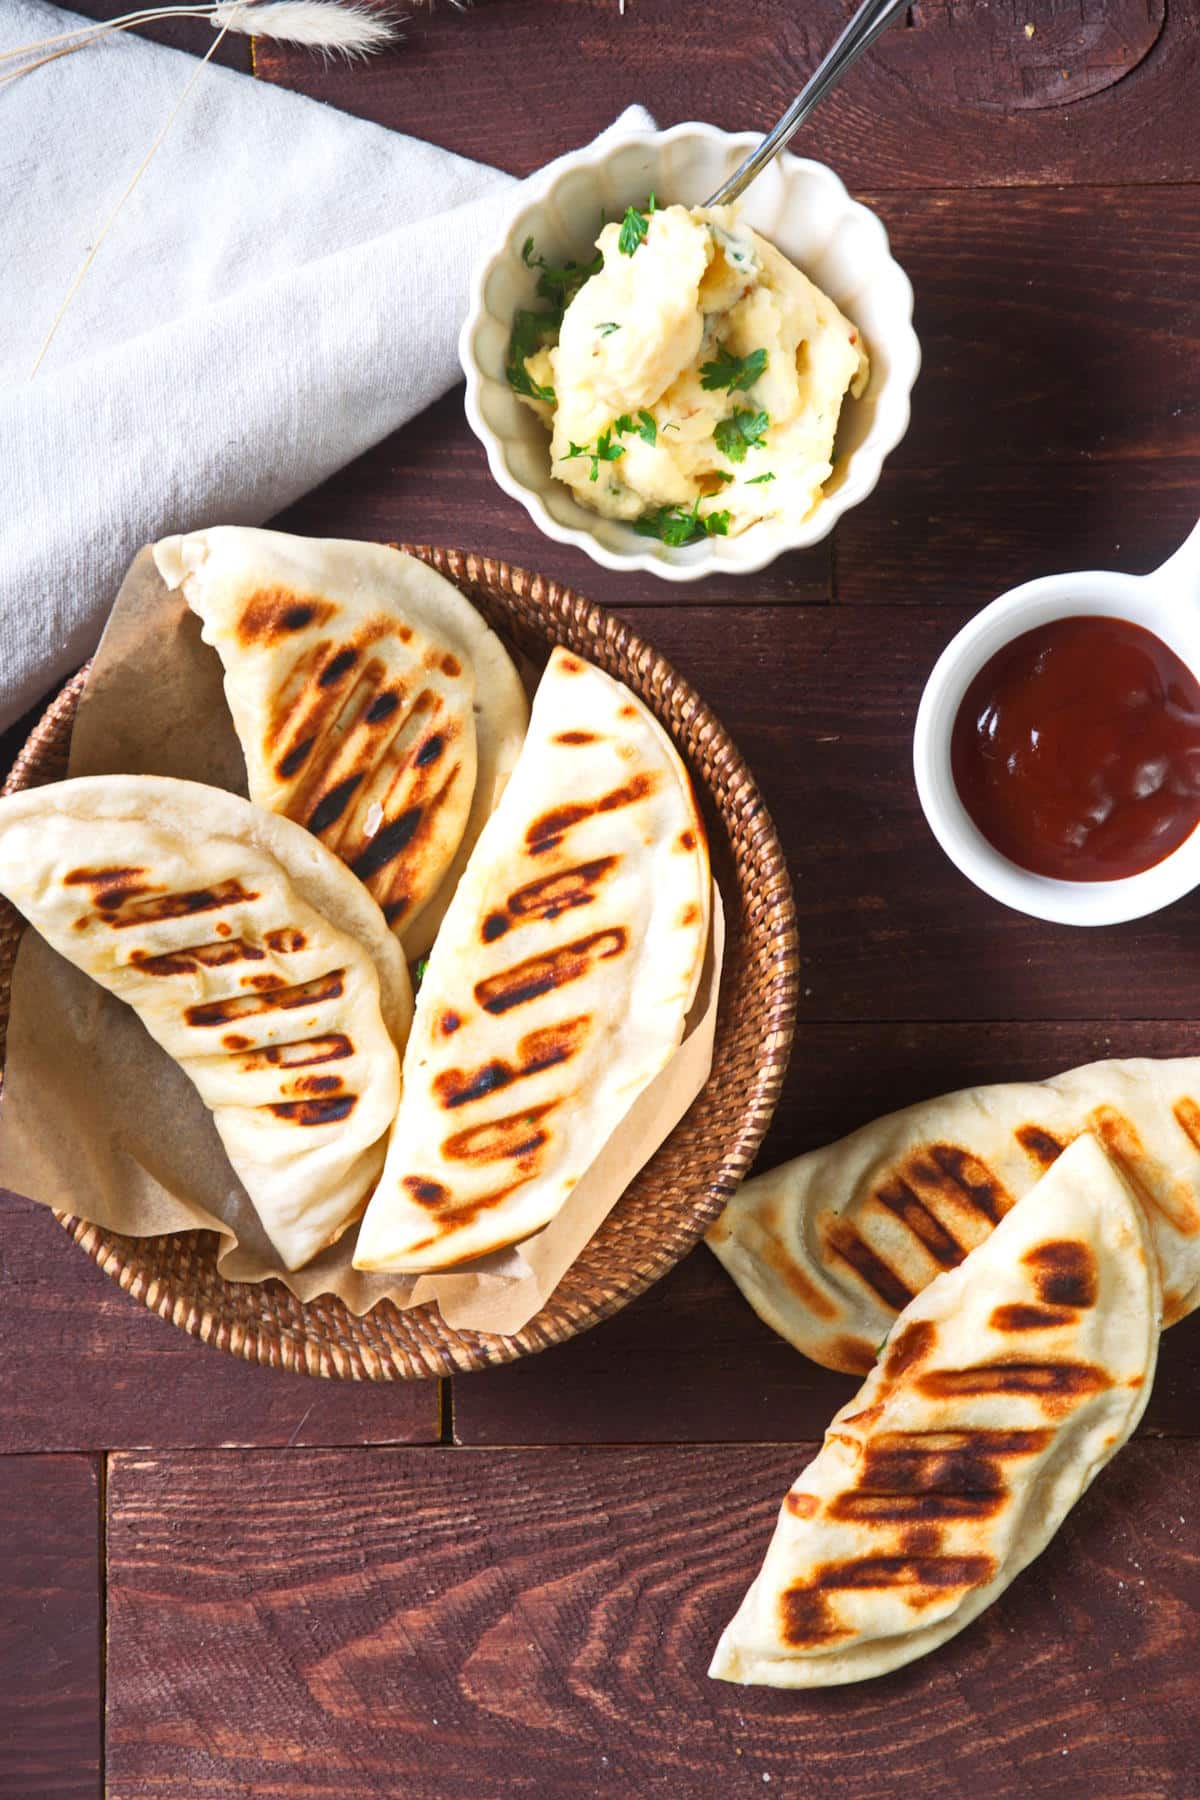
While it is customary to boil and/or pan fry your pierogies, grilling them gives them a summery touch with their smoky, crispy grill marks and soft, pillowy interior. They can be served with the suggested BBQ sauce or stick to the classic sour cream.
Jump to:
Grilled Pierogi Ingredients
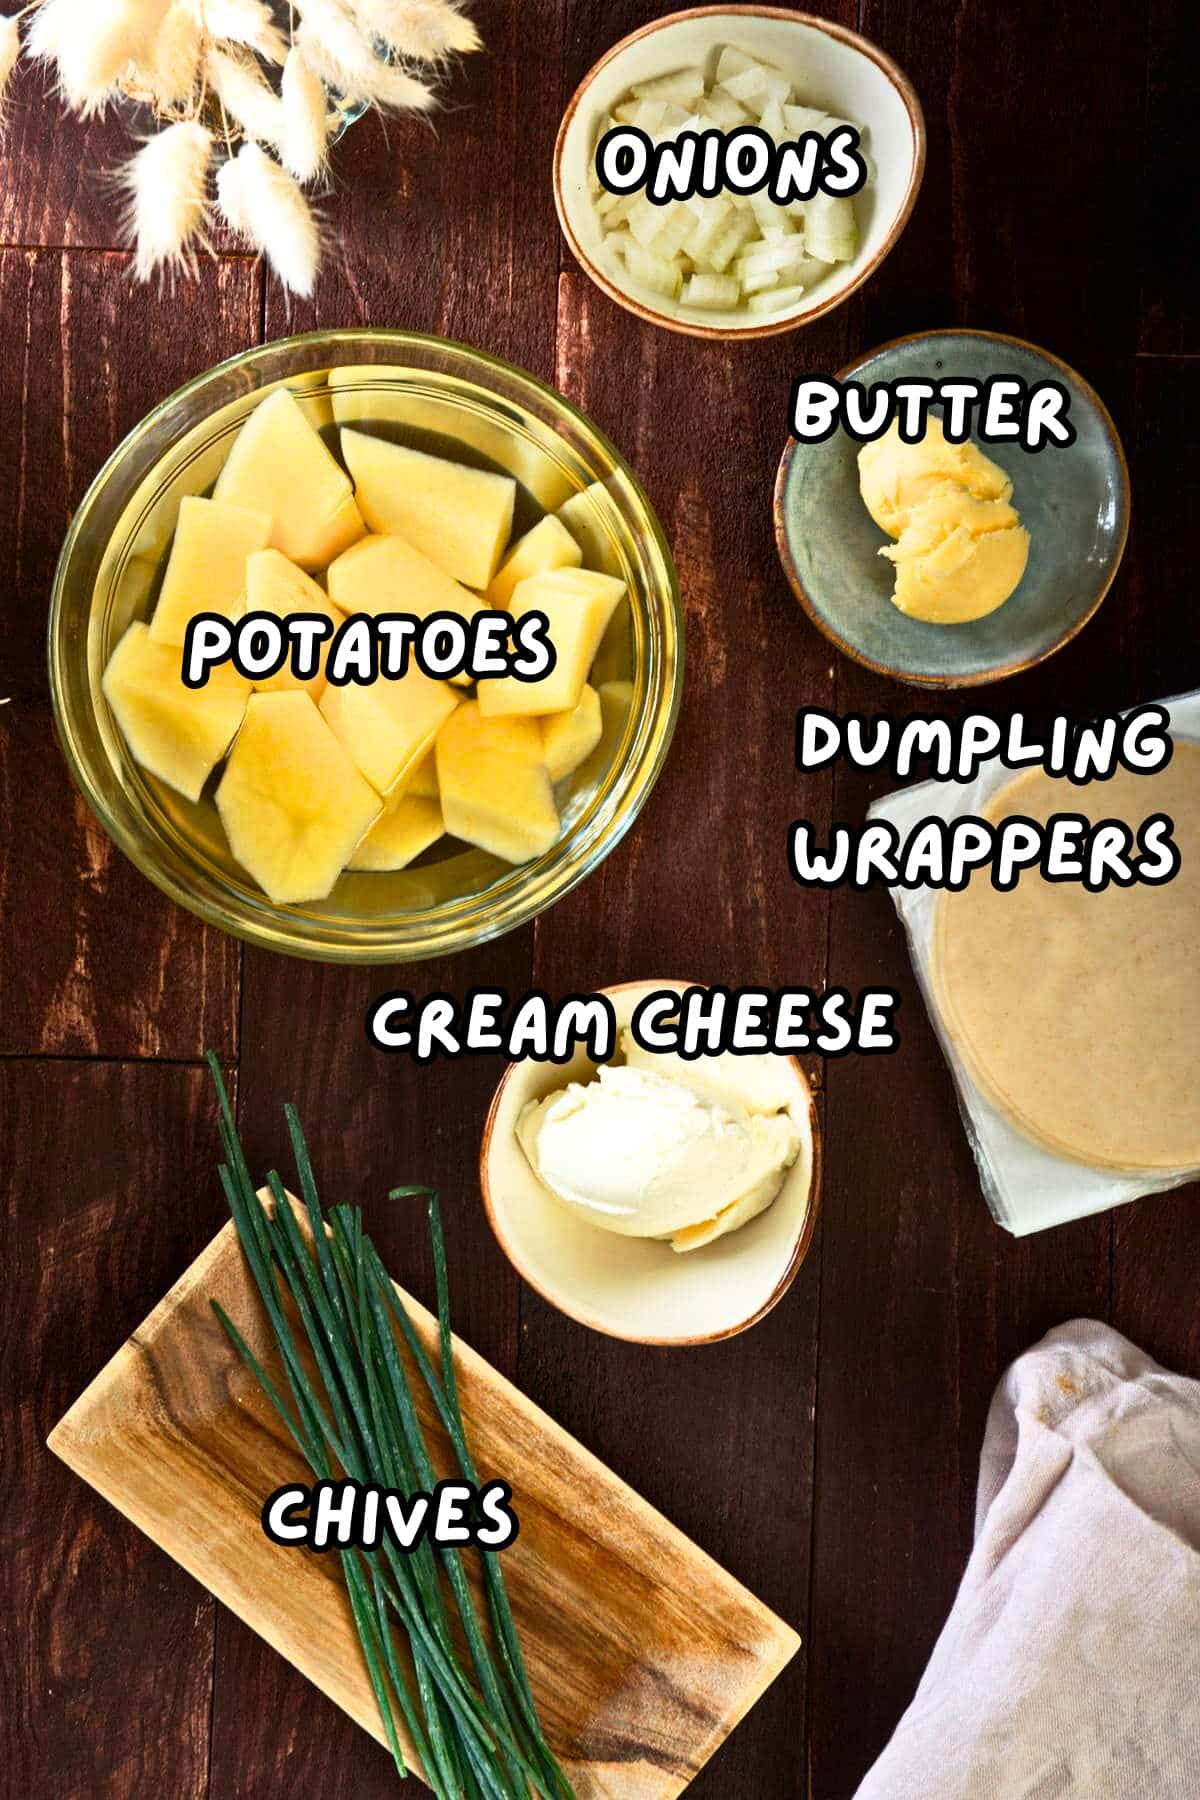
- dumpling wrappers - Instead of making a dough from scratch, the dumpling wrappers will help to keep the prep time down and keep them consistent in size.
- russet potatoes - Russets are a great choice for pierogi filling because of their texture.
- yellow onions - I love the flavor the cooked onions bring to these pierogies.
- butter - To cook the onions with. I use salted but you can use unsalted if you like.
- cream cheese - Make sure to soften it first so that it combines properly with the potatoes.
- chives - If you only have green onions on hand, these will work too but only chop up the green parts.
- olive oil or canola oil (not pictured) - This is to coat the pierogies so that the dough doesn't stick to the grill.
- BBQ sauce (for serving) - Using BBQ sauce goes hand in hand with grilled food, but feel free to use a different condiment like sour cream and/or hot sauce.
*Check recipe card for ingredient amounts.
Chef's Note: If need be, you can substitute with wonton wrappers. It won't be exactly the same texture as they are a bit thinner and square-shaped but I have tried it and it still makes a delicious grilled pierogi. What I do is take a 4" circular cookie cutter and cut them into round pieces.
How to Make Them
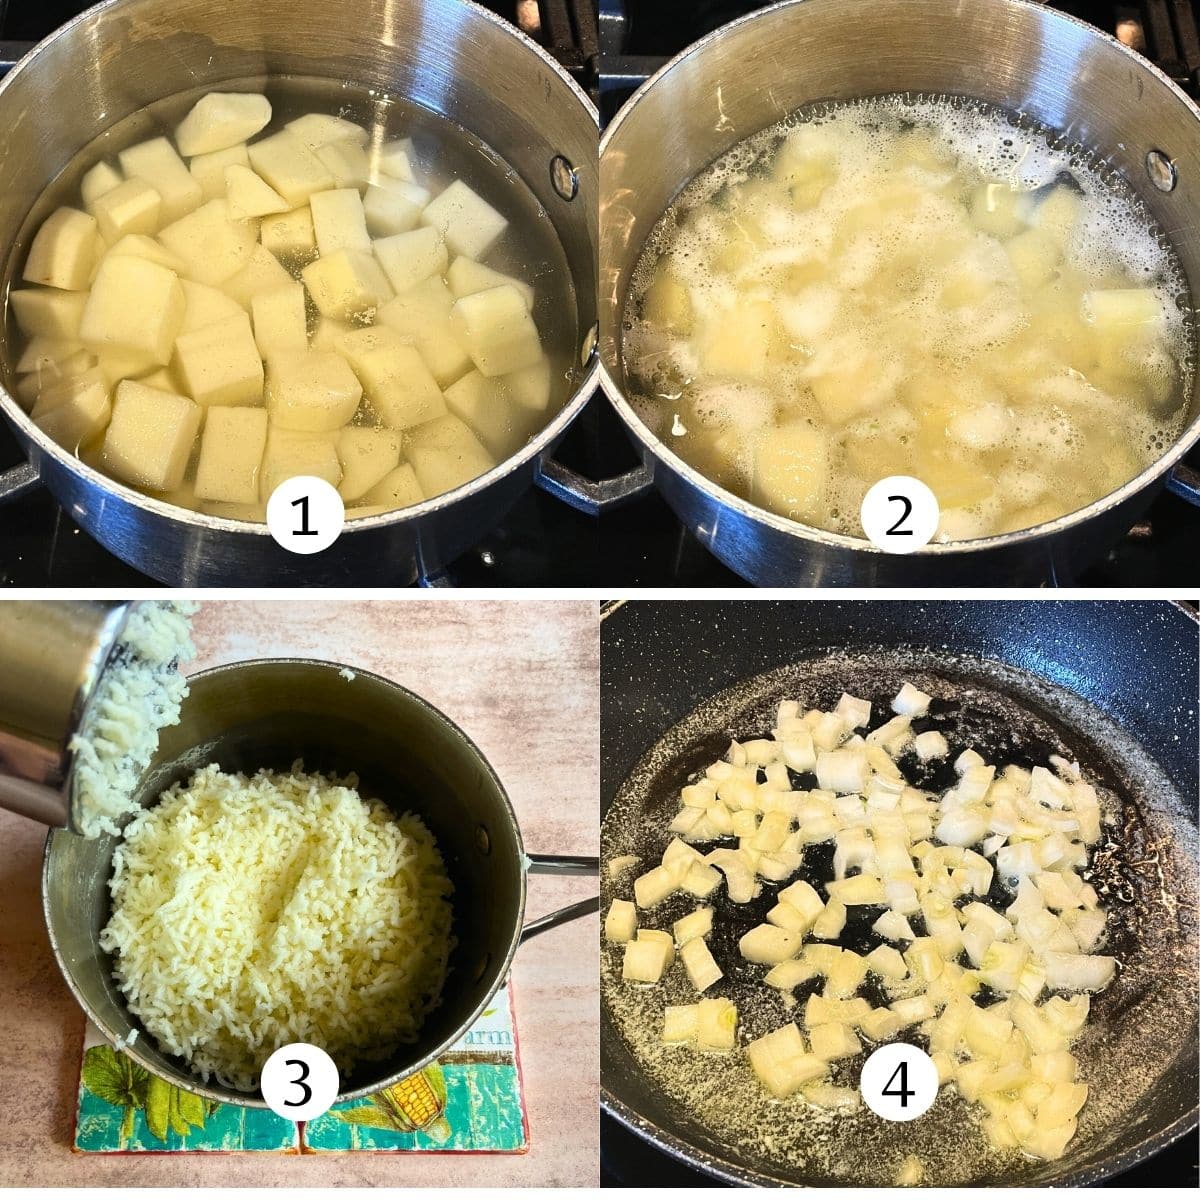
Step #1. Place the cubed potatoes in a pot and add just enough water to cover them. Sprinkle with some salt (Image 1).
Step #2. Bring to a boil over high heat. Lower the heat and simmer until the potatoes are tender, about 8-10 minutes. Remove from heat (Image 2).
Step #3. Drain and mash the potatoes. A potato ricer works great! Set aside (Image 3).
Step #4. In a skillet over medium heat, melt the butter. Add the onions and cook them, stirring constantly, until softened--about 5 minutes (Image 4).
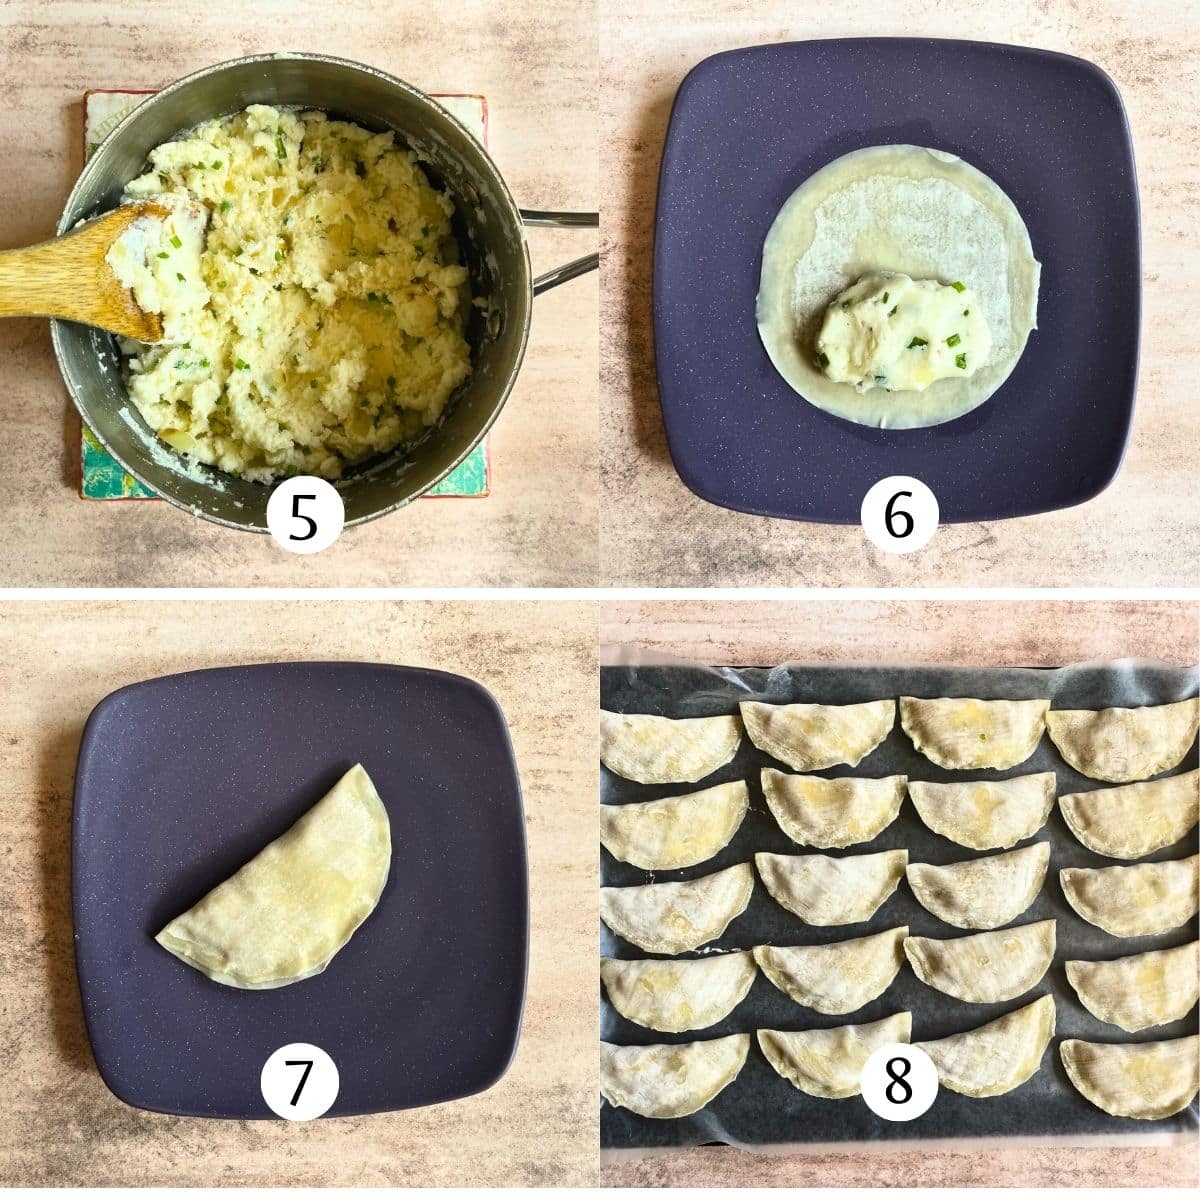
Step #5. Stir the cream cheese, chives and onions (along with the butter they were cooked in) into the mashed potatoes until the cream cheese is melted and combined. Season with salt and pepper (Image 5).
Step #6. Spoon about 1 tablespoon of potato filling onto the center of a dumpling wrapper (depending on the size of the wrapper) (Image 6).
Chef's Note: I tend to spread the filling towards the sides a little bit to avoid air pockets in the corners of the pierogi.
Step #7. Moisten the edges of the wrapper with water, using your finger. Fold in half and press the edges together to seal them tightly (Image 7).
Step #8. Place onto a baking sheet lined with waxed paper. Repeat with remaining dough wrappers and filling (Image 8).
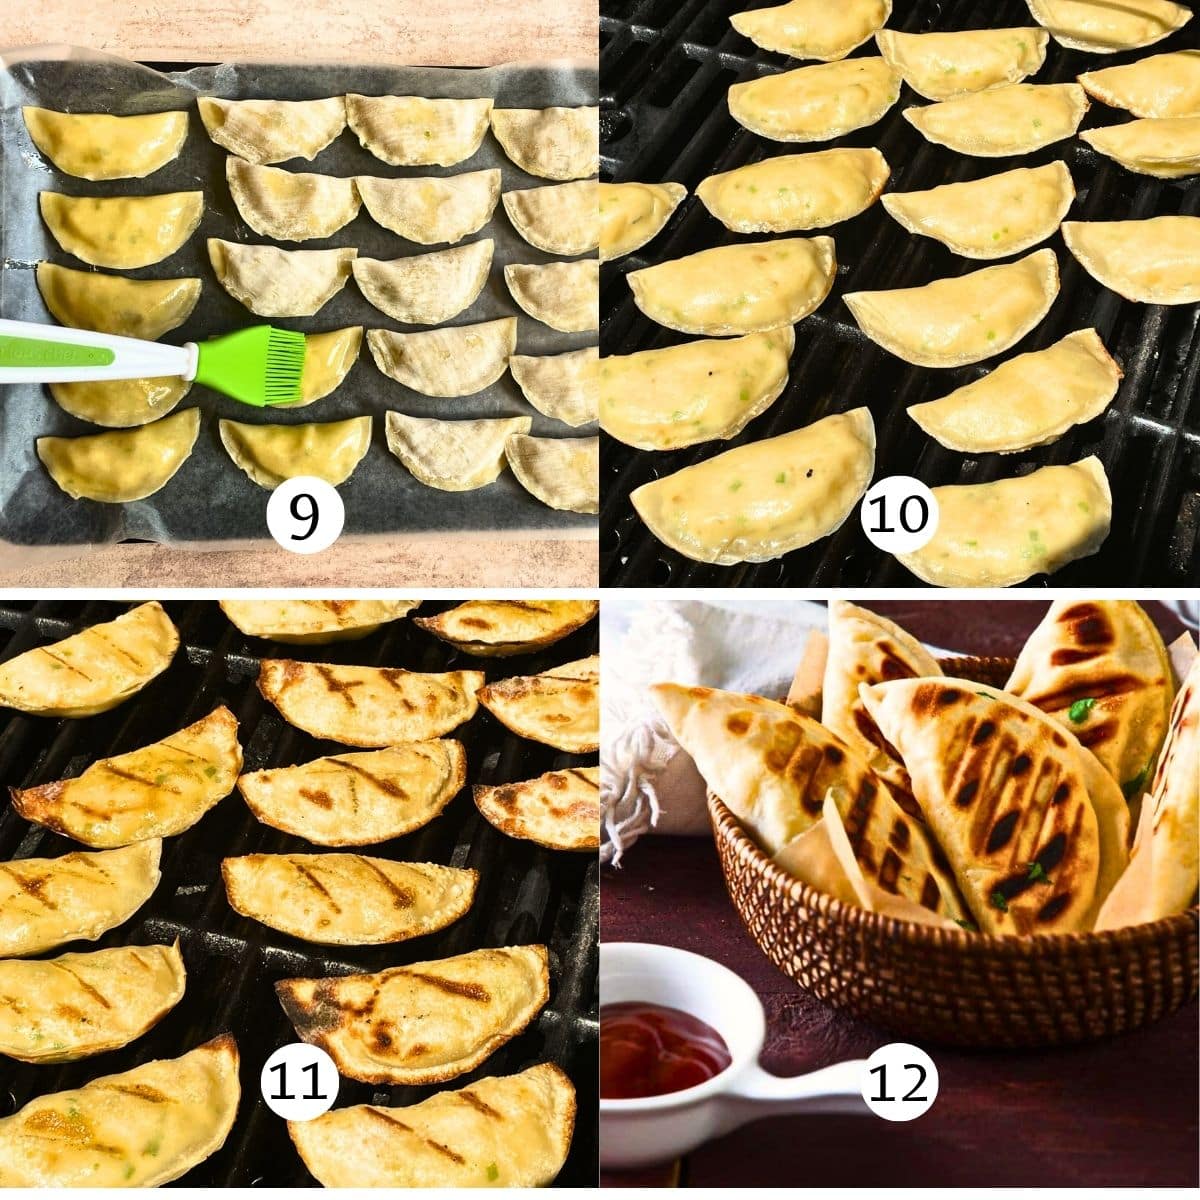
Step #9. Preheat your grill to medium heat and then turn off half of the burners to get 2 heat zones: one side with indirect heat and the other with direct heat. Brush both sides of the pierogies with the oil, so that they don't stick to the grill (Image 9).
Step #10. Place them onto the indirect-heat side of the grill (the area with no flame underneath). Close the grill and cook for 10 minutes (Image 10).
Step #11. Move the pierogies to the direct-heat side of the grill (where there is flame underneath) and cook for about 1 to 2 minutes per side or until the pierogies are golden and puffy on both sides (Image 11).
Step #12. Let the grilled pierogies cool for a few minutes as the filling will be hot. Serve with BBQ sauce and sour cream or desired condiments (Image 12).
Serving Suggestions
Nothing goes better with a potato side dish more than meat. I recommend grilled brats or smoked sausage, specifically kielbasa, for its smokiness that will pair well with grilled food. Another meat that pairs well is bacon, especially when you can sprinkle it over the grilled pierogies. I have a recipe for grilled bacon.
As for vegetables, grilled vegetables like onions and mushrooms are some of the best choices. Since the pierogies themselves are already filled with two types of onion, it is fitting to add more onion to the dish.
Mushrooms have an earthy taste and a texture that goes well with pierogies. They would also be great served with another side like my grilled avocado recipe.
This recipe offers BBQ sauce for dipping, but it is not the only sauce that you can dip your grilled pierogies in. The most popular dip or condiment is sour cream.
It goes with the cheesy potato filling, the slight tang gives your tastebuds a break from the saltiness, and it is thick enough to hang onto the dumplings.
You could also try my homemade white BBQ sauce.
Storage Info
Fresh pierogies. For a make-ahead option, you can prep these fresh pierogies and store them in the fridge for up to 2 to 3 days before bringing them out to grill.
Cooked pierogies. It is easy to store leftover, cooked pierogies. Store them in an airtight container in the fridge for up to 5 days or in the freezer for up to 3 months. For the freezer, make sure you use a freezer bag.
Freeze separately. When it comes to dumpling dough, if they are touching each other, they can stick and may rip a hole when you try to pull them apart later on. To keep this from happening, freeze them separately on a sheet pan first, then place them in the freezer bag together. This should help keep the dumplings from sticking.
Joss' Tips
- You're going to want to keep a small bowl of cool water on hand when filling the dumplings and work quickly to enclose the pierogi while the wrapper is still wet.
- They don't need to look perfect but ensure a good seal so that they don't open up during cooking, causing the filling to pop out! Also, try not to overstuff them for this same reason--but you still want enough filling to get a good bite of that soft, cheesy, mashed potato without any air pockets.
- While you aren't actively using the wrappers, make sure to keep them covered so that they don't dry out.
What to Do With Leftover Wrappers
You'll likely have leftover pierogi wrappers on hand after making grilled pierogies. I love turning them into cinnamon-sugar crisps for a sweet snack.
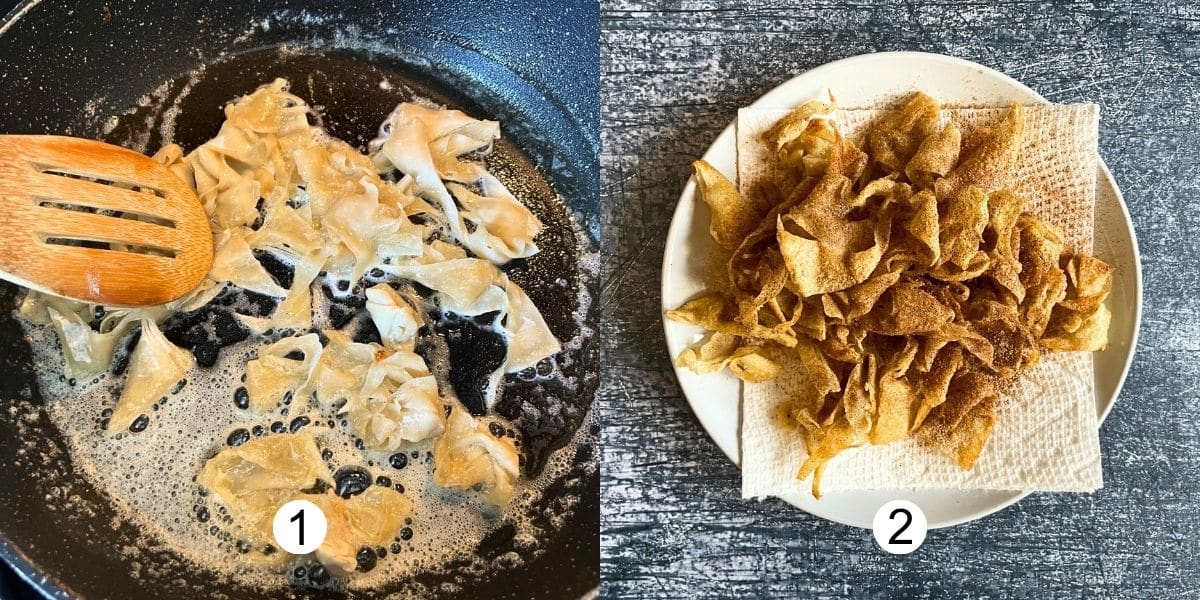
Try chopping them up, frying them in some butter until golden and crisp (Image 1) and then sprinkling with cinnamon sugar (Image 2). Delicious!
You could also go the savory route with some salt and pepper or a spice blend.
More Outdoor Grilling Recipes to Try


If you tried this Grilled Pierogies Recipe or any other recipe on my website, please leave a 🌟 star rating and let me know how it went in the 📝 comments below. And please share the recipe!
📋Recipe
Grilled Pierogies
Ingredients
- 2 cups russet potatoes - peeled and cubed
- 2 tablespoons butter
- ½ cup yellow onions - diced
- ½ cup cream cheese - softened--about 4 ounces or ½ a brick
- 2 tablespoons chives - diced
- ½ teaspoon salt - or to taste
- ½ teaspoon pepper
- 24 dumpling wrappers - about 4" in diameter
- canola oil or olive oil - to coat the pierogies
- BBQ sauce and/or sour cream - for serving
Instructions
For the Filling
- Place the cubed potatoes in a pot and add just enough water to cover them. Sprinkle with some salt.
- Bring to a boil over high heat. Lower the heat and simmer until the potatoes are tender, about 8-10 minutes. Remove from heat.
- Drain and mash the potatoes. A potato ricer works great. Set aside.
- In a skillet over medium heat, melt the butter. Add the onions and cook them, stirring constantly, until softened (about 5 minutes).
- Stir the cream cheese, chives and onions (along with the butter they were cooked in) into the mashed potatoes until the cream cheese is melted and combined. Season with salt and pepper.
Fill the Pierogies
- Spoon about 1 tablespoon of potato filling onto the center of a dumpling wrapper (depending on the size of the wrapper). I tend to spread the filling towards the sides a little bit to avoid air pockets in the corners of the pierogi.
- Moisten the edges of the wrapper with water, using your finger. Fold in half and press the edges together to seal them tightly. Place onto a baking sheet lined with waxed paper. Repeat with remaining dough wrappers and filling.
Grill the Pierogies
- Preheat your grill to medium heat and then turn off half of the burners to get 2 heat zones: one side with indirect heat and the other with direct heat.
- Brush both sides of the pierogies with the oil, so that they don't stick to the grill. Place them onto the indirect-heat side of the grill (the area with no flame underneath). Close the grill and cook for 10 minutes.
- Move the pierogies to the direct-heat side of the grill (where there is flame underneath) and cook for about 1 to 2 minutes per side or until the pierogies are golden and puffy on both sides.
- Let cool for a few minutes as the filling will be hot. Serve with BBQ sauce and sour cream or desired condiments.
Equipment
Notes
- You're going to want to keep a small bowl of cool water on hand when filling the dumplings and work quickly to enclose the pierogi while the wrapper is still wet.
- They don't need to look perfect but ensure a good seal so that they don't open up during cooking, causing the filling to pop out! Also, try not to overstuff them for this same reason--but you still want enough filling to get a good bite of that soft, cheesy, mashed potato without any air pockets.
- While you aren't actively using the wrappers, make sure to keep them covered so that they don't dry out.
- If need be, you can substitute with wonton wrappers. It won't be exactly the same texture as they are a bit thinner and square-shaped but I have tried it and it still makes a delicious grilled pierogi. What I do is take a 4" circular cookie cutter and cut them into round pieces.
- What to do with leftover wrappers? Try chopping them up, frying them in some butter until golden and crisp and then sprinkling with cinnamon sugar. Delicious!
- For a make-ahead option, you can prep these fresh pierogies and store them in the fridge for up to 2 to 3 days before bringing them out to grill.
- You can store the grilled pierogies in an airtight container in the fridge for up to 5 days or in the freezer for up to 3 months.
- When it comes to dumpling dough, if they are touching each other, they can stick and may rip a hole when you try to pull them apart later on. To keep this from happening, freeze them separately on a sheet pan first, then place them in the freezer bag together. This should help keep the dumplings from sticking. Thaw in the fridge.
Nutrition
Nutrition information on In the Kitch is provided as a courtesy and is an estimate only. It may not include toppings and/or sauces.


Leave a Reply