

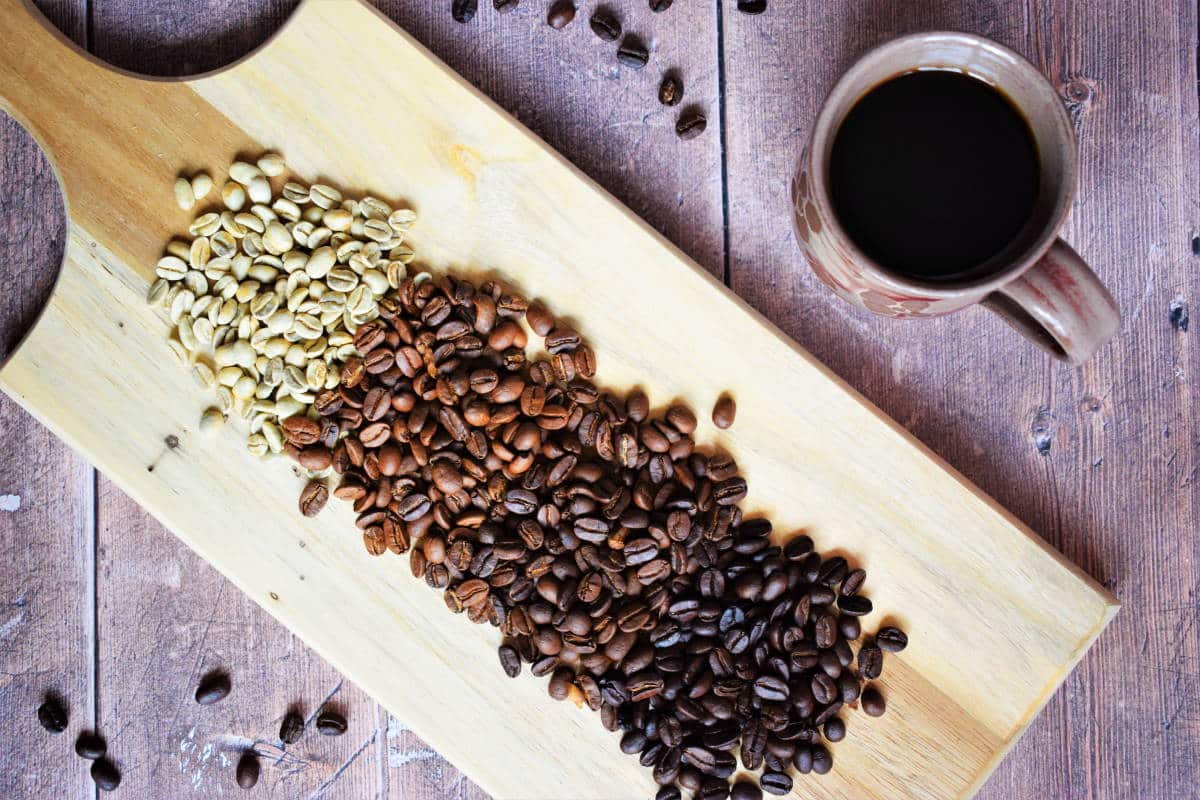
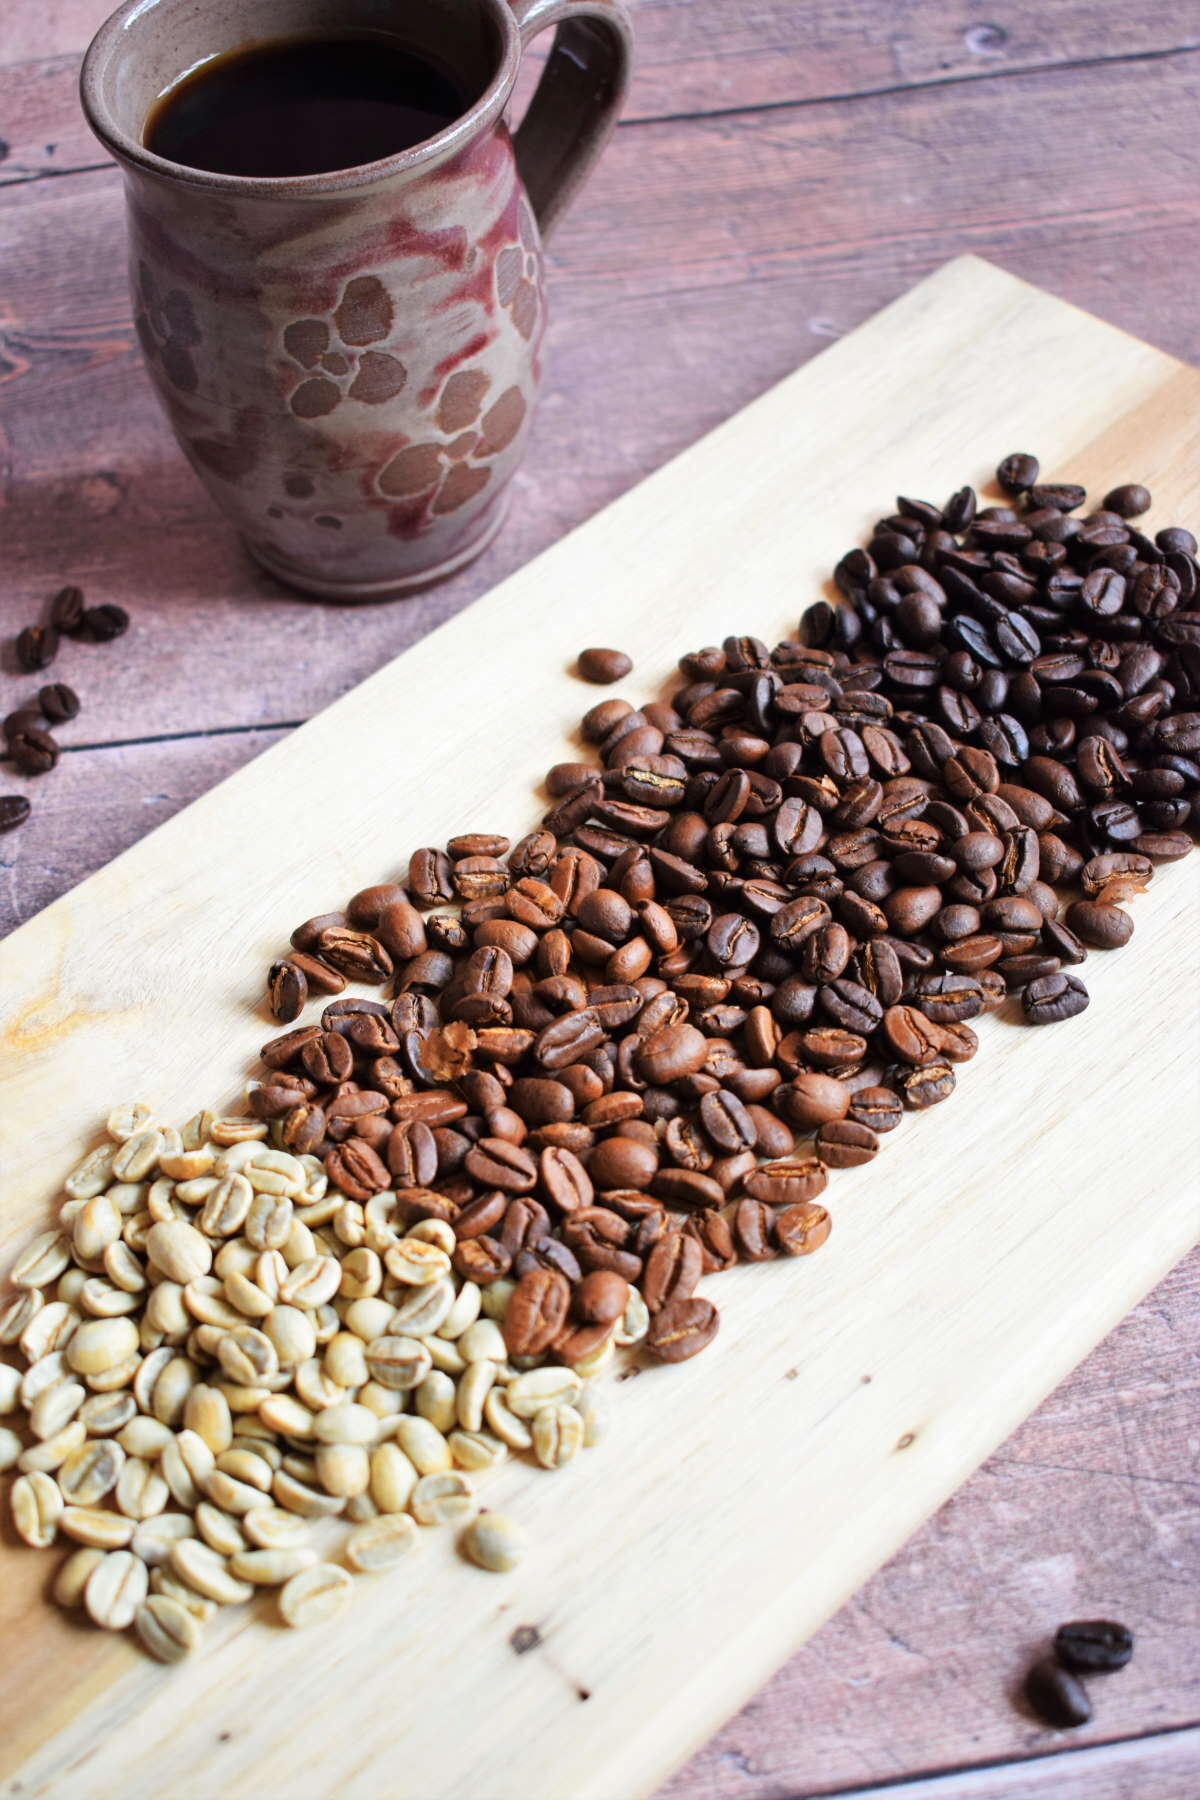
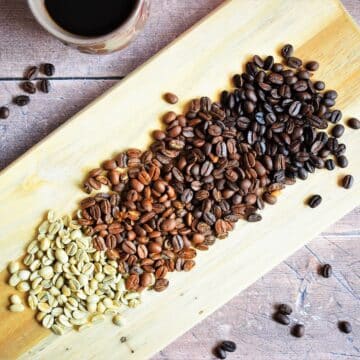
Have you ever been curious about how to roast coffee beans at home? It all starts with some green coffee beans and a roaster and you're on your way to a delicious, freshly roasted cup of coffee! It's a simple and satisfying process that I will guide you through step-by-step.
Some people do use popcorn makers, ovens and frying pans to roast coffee beans at home, but personally I recommend using a coffee roaster. You can check out some of the best home coffee roasters here.
Popcorn makers are not designed for roasting coffee, and I believe using a purpose-built coffee roaster is the best way to get a fresh cup of joe.
Why?
- It allows you to roast outside, avoiding smoke and smell inside of your home.
- It stirs the beans for you continuously and it is much easier to get an even roast on your beans.
- The motor can handle it. I used to use a popcorn maker for roasting, but the motor burned out very quickly! Plus, it could void the warranty if you use it in that way.
Jump to:
How Long Does it Take to Roast Coffee Beans?
The time it takes to roast coffee beans with a home coffee roaster can vary greatly depending on your specific model, the temperature you use, how many beans you use in one go and how dark you like your beans. It generally takes me between 26 and 50 minutes for light to dark roast.
At that point you will need to cool and then off-gas the beans for 1-3 days, depending on your preference.
What You Will Need
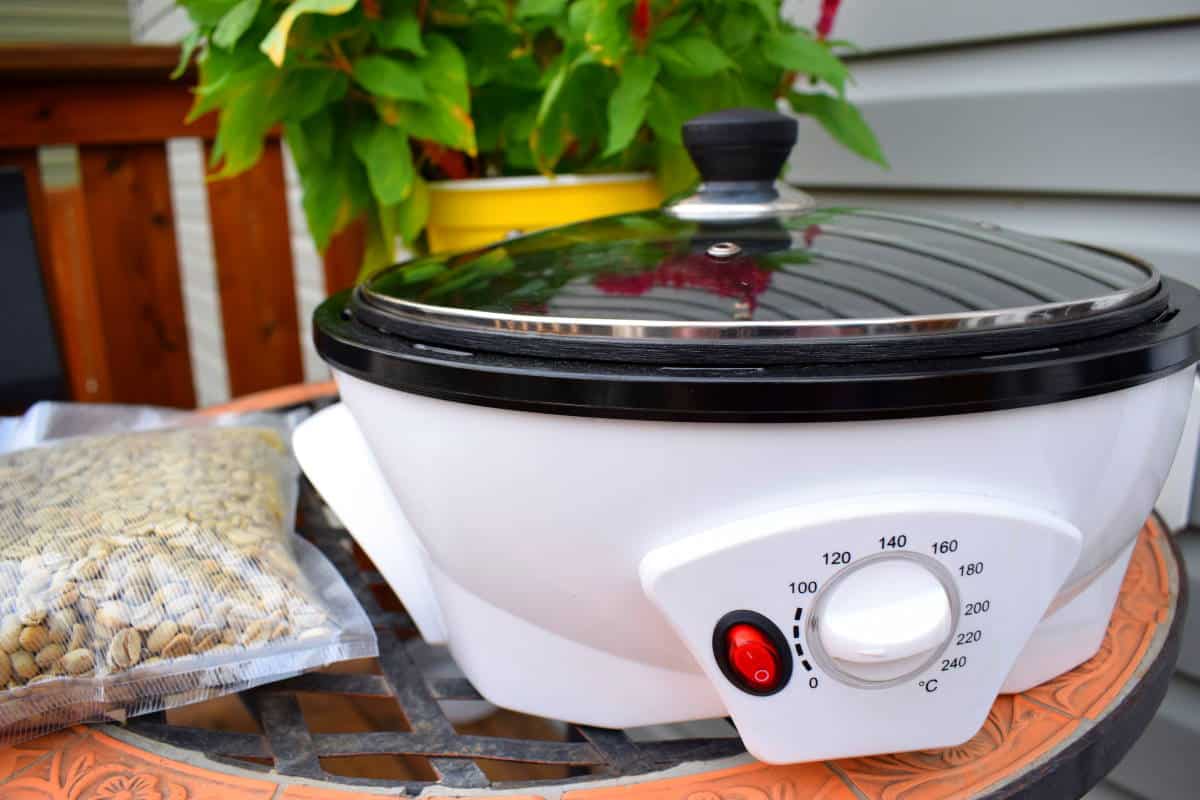
For this tutorial, you will need green coffee beans and a coffee roaster.
Instructions
Chef's Note: To begin, the best place to set up your coffee roaster is outside if you can. The smell from roasting is very strong.
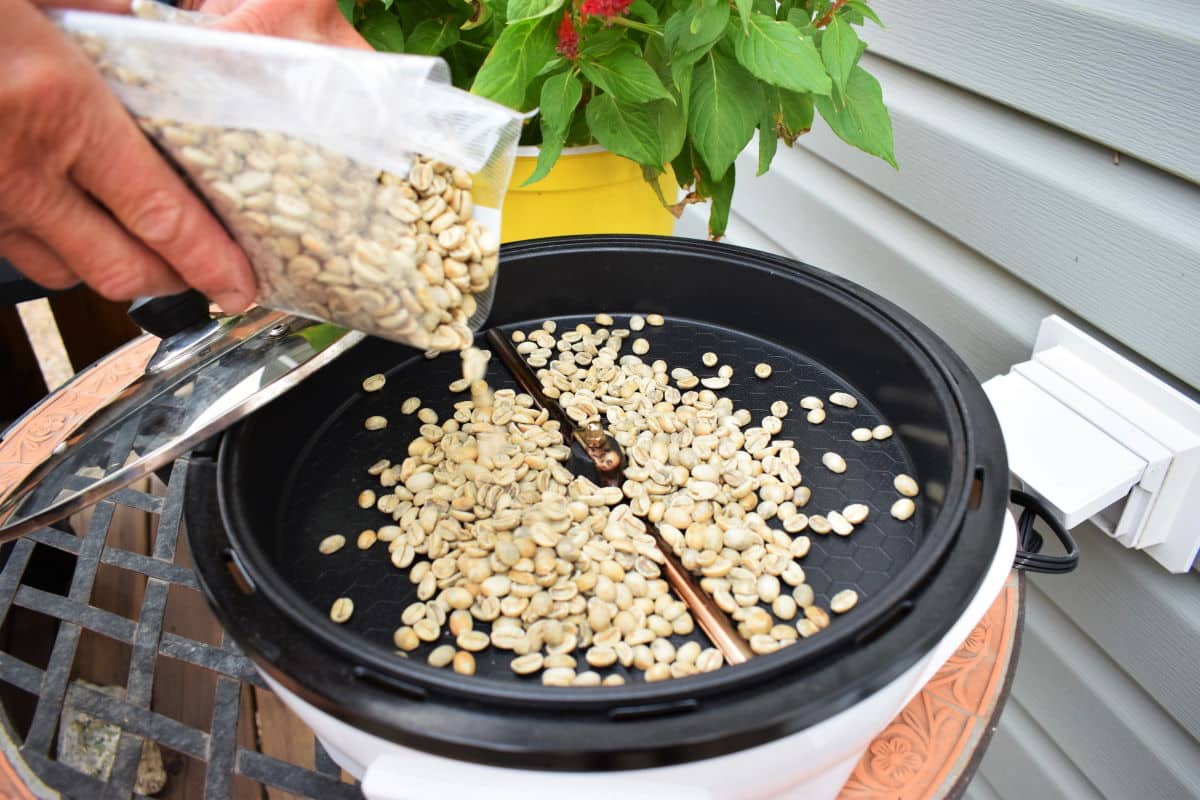
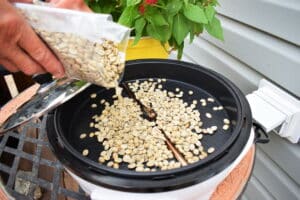
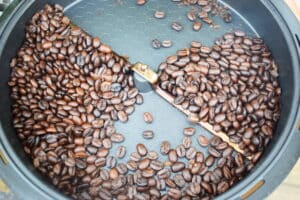
Step 1: Prepare the coffee roaster. Add the raw green coffee beans to the coffee roaster, with the amount specified in the manual.
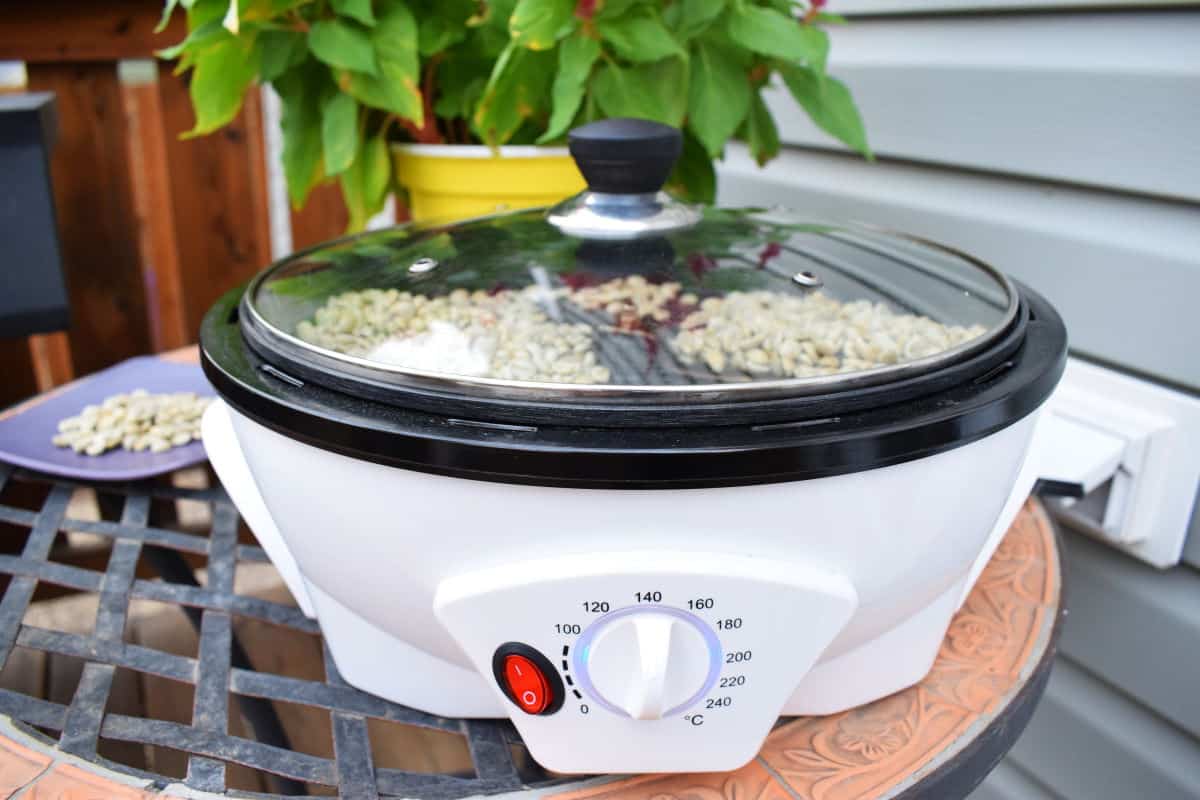
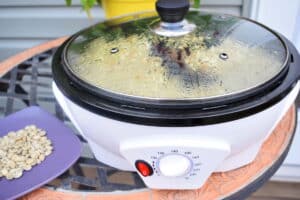
Step 2: Cover & heat. Cover with the lid and turn the temperature dial to 140°C (285°F) to begin the roasting process.
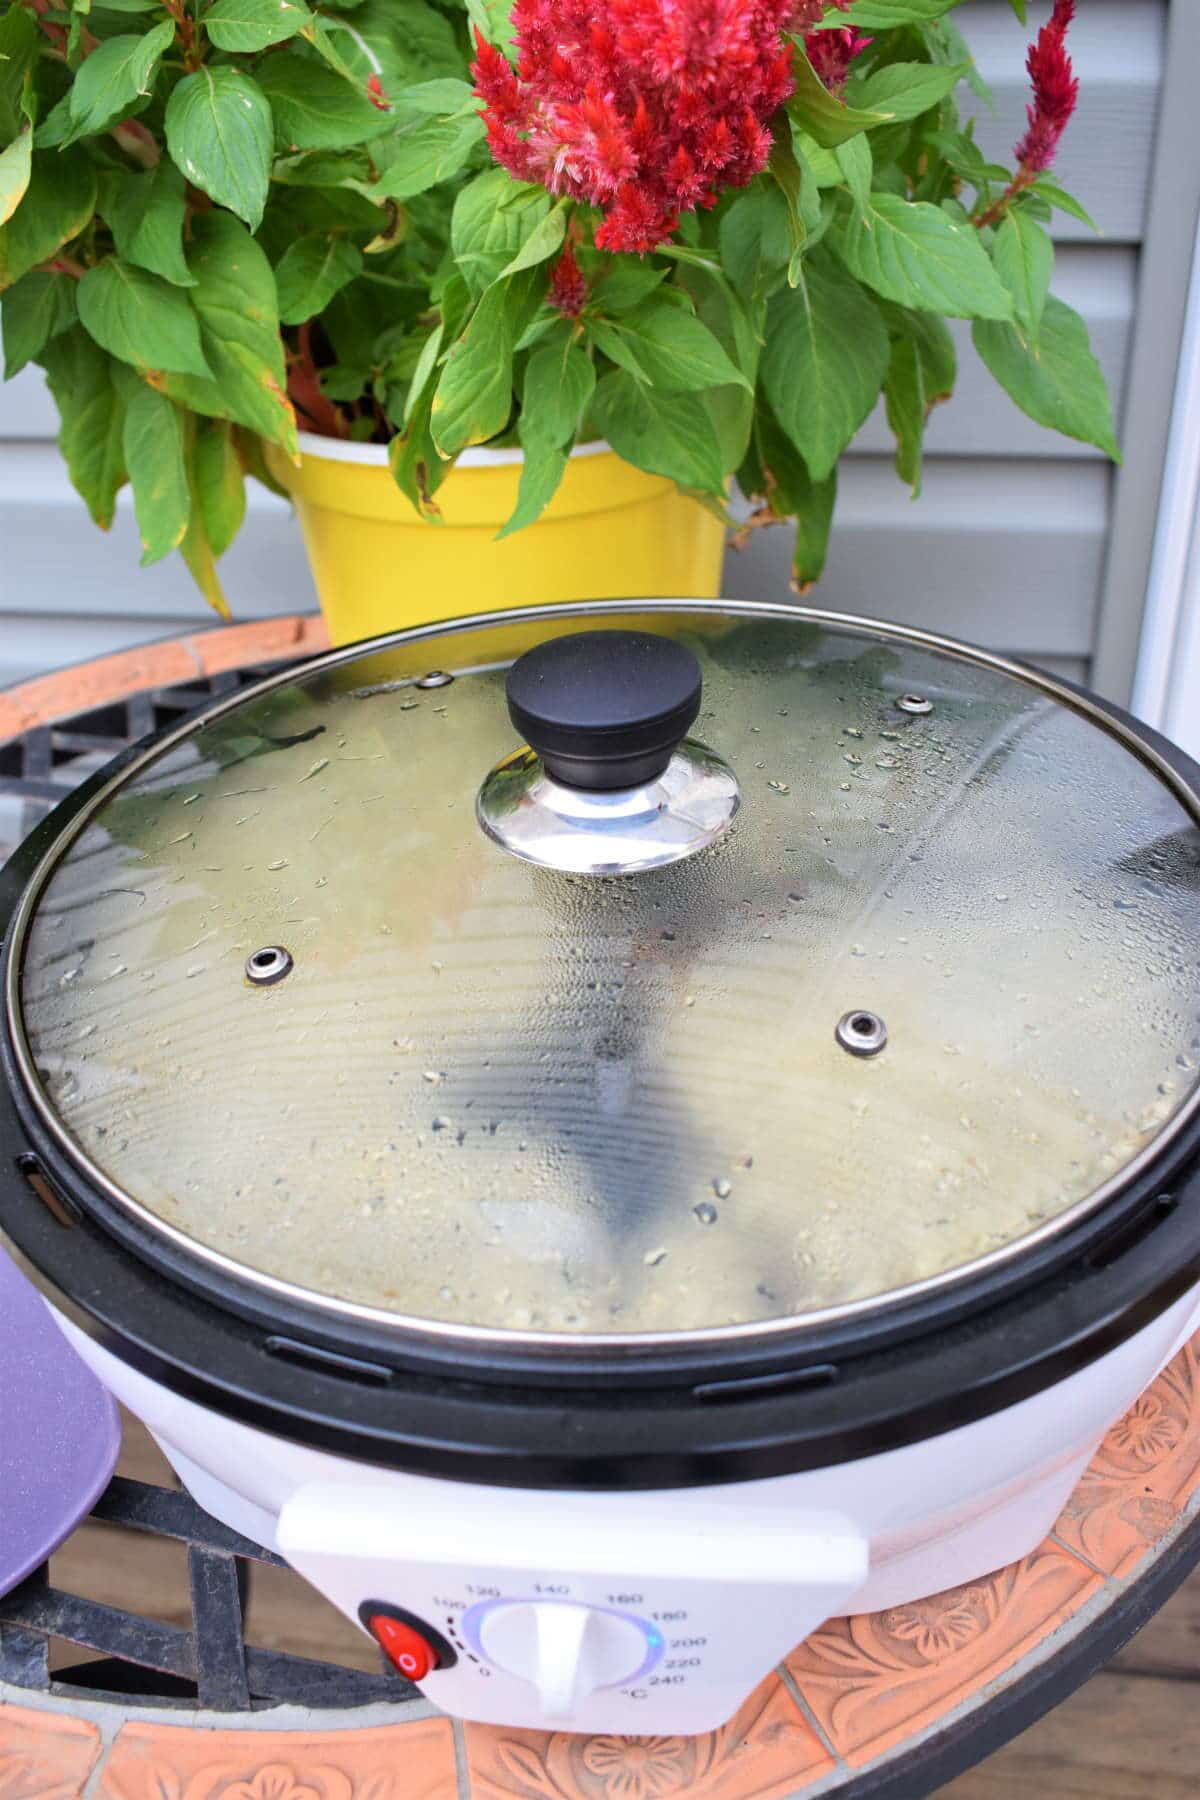
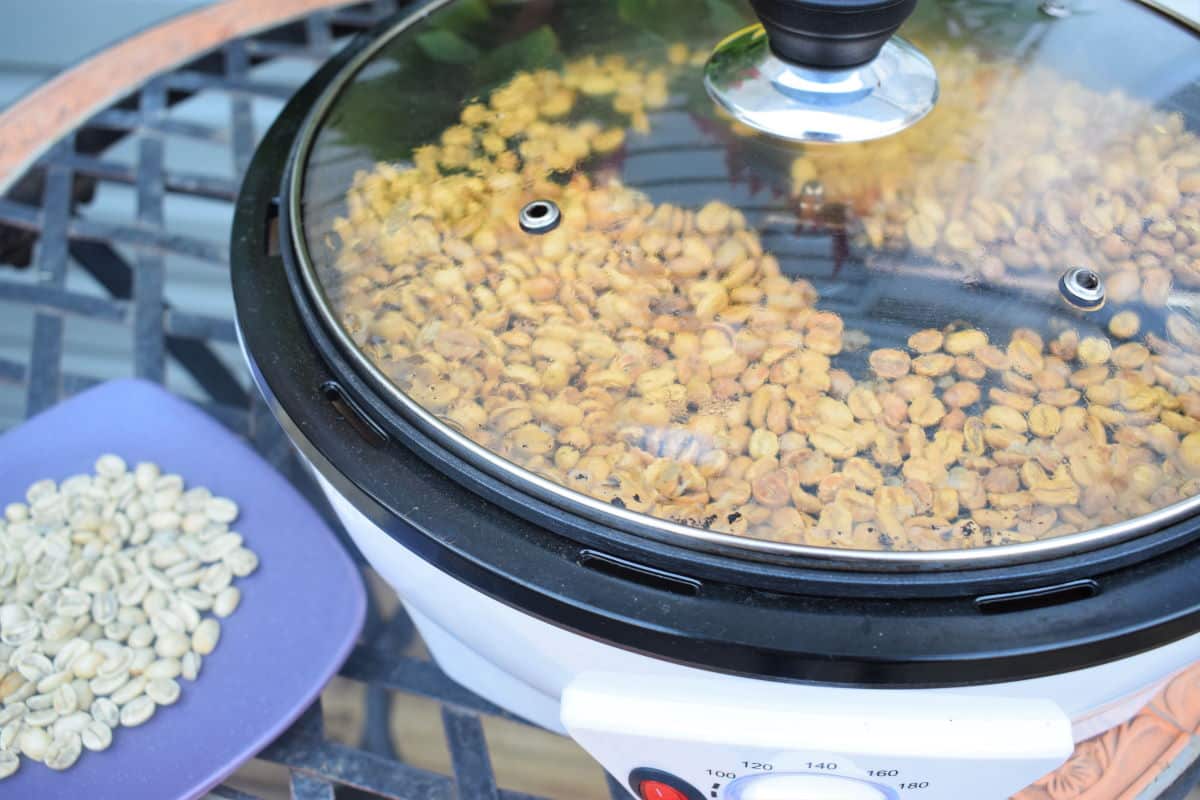
Step 3: Roast until beans turn yellow. Roast the beans until they turn from green to yellow and smell grassy. This took about 14 minutes in my roaster. Water will start evaporating from the beans and the lid of the roaster will steam up.

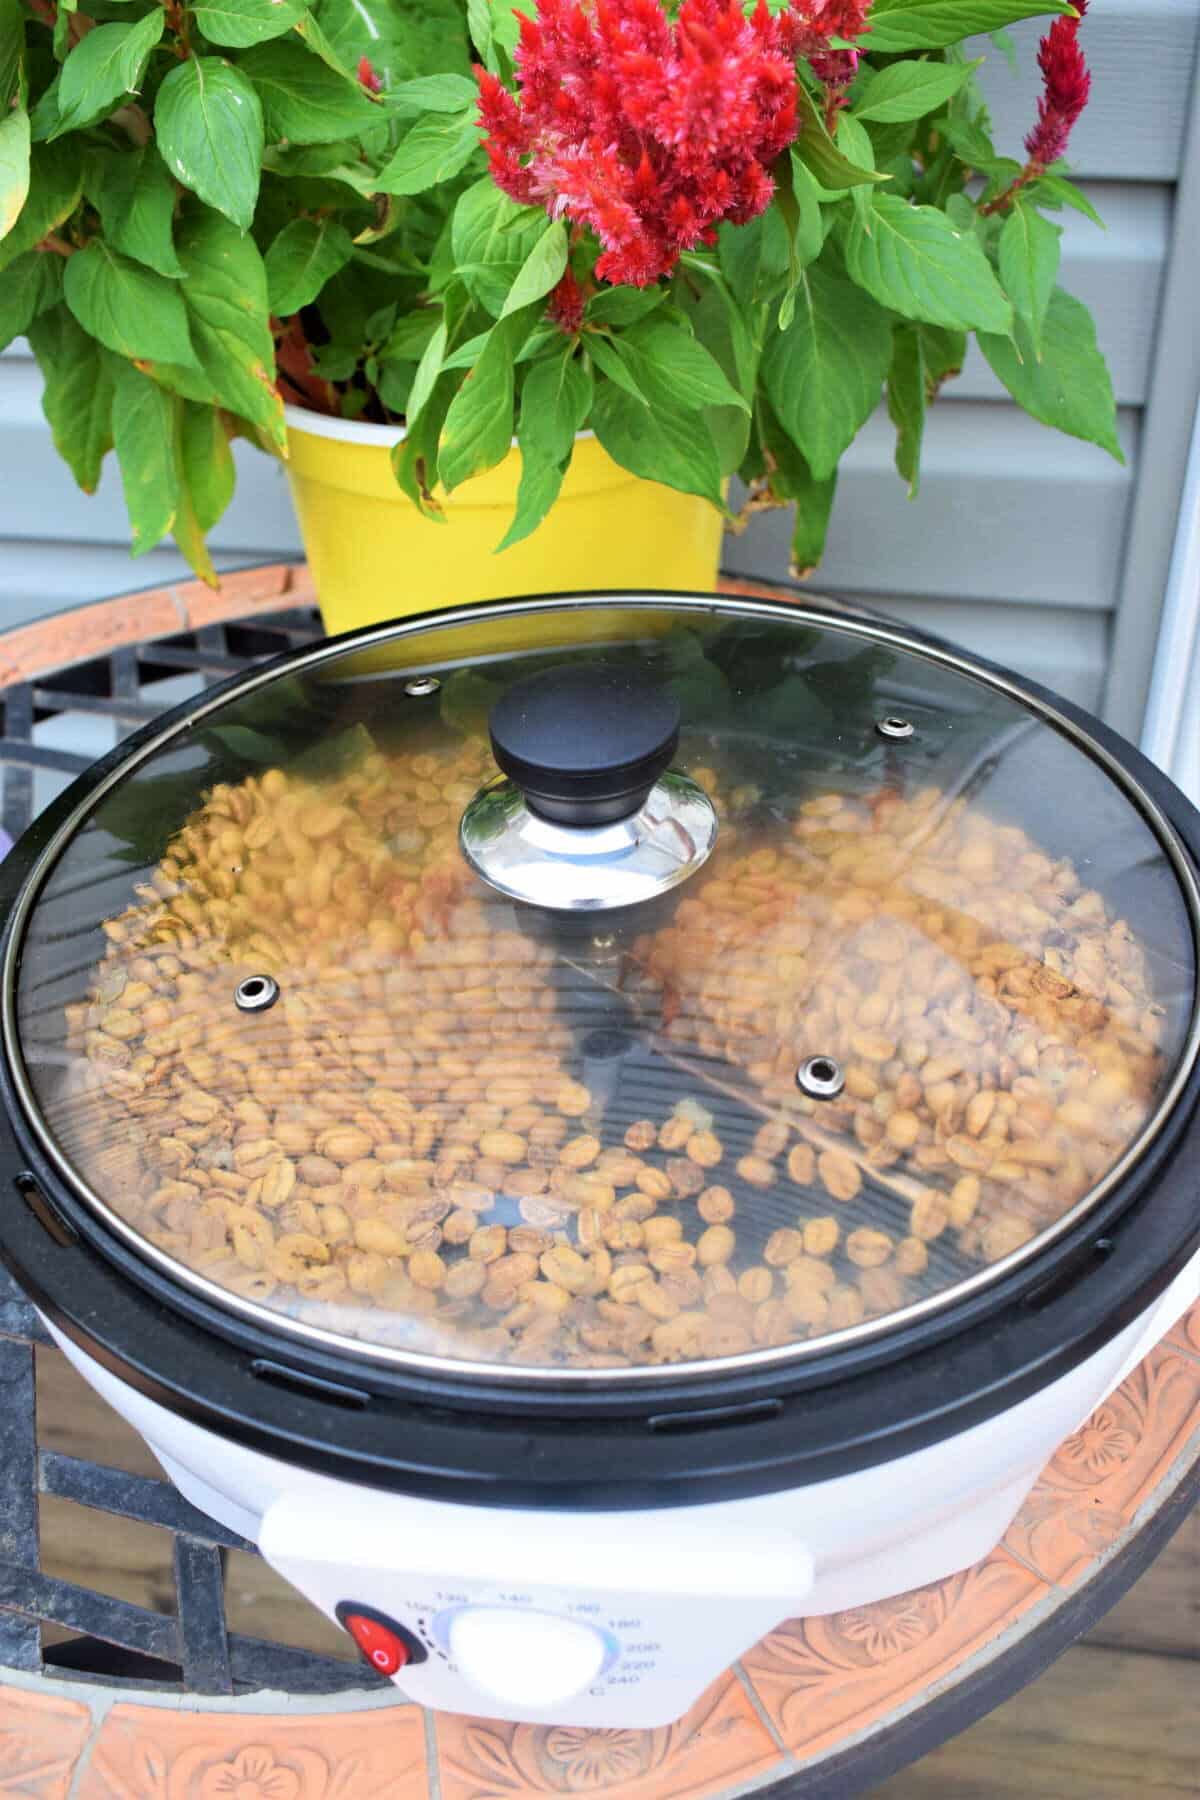
Step 4: Turn up the heat for first crack. Turn the temperature dial to 180°C (355°F). Continue roasting until you hear a cracking noise, about 12 minutes (this is the sound of sugars inside the beans caramelizing). You will start to see chaff (the skin of the beans) in the roaster.
Chef's Note: After the first crack, this is the point at which your coffee beans are officially lightly roasted and suitable to make a very light coffee with, but I recommend roasting it further.
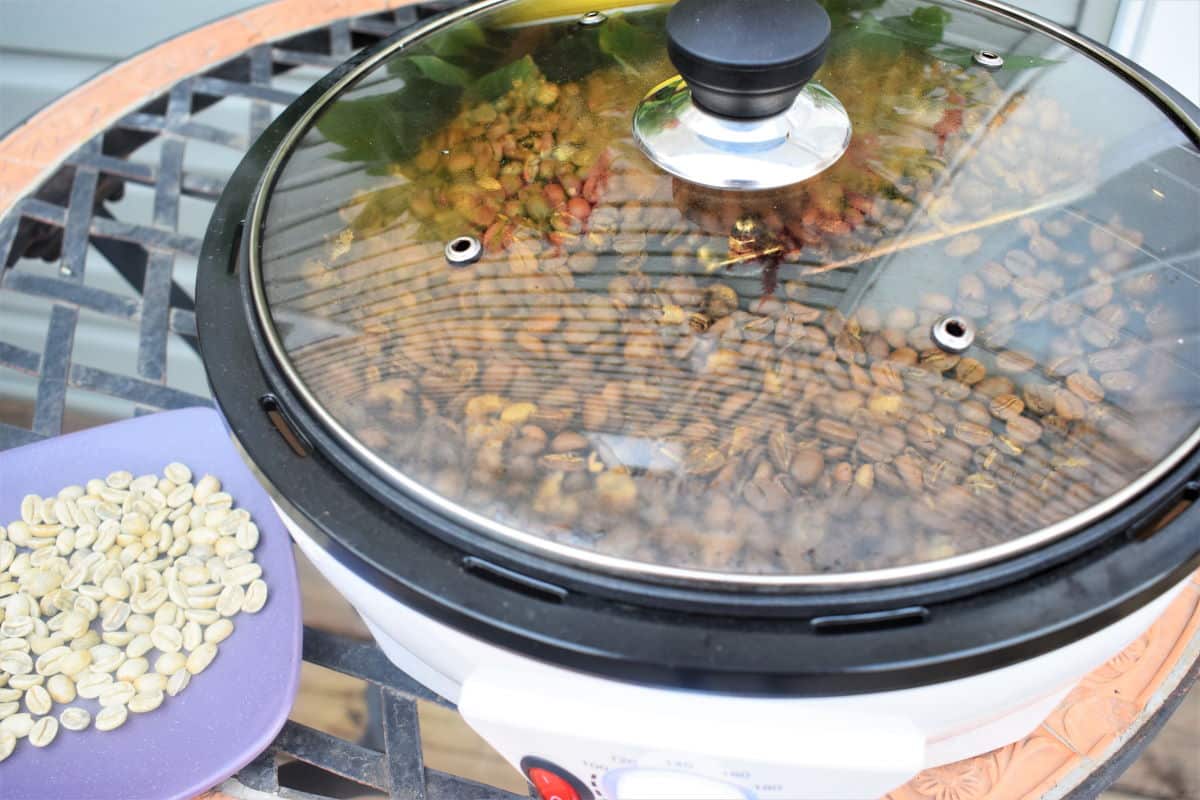
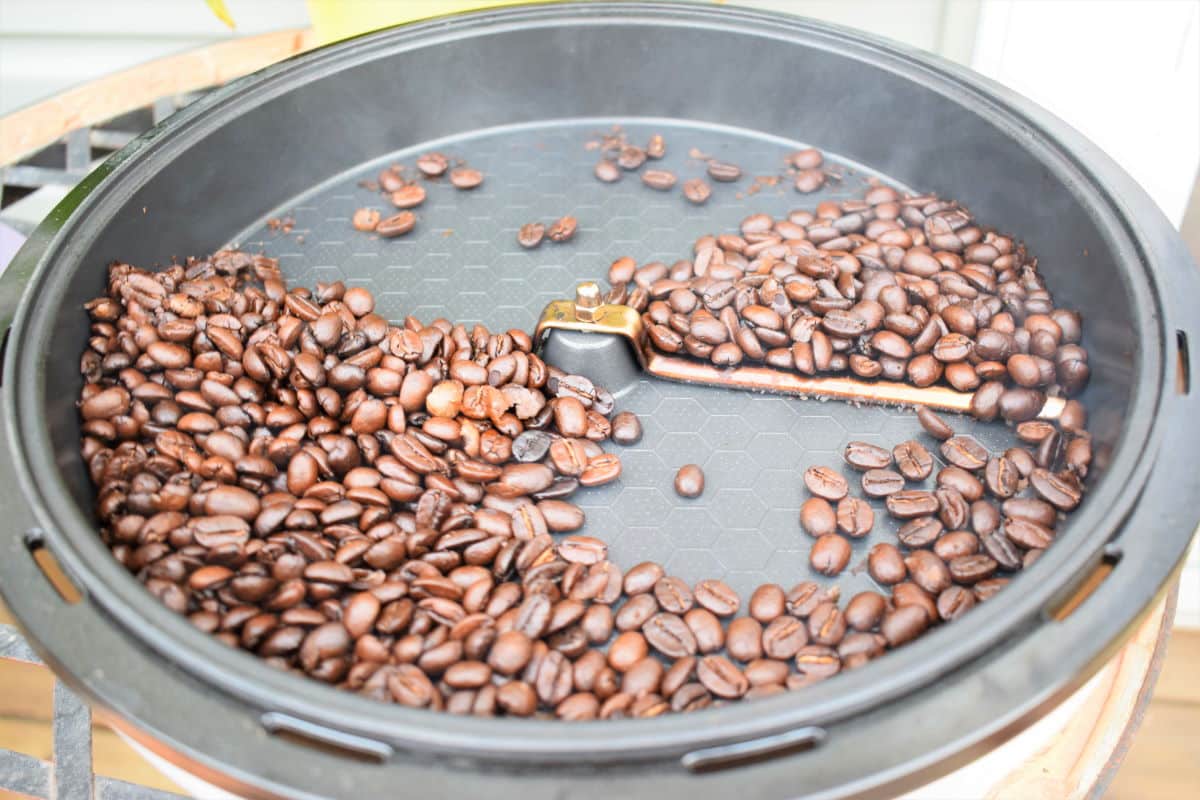
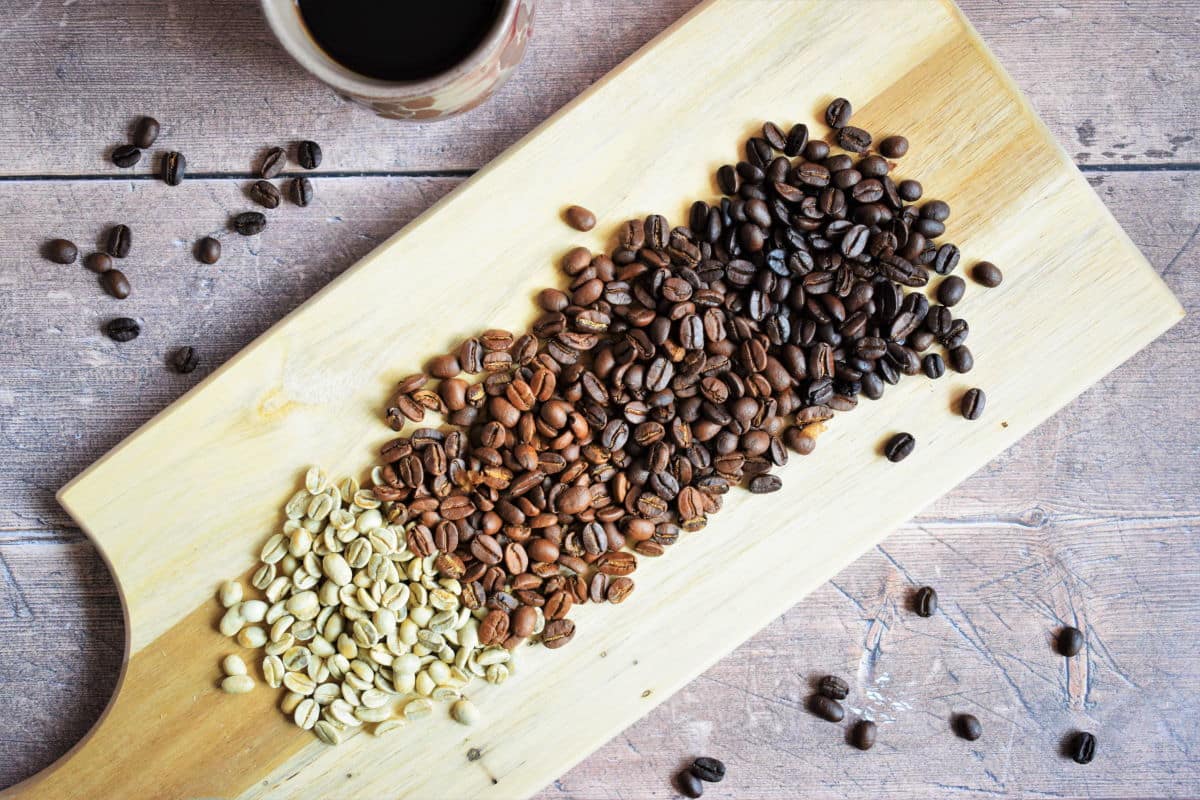
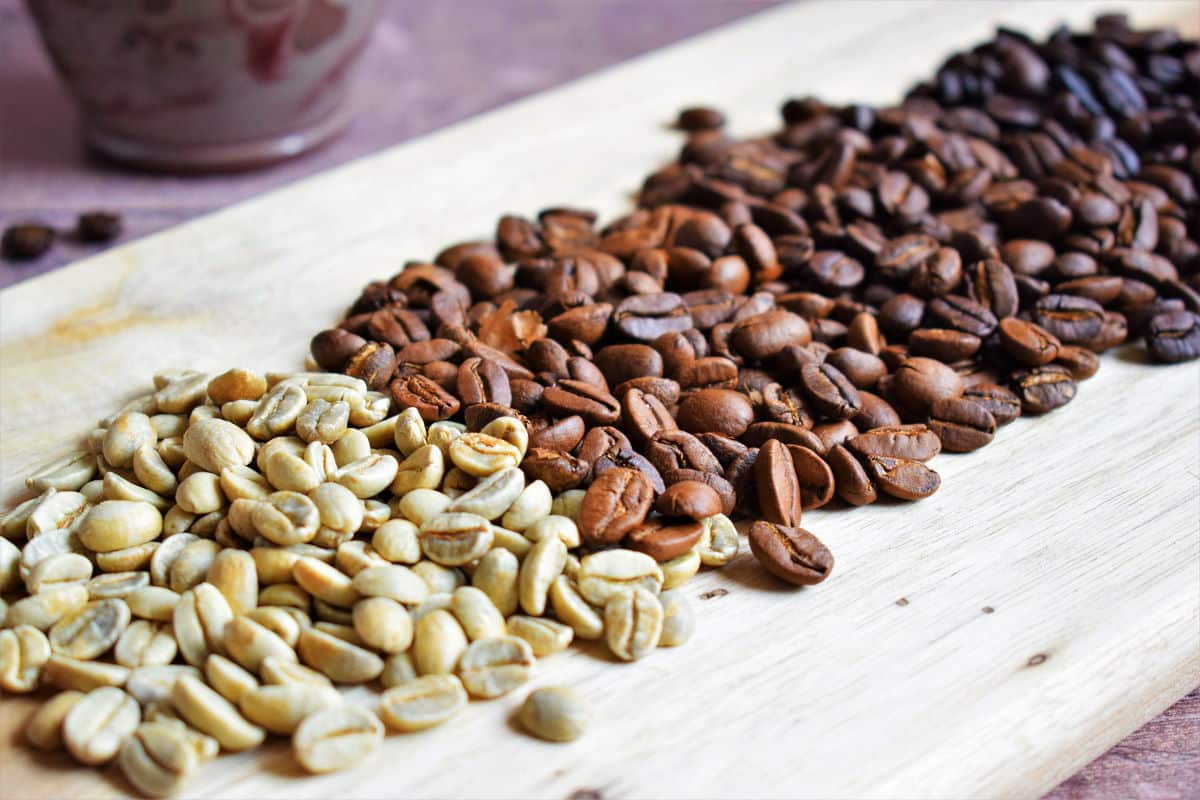
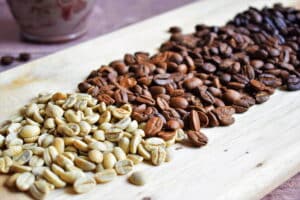
Step 5. Continue roasting. Turn the temperature dial to 220°C (430°F). Watch the beans for the change in color.
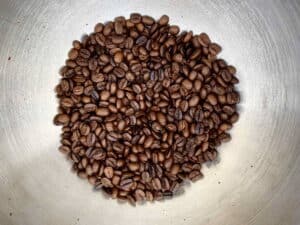
- Light Roast: My beans became a nice light roast after about 7 minutes at this temperature (after the first crack).
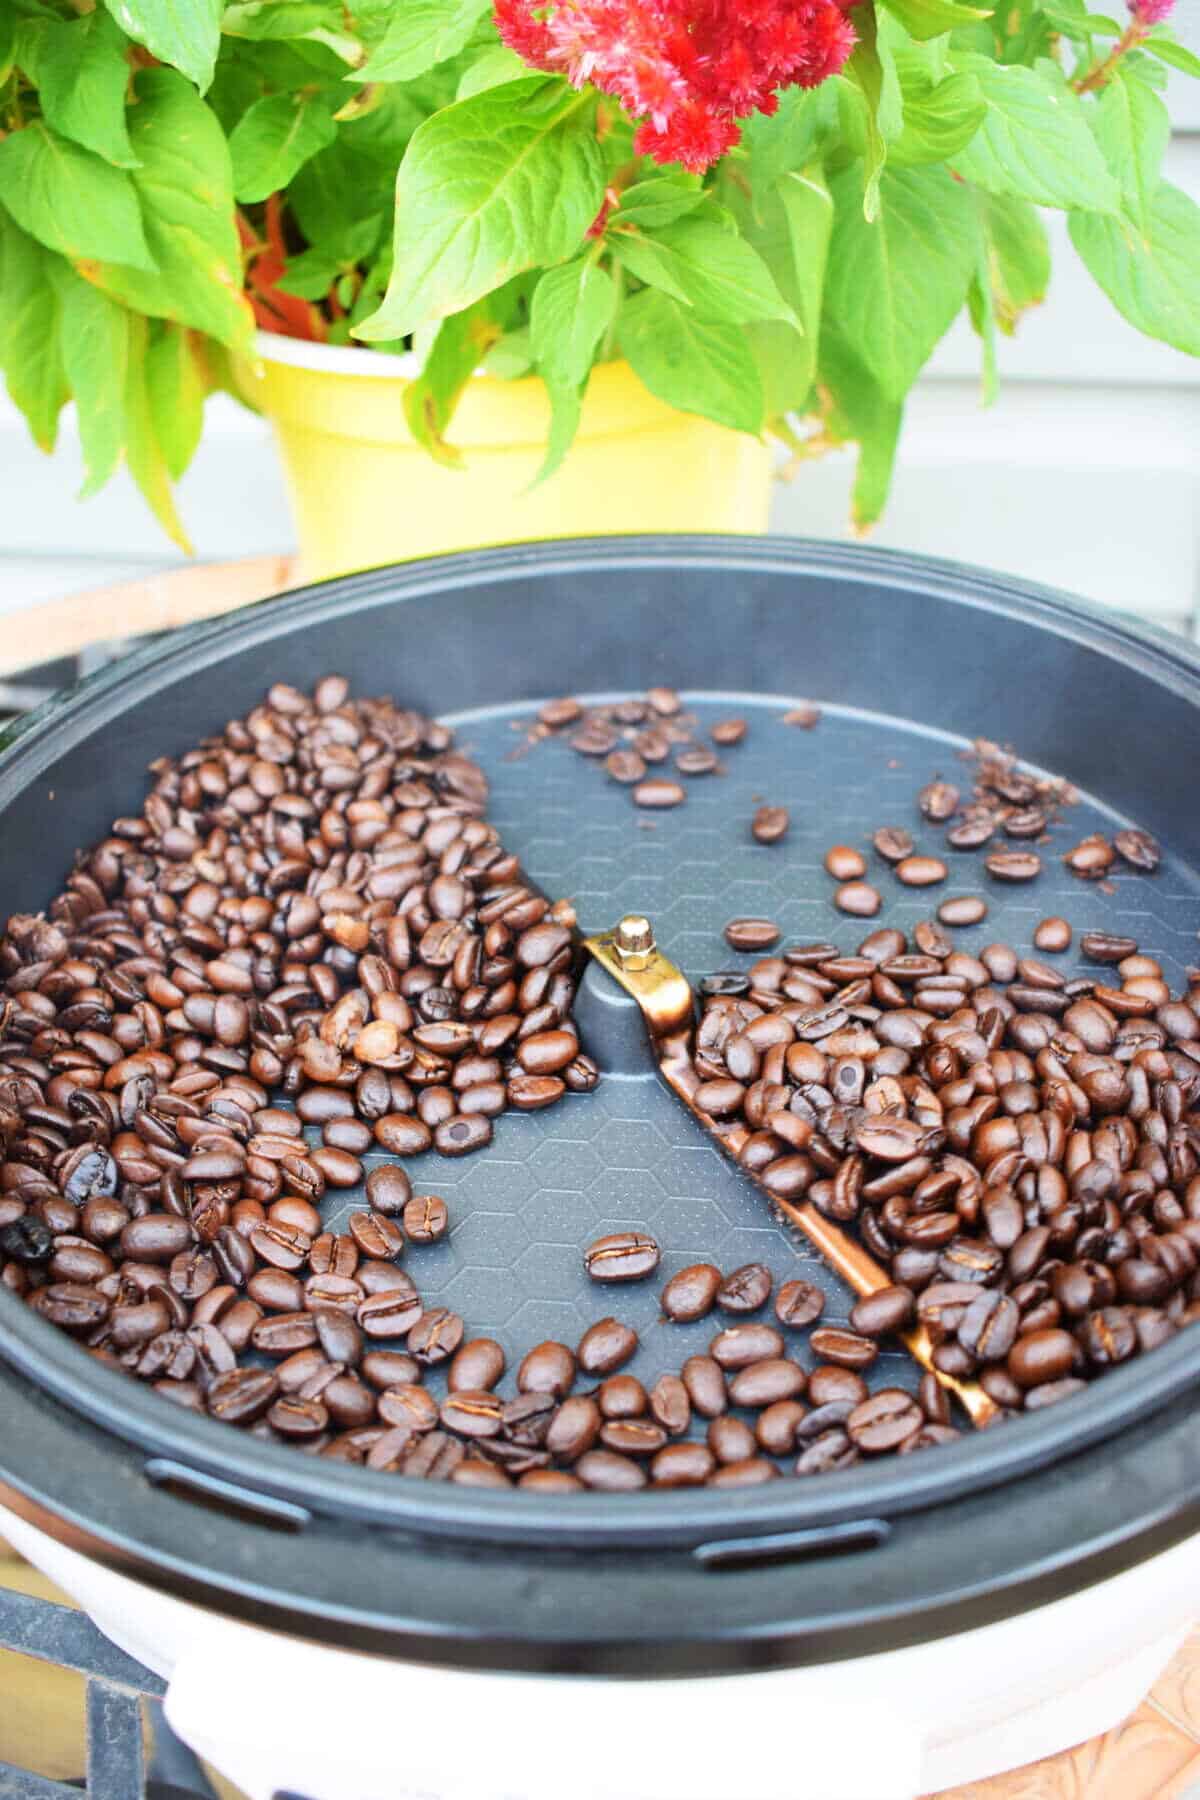
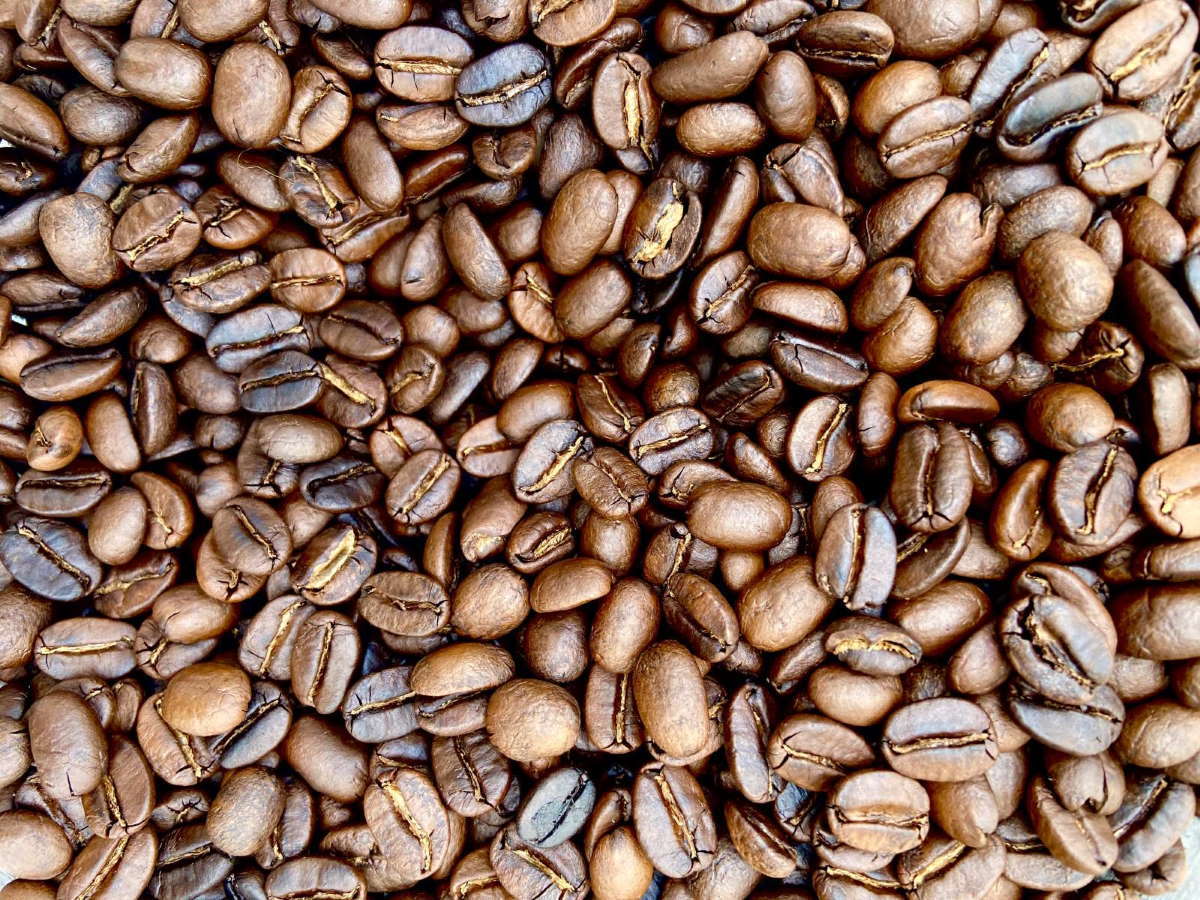
- Medium Roast: If you want a medium roast, keep roasting until you hear the beans cracking again (the second crack) and have reached medium brown in color. This took about 10 minutes in my roaster.
- Dark Roast: For a dark roast, the beans will be dark and oily looking. This took about 24 minutes.
Chef's Note: Times may vary with your roaster. Always look for color and listen for the first and second crack.
Medium Roast
Dark Roast
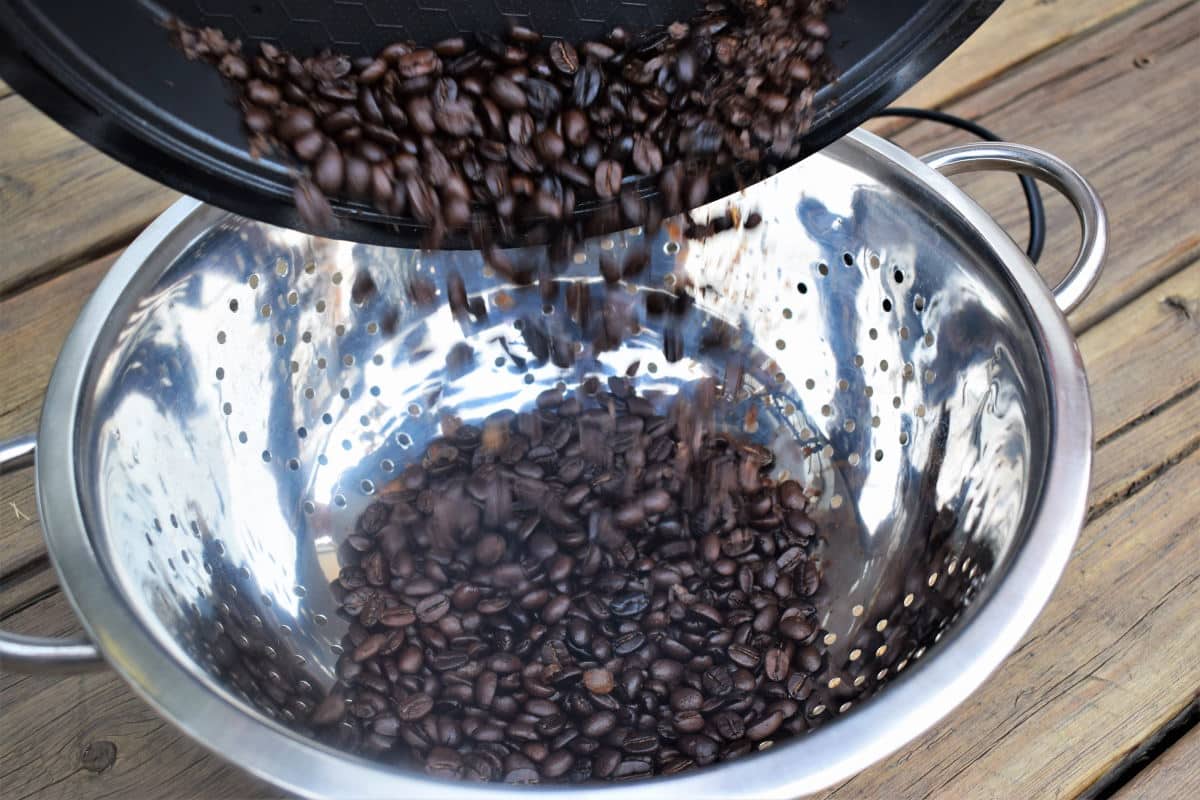
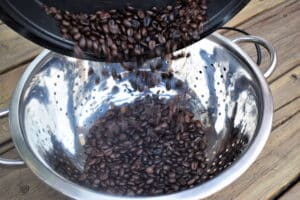
Step 6: Cool Beans. When the beans are finished roasting, they need to cool quickly to stop cooking. Carefully transfer them from the roaster to a metal colander. Shake them in the colander until they are easy to handle.
If you have 2 metal colanders, you can move them back and forth between the 2 colanders. This will cool them down and help remove the chaff (the skin of the beans). Remove as much chaff as you can.
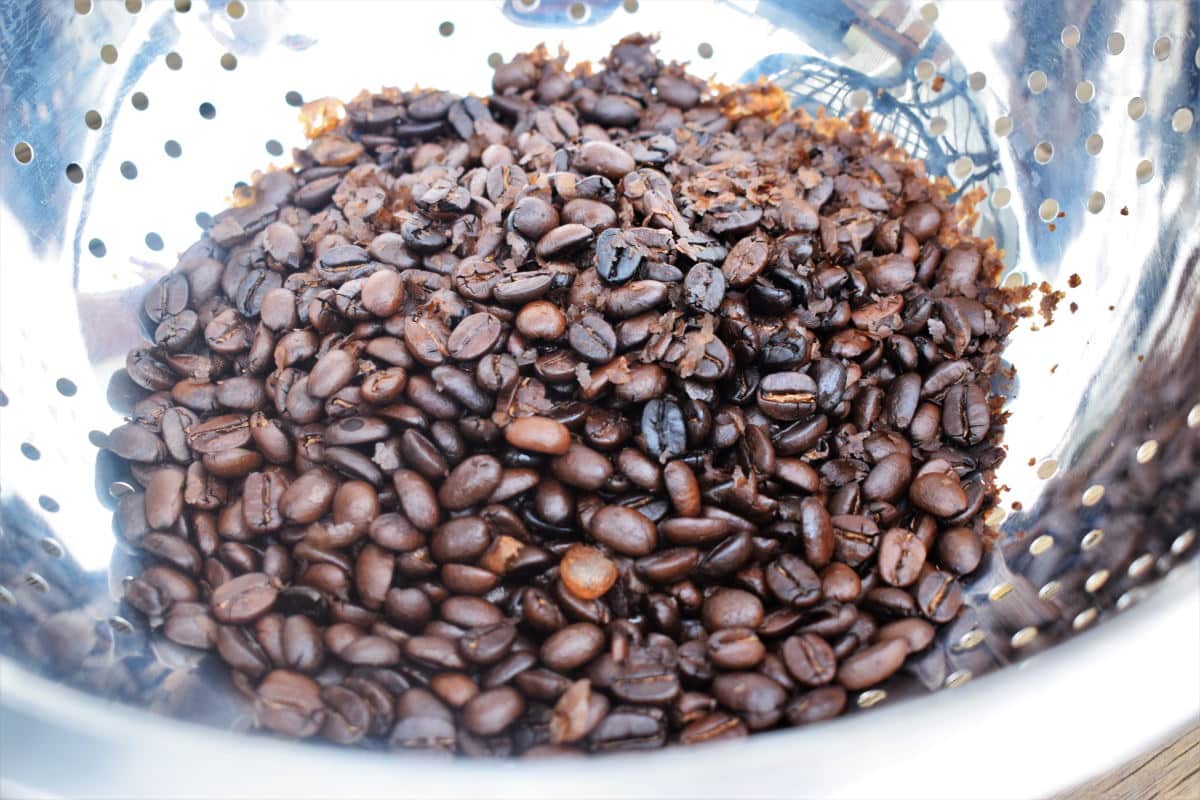
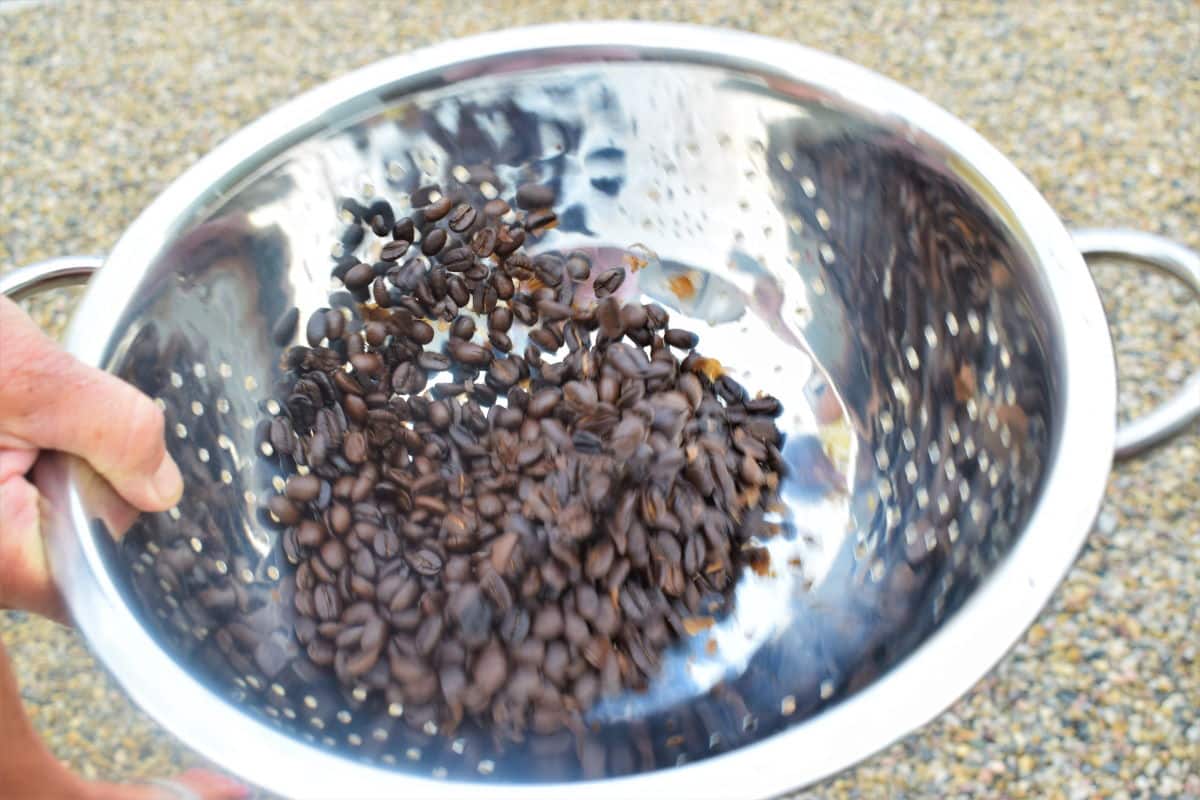
Expert tip from Damian Reed at Everything Coffee Biz in Panama: "...move them around preferably in front of a fan or on a windy day. I shake it in the colander, letting the chaff come to the top, then blow it off. LET IT COOL until it is easy to touch."
Step 7: Off gas. Once they have been cooled, leave the beans out for 1-3 days, as they will off-gas carbon dioxide. Then, store in an air-tight container in a cool, dark place like your pantry.
Step 8: Grind & brew. Your beans have now reached full-flavor. They are ready for grinding and brewing. Brew the beans within 7 days for maximum freshness.
🍫 What else can you do with roasted coffee beans besides grind and brew them? Try making chocolate covered coffee beans!
Coffee Roasting Tips
- These are average roasting times that worked in my roaster. It may vary with your own appliance. Remember to watch for the beans to change color and listen for the first and second crack.
- Practice makes perfect! Knowing the proper times for your roaster will come with practice and it will become much easier to achieve your favorite roast over time.
- Ever wonder how they make flavored coffee beans? If you want to add flavor to your beans, add a bit of flavor oil when they are still warm (just after cooling them in the metal colander). Mix them around with a wooden spoon to coat them evenly. Read flavor oil instructions for amounts.
- The best roast for espresso is between medium and medium-dark.
- Best beans for espresso roast: Give robusta coffee beans a try. They are often used for espresso because they produce a better crema from the high density of oils; they also have more caffeine.
- Arabica beans: Coffee from arabica beans will be more full-bodied/thicker as they are grown at higher altitudes, so keep that in mind when searching for green beans.
- Containers with one-way CO2 valves: This valve helps to release carbon dioxide while minimizing oxidation. You can place the roasted beans in the container after they have cooled, in a cool place, and then wait a few days before brewing.
More Coffee Recipes You Will Love


How did you like roasting your own coffee beans? What is your favorite roast? Mine is medium but every now and then I enjoy dark as well!
If you tried this recipe tutorial for ☕ How to Roast Coffee Beans or any other recipe on my website, please leave a 🌟 star rating and let me know how it went in the 📝 comments below. And please share the recipe!
📋Recipe
How to Roast Coffee Beans
Ingredients
- ½ pound green coffee beans - use as much as your coffee roaster holds - check manual
Instructions
- To begin, the best place to set up your coffee roaster is outside if you can. The smell from roasting is very strong.

- Add the raw coffee beans to the coffee roaster, with the amount specified in the manual.

- Cover with the lid and turn the temperature dial to 140°C (285°F) to begin the roasting process.
- Roast the beans until they turn from green to yellow and smell grassy. This took about 14 minutes in our roaster. Water will start evaporating from the beans and the lid of the roaster will steam up.
- Turn the temperature dial to 180°C (355°F). Continue roasting until you hear a cracking noise, about 12 minutes (this is the sound of sugars inside the beans caramelizing). You will start to see chaff (the skin of the beans) in the roaster. This is the point at which your coffee beans are officially lightly roasted and suitable to make a very light coffee with, but it is recommended to roast further.
- Turn the temperature dial to 220°C (430°F). Watch the beans for the change in color. Our beans became a nice light roast after about 7 minutes at this temperature. If you want a medium roast, keep roasting until you hear the beans cracking again and have reached medium brown in color. This took about 10 minutes in our roaster. For a dark roast, the beans will be dark and oily looking. This took about 24 minutes. (Times may vary with your roaster. Always look for color and listen for cracking.)
- When the beans are finished roasting, they need to cool quickly to stop cooking. Carefully transfer them from the roaster to a metal colander. Shake them in the colander until they are warm to the touch. If you have 2 metal colanders, you can move them back and forth between the 2 colanders. This will cool them down and help remove the chaff (the skin of the beans). Remove as much chaff as you can (it easily blows away).
- Once they have been cooled, leave the beans out for 1-3 days, as they will off-gas carbon dioxide. Then, store in an air-tight container in a cool, dark place like your pantry.

- Your beans have now reached full-flavor. They are ready for grinding and brewing. Brew the beans within 7 days for maximum freshness.


Notes
- The nutrition information is estimated for 100 grams of roasted coffee beans; not for brewed coffee.
- These are average roasting times that worked in our roaster. It may vary with your own appliance. Remember to watch for the beans to change color and listen for the first and second crack.
- Practice makes perfect! Knowing the proper times for your roaster will come with practice and it will become much easier to achieve your favorite roast over time.
- If you want to add flavor to your coffee beans, add a bit of flavor oil when they are still warm (just after cooling them in the metal colander). Mix them around with a wooden spoon to coat them evenly. Read flavor oil instructions for amounts.
- The best roast for espresso is between medium and medium-dark.
- Best beans for espresso roast: Give robusta coffee beans a try. They are often used for espresso because they produce a better crema from the high density of oils; they also have more caffeine.
- Arabica beans: Coffee from arabica beans will be more full-bodied/thicker as they are grown at higher altitudes, so keep that in mind when searching for green beans.
- Containers with one-way CO2 valves: This valve helps to release carbon dioxide while minimizing oxidation. You can place the roasted beans in the container after they have cooled, in a cool place, and then wait a few days before brewing.
Nutrition
Nutrition information on In the Kitch is provided as a courtesy and is an estimate only. It may not include toppings and/or sauces.


Tracey says
Hi
Just wondering how many watts your roaster is. Your guide to roasting is great. Just want to refine my roasting even more.
Thanks
Joss Dyckson says
Hi Tracey, I appreciate that. The one I used here is 800 watts.
DAN @ Sauce Grandmaster says
Does it affect the beans if they reach a temperature between 195 and 225 degrees Celsius?
Joss D says
Hi Dan, I'm guessing you already know but that is the temperature when the beans start to crack.
Hoyt Ray says
I bought the roaster that looks exactly like the one pictured in the above instructions. This thing says to plug into a 220-240v 50/60hz, and it's 1200w. My question is; is this China product misprinted on my machine. It has a 110 plug in cord? please respond
Joss D says
Hi Hoyt, I'm not sure I can help you with this question, sorry. Some of these roasters do look similar but aren't necessarily the same brand. I think it would be best if you asked the manufacturer or the place you bought the roaster from and they could help you better with that.
Chris D says
Thanks Joss, yours is the best recipe I have found. I was hand roasting using a small gas cooker, wok and wooden spoon. Lots of fun, and usually done in the wee hours of the morning. The occasional burnt bean bittered the taste of the brew, and if I didn't scoop these out before the blend I would miss out on an A grade brew. My daughter bought me a roaster earlier this week, which coincidentally looks the same as yours. Tried 100 grams, at stepped 140/180/220 degrees C and added a cinnamon stick in the ground beans jar for a couple of days. Magnificent. We went out and bought another 20 coffee trees as a result 🙂 They will produce arabica for us in a couple of years. Meanwhile, the existing 30 are ripening perfectly. Thanks again.
Joss D says
I really appreciate the comment Chris! I love hearing about successful coffee roasting stories 🙂 . That's really cool that you planted your own trees, that is amazing. Enjoy!
Murray says
Hi Joss. I 'm new to this but recently bought a roaster like the one you show, a grinder and "Single Estate Primos Coffee Company" unroasted Nicaragua green beans. Today was my second roast; a medium dark roast. Following your recipe my first roast came out pretty well, but I will continue to practice. I grind to a fine expresso grind looking for a dark full bodied cup of coffee.
Any suggestions on roasting, grinding or coffee brand to duplicate some of the best coffee one might find in top shelf hotels, or the little ones in Paris where the coffee is to die for. Thank you.
Joss D says
Thanks for the question Murray and for reminding me of Paris! I'm not going to lie, it would be hard to duplicate a Parisian coffee at home with the experience, knowledge, and professional equipment they would have in their coffee shops, but I will try to help you out. The best advice I can give is to keep experimenting! You could experiment with a full on dark roast if medium-dark isn't cutting it for you. As for the raw beans, I've been spoiled with my uncle's own Panamanian beans but I would recommend that instead of arabica, you should give robusta coffee beans a try. They are often used for espresso because they produce a better crema from the high density of oils; they also have more caffeine. That being said, coffee from arabica beans will be more full-bodied/thicker as they are grown at higher altitudes, so keep that in mind when searching for green beans. Keep grinding it to a fine espresso grind, that's great. I hope that this helps! Let me know how it goes.
Murray says
Thank you for the information. I will keep experimenting. When I hit it, I'll let you of my success.
Joss D says
Sounds great!
Murray says
Hi Joss. You helped me along nicely when I was beginning to roast beans back in April. Following your recipe has worked well. BUT I have not been able to determine the best way or time to "rest" the coffee beans right after roasting. I've been setting them out immediately on a towel for about 24 hours to help degassing and then put them in an Airscape stainless steel container with an internal plunger that eliminates most of the air or oxygen. But I still seem to have a fair amount of CO2, I think. Can you give me an idea of the best way and time to degas without having the beans absorb too much air. Or am I being too fussy? thanks.
Joss D says
Hi Murray, yes I remember 🙂 . I'm happy to hear it's been working well for you. Have you tried letting them off-gas for 2 days or 3 days? Some people wait even longer. Darker roasts usually degas quicker than light. Don't worry about being fussy, it just comes down to your preference and sounds like you just need to test off-gassing the beans for longer. I'm guessing your container has a one-way CO2 valve? This valve helps to release carbon dioxide while minimizing oxidation. You can place them in there after they are cooled completely, in a cool place, and then wait a few days or test daily to see what you like best. If your container doesn't have a CO2 valve, you may want to consider getting a Gator (above in the recipe card) or bags that have valves. I'm really curious to know how it goes for you so let me know!
Murray says
Hi Joss. My coffee roasting from MN is going well and I'm getting close to "the best cup of coffee I've ever made". You have been a great inspiration. I'm still trying to figure out the best process to rest the coffee. After roasting I place the beans on a towel in the open air to "rest" for 24 or so hours. Then I put the beans in a canister with a one way CO2 valve. Should I be placing the beans in the one way CO2 valve canister right after roasting or leave them out in the op[en air for some period of time? I cannot find any specific info online for the resting process.
Joss D says
That's kind of you to say, Murray! And that's great that you almost have your perfect cup of coffee figured out. I haven't tried immediately storing the beans in a CO2 valve canister before, so I can't say for sure but I'll try to help. Within the first 12 hours after roasting the beans, their internal pressure is high enough to prevent them from absorbing too much oxygen. So I think that you could transfer them to the container after they rest for 12 hours, since any remaining CO2 has an escape route in the canister. Hope that makes sense and let me know how it goes 🙂
Joss D says
That being said Murray, my uncle who grows and roasts coffee as a business, has just informed me that they packaged the coffee beans in bags with one way valves right after the roast. Sounds like that is the best way to get a very fresh, tasty cup of coffee!
David J says
Hi Joss. Was wondering if you had any recipes or tips on roasting Sumatra beans? Thank you
Joss D says
Hi David. Thanks for the question. I do not have a recipe using Sumatra beans just yet, but I will put it on my list of ideas! I believe it would be best to roast them until you achieve a dark roast.
David J says
Hi Joss, just tried your recipe for roasting beans and they turned out wonderful!! I have a roaster similar to yours pictured, so that helped a bunch. I did have to tend with below freezing temperatures outside, even in my garage, so the times were a little bit longer. Thanks so much for sharing, and look forward to more recipes
Joss D says
Hey David, I'm so happy they turned out for you! Despite the cold lol. Thanks for the comment.
Terri says
So cool to roast your own coffee beans! Now I really need to buy a coffee roaster!
Joss D says
Thanks Terri!
Sean says
I've been wanting to try this for ages! I actually had no idea there were dedicated at-home coffee roasters like this though - now I'm going to have to see if I can justify getting one or not, hah. Thanks for the tip on the strong smell from the green stages too - I had read that once years ago but I had forgotten. Cheers!
Joss D says
The home roasters work great! There is nothing like fresh coffee that you've roasted yourself. 🙂 Thanks for the comment Sean.
Julia says
I always thought about roasting coffee beans but didn't really know where to start. Thanks for the great article!
Joss D says
Thank you!
nancy says
wow - never thought to roast my own coffee beans but you make it looks so simple!
Joss D says
Thank you! It is simple and rewarding.
Bernice says
What a fun project! I have no idea where to get green beans though.
Once my sister worked at a roastery and I got her to grab me some. My intention was to try it out in the popcorn maker but I never ended up doing it. I bet it smells amazing in your house when you are roasting.
Joss D says
It is fun! I get green coffee beans from my Uncle in Panama, but you can actually buy them at many online stores.
Dave says
That roaster is suppose to be terrible, takes too long and you end up baking your coffee. I roast over a stove but will buy a FRESH ROAST SR800 or 540
Joss D says
Hi Dave, thanks for your input. We have no issue with this roaster. It produces a nice, even roast at the above temperatures/times.
Jacky Khoo says
is Fahrenheit or Celsius , i saw the coffee roaster is in Celsius but u wrote it at F, just wanna re confirm
Joss D says
Jacky, good catch! Yes, those temperatures are meant to be in Celsius. I will change that and add the Fahrenheit as well. Thank you so much for pointing that out!
Jacky Khoo says
thank you so much