In the Kitch

menu icon
go to homepage
  • Patriotic Recipes
  • Recipe Index
  • Guides
  • Tutorials
  • Subscribe
    • Facebook
    • Pinterest
    • YouTube
  • search icon
    Homepage link
    • Patriotic Recipes
    • Recipe Index
    • Guides
    • Tutorials
    • Subscribe
    • Facebook
    • Pinterest
    • YouTube
  • ×
    In the Kitch » Recipes

    How to Make Fruit-Infused Water

    March 11, 2020 by Joss Dyckson 10 Comments

    Staying hydrated doesn't have to be a bore. Give your water some pizazz with fruit infusion. I will show you, step by step, how to make fruit-infused water in a variety of combinations!

    Mixed berry infused water in pitcher.
    [feast_advanced_jump_to]

    Why Infuse Your Water With Fruit?

    For some people, drinking plain water tastes bland. Adding fresh berries, citrus, and herbs to your water will allow you to extract the natural flavors of the ingredients which makes it a great alternative to ordinary H2O. There are even pitchers and to-go cups designed specifically for infusing water.

    It's almost like drinking strawberry juice or pineapple juice but without the extra calories and with more of a subtle taste. You're simply enhancing the flavor of your water.

    Ingredients

    Empty pitcher, glass and fruit.
    • water - You can use regular drinking water although filtered or purified water will give you the best flavor.
    • fruit - Pick one of the fruit combinations below. Thoroughly wash the fruit before using.
    • sugar - This is totally optional. You can also use stevia for a sugar free sweetener or leave it out altogether.

    *Check recipe card for ingredient amounts.

    Chef's Note: You can use frozen fruit, but I recommend fresh if you can. The frozen fruit will take longer to infuse and the appearance, once it thaws, will not be as aesthetic as the fresh fruit.

    + Pick a Fruit Combination

    Mixed berry infused water in pitcher and glass.

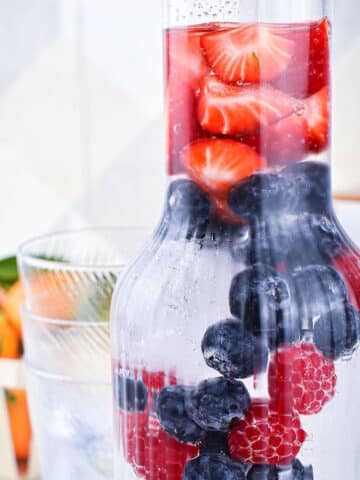
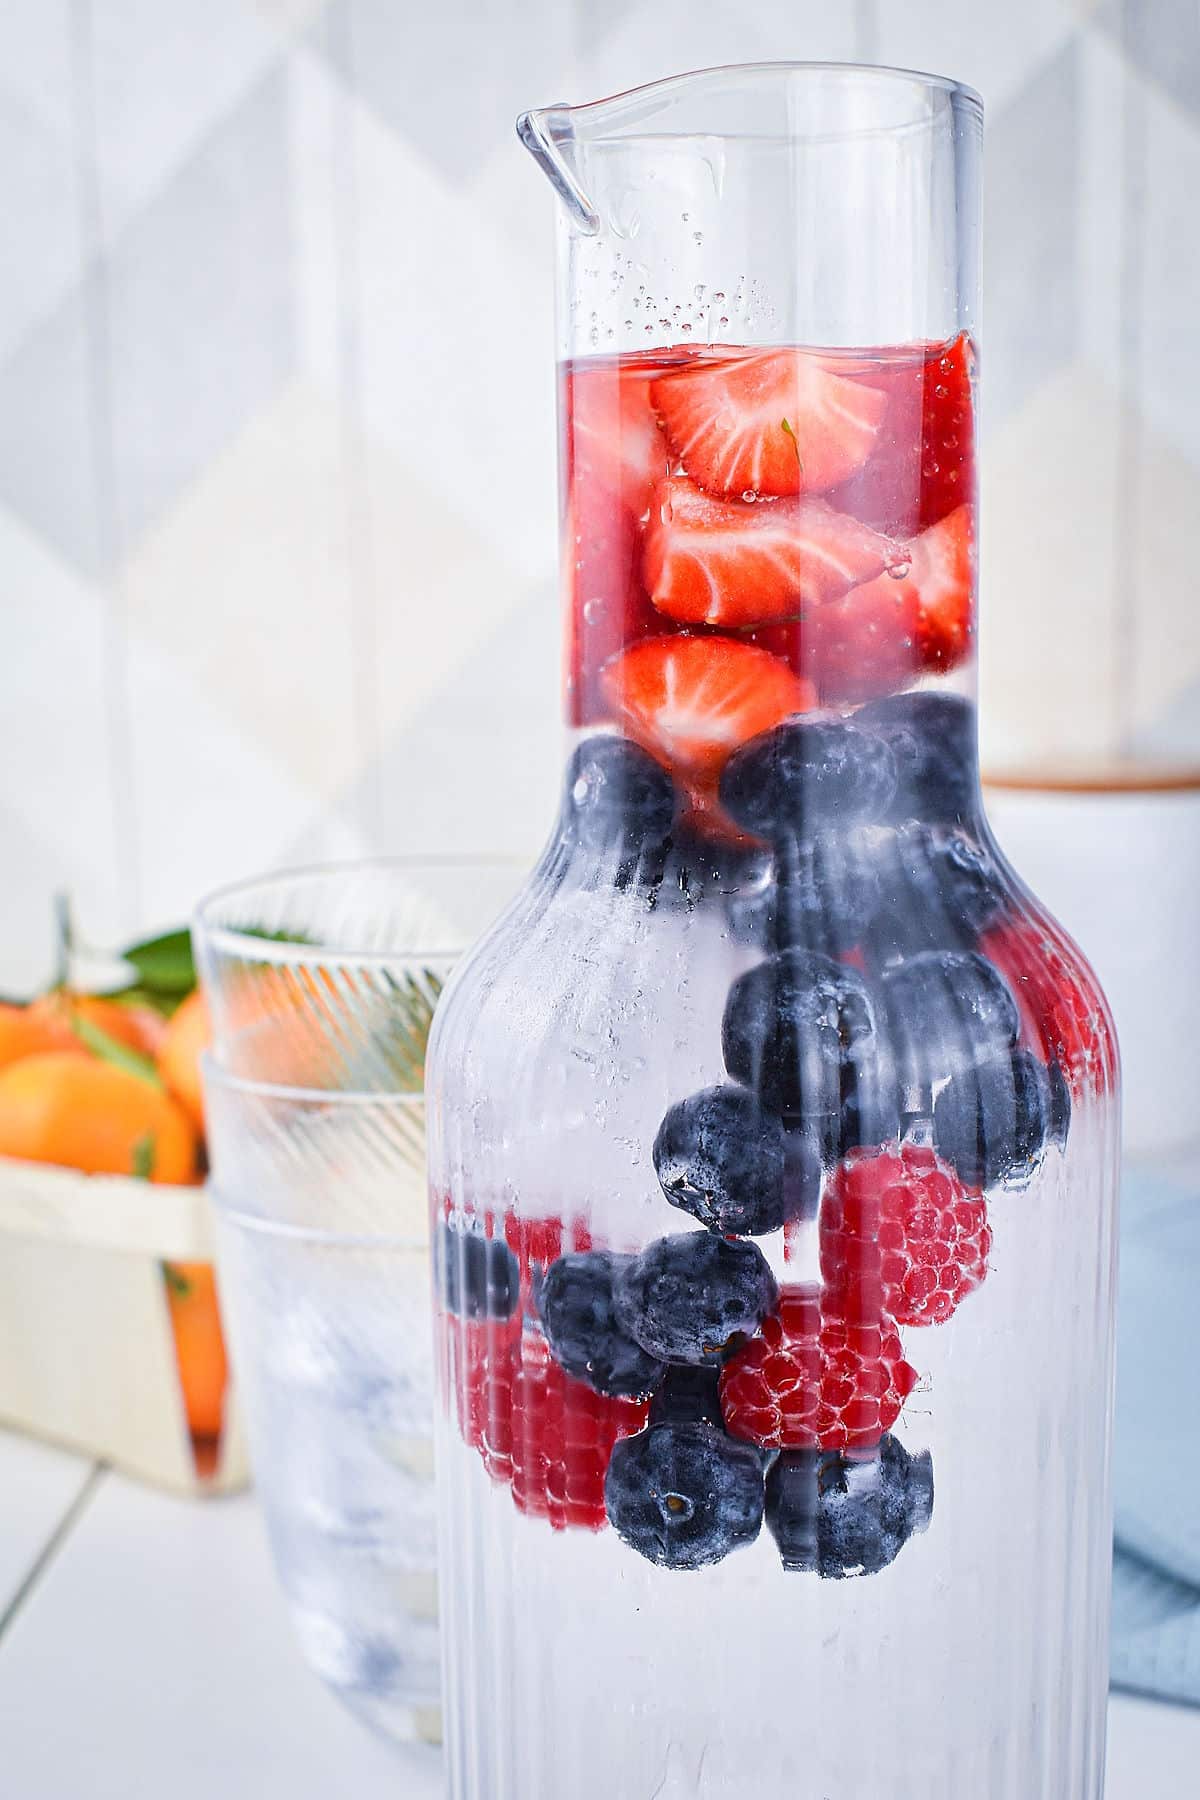
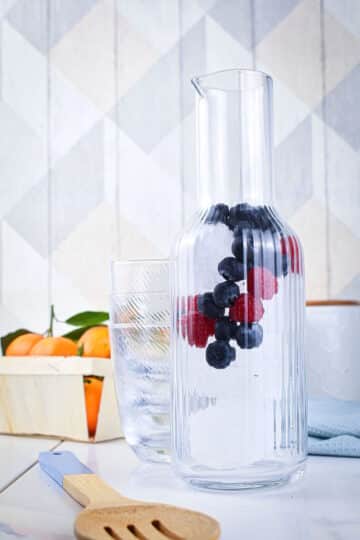
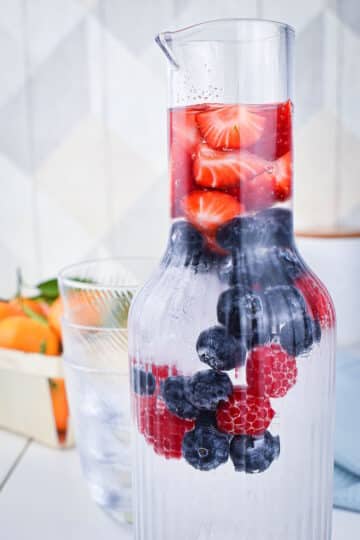
    Option 1: Mixed Berry Fruit-Infused Water

    • 1 cup blueberries
    • 1 cup raspberries
    • 1 cup strawberries, sliced
    Cucumber, pineapple and mint infused water in glass.

    Option 2: Pineapple, Mint and Cucumber-Infused Water

    • 1 cup pineapple chunks
    • ½ cucumber, sliced thinly
    • 1 bunch mint leaves
    Citrus fruit infused water in glass and pitcher.

    Option 3: Citrus-Infused Water

    • 1 orange, in wedges
    • 1 lemon, in wedges
    • 1 tangerine, in wedges
    • Optional: for this fruit-infused water, you can also add a bit of freshly squeezed orange and lemon juice, to taste.

    Instructions

    Ice and berries in pitcher.

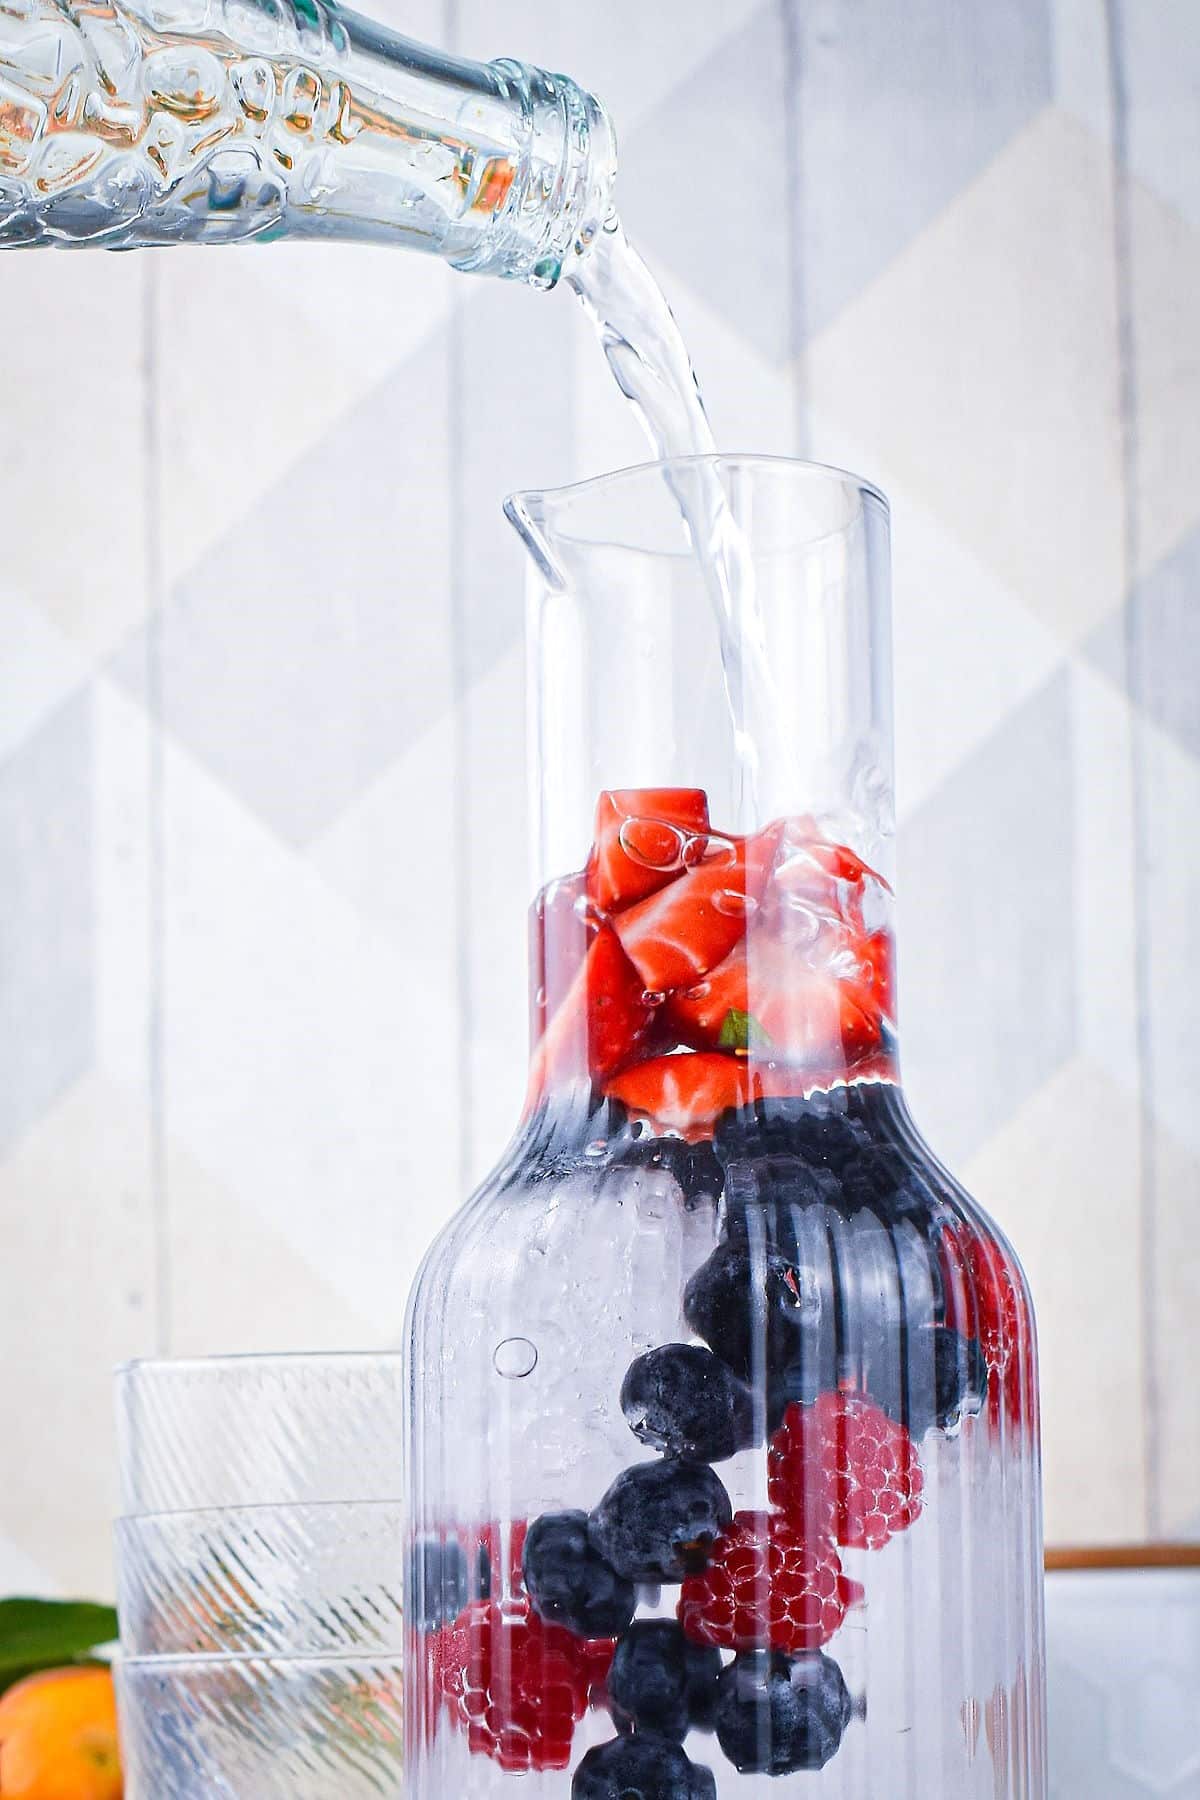
    Step 1. Fill a big jar or glass pitcher with ice (leaving some room for the fruit). Add your favorite fruit combination from above.

    Water pouring into pitcher of fruit.

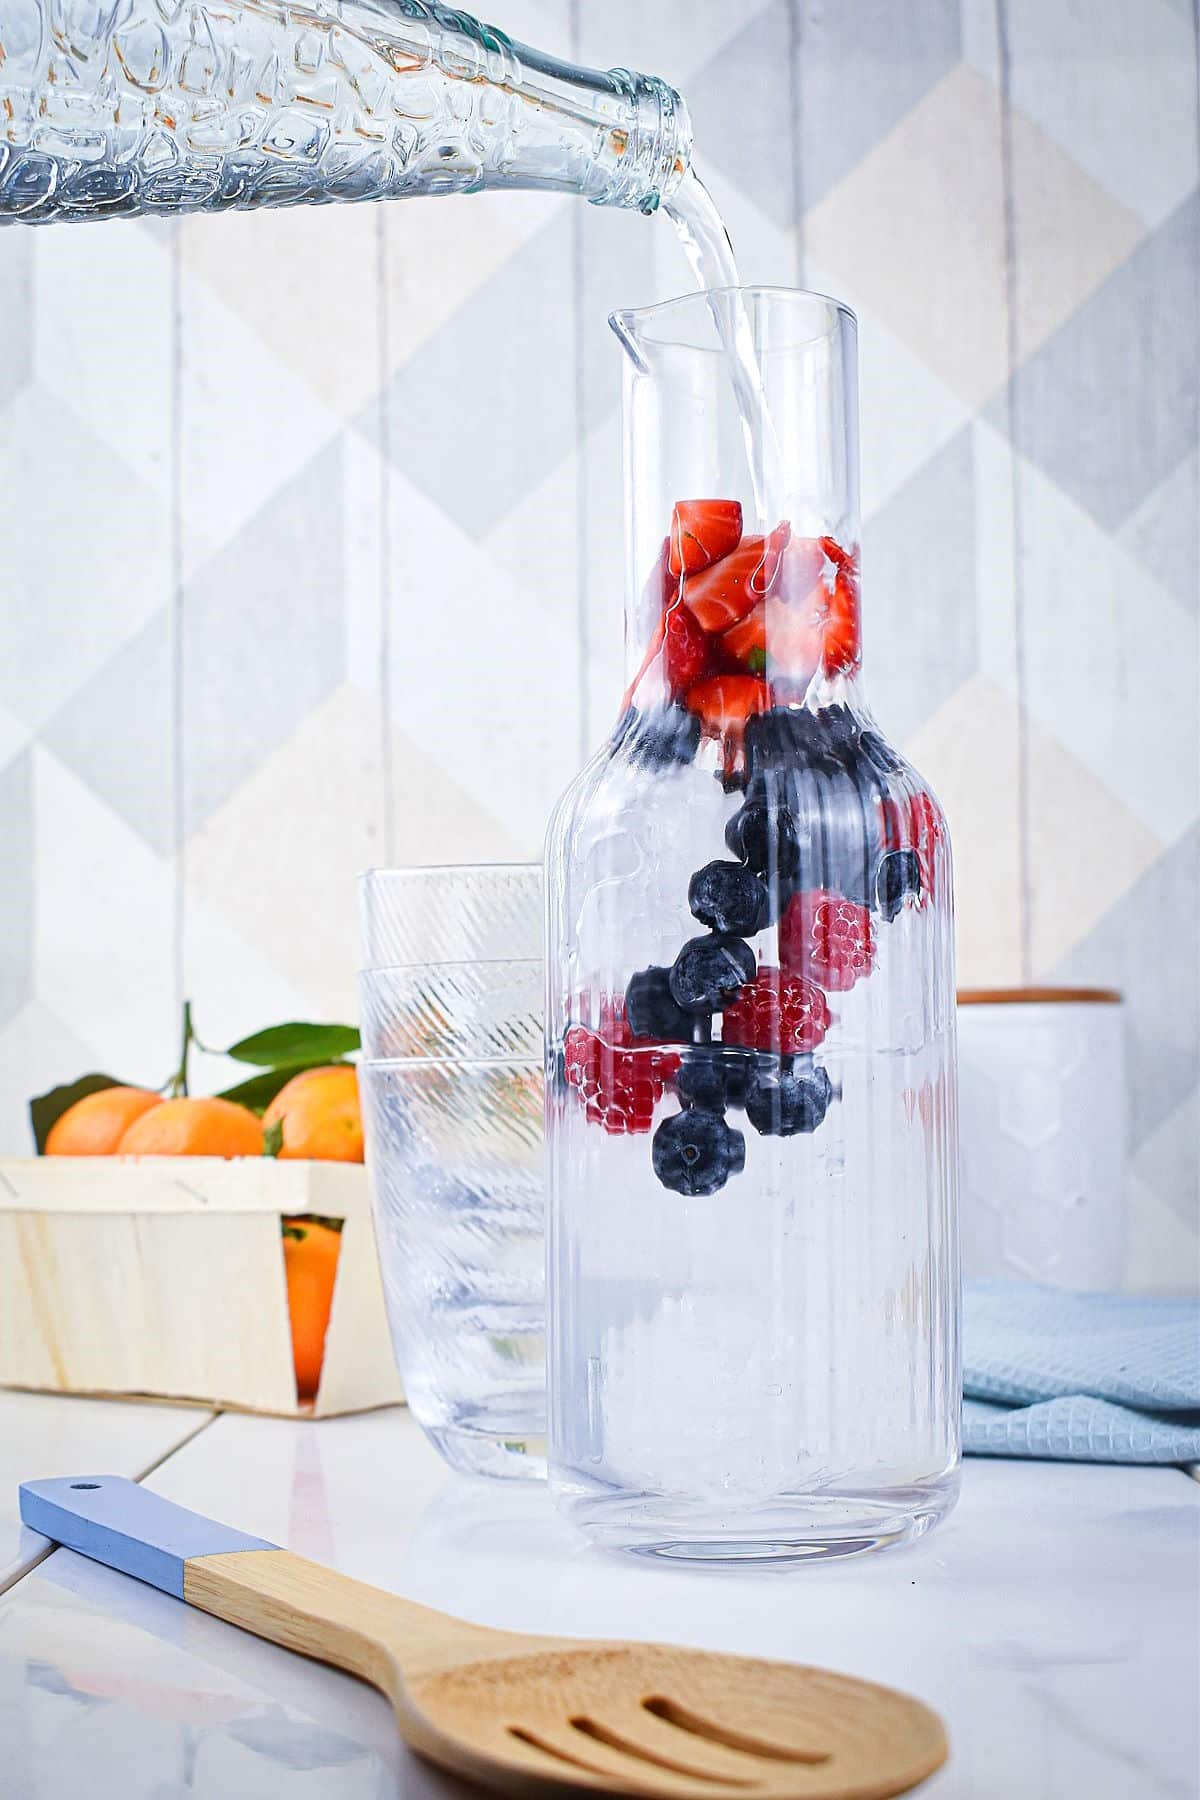
    Step 2. Fill the rest of the pitcher with water. Use a wooden spoon to gently stir the water and fruit together.

    Fruit infused water with sugar in pitcher.

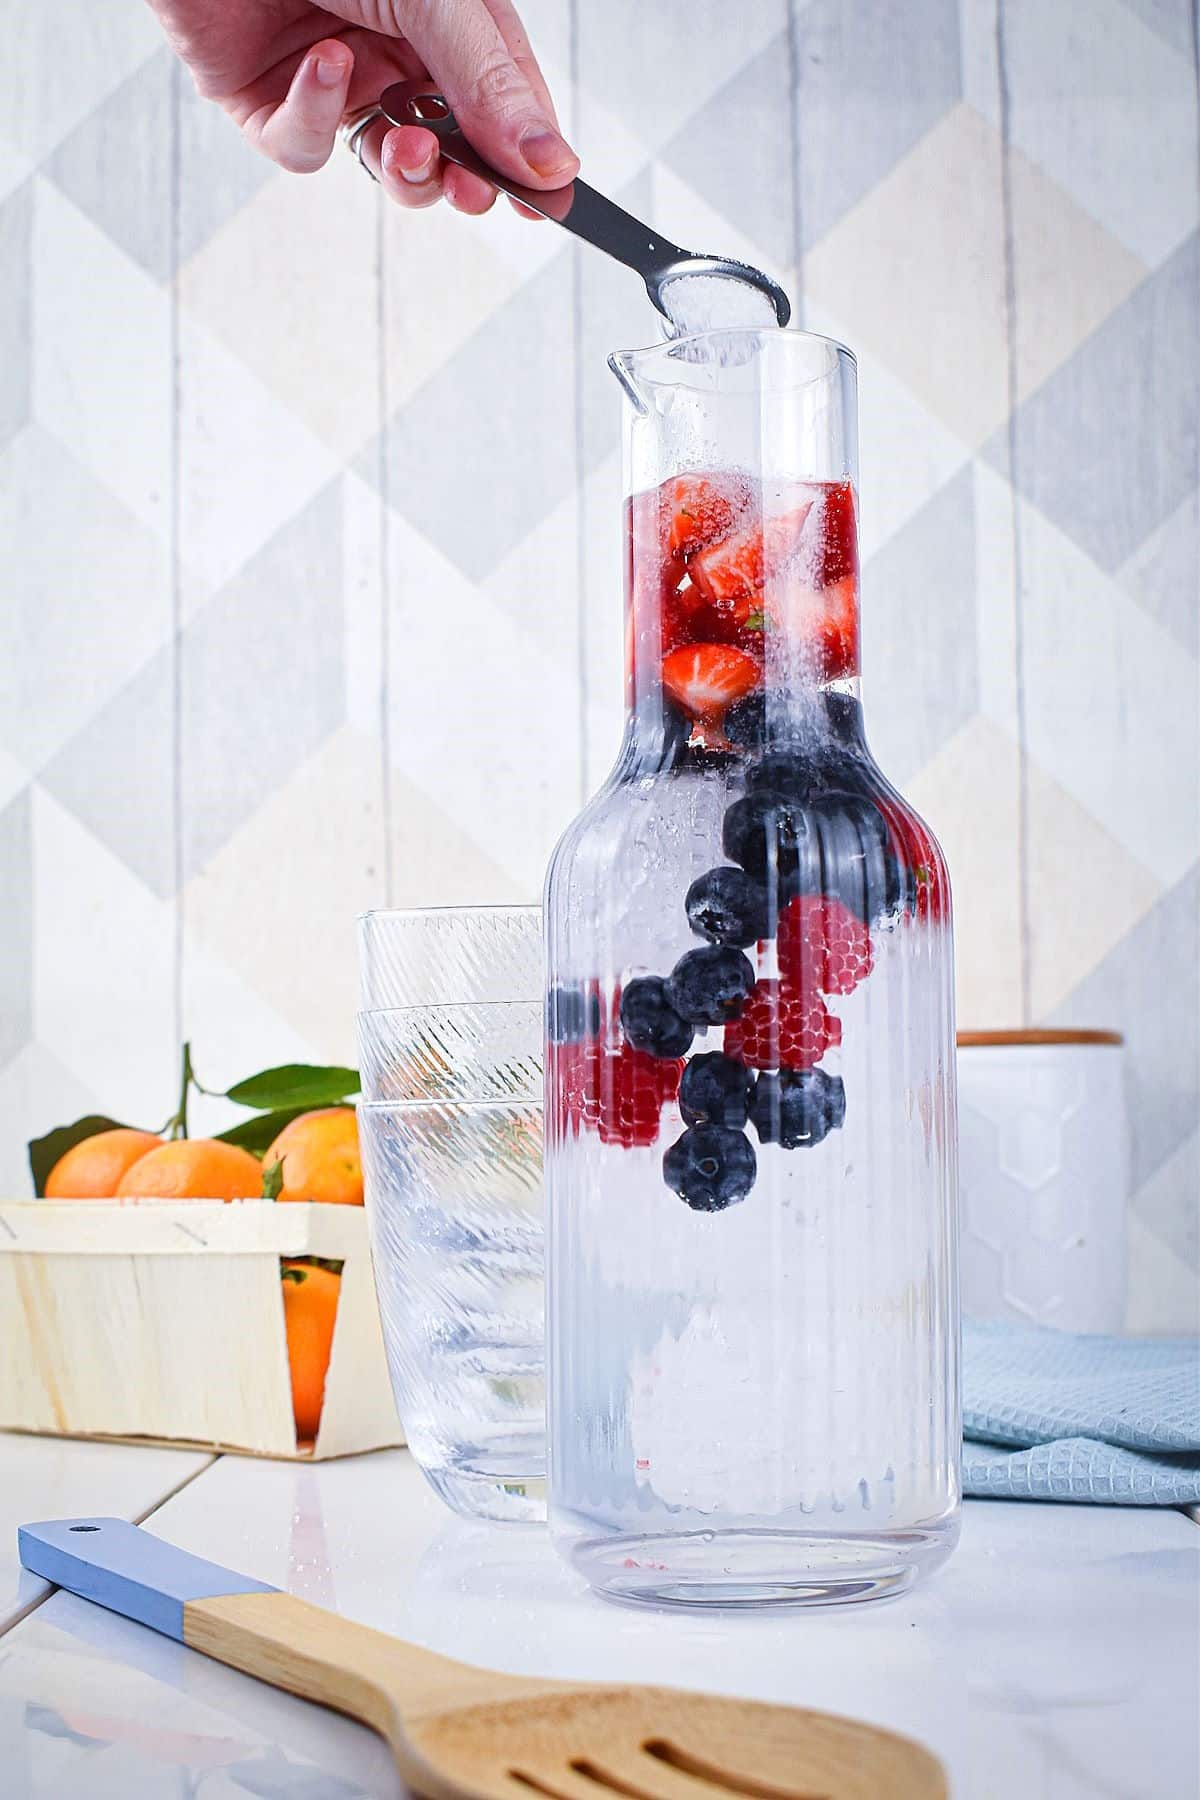
    Step 3. Optional: Add sugar or stevia, to taste, and mix it well until dissolved. This is also great without any sugar added!

    Fruit infused water in glass pitcher.

    Step 4. Let it chill and infuse for at least 1 hour in the refrigerator.

    Fruit infused water in pitcher, pouring into glass.

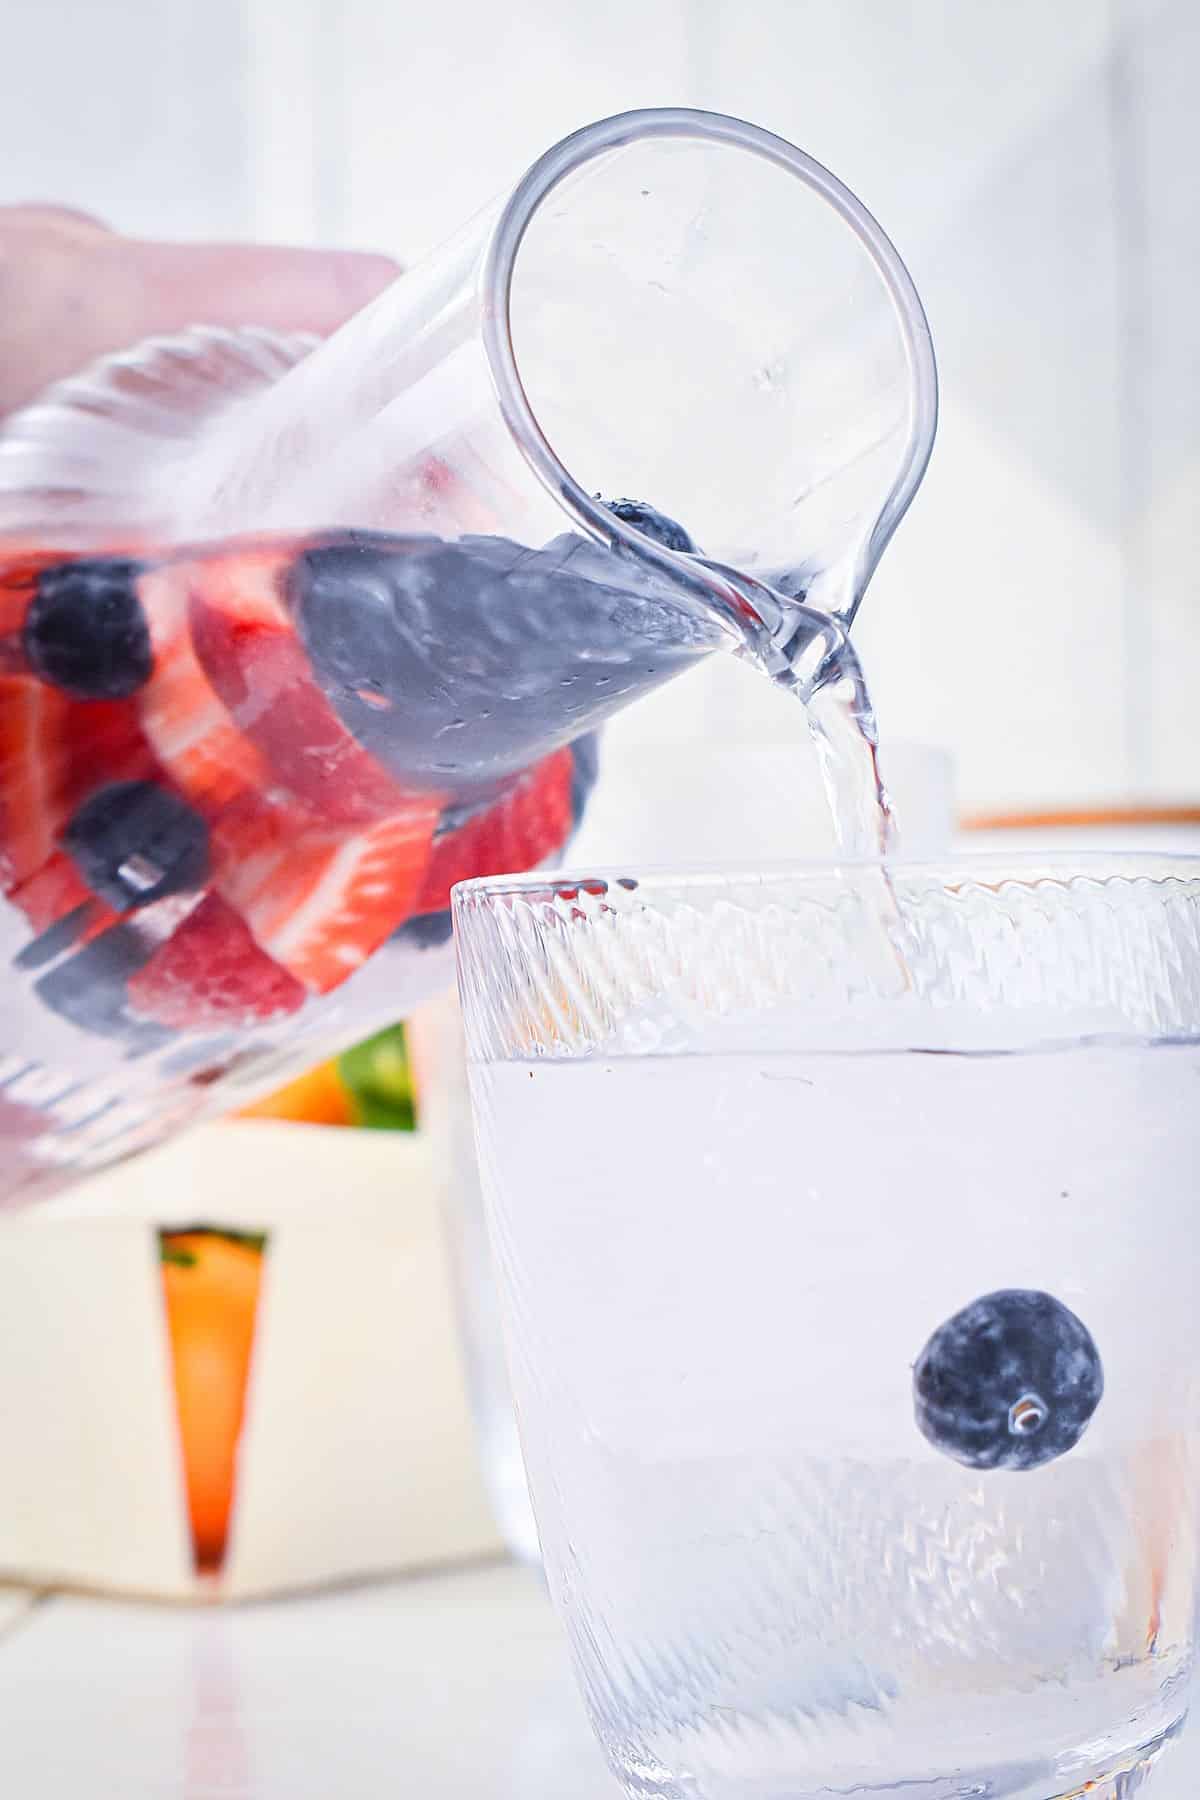
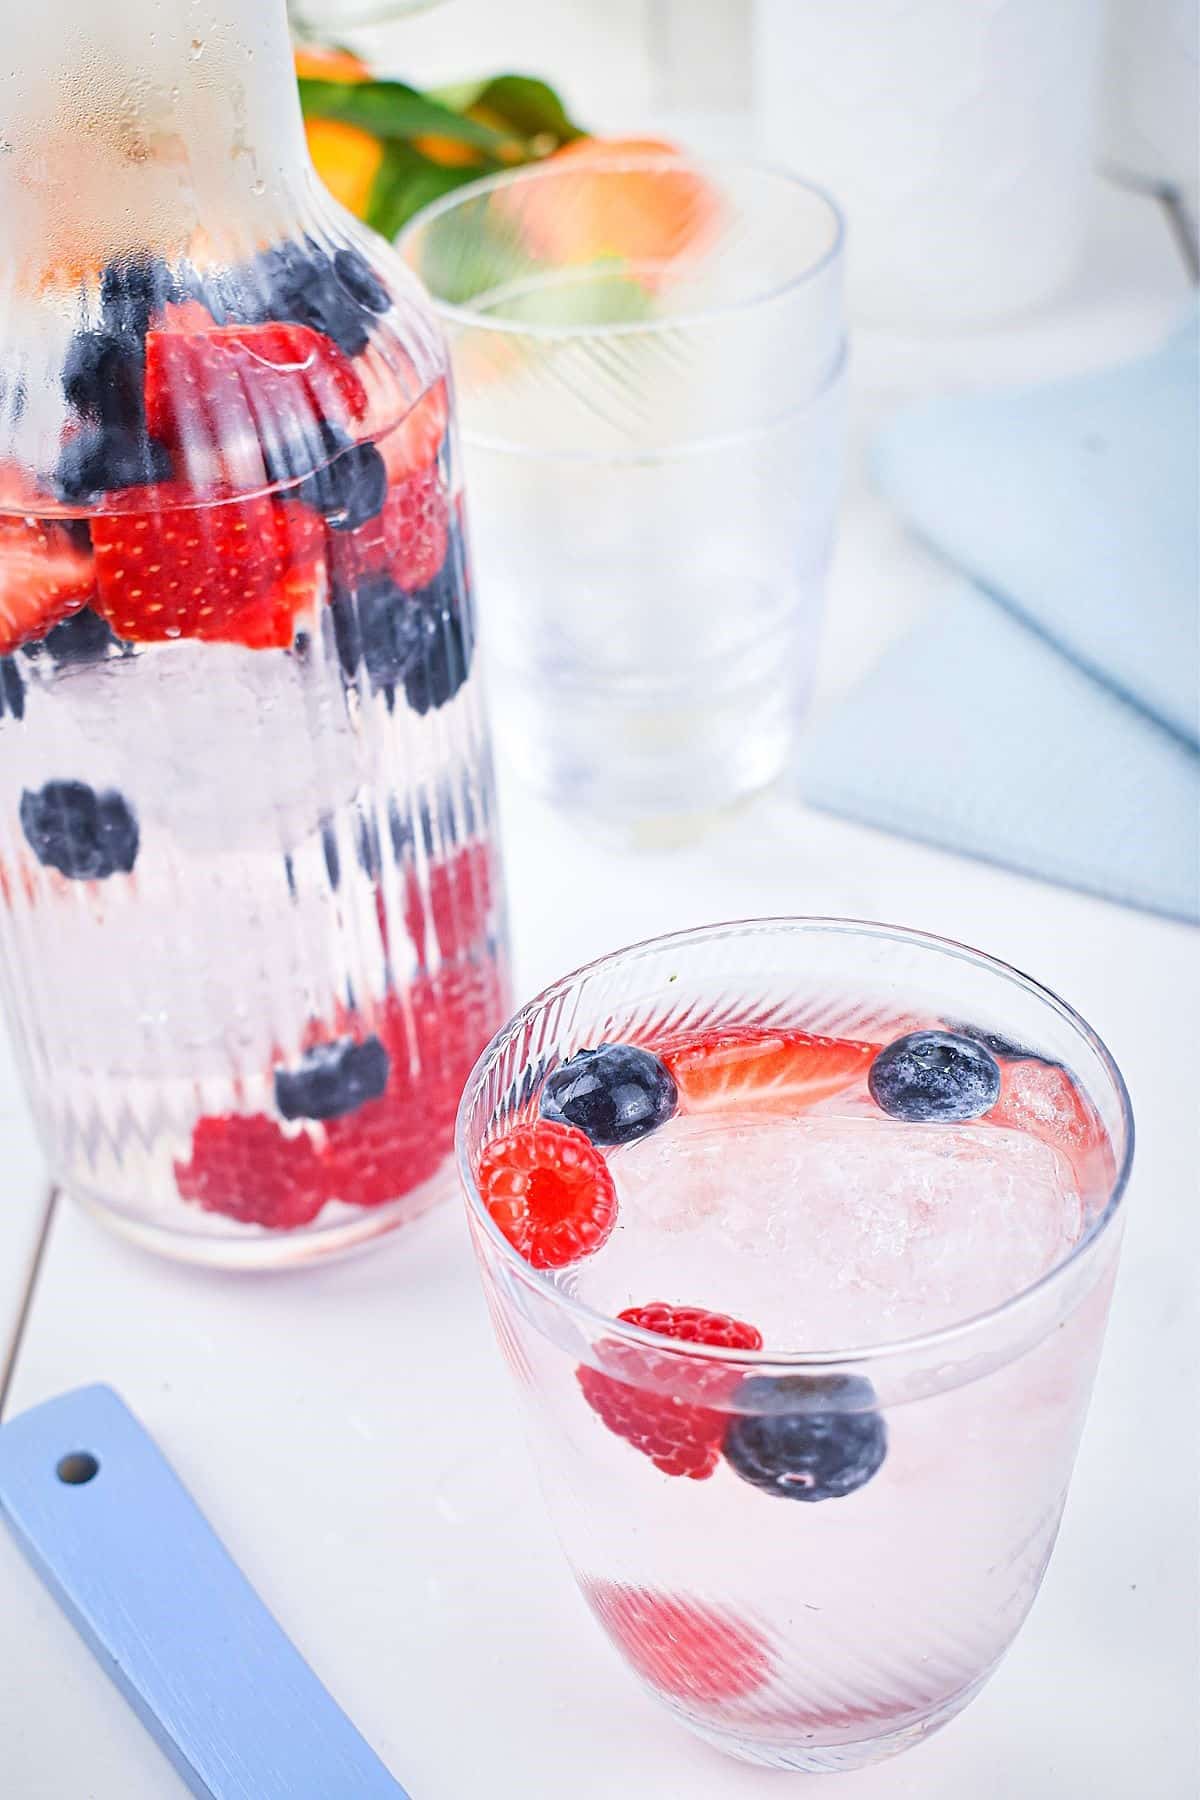
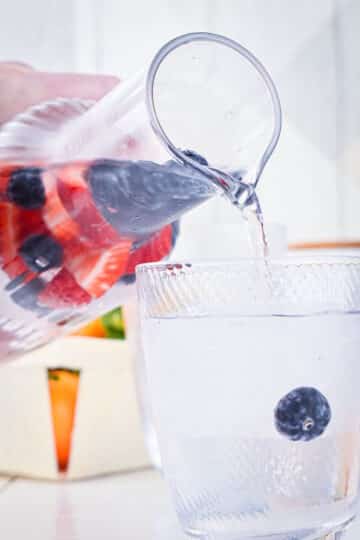
    Step 5. Serve in glasses with more ice.

    Joss' Tips

    • Slicing or chopping the fruit will allow the fruit to release more flavor into the water quicker (small berries can be left whole or just cut in half).
    • Make sure the fruit is nice and ripe for best flavor!
    • You can actually refill the container with water 1-2 times using the same fruit before the flavors diminish.

    Water Infusion FAQs

    How long should you let fruit infuse in water?

    The fruit should infuse in the water for at least 1 hour or until you can taste the fruity flavors.

    How long does fruit infused water last?

    Your infused water can last up to 3 to 4 days, depending on the type of ingredients you're using. However, if you plan on storing it longer than 24 hours, be sure to remove the fruit from the water. Removing the fruit will help prevent the fruit from decomposing and giving the water an unpleasant taste.

    What is the best fruit to put in water?

    Fruits with strong flavor, such as citrus fruit, work very well to infuse water, as do cucumbers and fresh herbs--like mint and rosemary.

    Citrus infused water in glass with ice.

    ❤️More Fruity Recipes You Will Love

    • Blackberry smoothie bowl with fruit and seed toppings and a watermelon popsicle.
      Blackberry Watermelon Smoothie Bowl
    • Fruit salad in a glass dish on white tile.
      How to Make Fruit Salad
    • Iced peach green tea in glass with straw and peach garnish.
      Iced Peach Green Tea
    • Blackberry galette with brie cheese and thyme in cast iron pan.
      Blackberry Brie Galette

    Which of these 🍓fruit-infused water combinations did you try? If you tried this recipe tutorial for How to Make Fruit-Infused Water or any other recipe on my website, please leave a 🌟 star rating and let me know how it went in the 📝 comments below. And please share the recipe!

    📋Recipe

    Fruit infused water with berries in glass pitcher.
    Print Pin
    4.86 from 7 votes

    How to Make Fruit-Infused Water

    Staying hydrated doesn't have to be a bore. Give your water some pizazz with fruit infusion. I'm going to show you, step by step, how to make fruit-infused water in a variety of combinations.
    Course Drinks
    Cuisine American
    Diet Low Salt, Vegan, Vegetarian
    Prep Time 5 minutes minutes
    Chill Time 1 hour hour
    Total Time 1 hour hour 5 minutes minutes
    Servings 8 cups
    Calories 24kcal
    Author Joss Dyckson

    Equipment

    • Pitcher, Glass Jars or Infuser Water Bottle

    Ingredients

    • 8 cups water
    • ice
    • fruit see combinations below
    • sugar or stevia for sugar free--optional

    Fruit Combination 1: Mixed Berry

    • 1 cup blueberries
    • 1 cup raspberries
    • 1 cup strawberries sliced

    Fruit Combination 2: Minty

    • 1 cup pineapple chunks
    • ½ cucumber sliced thinly
    • 1 bunch mint leaves

    Fruit Combination 3: Citrus

    • 1 orange in wedges
    • 1 lemon in wedges
    • 1 tangerine in wedges
    • fresh orange and/or lemon juice to taste--optional
    US Customary - Metric

    Instructions

    • Fill a big jar or pitcher with ice (leaving some room for the fruit). Add your favorite fruit combination from above.
      Ice and berries in pitcher.
    • Fill the rest of the pitcher with water. Use a wooden spoon to gently stir the water and fruit together.
      Water pouring into pitcher of fruit.
    • Add sugar or stevia, to taste, and mix it well until dissolved. This is also great without any sugar added!
      Fruit infused water with sugar in pitcher.
    • Let it chill and infuse for at least 1 hour in the refrigerator.
      Fruit infused water in glass pitcher.
    • Serve with more ice.
      Fruit infused water in pitcher, pouring into glass.

    Notes

    • The nutrition information is provided for Fruit Combination 1: Mixed Berry, without the added sugar because it is optional.
    • You can remove the fruit from the water after 12 hours and within 24 hours to keep the beverage fresh for longer. Store in the fridge for up to 3 to 4 days.
    • Fruits with strong flavor, such as citrus fruit, work very well to infuse water, as do cucumbers and fresh herbs--like mint and rosemary. When the fruits are sliced before added to the water, they release their flavors quicker.
    • Slicing or chopping the fruit will allow the fruit to release more flavor into the water quicker (small berries can be left whole or just cut in half).
    • Make sure the fruit is nice and ripe for best flavor!
    • You can actually refill the container with water 1-2 times using the same fruit before the flavors diminish.

    Nutrition

    Calories: 24kcal | Carbohydrates: 6g | Protein: 1g | Fat: 1g | Saturated Fat: 1g | Sodium: 13mg | Potassium: 64mg | Fiber: 2g | Sugar: 3g | Vitamin A: 10IU | Vitamin C: 16mg | Calcium: 14mg | Iron: 1mg

    St. Patrick’s Day Beef and Guinness Stew

    March 4, 2020 by Joss Dyckson 1 Comment

    My library of electric skillet recipes is as vast as it is delicious, so I think you'll really enjoy what I've cooked up for you today. Try out this amazing take on a St. Patrick's Day beef and Guinness stew, made in an electric frying pan, to celebrate the holiday.

    Beef black beer stew on black plate.

    St. Paddy's Day is a time for food, fun and festivities for everyone. Irish or not, you can still join in in all sorts of ways.

    Whether you're knocking back a pint at the local pub or staying in to eat something delicious, it's a good day to get down with some culture. I've got you covered on that latter point with this one-pan beef and black beer stew.

    It is a deliciously hearty beef meal (just like this beef and cabbage soup). No matter if you're hosting a party or just chilling out alone, it's the kind of dish that really makes you feel like celebrating when you eat it.

    For a side dish option, I highly recommend slow cooker cabbage and bacon. I usually serve it with this easy grasshopper pie for dessert.

    For a festive twist, top your accompanying drinks or desserts with green peppermint whipped cream and wash it all down with a black fog cocktail for some extra black beer goodness.

    SUMMARIZE & SAVE THIS CONTENT ON

    ChatGPT
    Google AI
    Perplexity
    Grok
    [feast_advanced_jump_to]

    Ingredients

    Beef Guinness stew ingredients labeled on wooden background.
    • sirloin steaks - Top sirloin steaks are a type of beef cut that are tender and flavorful. They aren't great for slow-cooking, but work well in this quick-cooking stew.
    • bacon - Just pick your favorite or whatever you have on hand. Bacon helps add plenty of rich, smoky flavor to the stew.
    • beef broth - You can use regular or low-sodium if you prefer.
    • Guinness beer - Or your preferred black beer.

    *Check recipe card for full ingredients/amounts.

    Chef's Note: You can add an extra boost of flavor and texture with some root vegetables like baked turnip fries or even some cubed potatoes if you're into that.

    How to Make Beef and Guinness Stew

    Beef cubes in electric skillet.

    Step #1: Sear Beef. Heat the electric skillet to medium-high heat. Heat 2 tablespoons of olive oil in the skillet and add the beef. Fry until golden brown on all sides, remove from skillet and reserve.

    Veggies and bacon in electric skillet.

    Step #2: Cook veggies and bacon. Lower heat to medium and add the remaining 1 tablespoon olive oil. Add the onion, celery, carrots, bacon and garlic. Cook for 2 minutes.

    Beef stew ingredients in electric skillet.

    Step #3: Add broth. Add the flour and tomato paste and mix it around. Add 3 cups beef broth and the bay leaves. Return the beef to the skillet.

    Beef stew in electric skillet.

    Step #4: Add Guinness. Pour in the black beer.

    Stew in electric skillet, covered with a lid.

    Step #5: Cook on low. Cover and cook for about 40 minutes at low heat (200ºF) - if it starts to dry out, you can add more of the broth.

    Beef stew ladled onto black plate.

    Step #6: Serve. Discard bay leaves. Season with salt and pepper, if needed. Serve the Guinness Irish stew topped with fresh dill.

    Beef and Guinness Stew Storage

    • Store leftovers, covered, in the fridge for up to 3 to 4 days.
    • Reheat in the electric skillet over medium heat.
    • Beef and Guinness stew can also be frozen for up to 3 months.

    If you've got any other signature St. Paddy's Day or Irish dishes you want to learn to make, tell me about it in the comments.

    Beef black beer stew on black plate with skillet in background.

    ❤️ More Main Dishes You Will Love

    • Chicken and vegetable lo mein in red bowl with chopsticks.
      Homemade Chicken Vegetable Lo Mein
    • Creamy tuna macaroni casserole in baking dish.
      Creamy Tuna Macaroni Casserole
    • Grilled bison ribeye steak sliced on cutting board with spices on the side.
      Grilled Bison Ribeye Steaks
    • Grilled jerk pork tenderloin skewers on serving board with jerk sauce on the side.
      Grilled Jerk Pork Tenderloin Skewers (Kebabs)

    If you tried this St. Patrick's Day Skillet Beef & Guinness Stew Recipe or any other recipe on my website, please leave a 🌟 star rating and let me know how it went in the 📝 comments below. And please share the recipe!

    📋Recipe

    Beef black beer stew on black plate with fresh dill.
    Print Pin
    5 from 2 votes

    St. Patrick's Day Beef Guinness Stew

    Try out this amazing take on a St. Patrick's Day electric skillet beef Guinness stew to celebrate the holiday. It may not be a pot of gold, but even just one bite will make you feel like you've made it to the end of a rainbow.
    Course Main Course
    Cuisine Irish
    Prep Time 15 minutes minutes
    Cook Time 55 minutes minutes
    Total Time 1 hour hour 10 minutes minutes
    Servings 6
    Calories 557kcal
    Author Joss Dyckson

    Equipment

    • Electric Skillet

    Ingredients

    • 3 tablespoons olive oil divided
    • 2 ½ pounds top sirloin steaks cubed
    • 1 yellow onion chopped
    • 4 celery stalks chopped
    • 1 carrot chopped
    • 8 strips bacon chopped
    • 2 garlic cloves minced
    • ¼ cup flour
    • ¼ cup tomato paste
    • 3-4 cups beef broth
    • 3 bay leaves
    • 1 can Guinness beer or another black beer
    • salt and pepper
    • fresh dill to garnish
    US Customary - Metric

    Instructions

    • Heat the electric skillet to medium-high heat (375ºF). Heat 2 tablespoons of olive oil in the skillet and add the beef. Fry until golden brown on all sides, remove from skillet and reserve.
      2 ½ pounds top sirloin steaks
      Beef cubes in electric skillet.
    • Lower heat to medium (300ºF). In the same skillet, add the remaining 1 tablespoon olive oil. Add the onion, celery, carrots, bacon and garlic. Cook for 2 minutes.
      1 yellow onion, 4 celery stalks, 1 carrot, 8 strips bacon, 2 garlic cloves
      Veggies and bacon in electric skillet.
    • Add the flour and tomato paste and mix it around. Add 3 cups beef broth and the bay leaves. Return the beef to the skillet.
      ¼ cup flour, ¼ cup tomato paste, 3 bay leaves
      Beef stew ingredients in electric skillet.
    • Pour in the black beer.
      1 can Guinness beer
      Beef stew in electric skillet.
    • Cover and cook for about 40 minutes at low heat (200ºF)* - if it starts to dry out, you can add more of the broth.
      Stew in electric skillet, covered with a lid.
    • Discard bay leaves. Season with salt and pepper, if needed. Serve topped with fresh dill.
      Beef stew ladled onto black plate.

    Video

    Notes

    • *If the stew doesn't seem to be heating up at 200ºF, you can bring it up to 250ºF. Some electric skillets heat a little differently than others.
    • You can add an extra boost of flavor and texture with some root vegetables like cubed potatoes if you're into that.
    • Store leftovers, covered, in the fridge for up to 3 to 4 days.
    • Reheat in the electric skillet at medium heat.
    • It can also be frozen for up to 3 months.

    Nutrition

    Calories: 557kcal | Carbohydrates: 13g | Protein: 49g | Fat: 32g | Saturated Fat: 9g | Cholesterol: 140mg | Sodium: 922mg | Potassium: 1041mg | Fiber: 2g | Sugar: 3g | Vitamin A: 1999IU | Vitamin C: 5mg | Calcium: 88mg | Iron: 4mg

    Freezer Meal: Turkey Meatballs in Tomato Sauce

    February 26, 2020 by Joss Dyckson Leave a Comment

    These turkey meatballs with a herbaceous tomato sauce are a quick and easy freezer meal that can save you time on those busy evenings. In our home, we have a lot of nights like that, which is why we prepare ahead with some freezer friendly meals that you can just pop in the oven!

    Turkey meatballs in tomato sauce in bowl with rice on the side.
    [feast_advanced_jump_to]

    About This Frozen Turkey Meatballs Meal

    • Make-ahead freezer meals are a great alternative to buying prepackaged meals from the grocery store that may contain undesirable ingredients. You will see how easy it is to make your own delicious meatballs and sauce for that crazy on-the-go lifestyle.
    • Tastes fresh: Many cooked meals are easily freezable, such as this ground beef stir fry recipe but with this recipe we are freezing the meatballs raw and cooking later for the freshest taste possible.
    • Bulk-worthy: You can double or triple this meatball recipe for several make-ahead meals, if your freezer has the room for it.
    • Frozen turkey meatballs are very versatile. You can add your favorite herbs and seasonings like fresh dill (just like I do in these amazing Mediterranean meatballs). Turkey meatballs can be served with pasta, over rice or on their own as an appetizer. Another bonus to this recipe is you can adjust the seasoning and flavors to your liking.

    Ingredients

    Frozen turkey meatballs and tomato sauce ingredients labeled.
    • ground turkey - If you aren't keen on turkey, you could always swap it out for ground beef, chicken, a pork/beef mixture or you could even use bison for a bison meatball recipe.
    • button mushrooms - Make sure you clean the dirt off by lightly rubbing the mushrooms with a dry paper towel.
    • frozen chopped spinach - Thawed and drained of liquid. You can do this by placing the frozen spinach in a strainer and running warm water over the spinach. Gently turn the spinach until thawed and let the liquid drain in the sink.
    • tomato sauce - You will need a plain, canned tomato sauce (not a prepared pasta sauce) because it will be used as a base for the homemade sauce in this recipe.
    • bread crumbs - Plain.
    • eggs (not pictured) - I forgot to add the eggs when taking the picture!

    *Check recipe card for ingredient amounts.

    How to Make Frozen Turkey Meatballs

    Preparation and Freezing Instructions

    Raw turkey meatballs on sheet pan.

    Step 1. Form the meatballs. In a bowl, mix all of the meatball ingredients until well combined. Shape them into balls and place onto wax paper-lined sheet pan. Freeze.

    Tomato sauce in pan.

    Step 2. Make the sauce. In a saucepan, heat the oil. Sauté the garlic and oregano for about 30 seconds. Add remaining sauce ingredients. Simmer until slightly thickened. Season, remove bay leaves and let cool.

    Raw turkey meatballs and tomato sauce in zip-top bags.

    Step 3. Transfer to freezer bags. Take the premade frozen turkey meatballs out of the freezer and transfer them from the sheet pan to a large zip-top freezer bag (about 10 x 10 inches). Pour the sauce in a separate medium zip-top bag (around 7 x 8 inches). Place the sauce bag inside the meatball bag and freeze.

    Chef's Note: Transferring the sauce to the bag can get messy! I recommend placing the opened zip-top bag in a bowl or glass to stand it upright and using a measuring cup or something with a lip to pour the sauce into the bag.

    Baking Instructions

    Baked turkey meatballs on sheet pan.

    Step 1. Bake the frozen turkey meatballs. When it's time to prepare the meal - bake the frozen meatballs in the oven at 400ºF for around 25 minutes, until no longer pink in the center.

    Tomato sauce package in bowl of cool water.

    Step 2. Thaw and heat the sauce. Thaw the sauce package in cold water. Then open it up and heat the sauce in a large saucepan over medium heat.

    Turkey meatballs in tomato sauce in white bowl.

    Step 3. Serve. Add the turkey meatballs to the tomato sauce and serve over pasta, rice, or on their own.

    Joss' Pro Tips

    • Use a cookie scoop for perfectly sized frozen turkey meatballs. I love using a cookie scoop to make perfectly sized and evenly shaped meatballs. Simply scoop, give them a quick roll in your hands, and place them on the sheet pan for easy, uniform portions!
    • Freeze the meatballs individually first. When you freeze the meatballs individually on wax paper before adding them to the zip-top bag, this helps prevent them from sticking together when it's time to separate them for baking.
    • Cool the sauce. You want to make sure the sauce cools before pouring it into a freezer bag, but remember not to leave it out for more than 2 hours to avoid harmful bacteria.
    • Label the bags. Be sure to label the bags with the date of preparation so that you know when they need to be cooked by.

    Freezer Meatballs FAQs

    How long can you store raw frozen meatballs?

    For best results, raw meatballs can be frozen for up to two months.

    Can raw meatballs be cooked from frozen?

    Yes! Raw meatballs can be cooked from frozen, making them an easy and convenient freezer meal. Just place the frozen meatballs on a baking sheet and pop them into a 400°F oven for about 25 minutes or until the internal temperature reaches 165°F.

    How do you defrost frozen raw meatballs?

    You can defrost frozen, raw meatballs in the fridge overnight for food safety purposes. Do not leave them out at room temperature. Make sure you cook them within the next 1 to 2 days once thawed.

    How long do cooked turkey meatballs last in the fridge?

    Up to 3 to 4 days in a covered container.

    Turkey meatballs in tomato sauce in bowl with fresh parsley.

    More Easy Meat-Based Meals

    • Beef black beer stew on black plate with fresh dill.
      St. Patrick's Day Beef and Guinness Stew
    • Bison chanterelle mushroom meat sauce in jar.
      Bison and Chanterelle Meat Sauce
    • Beef and broccoli in black bowl.
      Easy Sheet Pan Beef and Broccoli
    • Blackened chicken breast on plate with lime wedges and cilantro.
      Cajun Blackened Chicken Breast

    If you tried this 🍗 Turkey Meatballs in Tomato Sauce Freezer Meal Recipe or any other recipe on my website, please leave a 🌟 star rating and let me know how it went in the 📝 comments below. And please share the recipe!

    📋Recipe

    Turkey meatballs in tomato sauce in bowl with fresh parsley.
    Print Pin
    5 from 1 vote

    Freezer Meal: Turkey Meatballs in Tomato Sauce

    Turkey and mushroom meatballs with a herbaceous tomato sauce is a quick and easy freezer meal that can save you time on those busy evenings. You can serve them with pasta, over rice or on their own as an appetizer.
    Course Appetizer, Main Course, Side Dish
    Cuisine American
    Prep Time 20 minutes minutes
    Cook Time 10 minutes minutes
    Cooling Time 30 minutes minutes
    Total Time 1 hour hour
    Servings 6
    Calories 246kcal
    Author Joss Dyckson

    Equipment

    • Large zip-top freezer bag
    • Medium zip-top freezer bag

    Ingredients

    For the Turkey Meatballs

    • 1 pound ground turkey
    • 1 cup button mushrooms finely chopped
    • 4 ounces frozen chopped spinach thawed and drained of liquid (1 ¼ cups)
    • 2 eggs beaten
    • ½ cup bread crumbs plain
    • ¼ cup Parmesan cheese grated
    • 1 tablespoon onion powder
    • 2 garlic cloves chopped
    • 1 ½ teaspoons salt
    • ¼ teaspoon pepper

    For the Sauce

    • 2 tablespoons olive oil
    • 1 garlic clove minced
    • 1 teaspoon dried oregano
    • 3 cups tomato sauce
    • 2 tablespoons fresh parsley chopped
    • 2 bay leaves
    • salt and pepper to taste
    US Customary - Metric

    Instructions

    Freezer Prep

    • In a bowl, mix all of the meatball ingredients until well combined.
    • Shape into 1 ½ inch balls. Place them on a sheet pan lined with wax paper, making sure they aren't touching. Transfer to the freezer until sauce is prepared.
    • In a saucepan, heat the olive oil to medium heat. Sauté the garlic and oregano for about 30 seconds.
      2 tablespoons olive oil, 1 garlic clove, 1 teaspoon dried oregano
    • Add remaining sauce ingredients. Bring to a boil and then simmer, uncovered, for around 8 minutes, or until slightly thickened. Season with salt and pepper, to taste. Remove bay leaves and let cool.
      3 cups tomato sauce, 2 tablespoons fresh parsley, 2 bay leaves
    • Take the meatballs out of the freezer and transfer them from the sheet pan to a large zip-top freezer bag (about 10 x 10 inches). Pour the sauce in a separate medium zip-top bag (around 7 x 8 inches). Place the sauce bag inside the meatball bag and freeze.

    Baking Instructions

    • When it's time to prepare the meal - place the frozen meatballs in a shallow baking pan. Bake uncovered in the oven at 400ºF for around 25 minutes, or until they are no longer pink in the center and reach a minimum temperature of 165°F.
    • While they're baking, thaw the sauce package in cold water. Then open it up and heat the sauce in a large saucepan over medium heat.
    • Add the meatballs to the sauce and serve over pasta, rice, or on their own.

    Notes

    • Yield: This recipe makes about 36 meatballs.
    • Use a cookie scoop: I love using a cookie scoop to make perfectly sized and evenly shaped meatballs. Simply scoop, give them a quick roll in your hands, and place them on the sheet pan for easy, uniform portions!
    • Freezing Tip: When you freeze the meatballs individually on wax paper before adding them to the zip-top bag, this helps prevent them from sticking together when it's time to separate them for baking.
    • Cool the Sauce: You want to make sure the sauce cools before pouring it into a freezer bag, but remember not to leave it out for more than 2 hours to avoid harmful bacteria.
    • Best Before: For best results, the raw meatballs/sauce can be frozen for up to two months.
    • Fridge Storage: Cooked turkey meatballs will last up to 3 to 4 days in the fridge. Store them in a covered container.
    • Label the Bags: Be sure to label the bags with the date of preparation so that you know when they need to be cooked by.

    Nutrition

    Calories: 246kcal | Carbohydrates: 17g | Protein: 25g | Fat: 10g | Saturated Fat: 2g | Polyunsaturated Fat: 2g | Monounsaturated Fat: 5g | Trans Fat: 0.02g | Cholesterol: 100mg | Sodium: 1280mg | Potassium: 779mg | Fiber: 3g | Sugar: 6g | Vitamin A: 3001IU | Vitamin C: 12mg | Calcium: 121mg | Iron: 3mg

    How to Shred Cabbage 3 Ways

    February 24, 2020 by Joss Dyckson 2 Comments

    Have some cabbage that you need to shred? Here's a great tutorial on how to shred cabbage no matter what tools you have. You can use a box grater, a mandolin or even just a knife.

    Red and green cabbage shredded in bowls.

    Use a box grater if you need smaller pieces, a mandolin if you want your shreds to stay long and thin, or a knife if you want more control over the size of your cabbage pieces.

    These methods work with multiple types of cabbage, and can also be used to shred Brussels sprouts.

    Pretty soon you'll be making kimchi coleslaw, beef and cabbage soup and cabbage rolls before you know it!

    [feast_advanced_jump_to]

    Ingredients

    Red and green cabbages.
    • red or green cabbage

    Equipment

    Your Pick of Cutting Tools:

    Chef's Knife & Cutting Board

    Chefs Knife and knife sharpener on cutting board.

    Box Grater

    Box grater on white background.

    Mandolin

    Mandolin on white background.

    Prepare Cabbage

    No matter what method you choose to shred your cabbage, follow these prepping steps first.

    Red cabbage leaves getting pulled off.

    Step #1. Wash the cabbage and remove the outer leaves.

    Red cabbage bottom cut off with knife.

    Step #2. Place the cabbage on a cutting board and cut the bottom off.

    Red cabbage with knife down the middle.

    Step #3. Make sure the cabbage is sturdy and flat against the cutting board and cut it in half.

    Red cabbage getting cored with knife.

    Step #4. Cut out the white solid core by carefully making 2 diagonal cuts towards the center.

    Red cabbage without core.

    Chef's Note: Sometimes it is easier to remove the core with a diagonal cut after it has been cut into quarters. Do what works best for you.

    Red cabbage getting sliced into quarters.

    Step #5. Cut the cabbage in half again, making quarters.

    Option 1. Use a Knife

    A knife will give you more control over the thickness, but might take more time to achieve the desired results than some of the other tools. You may find it more difficult to get very fine slices with a knife.

    Once you have followed the steps above to prep the cabbage into quarters, continue here:

    Red cabbage shredded with knife on cutting board.

    Step #1. Make sure the cabbage quarter is flat and steady on the cutting surface. Begin slicing it into thin strips with a chef's knife.

    Red cabbage getting shredded with knife.

    Step #2. Once it becomes hard to grasp, turn it so that it is flat against the cutting board and finish slicing.

    Red cabbage shredded on black cutting board.

    Step #3. If you want to shred the pieces further, cut them in half horizontally and then continue cutting vertically until they are as fine as needed.

    Option 2. Use a Box Grater

    Green cabbage quarter on cutting board with box grater.

    A box grater is going to give you a very fine, minced result that is perfect for slaw.

    Once you have followed the steps above to prep the cabbage into quarters, continue here.

    Green cabbage against box grater.

    Step #1. Shred the cabbage with a box grater on the side with large holes, by placing the cabbage quarter flat against the holes with your hand and using a forceful downward sliding motion. Repeat.

    Green cabbage shredded with box grater.

    Chef's Note: This will produce a very fine shred. Carefully keep your fingers away from the grater holes and stop before you get to the end of the cabbage.

    Green shredded cabbage on black cutting board.

    Step #2. Your shredded cabbage is ready to use.

    Option 3. Use a Mandolin

    Red cabbage, mandolin and glove.

    A mandolin can be adjusted to different thicknesses and is great for very thin, uniform slices of cabbage. This is probably the most common way I shred cabbage, especially if I'm making my halibut tacos with mango salsa and slaw.

    Once you have followed the steps above to prep the cabbage into quarters, continue here:

    Red cabbage against mandolin with hand guard.

    Step #1. Set the mandolin to desired thickness. Place the cabbage flat against the mandolin and place the guard over top of the cabbage.

    Red cabbage in hand with cut-resistant glove against mandolin.

    Step #2. Carefully shred the cabbage with the mandolin by moving it up and down over the blade, using the guard to protect your fingers. You can also use a cut-resistant glove.

    Joss' Tips

    • Vegetables shred best when they are cold so keep the cabbage in the fridge until you are ready to use it.
    • After washing the cabbage, make sure to dry it well with a clean kitchen towel so that it shreds properly.
    • When using a knife, make sure your fingers are holding the cabbage in a 'claw' position so that you protect them (curl fingertips inward).

    Ways to Use Shredded Cabbage

    Now that you have your shredded cabbage, there are a lot of great ways you can use it.

    • For soup, adding shredded cabbage is a good way to sneak in some more servings of vegetables, as well as being absolutely delicious.
    • Need a cool and creamy side for dinner? Shred some cabbage finely and throw together a quick coleslaw.
    • Make this ground beef stir fry with rainbow veggies.
    • If you have some more time on your hands, homemade sauerkraut is amazing and incredibly nutritious.
    • Feeling adventurous? Shred up some napa cabbage and make kimchi, the spicy Korean version of sauerkraut.
    Red and green cabbage shredded on white tile background.

    Storage

    • In the Fridge: Once you've shredded your cabbage, you can store it raw in a tightly sealed container or bag in the refrigerator crisper, but only for 2 to 3 days. It will start to brown on the areas that have been cut if you store it any longer.
    • In the Freezer: If you want to freeze your shredded cabbage, blanch it before cooling it in ice water. Pat your cabbage dry, put it in freezer bags (making sure to squeeze out all the air before sealing the bags) and pop the bags into the freezer. Of course, only use your frozen green or purple cabbage in recipes that don't call for raw cabbage.

    Cabbage Shredding FAQs

    What is the easiest way to shred cabbage?

    It depends on the what you are using the cabbage for, but I think it's easiest to use a mandolin to shred cabbage. It's quick, easy and makes consistent, thin cuts.

    Can I shred cabbage in a food processor?

    Yes, you can use the shredding disc attachment that usually comes with the food processor.

    Why do you soak shredded cabbage in water?

    To keep the shredded cabbage fresh and crispy, you can store it in a bowl of water in the fridge, but be sure to drain and dry it really well before using.

    Green and red cabbage shredded in bowl.

    More Recipe Tutorials to Consider

    • Fruit infused water with berries in glass pitcher.
      How to Make Fruit-Infused Water
    • Taco in a bag with forks and toppings on the side.
      How to Make Walking Tacos (aka Taco in a Bag)
    • Cooked barley on a spoon.
      How to Cook Barley
    • Butternut squash sliced open on cutting board.
      How to Clean, Save and Roast Butternut Squash Seeds

    If you tried this recipe tutorial for How to Shred Cabbage 3 Ways or any other recipe on my website, please leave a 🌟 star rating and let me know how it went in the 📝 comments below. And please share the recipe!

    📋Recipe

    Red cabbage shredded with knife.
    Print Pin
    5 from 1 vote

    How to Shred Cabbage (3 Ways)

    Have some cabbage that you need to shred? Here's a guide on how to shred cabbage no matter what tools you have. You can use a box grater, a mandolin or even just a knife.
    Course Salad, Side Dish
    Cuisine American
    Diet Vegan, Vegetarian
    Prep Time 5 minutes minutes
    Total Time 5 minutes minutes
    Servings 1
    Calories 18kcal
    Author Joss Dyckson

    Equipment

    • Chef's Knife
    • Cutting board
    • Optional: Box Grater
    • Optional: Mandolin
    • Optional: Cut-Resistant Glove

    Ingredients

    • 1 head cabbage red or green

    Instructions

    Prep the Cabbage: Do this Step Before Any Cutting Method

    • Wash the cabbage and remove the outer leaves.
      Red cabbage leaves getting pulled off.
    • Place the cabbage on a cutting board and cut the bottom off.
      Red cabbage bottom cut off with knife.
    • Make sure the cabbage is sturdy and flat against the cutting board and cut it in half.
      Red cabbage with knife down the middle.
    • Cut out the white solid core by carefully making 2 diagonal cuts towards the center. (Sometimes it is easier to remove the core with a diagonal cut after it has been cut into quarters. Do what works best for you.)
      Red cabbage without core.
    • Cut the cabbage in half again, making quarters.
      Red cabbage getting sliced into quarters.

    Option #1: With a Knife

    • Make sure the cabbage is flat and steady on the cutting surface. Begin slicing it into thin strips with a chef's knife.
      Red cabbage shredded with knife on cutting board.
    • Once it becomes hard to grasp, turn it so that it is flat against the cutting board and finish slicing.
      Red cabbage getting shredded with knife.
    • If you want to shred the pieces further, cut them in half horizontally and then continue cutting vertically until they are as fine as needed.
      Red cabbage shredded on black cutting board.

    Option #2: With a Box Grater

    • Shred the cabbage with a box grater on the side with large holes, by placing the cabbage quarter flat against the holes with your hand and using a forceful downward sliding motion. This will produce a very fine shred. Carefully keep your fingers away from the grater holes and stop before you get to the end of the cabbage.
      Green cabbage shredded with box grater.

    Option #3: With a Mandolin

    • Set the mandolin to desired thickness. Place the cabbage flat against the mandolin and place the guard over top of the cabbage.
      Red cabbage, mandolin and glove.
    • Carefully shred the cabbage with the mandolin by moving it up and down over the blade, using the guard to protect your fingers. You can also use a cut-resistant glove.
      Red cabbage against mandolin with hand guard.
    • Your cabbage is now ready to use!
      Red and green cabbage shredded on white tile background.

    Notes

    • These methods work with multiple types of cabbage, and can also be used to shred Brussels sprouts.
    • A knife will give you more control over the thickness, but might take more time to achieve the desired results than some of the other tools. You may find it more difficult to get very fine slices with a knife.
    • A box grater is going to give you a very fine, minced result that is perfect for slaw.
    • A mandolin can be adjusted to different thicknesses and is great for very thin, uniform slices of cabbage.
    • Vegetables shred best when they are cold so keep the cabbage in the fridge until you are ready to use it.
    • After washing the cabbage, make sure to dry it well with a clean kitchen towel so that it shreds properly.
    • When using a knife, m ake sure your fingers are holding the cabbage in a 'claw' position so that you protect them (curl fingertips inward).
    • You can store shredded cabbage in the fridge for up to 2 to 3 days. It will start to brown on the areas that have been cut if you store it any longer. Make sure it is in an airtight container or bag in the crisper or coldest part of your fridge.
    • If you want to freeze your shredded cabbage, blanch it before cooling it in ice water. Pat your cabbage dry, put it in freezer bags (making sure to squeeze out all the air before sealing the bags) and pop the bags into the freezer. Of course, only use your frozen cabbage in recipes that don't call for raw cabbage.

    Nutrition

    Calories: 18kcal | Carbohydrates: 4g | Protein: 1g | Fat: 0.1g | Saturated Fat: 0.02g | Polyunsaturated Fat: 0.01g | Monounsaturated Fat: 0.01g | Sodium: 13mg | Potassium: 119mg | Fiber: 2g | Sugar: 2g | Vitamin A: 69IU | Vitamin C: 26mg | Calcium: 28mg | Iron: 0.3mg

    Electric Skillet Stuffed French Toast

    February 19, 2020 by Joss Dyckson Leave a Comment

    In my house, we love French toast and we love Nutella, so I combined these two goods in delicious ways with this recipe for electric skillet French toast stuffed with chocolate-hazelnut spread.

    French toast stuffed with Nutella and topped with apples and icing sugar.

    Filled French toast is a thing of beauty, this Nutella sandwich being no exception. Crispy and sweet on the outside, soft and pillowy on the inside, and all of it complimented by that deliciously nutty and chocolaty hazelnut spread. It's my kind of full breakfast.

    I make them in an electric skillet for convenience and even heating. If you don't have one yet, take a look at some of my top electric frying pan reviews or, more specifically, the best ceramic electric skillets.

    I also have many more electric skillet breakfast recipes for you to try.

    [feast_advanced_jump_to]

    What is Stuffed French Toast?

    French toast is one of those universally delicious foods. Plain or fancy, simple or complicated, syrup or no; there's really no wrong way to go about it. That being said, there definitely are some ways of preparing this tasty treat that one might consider a bit more decadent.

    Enter stuffed French toast: a delicious creation sandwiching two slices of French toast together stuffed with a hazelnut chocolate spread filling. It's basically a sweet French toast sandwich.

    Ingredients

    • French baguette - Cut into thick slices.
    • chocolate hazelnut spread - Such as Nutella or store-brand spread.
    • eggs - I use large eggs.
    • milk - The type of milk you use for French toast can influence the texture and flavor of the dish. Whole milk is the most commonly used type of milk for French toast. Its higher fat content adds richness and creates a creamy custard mixture. Half-and-half or heavy cream will make the French toast even richer and creamier. 2%, 1% or skim milk will result in a lighter French toast.
    • white sugar - Or an alternative sweetener.
    • butter - To fry the French toast with.
    • optional toppings - Powdered sugar and berries or apple slices.

    *Check recipe card for ingredient amounts.

    Tweaks

    Here are some topping suggestions for your French toast:

    • berries
    • apple slices
    • powdered sugar
    • honey
    • maple syrup (check out how to make maple syrup here)

    You can also mix up this recipe by adding a secondary filling:

    • peanut butter - besides adding peanut butter to soup, this is my second favorite way to use it
    • jelly
    • marshmallow fluff
    French toast stuffed with Nutella on cutting board.

    How to Make it

    1. Stuff the bread. Heat electric skillet to 300ºF (medium heat). Spread some chocolate hazelnut spread over one slice of French bread and cover with the other slice. Press them together with your hands. Repeat with remaining slices of bread.
    2. Soak. In a bowl, mix together the eggs, milk and white sugar. Soak the sandwiches in the egg mixture, until they have absorbed the liquid on both sides.
    3. Cook. Melt the butter in the skillet. Add the sandwiches and cook for around 2 minutes per side, or until golden brown.
    4. Serve. Serve topped with fresh berries or apple slices and powdered sugar, if desired.

    Recipe FAQs

    What temperature should my electric skillet be for French toast?

    French toast does well at a temperature that ranges between 300°F to 325°F (medium heat in an electric skillet).

    How long can you store leftovers?

    Cover leftover French toast and store it in the fridge for up to 3 days.

    How do you reheat the leftovers?

    Reheat in the skillet over medium to medium-low heat, flipping once, until heated through. You can also microwave them for a short time but they won't retain their crispiness.

    Electric skillet French toast stuffed with Nutella and topped with apples on cutting board.

    More Electric Skillet Recipes to Try

    • Electric skillet biscuits in a wooden tray.
      Electric Skillet Biscuits
    • A piece of Electric Skillet Vegetable and Goat Cheese Frittata on a pie server.
      Electric Skillet Vegetable and Goat Cheese Frittata
    • Key lime pie on plate topped with lime and broken meringue cookies.
      Electric Skillet Mini Key Lime Pies
    • Electric Skillet Chili in a white bowl with blue polka dots, wooden background, tortillas chips on the side.
      Electric Skillet Chili

    If you tried this Electric Skillet French Toast Recipe or any other recipe on my website, please leave a 🌟 star rating and let me know how it went in the 📝 comments below. And please share the recipe!

    📋Recipe

    Electric skillet French toast stuffed with Nutella and topped with sliced apples and icing sugar.
    Print Pin
    5 from 1 vote

    Electric Skillet Chocolate-Hazelnut Stuffed French Toast

    We love French toast and we love Nutella in my house so I combined these two goods in delicious ways with this recipe for electric skillet French toast stuffed with chocolate-hazelnut spread.
    Course Breakfast
    Cuisine French
    Diet Vegetarian
    Prep Time 10 minutes minutes
    Cook Time 4 minutes minutes
    Total Time 14 minutes minutes
    Servings 4 mini french toast sandwiches
    Calories 535kcal
    Author Joss Dyckson

    Equipment

    • Electric Skillet

    Ingredients

    • 8 slices French baguette sliced into thick slices
    • ½ cup chocolate hazelnut spread Nutella
    • 4 eggs
    • ¼ cup milk
    • 4 teaspoons white sugar
    • 2 tablespoons butter
    • 1 tablespoon powdered sugar
    • berries or apple slices optional topping
    US Customary - Metric

    Instructions

    • Heat electric skillet to 300ºF (medium heat).
    • Spread some chocolate hazelnut spread over one slice of French bread and cover with the other slice. Press them together with your hands. Repeat with remaining slices of bread.
      8 slices French baguette, ½ cup chocolate hazelnut spread
    • In a bowl, mix together the eggs, milk and white sugar.
      4 eggs, ¼ cup milk, 4 teaspoons white sugar
    • Soak the sandwiches in the egg mixture, until they have absorbed the liquid on both sides.
    • Melt the butter in the skillet. Add the sandwiches and cook for around 2 minutes per side, or until golden brown.
      2 tablespoons butter
    • Serve topped with fresh berries or apple slices and powdered sugar, if desired.

    Notes

    • The type of milk you use for French toast can influence the texture and flavor of the dish:
      • Whole milk is the most commonly used type of milk for French toast. Its higher fat content adds richness and creates a creamy custard mixture.
      • Half-and-half or heavy cream will make the French toast even richer and creamier.
      • 2%, 1% or skim milk will result in a lighter French toast.
    • Cover leftover French toast and store it in the fridge for up to 3 days.
    • Reheat in the skillet over medium to medium-low heat, flipping once, until heated through. You can also microwave them for a short time but they won't retain their crispiness.

    Nutrition

    Calories: 535kcal | Carbohydrates: 65g | Protein: 14g | Fat: 24g | Saturated Fat: 17g | Cholesterol: 181mg | Sodium: 529mg | Potassium: 303mg | Fiber: 4g | Sugar: 30g | Vitamin A: 446IU | Calcium: 132mg | Iron: 4mg

    What is the Difference Between White and Brown Eggs?

    February 12, 2020 by Joss Dyckson 4 Comments

    When shopping the egg selection at the grocery store or farmer's market, do you ever wonder what the difference is between white and brown eggs? Other than the color of course. I certainly have, so I thought I would do some research to find out what the deal is with white and brown eggs.

    In my hunt for answers, I was surprised by what I found out. The truth is, there really isn't much of a difference. Here are some things I did learn.

    White and brown eggs in a carton.
    [feast_advanced_jump_to]

    Chicken Egg Colors

    White, brown and grey hens.

    Most of the eggs that you will see in the supermarket are white. One typical white-egg layer is the White Leghorn. However, you can generally find brown eggs from cage free chickens that are labeled as such. If you go to a farmer's market, it is not uncommon to find eggs that are pale blue or green even.

    Breed. The different colors are commonly based on the breed of chicken. Simply put, different breeds produce different colored eggs. For example, the 'Easter Egger' can lay a variety of egg colors such as pink, cream, blue and green. Whereas other varieties can only lay one color. The color of the eggshells is determined by genetics.

    The diet and environment of the hen can have an affect on the hue of the egg yolk and the shade of color, however. Hens that are stress-free may produce slightly darker shades of white or brown eggs.

    Age. Another difference to note is that older chickens typically produce thinner egg shells than younger chickens.

    White hen on grass.
    Brown hen on grass.

    Generally, white-feathered hens with white ear lobes will lay white eggs, whereas reddish-brown feathered hens with red ear lobes will lay brown eggs.

    Nutrition and Flavor

    You are not necessarily going to see a difference in nutrition and flavor based on the color of the egg. Factors that can impact the flavor and nutritional value of an egg are the hen's diet and environment. Generally, eggs can be affected by the hens eating a diet rich in grasses and insects rather than a strictly feed-based diet.

    Are Brown Eggs Healthier than White Eggs?

    Brown eggs on grass. One egg cracked in half with yolk in it.

    There is a common perception that brown eggs might be a healthier choice than white eggs. This is not really the case. Pretty much all eggs are a healthy source of omega-3 fatty acids, protein, vitamins, and minerals, despite their color.

    As mentioned earlier, the diet and environment of the hen is where the nutritional difference can be seen. Free range chickens that have access to the outdoors tend to lay eggs with less fat and cholesterol, and are higher in certain vitamins and omega-3's.

    Do Brown and White Eggs Taste Different?

    Inside the shell, most eggs look the same with a clear membrane (egg white) and a yellow or orange yolk. Some chickens do produce larger and brighter yolks. Yet, white and brown eggs pretty much taste the same.

    You may notice that pasture-raised eggs taste slightly richer. This is simply based on their diet/environment and the fact that they lead less stressful lives than eggs from commercially farmed chickens.

    If you are looking for a more flavorful and vibrant egg, you might want to gravitate toward humanely raised birds, no matter the color of the outer shell.

    White eggs in a blue carton.

    The Price of Brown Eggs vs. White

    Here is where there is a difference. Brown eggs do often cost more when compared side by side with white eggs in the market. The reason for this can be traced back to the breed again. Breeds that produce brown eggs are often larger birds that require more food than hens that produce white eggs.

    Farmers who raise these larger chickens that produce brown shelled eggs have to offset the cost of feeding these birds by putting a higher price on the eggs. This is reflected in the price you will see at the market. To sum all of this up, here is a video that explains why brown eggs cost more than white eggs.

    Final Thoughts

    The bottom line is that the difference between white and brown eggs is simply in the color of the shell that is the result of genetics in the various breeds of chickens. Both white and brown eggs are nutritionally similar and do not differ in taste. The major difference between the two is cost, with brown often being more expensive than white.

    Try Out Some of Our Tasty Egg Dishes

    • A piece of Electric Skillet Vegetable and Goat Cheese Frittata on a pie server.
      Electric Skillet Vegetable and Goat Cheese Frittata
    • Hamburger scrambled eggs in cast iron pan.
      Hamburger Scrambled Eggs
    • Korean kimchi scrambled eggs in pan.
      Kimchi Scrambled Eggs
    • Spinach egg bites on plate with Greek yogurt.
      Cake Pop Maker Spinach & Mozza Egg Bites

    If you have any thoughts or comments you would like to add to this article, please feel free to do so and please share the article. I welcome the feedback.

    Electric Skillet Classic Beef Stew

    February 5, 2020 by Joss Dyckson Leave a Comment

    Is there anything more comforting than a bubbling pot of stew? The warm steam and tantalizing smells will fill your kitchen, making stomachs rumble and hearts sigh in contentment.

    Such is the power of Classic Beef Stew with Potatoes and Carrots. We have adapted the recipe so that you can make it in your electric frying pan. Believe us, electric skillet beef stew is just as good- or better!- than stove top, due to the ease with which you can cook your meal.

    Electric Skillet Beef Stew in a white bowl, cherry tomatoes and forks on the side, white background.

    The potatoes, celery, and carrots add a nice variety in texture to this meal, making it the perfect family meal.

    For those of you who are daring culinary adventurers, this recipe allows for experimentation. After all, within reason, what doesn't taste good in a stew? You could add seasonal vegetables such as squash, mushrooms, or corn.

    Electric Skillet Beef Stew in a white bowl, cherry tomatoes and a fork on the side, white background.

    If you have an herb garden, this recipe is the perfect time to experiment with your flavorful plants: try adding basil, oregano, parsley, and/or thyme. Try adding some kimchi to your stew for an Asian twist. Either way, your electric skillet beef stew will be delicious.

    Electric Skillet Beef Stew in a white bowl, cherry tomatoes and two forks on the side, white background.
    Electric Skillet Beef Stew in a white bowl, cherry tomatoes on the side, white background.

    While your stew is bubbling away, you will have time to select the perfect wine. Some of the most popular wines to pair with a rich stew are a red Bordeaux, Argentinian Malbec, or a Cabernet Sauvignon. The dark fruit flavors and tannins complement the savory, meaty taste of the stew.

    Check out more electric skillet family meals:

    • Electric skillet French toast stuffed with Nutella and topped with sliced apples and icing sugar.
      Electric Skillet Stuffed French Toast
    • Sloppy Joe with chips in the background.
      Electric Skillet Sloppy Joes
    • Creamy Tuscan chicken breast in skillet.
      Electric Skillet Creamy Tuscan Chicken
    • Electric Skillet Chicken Enchiladas on a wooden plate, chilies in the background.
      Electric Skillet Chicken Enchiladas

    How did you enjoy your stew? Let us know in the comments and please share the recipe!

    📋Recipe

    Electric Skillet Beef Stew in a white bowl, cherry tomatoes on the side, white background.
    Print Pin
    5 from 1 vote

    Electric Skillet Classic Beef Stew

    The warm steam and tantalizing smells of this electric skillet classic beef stew will fill your kitchen, making stomachs rumble and hearts sigh in contentment.
    Course Main Course
    Cuisine American
    Prep Time 18 minutes minutes
    Cook Time 1 hour hour 42 minutes minutes
    Total Time 2 hours hours
    Servings 4
    Calories 575.87kcal
    Author Joss Dyckson

    Equipment

    • Electric Skillet

    Ingredients

    • 1 ½ pounds chuck roast or round roast cubed
    • 2 tablespoons Worcestershire sauce
    • 2 tablespoons canola oil
    • 2 garlic cloves chopped
    • 1 cup yellow onion chopped
    • 1 cup carrots chopped
    • ½ cup celery chopped
    • 4 medium potatoes peeled and chopped
    • ¼ cup flour
    • 3 cups beef broth divided
    • ½ cup marinara sauce
    • 1 bay leaf
    • salt and pepper
    US Customary - Metric

    Instructions

    • Heat electric skillet to 400ºF. Season meat with Worcestershire sauce, salt and pepper.
    • Heat the oil in the skillet, add the meat and sear it until it's browned on each side.
    • Add garlic, onions, carrots and celery and sauté with the meat for around 2 minutes. Add the flour and mix it in until dissolved.
    • Pour 2 cups of broth in, marinara sauce, potatoes and the bay leaf. Stir it all together.
    • Lower temperature to 250ºF. Cover and cook for about 1.5 hours, or until meat is tender. If it becomes dry, just add more of the broth.
    • If needed, season again with salt and pepper. Discard bay leaf and serve.

    Notes

    • Some of the most popular wines to pair with a rich stew are a red Bordeaux, Argentinian Malbec, or a Cabernet Sauvignon. The dark fruit flavors and tannins complement the savory, meaty taste of the stew.
    • Leftovers can be stored in an airtight container in the fridge for up to 3 to 4 days.
    • Leftovers can also be frozen for up to 3 months. Thaw in the fridge.

    Nutrition

    Calories: 575.87kcal | Carbohydrates: 43.5g | Protein: 41.6g | Fat: 27.29g | Saturated Fat: 9.34g | Cholesterol: 117.37mg | Sodium: 883.45mg | Potassium: 1872.21mg | Fiber: 7.77g | Sugar: 5.63g | Vitamin A: 5557.32IU | Vitamin C: 33.24mg | Calcium: 140.62mg | Iron: 11.95mg

    Brownie Bites

    January 29, 2020 by Joss Dyckson 8 Comments

    Everyone loves a luscious, chocolatey dessert, especially when it comes in bite-size form. Next time you're craving a fudgy morsel to satisfy your sweet tooth, try this homemade, mini brownie bites recipe. These are a fun, tasty alternative to your traditional chocolate brownie, and they're easy to make (clocking in at less than 20 minutes)!

    Brownie bites stacked on top of each other on pink napkin.
    [feast_advanced_jump_to]

    Chocolate Brownie Bites: Big Flavor in a Mini Treat!

    With the melted dark chocolate mixed right into the batter, these fudgy brownie bites are everything you expect a brownie to be, in a mini snackable form!

    The low flour content keeps these one-bite brownies (or two-bites depending on the person) nice and fudgy and the dark chocolate elevates the richness.

    These treats are the perfect dessert to bring to a party, classroom or bake sale, to serve to your family as an after dinner delight or movie night treat, a Valentine's Day or Christmas snack for kids or just to treat yourself!

    We love indulging in these sweet bites after dinner, but the real joy comes when my kids open their lunch boxes to find these rich, chocolatey treats-turning an ordinary day into something special.

    If you're craving more chocolatey delights, These dark chocolate truffles and chocolate caramel bars are great for satisfying that sweet tooth. You can also try my skillet brownies for a more traditional recipe.

    Ingredients

    Brownie bites ingredients prepped and labeled.
    • flour - All-purpose flour works great for brownie batter and it's what I use.
    • dark chocolate bar - Choose a high quality chocolate bar for best results.
    • butter - I use salted butter for enhanced flavor.
    • vanilla extract - Can use artificial or natural.

    *Check recipe card for ingredient amounts.

    Equipment

    You will also need a cake pop maker, which makes these delicious cake bites super easy and quick to make.

    Technically, if you don't have a cake pop baker, this mini brownie bites recipe can even be baked in a sheet pan and cut into different shapes with a silicone knife or cookie cutters.

    Recipe Tweaks

    • Add toppings like salted caramel sauce, chocolate frosting, chopped up pretzels, candy sprinkles for decorating and more. For Christmas specifically, try these Christmas candy sprinkles!
    • Mix in some mini rolos, chocolate chips or nuts, into the batter.
    • Sprinkle with some powdered sugar.

    How to Make Mini Brownie Bites

    Brownie dry mixture in bowl.

    Step 1. Combine dry ingredients. In a bowl, combine all dry ingredients.

    Mini brownie batter in bowl.

    Step 2. Add wet ingredients. Melt the chocolate and butter together using a double boiler or microwave. Combine with the dry ingredients. Add the eggs and vanilla.

    Brownie bites baked in cake pop maker.

    Step 3. Bake. Lightly oil the cake pop maker cooking plates and plug it in to preheat. Transfer the batter to the cake pop maker cavities, using a spoon or piping bag. Close the lid and bake for about 8 minutes, or until baked through.

    Close up of brownie bite.

    Step 4. Serve. The mini brownie bites will be hot inside, so let them cool and enjoy!

    Chef's Note: The cake pop maker and bites do get hot, so my trick is to use a heat glove instead of bulky oven mitts to handle them without feeling the heat. I also like to use a narrow spatula to remove them.

    Joss' Tips

    If you don't have all of the equipment required in this recipe, don't worry. Follow these tips:

    • Whisk: A mixing spoon works just as well as a whisk.
    • Double boiler: A microwave can be used in place of a double boiler. Melt the chocolate and butter in the microwave, in a microwave safe bowl, at 20 second intervals. Stir each time until fully melted.
    • Piping bag: If you don't have a piping bag, a plastic zip top bag with the corner cut off works just as well. Or, you can skip the bag and use a teaspoon.

    Mini Brownie Bites Storage

    • Room temperature: Store uneaten bites in an airtight container to preserve freshness, and enjoy for up to 4 days!
    • Frozen brownie bites: If you don't want to make the full batch at once, you can freeze the brownie batter for later use. You can also freeze the baked fudge brownie bites in a freezer bag for up to 3 months.

    Recipe FAQs

    What is a brownie bite?

    It's exactly as it sounds: a brownie small enough to eat within one or two bites. It makes a good snack or small portioned treat.

    How long does it take to bake them?

    How long to bake them will depend on your cake pop maker. In my Babycakes cake pop maker, 8 minutes is the perfect time for a moist, fudgy, fully-baked brownie.

    Brownie bites scattered on and around clear plate with cocoa powder and pink napkins.

    More Bite Size Treats You Will Love

    • Maple bacon cake pops on plate.
      Maple Bacon Cake Pops
    • Marzipan ball dusted in icing sugar.
      Marzipan Balls
    • Decorated cake pops in jar.
      How to Make Cake Pops with a Mold
    • Banana cake pops upside down on a black tray with colorful, striped treat sticks.
      Banana Cake Pops

    If you tried this 🤎 Mini Brownie Bites Recipe or any other recipe on my website, please leave a 🌟 star rating and let me know how it went in the 📝 comments below. And please share the recipe!

    📋Recipe

    Mini brownie bites stacked on top of each other.
    Print Pin
    5 from 2 votes

    Brownie Bites

    Next time you're craving a chocolaty, fudgy morsel to satisfy your sweet tooth, try this cake pop maker mini brownie bites recipe. These are a fun, tasty alternative to your traditional chocolate brownie, and they're easy to make.
    Course Dessert
    Cuisine American
    Diet Vegetarian
    Prep Time 10 minutes minutes
    Cook Time 8 minutes minutes
    Total Time 18 minutes minutes
    Servings 60 bites
    Calories 61kcal
    Author Joss Dyckson

    Equipment

    • Cake Pop Maker
    • Double boiler or metal bowl and pot optional
    • heat glove optional

    Ingredients

    • 1 cup flour
    • 1 ¼ cups sugar
    • 1 teaspoon baking powder
    • 6 ounces dark chocolate bar broken into pieces
    • 5 ounces butter 10 tablespoons
    • 3 eggs
    • 2 teaspoons vanilla extract
    US Customary - Metric

    Instructions

    • In a bowl, combine all dry ingredients (flour, sugar and baking powder).
      1 cup flour, 1 ¼ cups sugar, 1 teaspoon baking powder
    • Melt the chocolate and butter together by: using a double boiler, or melt it in the microwave, in a microwave safe bowl, at 20 second intervals. Stir each time until fully melted.
      6 ounces dark chocolate bar, 5 ounces butter
    • Add the melted chocolate/butter mixture to the dry ingredients and mix together with a wooden spoon. Add the eggs and vanilla. Mix until well combined.
      3 eggs, 2 teaspoons vanilla extract
    • Lightly oil the cake pop maker cooking plates and plug it in to preheat. Transfer the brownie batter to the cake pop maker cavities using a piping bag or teaspoon.
    • Close the lid and bake for about 8 minutes, or until baked through. I like to use a narrow spatula to remove them.
    • They will be hot inside, so let them cool and enjoy!

    Notes

    • Baking Time: Baking time may vary, depending on your cake pop maker.
    • Room Temperature Storage: Store uneaten brownie bites in an airtight container to preserve freshness, and enjoy for up to 4 days!
    • Freezer Storage: If you don't want to make the full batch at once, you can freeze the brownie batter for later use. You can also freeze the baked brownie bites in a freezer bag for up to 3 months.
    • Piping Bag Alternative: If you'd rather use a piping bag but don't have one on hand, a plastic zip top bag with the corner cut off works just as well. Or, you can skip the bag and use a teaspoon.

    Nutrition

    Calories: 61kcal | Carbohydrates: 7g | Protein: 1g | Fat: 3g | Saturated Fat: 2g | Cholesterol: 13mg | Sodium: 21mg | Potassium: 34mg | Fiber: 1g | Sugar: 5g | Vitamin A: 72IU | Calcium: 8mg | Iron: 1mg

    Valentine’s Day Electric Skillet Shrimp Curry For Two

    January 27, 2020 by Joss Dyckson Leave a Comment

    Looking for the perfect dinner for two? This aromatic electric skillet shrimp curry is bound to impress your significant other on Valentine's day. Why go out to an overcrowded restaurant when you can create a delectable yet fancy shrimp curry dish at home? Bring a 5-star curry restaurant dish to your own kitchen with this recipe.

    Shrimp curry in bowl.

    With this Valentine's Day main course recipe, you'll be set for a romantic, in-house date - or a fun night with friends. Let's not forget the convenience of this curry - there's little mess or stress, whether it's a last-minute Valentine's dinner or as a part of a multi-course meal.

    The actual cooking is fairly quick and the result is tender, simmered shrimp in a thick sauce of exotic flavors. Even with minimal effort, this shrimp curry still comes out to be a fancy dinner for a passionate Valentine's Day date, just like my creamy gnocchi.

    And if you're single, it's no problem. There's no reason why you can't enjoy shrimp curry by yourself! Savor this cuisine while watching a fitting romantic comedy.

    This Valentine's Day red velvet cake is the perfect way to end your meal on a sweet note. You can check out more romantic Valentine's Day recipes here.

    [feast_advanced_jump_to]

    Ingredients

    Shrimp curry ingredients prepped on deep red background.
    • Shrimp - Just make sure the shrimp are peeled and deveined for this recipe.
    • Raisins - Regular black raisins work well but you can also use sultana or golden.
    • Basmati rice - Traditional Basmati rice pairs with it fantastically, especially when cooked to a fluffy finish. If you ever want to switch things up, try some jasmine rice or even some pumpkin and garlic naan bread to dip into the curry.

    How to Make Electric Skillet Shrimp Curry

    Cooked rice in electric skillet.

    Step 1. Make the basmati rice according to package instructions in the electric skillet. Remove to a separate, covered dish to keep warm.

    Toasted almonds in electric skillet.

    Step 2. Meanwhile, to toast the almonds, simply heat electric skillet to medium heat (300ºF), add a bit of olive oil and cook the almonds until golden brown, stirring often. Set aside.

    Cooked onions, ginger and garlic in electric skillet.

    Step 3. Add 1 tablespoon olive oil to the skillet. Add the onion, garlic and ginger and cook until the onion is translucent (around 5 minutes).

    Curry in electric skillet with lid.

    Step 4. Add the curry powder, tomato sauce and chicken broth. Cover and cook for 2 minutes.

    Curry and shrimp in electric skillet.

    Step 5. Add the shrimp and cook for 5 more minutes or until they are fully cooked. They should be pink and opaque (not transparent).

    Curry, shrimp and coconut milk in electric skillet.

    Step 6. Add the coconut milk and mix well. Season with salt and pepper, to taste.

    Shrimp curry with fresh basil in electric skillet.

    Step 7. Add the fresh basil and cook for 30 more seconds.

    Shrimp curry in two bowls with Valentine's Day decorations.

    Step 8. Dish out the rice and curry in two bowls. Top with the raisins, toasted almonds and shredded coconut. Serve!

    💕 Looking for a Valentine's Day dessert? Try my Cake Pop Maker Brownie Bites, Strawberry Candy or check out some more electric skillet recipes.

    Storage

    Leftovers can be stored for up to 3 to 4 days in a covered container in the fridge.

    Reheating

    Reheat leftovers in the electric skillet or microwave.

    Shrimp curry in two bowls on deep red backround.

    More Electric Skillet Content to Consider

    • Electric Skillet Stuffed Puff Pastry Triangles
    • Stainless steel electric skillet isolated on white background.
      The Best Stainless Steel Electric Skillet (Top Picks)
    • Electric skillet with scrub brush.
      How to Clean an Electric Skillet
    • Ceramic electric skillet on counter.
      Top 5 Choices for the Best Ceramic Electric Skillet

    If you tried this Valentine's Day Electric Skillet Shrimp Curry Recipe or any other recipe on my website, please leave a 🌟 star rating and let me know how it went in the 📝 comments below. And please share the recipe!

    📋Recipe

    Shrimp curry with rice in two bowls.
    Print Pin
    5 from 1 vote

    Valentine's Day Electric Skillet Shrimp Curry

    Looking for the perfect dinner for two? This aromatic electric skillet shrimp curry recipe is bound to impress your significant other on Valentine's day. The actual cooking is fast and the result is tender, simmered shrimp in a thick sauce of exotic flavors. Even with minimal effort, this shrimp curry still comes out to be a fancy dinner for a passionate Valentine's Day date.
    Course Main Course
    Cuisine American, Indian
    Diet Gluten Free
    Prep Time 15 minutes minutes
    Cook Time 30 minutes minutes
    Total Time 45 minutes minutes
    Servings 2
    Calories 667kcal
    Author Joss Dyckson

    Equipment

    • Electric Skillet

    Ingredients

    • 1 cup basmati rice
    • 2 tablespoons sliced almonds
    • 1 tablespoon olive oil
    • ¼ cup yellow onion chopped
    • 1 tablespoon garlic minced
    • 1 tablespoon ginger grated
    • 1 teaspoon curry powder
    • 1 cup tomato sauce
    • 1 cup chicken broth
    • 1 pound shrimp peeled and deveined
    • ½ cup coconut milk
    • 2 tablespoons fresh basil sliced
    • 1 tablespoon raisins
    • 1 tablespoon shredded coconut
    • salt and pepper to taste
    US Customary - Metric

    Instructions

    • Make the basmati rice according to package instructions in the electric skillet. Remove to a separate, covered dish to keep warm.
      1 cup basmati rice
      Cooked rice in electric skillet.
    • Meanwhile, to toast the almonds, simply heat electric skillet to medium heat (300ºF), add a bit of olive oil and cook the almonds until golden brown, stirring often. Set aside.
      2 tablespoons sliced almonds
      Toasted almonds in electric skillet.
    • Add 1 tablespoon olive oil to the skillet. Add the onion, garlic and ginger and cook until the onion is translucent (around 5 minutes).
      1 tablespoon olive oil, ¼ cup yellow onion, 1 tablespoon garlic, 1 tablespoon ginger
      Cooked onions, ginger and garlic in electric skillet.
    • Add the curry powder, tomato sauce and chicken broth. Cover and cook for 2 minutes.
      1 teaspoon curry powder, 1 cup tomato sauce, 1 cup chicken broth
      Curry in electric skillet with lid.
    • Add the shrimp and cook for 5 more minutes or until they are fully cooked. They should be pink and opaque (not transparent).
      1 pound shrimp
      Curry and raw shrimp in electric skillet with lid.
    • Add the coconut milk and mix well. Season with salt and pepper, to taste.
      ½ cup coconut milk
      Curry, shrimp and coconut milk in electric skillet.
    • Add the fresh basil and cook for 30 more seconds.
      2 tablespoons fresh basil
      Shrimp curry with fresh basil in electric skillet.
    • Dish out the rice and curry in two bowls. Top with the raisins, toasted almonds and shredded coconut. Serve!
      1 tablespoon raisins, 1 tablespoon shredded coconut
      Shrimp curry in two bowls with Valentine's Day decorations.

    Notes

    • Leftovers can be stored for up to 3 to 4 days in a covered container in the fridge.
    • They can be reheated in the skillet or microwave.

    Nutrition

    Calories: 667kcal | Carbohydrates: 97g | Protein: 13g | Fat: 27g | Saturated Fat: 13g | Polyunsaturated Fat: 2g | Monounsaturated Fat: 9g | Cholesterol: 2mg | Sodium: 1043mg | Potassium: 845mg | Fiber: 6g | Sugar: 8g | Vitamin A: 649IU | Vitamin C: 13mg | Calcium: 108mg | Iron: 5mg

    Mango Soup

    January 22, 2020 by Joss Dyckson 2 Comments

    Mango soup, or Fajeto, is packed with all the cozy, spiced-up flavors you love about Indian food. It's bright, fragrant, and bursting with deliciousness in every bite. You can have it ready in about 20 minutes.

    Mango soup in white bowls.

    Soup is an extremely broad and versatile dish made by people all across the globe and can range from a basic roasted garlic tomato soup to a watermelon gazpacho soup to this bright yellow, mango soup.

    This savory soup is a great meal for basically any time of day. While it's most popular in the summer months (mango season) you can enjoy this version year round by using canned mango pulp.

    It's easy, filling and has so much room to improvise that it's no wonder all kinds of cultures have had their own spin on it. For more delicious recipes with a twist, check out my electric skillet butter chicken, this super creamy kimchi macaroni and cheese and this fusion kimchi pizza recipe.

    What is Mango Soup?

    Mango soup is also known as 'fajeto', which is an Indian dish, specifically from Gujarat. It is a mango, yogurt and chickpea flour-based soup with numerous spices. Despite what many people think, it is most often served hot, not chilled.

    Ingredients

    Mango soup ingredients prepped and labeled.
    • canned mango purée/pulp - In the supermarket, you might come across two different kinds of mango pulp: Kesar and Alphonso. Kesar is considered the "Queen of mangoes" for its flavor and aroma that comes from the orchards in Gujarat. Alphonso mangoes are considered the "King of mangoes" for their high quality flavor and are more expensive. They are grown along Western India. Both types can be used in this soup.
    • chickpea flour - Chickpea flour is a gluten free alternative to wheat flour and is used in this soup to thicken it up a bit.
    • yogurt - Be sure to use plain yogurt. This gives the soup its creaminess.
    • red chili peppers - For a bit of heat. Leave them out if you're sensitive to spice.
    • spices - Mango soup contains many spices like mustard seeds, fenugreek and cumin that give it beautiful, complex flavor. You will also need turmeric, ground coriander, ground cumin, chili powder, salt and pepper. If you need to enhance the sweetness, you can add a touch of sugar.

    *Check recipe card for ingredient amounts.

    How to Make Mango Soup

    Yogurt and water in bowl with whisk.

    Step 1. Place the yogurt in a bowl and add one cup of water. Stir until smooth.

    Chickpea flour and yogurt mixture in bowl.

    Step 2. Place the chickpea flour into a medium bowl. Add a bit of the yogurt/water mixture and whisk well. Pour in the rest of the yogurt mixture, while continuing to whisk. Set aside.

    Chef's Note: This step will help dissolve the chickpea flour into the liquid.

    Seeds and oil in pot.

    Step 3. In a pot, heat the oil to medium-low heat and add the mustard, fenugreek and cumin seeds. Let them cook for 1 to 2 minutes while stirring. The seeds will start to crackle.

    Mango soup ingredients in pot.

    Step 4. Add the mango purée, red chilies, sugar, turmeric, cumin, coriander, chili powder and 1 cup of water. Mix well. Season with salt and pepper, to taste. Cook for 5 minutes.

    Mango soup in pot with chili peppers.

    Step 5. Add the yogurt/chickpea flour mixture and cook for 3 more minutes or until desired thickness.

    Mango soup strained through mesh strainer into pot.

    Step 6. Carefully strain the soup into another pot to remove the seeds and chili peppers. Heat to desired temperature and adjust the seasoning, if needed.

    Mango soup in white bowls with a fresh mango and spoons on the side.

    Step 7. Serve the mango soup hot in bowls. You can add some more seeds as toppings, if desired.

    Joss' Top Tip

    If you can't find canned mango purée/pulp, you can make it by adding 3 cups of peeled mango flesh chunks to a blender or food processor and process until creamy/smooth.

    Serving Suggestions

    • Despite its creamy consistency, mango soup is a very light dish that you can easily eat as a side for other foods or on its own to warm up on a cold winter day.
    • Serving it with steamed rice is one of the most popular ways to enjoy it.
    • It can also be served with Indian puri bread, or for something a little different: this pumpkin naan bread.
    • While classic mango soup is usually served hot, you can serve it cold if you prefer.

    How to Store Mango Soup Leftovers

    • If you happen to have leftovers or want to make a bigger pot to save some for later, you can store any uneaten soup in the fridge for up to 3 to 4 days.
    • It can also be frozen for up to 3 months.
    • Thaw frozen mango soup in the fridge.
    Mango soup in white bowl.

    More Delicious Mango Recipes to Try

    • Mango ginger cocktail in glass with mango skewer, lime slice and straw.
      Mango Ginger Cocktail
    • Grilled cubed mango on wooden skewers.
      Grilled Mango Skewers
    • Summer mango pomegranate soda in glasses with blue umbrellas.
      Summer Mango-Pomegranate Soda
    • Mango pineapple smoothie in two glasses with skewered mango on top.
      How to Make a Mango-Pineapple Smoothie

    If you tried this Mango Soup Recipe or any other recipe on my website, please leave a 🌟 star rating and let me know how it went in the 📝 comments below. And please share the recipe!

    📋Recipe

    Mango soup in white bowl with spices on top.
    Print Pin
    5 from 1 vote

    Mango Soup

    Mango soup, or fajeto, is packed with all the cozy, spiced-up flavors you love about Indian food. It's bright, fragrant, and bursting with deliciousness in every bite.
    Course Soup
    Cuisine Indian
    Diet Low Salt, Vegetarian
    Prep Time 10 minutes minutes
    Cook Time 9 minutes minutes
    Total Time 19 minutes minutes
    Servings 4
    Calories 267kcal
    Author Joss Dyckson

    Ingredients

    • ½ cup plain yogurt
    • 2 cups water divided
    • 2 tablespoons chickpea flour
    • 1 ½ tablespoons olive oil
    • ½ teaspoon mustard seeds
    • ½ teaspoon fenugreek seeds
    • ½ teaspoon cumin seeds
    • 3 cups canned mango purée* also called mango pulp
    • 2 red chili peppers
    • 1 teaspoon ground turmeric
    • 1 teaspoon ground cumin
    • 1 teaspoon ground coriander
    • 1 teaspoon chili powder or paprika
    • 1 teaspoon sugar optional--only add if the mango pulp is unsweetened
    • salt and pepper to taste
    US Customary - Metric

    Instructions

    • Place the yogurt in a bowl and add one cup of water. Stir until smooth.
    • Place the chickpea flour into a medium bowl. Add a bit of the yogurt/water mixture (just enough to dissolve the flour) and whisk well. Pour in the rest of the yogurt mixture, while continuing to whisk (this will help dissolve the chickpea flour). Set aside.
    • In a pot, heat the oil to medium-low heat and add the mustard, fenugreek and cumin seeds. Let them cook for 1 to 2 minutes while stirring. The seeds will start to crackle.
    • Add the mango purée, red chilies, sugar, turmeric, cumin, coriander, chili powder and 1 cup of water. Mix well. Season with salt and pepper, to taste. Cook for 5 minutes.
    • Add the yogurt/chickpea flour mixture and cook for 3 more minutes or until desired thickness.
    • Carefully strain the soup into another pot to remove the seeds and chili peppers. Heat to desired temperature and adjust the seasoning, if needed.
    • Serve hot in bowls. It can be served with rice, Indian puri bread or on its own. You can add some more seeds as toppings, if desired.

    Notes

    • *Canned mango pulp substitute: If you can't find canned mango purée/pulp, you can make it by adding 3 cups of peeled, mango flesh chunks to a blender or food processor and process until creamy/smooth.
    • Mango Pulp Type: In the supermarket, you might come across two different kinds of mango pulp: Kesar and Alphonso. Kesar is considered the "Queen of mangoes" for its flavor and aroma that comes from the orchards in Gujarat. Alphonso mangoes are considered the "King of mangoes" for their high quality flavor and are more expensive. Both can be used in this soup.
    • Serving: While its usually served hot, you can serve it chilled if you prefer.
    • Storage: Store in a covered container in the fridge for up to 3 to 4 days. It can also be frozen for up to 3 months. Thaw in the fridge.

    Nutrition

    Calories: 267kcal | Carbohydrates: 47g | Protein: 3g | Fat: 8g | Saturated Fat: 1g | Polyunsaturated Fat: 1g | Monounsaturated Fat: 4g | Cholesterol: 4mg | Sodium: 74mg | Potassium: 133mg | Fiber: 2g | Sugar: 40g | Vitamin A: 4504IU | Vitamin C: 25mg | Calcium: 75mg | Iron: 24mg

    Cake Pop Maker Mini Shrimp Balls

    January 15, 2020 by Joss Dyckson Leave a Comment

    Mini shrimp balls are the kind of party food that you really want to take home from the party. Succulent, flavorful shrimp inside warm, tender breading is a match made in heaven the likes of which is hard to match. You don't need to be a master chef to successfully execute this recipe.

    Shrimp balls in a bowl.

    With this easy recipe, you'll be able to have amazing shrimp balls basically whenever you like thanks to this one simple kitchen hack - the cake pop maker.

    Savory, spicy, sweet, salty, sesame-y shrimp in some deliciously moist and airy breading is no longer reserved for special occasions. Just bust out the cake pop maker and have it whenever you please.

    I also make these mini puff pastry chicken balls and mini Chinese pork buns in the cake pop maker.

    [feast_advanced_jump_to]

    Ingredient Notes & Substitutions

    • shrimp - Peeled, cooked and finely chopped. You can use fresh or frozen but make sure to thaw them in the fridge first if using frozen.
    • honey - You can substitute with regular sugar or agave nectar.
    • soy sauce - Or your favorite Asian sauce for dipping such as Chinese XO sauce or Korean mayonnaise. You can also try other sauces like sweet and sour, creamy curry yogurt sauce, Sriracha or cocktail sauce.
    • chili garlic sauce - A thick, spicy, flavorful Asian condiment used in the filling.

    *See recipe card for ingredient amounts.

    How to Make Mini Shrimp Balls

    1. Heat the water until warm (not too hot, just warm). Add the sugar and yeast, and let it rest until foamy (around 10 minutes).
    2. Place the flour in a bowl, and make a hole in the middle. Pour the vegetable oil and yeast mixture into the center. Mix with a wooden spoon until soft. If it's too sticky, just add a bit more flour.
    3. Once it separates from the sides of the bowl, transfer to a clean working surface and knead for 15 minutes (don't skip this step because this helps gluten to develop and the bread will be soft and airy).
    4. Sprinkle some more flour into the bowl and place the dough ball inside. Cover with plastic wrap and let it sit for around 1 hour, or until it doubles in size.
    5. Mix all filling ingredients together.
    6. Once the dough is ready, work it a little more with your hands, and form it into a long cylinder. Cut the cylinder into 24 equal pieces.
    7. For each piece: make a ball, and flatten it to form a thin disc.
    8. Place around ½ teaspoon of shrimp filling inside the disc, close it with your hand and shape into a ball. Repeat for each.
    9. Bake in the cake pop maker for 3 to 4 minutes, or until golden brown and cooked through. (You may need to flip them half way through to golden both sides evenly.)
    10. Let cool a couple of minutes before serving. Serve with soy sauce or your favorite Asian sauce.
    Shrimp ball cut open.

    Joss' Top Tip

    You can save time by using 1 sheet of thawed puff pastry, instead of making the dough from scratch. The puff pastry can be cut into 24 equal portions with a pizza cutter.

    Storage

    • Store leftover shrimp balls in an airtight container in the fridge for up to 3 or 4 days.
    • They can also be frozen for up to 3 months.
    • Reheat in the microwave or a 350°F oven until warmed through to an internal temperature of 165°F.
    Shrimp balls in a bowl with dipping sauce on the side.

    More Asian Recipes to Try

    • Mango soup in white bowl with spices on top.
      Mango Soup
    • Banana ketchup in a small jar and on a small spoon.
      Banana Ketchup
    • Bok choy stir fry in frying pan.
      Bok Choy Stir Fry
    • Beef and broccoli in black bowl.
      Easy Sheet Pan Beef and Broccoli

    Any other cake pop recipes you'd like me to hack? How about some electric skillet recipes? Both are devices I use regularly. If you tried this Cake Pop Maker Shrimp Balls Recipe or any other recipe on my website, please leave a 🌟 star rating and let me know how it went in the 📝 comments below. And please share the recipe!

    📋Recipe

    Mini shrimp ball with a bite taken out of it in hand.
    Print Pin
    5 from 1 vote

    Cake Pop Maker Mini Shrimp Balls

    These cake pop maker shrimp balls consist of a succulent, flavorful shrimp filling inside warm, tender breading. They are the perfect party appetizer.
    Course Appetizer, Snack
    Cuisine American, Chinese
    Prep Time 30 minutes minutes
    Cook Time 3 minutes minutes
    Resting Time 1 hour hour
    Total Time 1 hour hour 33 minutes minutes
    Servings 24 shrimp balls
    Calories 31kcal
    Author Joss Dyckson

    Equipment

    • Cake Pop Maker

    Ingredients

    For the Dough

    • ½ cup water
    • 1 tablespoon sugar
    • 1 teaspoon dry yeast
    • 1 cup flour
    • ½ tablespoon vegetable oil

    For the Filling

    • ½ cup shrimp peeled, cooked and finely chopped
    • 2 teaspoons honey
    • 1 teaspoon sesame oil
    • 1 teaspoon ginger grated
    • 1 teaspoon chili garlic sauce

    To Serve

    • soy sauce or your favorite Asian sauce for dipping
    US Customary - Metric

    Instructions

    • Heat the water until warm (not too hot, just warm). Add the sugar and yeast, and let it rest until foamy (around 10 minutes).
      ½ cup water, 1 tablespoon sugar, 1 teaspoon dry yeast
    • Place the flour in a bowl, and make a hole in the middle. Pour the vegetable oil and yeast mixture into the center. Mix with a wooden spoon until soft. If it's too sticky, just add a bit more flour.
      1 cup flour, ½ tablespoon vegetable oil
    • Once it separates from the sides of the bowl, transfer to a clean working surface and knead for 15 minutes (don't skip this step because this helps gluten to develop and the bread will be soft and airy).
    • Sprinkle some more flour into the bowl and place the dough ball inside. Cover with plastic wrap and let it sit for around 1 hour, or until it doubles in size.
    • Mix all filling ingredients together.
      ½ cup shrimp, 2 teaspoons honey, 1 teaspoon sesame oil, 1 teaspoon ginger, 1 teaspoon chili garlic sauce
    • Once the dough is ready, work it a little more with your hands, and form it into a long cylinder. Cut the cylinder into 24 equal pieces.
    • For each piece: make a ball, and flatten it to form a thin disc.
    • Place around ½ teaspoon of shrimp filling inside the disc, close it with your hand and shape into a ball. Repeat for each.
    • Bake in the cake pop maker for 3 to 4 minutes, or until golden brown and cooked through. (You may need to flip them half way through to golden both sides evenly.)
    • Let cool a couple of minutes before serving. Serve with soy sauce or your favorite Asian sauce.

    Notes

    • You can save time by using 1 sheet of thawed puff pastry, instead of making the dough from scratch. The puff pastry can be cut into 24 equal portions with a pizza cutter.
    • If you can't find chili garlic sauce, you can replace it with Sriracha or another chili sauce.
    • Store leftover shrimp balls in an airtight container in the fridge for up to 3 or 4 days.
    • They can also be frozen for up to 3 months.
    • Reheat in the microwave or a 350°F oven until warmed through to an internal temperature of 165°F.

    Nutrition

    Calories: 31kcal | Carbohydrates: 5g | Protein: 1g | Fat: 1g | Saturated Fat: 1g | Cholesterol: 7mg | Sodium: 31mg | Potassium: 10mg | Fiber: 1g | Sugar: 1g | Vitamin C: 1mg | Calcium: 5mg | Iron: 1mg

    Electric Skillet Oatmeal Cookies

    January 13, 2020 by Joss Dyckson 2 Comments

    Ovens are wonderful, incredibly useful appliances - but it isn't until we don't have an oven that we appreciate all of its functions. Have you ever been camping out in the great outdoors, sitting around a crackling fire, and became struck with a sudden craving for warm home-baked cookies? Trust me, you're not alone.

    That's where electric skillet oatmeal cookies come in.

    Electric Skillet Oatmeal Cookies in a clear jar, on white wooden background.

    In case you couldn't guess, all you need is an electric skillet - and butter, flour, egg, and other ingredients necessary to make the cookies come alive. The fantastic perk of this recipe is how simple it is.

    Crispy, fresh oatmeal cookies baked in less than 15 minutes without an oven? Sign me up! (Another fun oatmeal recipe I think you'd love are these breakfast oatmeal shots.)

    Electric Skillet Oatmeal Cookies in a clear jar, on white wooden background.

    This is a great option for cookies if you are camping or just don't have an oven around for whatever reason!

    With this recipe's simplicity, you have no excuses. Most of these ingredients are affordable and probably already in your pantry - vitamin-rich oatmeal, brown and white sugar, butter and baking powder.

    Electric Skillet Oatmeal Cookies in a clear jar.

    The best thing about electric skillet cookies (other than the part where you dig in) is that you aren't in the dark about how your little creations are doing. You can see and control how the cookies turn out, flipping before they burn, making sure they bake evenly. This combination results in a firm and crispy, yet soft-on-the-inside cookie.

    Electric Skillet Oatmeal Cookies in a clear jar, on white wooden background.

    Even if you aren't camping, these cookies are perfect for a lazy day when even ordering takeout is too much effort (and money). College students staying in dorms that lack an oven may find these electric skillet oatmeal cookies a lifesaver.

    Enjoy with a warm cup of milk, freshly brewed coffee, or hot cocoa, and share with your camp buddies, roommates, family - or not.

    Will you give these electric skillet cookies a try on your camping trip?

    HUNGRY FOR MORE SKILLET RECIPES? TRY OUR:

    • Electric Skillet Classic Beef Stew
    • Easy Skillet S'mores

    📋Recipe

    Electric Skillet Oatmeal Cookies in a clear jar, on white wooden background.
    Print Pin
    5 from 1 vote

    Electric Skillet Oatmeal Cookies

    These crispy, fresh electric skillet oatmeal cookies are baked in less than 15 minutes without an oven.
    Course Dessert
    Cuisine American
    Diet Vegetarian
    Prep Time 16 minutes minutes
    Cook Time 14 minutes minutes
    Total Time 30 minutes minutes
    Servings 24
    Calories 161kcal
    Author Joss Dyckson

    Equipment

    • Electric Skillet

    Ingredients

    • 1 cup flour
    • ½ teaspoon baking powder
    • ½ teaspoon salt
    • ¼ cup butter
    • 1 teaspoon cinnamon
    • ½ cup vegetable oil
    • 1 large egg
    • 1 teaspoon vanilla extract
    • ¾ cup brown sugar
    • ½ cup sugar
    • 2 cups oats
    • ½ cup pecans chopped (optional)
    US Customary - Metric

    Instructions

    • Heat the electric skillet to 300ºF. Combine the flour, baking powder and salt together.
    • Melt the butter in a microwave (or you could use the electric skillet if you don't have access to one). Once it's melted, transfer to a bowl and add the cinnamon.
    • Add the oil, egg, vanilla and brown and white sugars to the butter. Mix well.
    • Add the flour mixture to the butter mixture and mix with a wooden spoon until well combined. Add the oats and pecans and mix well.
    • Divide the dough into 1 tablespoon portions and arrange them in the electric skillet (around 2 inches apart). Flatten them a little with a spatula.
    • Cover and bake until golden on the bottom and the edges start to firm up, about 8 minutes (if it's not easy to flip them, they are not quite ready). Flip them, cover again and bake 6 more minutes or until golden brown and baked through.
    • Cool on a wire baking rack. Serve and enjoy!

    Notes

    • If the bottoms are browning too quickly, you can turn the heat down a little.
    • Once cooled, store in airtight containers for up to 1 to 2 weeks at room temperature.
    • They can also be frozen for up to 3 months.

    Nutrition

    Calories: 161kcal | Carbohydrates: 20g | Protein: 2g | Fat: 9g | Saturated Fat: 5g | Cholesterol: 12mg | Sodium: 62mg | Potassium: 61mg | Fiber: 1g | Sugar: 11g | Vitamin A: 69IU | Calcium: 20mg | Iron: 1mg

    How to Make a London Fog

    January 8, 2020 by Joss Dyckson 12 Comments

    The creamy "London Fog" latte consists of the classically British Earl Grey, which is a mixture of black tea and bergamot oil, adding citrusy notes to the flavor profile, combined with steamed milk and vanilla. Here I will show you how to make a London Fog at home!

    London fog tea latte in a clear glass mug with tea biscuits on the side.

    This simple recipe is your ticket to enjoying a DIY café-quality mug of London Fog at home - or a fancy British teacup if you prefer. It results in a pale caramel-colored drink beneath a creamy, white cloud of milk froth.

    The London Fog Latte will make you feel like you're roaming the streets of London - hopefully with more sunlight than fog. If you're looking for more hot drinks to enjoy this fall and winter, try my matcha latte powder, gingerbread latte or toasted marshmallow latte.

    [feast_advanced_jump_to]

    🍵 What is a London Fog?

    London Fog may sound like a weather report for the capital of the United Kingdom. Spoiler alert - it isn't. So what is a London Fog? It's actually a latte with a base of earl grey steeped in boiling water, layered with frothy hot milk and a touch of vanilla.

    Despite the name, it is said to have been created in Vancouver, Canada.

    With hints of vanilla, London Fog has a refreshing combination of floral black tea and a subtle zest - this flavor hits all your taste buds.

    The caffeine content in a London Fog makes it a fantastic morning energizer or afternoon pick-me-up.

    🛒 London Fog Latte Ingredients

    London Fog latte ingredients prepped on light wooden background.

    To make yourself a comforting London Fog tea, all you need is an earl grey tea-bag, hot milk of choice, vanilla, and any sweetener you'd like.

    • Earl Grey tea bag - a type of flavored tea that is traditionally made from black tea leaves and flavored with the oil of bergamot (a citrus fruit)
    • hot water - avoid using boiling water
    • sweetener - sugar, honey, agave nectar or your favorite sweetener
    • vanilla extract - for a hint of sweet, vanilla flavor
    • hot milk - or almond milk if you would like a dairy free alternative
    • cinnamon powder - to garnish

    *Check recipe card for ingredient amounts.

    ➕ Add Ins

    • If you're really feeling luxurious, sprinkle some dried lavender on top. Alternatively, you can infuse lavender with the earl grey in the water, to really complete the floral flavor of the London Fog drink.
    • If you're in the mood for something stronger, try adding a touch of amaretto.
    • For extra vanilla flavor, try topping the prepared London Fog with some vanilla powder. I have a tutorial for how to make vanilla powder.

    🫖 Instructions

    A clear glass mug with hot water and Earl Grey tea bag.

    Step #1. Infuse. Add the hot water to a mug. Infuse the tea bag in the hot water for about 5 minutes.

    A clear glass mug with Earl Grey tea.

    Step #2. Remove Tea Bag. Remove the tea bag from the mug.

    A clear glass mug with Earl Grey tea and vanilla extract.

    Step #3. Sweeten. Add the vanilla and sugar, to taste. Stir to dissolve the sugar.

    Bowl of frothy milk and a whisk.

    Step #4. Froth the Milk. Whisk the hot milk until it forms froth at the top.

    • you can use a milk frother or whisk by hand to froth the hot milk
    • or you can steam cold milk with an espresso machine steam wand
    A clear glass mug of Earl Grey tea with steamed milk.

    Step #5. Add Milk to Tea. Pour the frothed milk into the hot tea. Spoon any leftover froth on top.

    A clear glass mug of London Fog with frothed milk and cinnamon powder.

    Step #6. Sprinkle With Cinnamon. Sprinkle the tea latte with a pinch of cinnamon powder.

    London fog tea latte in a clear glass mug with tea biscuits on the side.

    Step #7. Enjoy. Serve and enjoy! It can also be served with biscuits, biscotti or graham cracker lemon squares, to name a few.

    London fog tea latte in mug with tea biscuits and cinnamon sticks on the side.

    ✔️ Top Tips

    • Go with a large bowl to froth the milk. When you are frothing the milk, make sure the bowl or pitcher can hold extra volume because the milk will expand to approximately double in size. It will need the extra room!
    • Use hot water, not boiling. It is better to use hot water rather than boiling water so that you don't scald the tea leaves. For best results, you can boil the water in the kettle and then leave it for a few minutes before steeping the tea. It will still be nice and hot with great flavor.
    • Use fresh water. Using fresh, cold water in the kettle will result in a better tasting cup of tea. If you keep re-boiling the water in the kettle, it can become flat because it loses oxygen.

    ❓ FAQs for How to Make a London Fog

    Does Earl Grey tea have caffeine in it?

    Yes, a standard cup of Earl Grey tea does have about 40 milligrams of caffeine because it contains black tea.

    What does London Fog tea taste like?

    It tastes slightly sweet and creamy with the black tea and bergamot oil adding bitter, citrusy notes to the flavor profile and it has a hint of vanilla.

    How to make a London Fog without a frother?

    You can froth the hot milk with a whisk by hand. You can also froth cold milk with the steam wand on an espresso machine.

    How long to steep the Earl Grey tea?

    It should only take about 5 minutes to extract the full flavor from the tea bag.

    London fog tea latte sprinkled with cinnamon powder.

    ❤️ More Hot Homemade Drinks to Consider

    • Cinnamon orange glögg in wine glass.
      Swedish Glögg
    • 4 colors of coffee beans on wooden board with a mug of coffee on the side.
      How to Roast Coffee Beans
    • Irish coffee in coffee mug with 4 leaf clover, whipped cream and chocolate curls.
      Irish Coffee Cocktail
    • Hot chocolate spoons on serving tray.
      Hot Chocolate Spoons

    If you tried this recipe tutorial for 🍵 How to Make a London Fog or any other recipe on my website, please leave a 🌟 star rating and let me know how it went in the 📝 comments below. And please share the recipe!

    📋Recipe

    London fog tea latte in a clear glass mug with tea biscuits on the side.
    Print Pin
    5 from 11 votes

    How to Make a London Fog at Home

    The creamy "London Fog" latte consists of the classically British Earl Grey, which is a mixture of black tea and bergamot oil, adding citrusy notes to the flavor profile, combined with steamed milk and vanilla. Here I will show you how to make a London Fog at home!
    Course Drinks
    Cuisine Canadian
    Diet Vegetarian
    Prep Time 10 minutes minutes
    Total Time 10 minutes minutes
    Servings 1
    Calories 92kcal
    Author Joss Dyckson

    Equipment

    • Milk frother

    Ingredients

    • 1 Earl Grey tea bag
    • ½ cup hot water
    • 1 teaspoon sweetener sugar, honey, agave nectar etc.--or to taste
    • ¼ teaspoon vanilla
    • ½ cup hot milk or almond milk
    • 1 pinch ground cinnamon
    US Customary - Metric

    Instructions

    • Add the hot water to a mug. Infuse the tea bag in the hot water for about 5 minutes. Remove the tea bag.
      A clear glass mug with hot water and Earl Grey tea bag.
    • Add the vanilla and sugar, to taste. Stir to dissolve the sugar.
      A clear glass mug with Earl Grey tea and vanilla extract.
    • Whisk the hot milk until it forms froth at the top. (You can either use a milk frother or whisk for the hot milk, or you can steam cold milk with an espresso machine steam wand.)
      Bowl of frothy milk and a whisk.
    • Pour the frothed milk into the hot tea. Spoon any leftover froth on top of the tea.
      A clear glass mug of Earl Grey tea with steamed milk.
    • Sprinkle with cinnamon and serve!
      A clear glass mug of London Fog with frothed milk and cinnamon powder.

    Video

    Notes

    • When you are frothing the milk, make sure the bowl or pitcher can hold extra volume because the milk will expand to approximately double in size. It will need the extra room!
    • It is better to use hot water rather than boiling water so that you don't scald the tea leaves.
    • Using fresh, cold water in the kettle will result in a better tasting cup of tea. If you keep re-boiling the water in the kettle, it can become flat because it loses oxygen.
    • If you're really feeling luxurious, sprinkle some dried lavender on top. Alternatively, you can infuse lavender with the earl grey in the water, to really complete the floral flavor of the London Fog drink.
    • A standard cup of Earl Grey tea does have about 40 milligrams of caffeine because it contains black tea.

    Nutrition

    Calories: 92kcal | Carbohydrates: 10g | Protein: 4g | Fat: 4g | Saturated Fat: 2g | Polyunsaturated Fat: 0.1g | Monounsaturated Fat: 1g | Cholesterol: 15mg | Sodium: 52mg | Potassium: 185mg | Fiber: 0.1g | Sugar: 10g | Vitamin A: 198IU | Vitamin C: 0.01mg | Calcium: 156mg | Iron: 0.02mg

    Keto Zucchini Noodles (Zoodles)

    January 1, 2020 by Joss Dyckson 1 Comment

    One of the most difficult parts of going keto is cutting out carbs, such as pasta. There are so many delicious pasta dishes that you just can't eat anymore like this skillet spaghetti and lemon basil pasta. At least, that's how it might seem at first. These keto zucchini noodles ("zoodles") are a delicious way to swap out your pasta for something that's a little more low carb.

    Zucchini noodles in bowls with bocconcini on purple background.
    [feast_advanced_jump_to]

    Why Zucchini Pasta Works For Keto

    Zucchini noodles are naturally keto-friendly with 2 to 3 grams net carbs and 1 gram fiber per cup (raw/without sauce), according to online calculators. They are simply noodles made from the zucchini vegetable, instead of wheat.

    Substituting pasta doesn't mean substituting flavor and satisfaction; these spiralized noodles are delicious and fulfilling. They are creamy like my carb-filled favorites: tuna alfredo casserole and creamy burrito casserole but low in carbs like this breadcrumb free bison meatloaf.

    If you don't want to serve this noodle dish on its own (although you can), I like to add these keto-friendly options on the side: scallops wrapped in bacon or bison ribeye steaks for something more hearty.

    By the end of this, you will have all the know-how you'll need to make this delicious low carb recipe for yourself.

    Ingredients

    Keto zucchini noodles ingredients prepped and labeled.
    • olive oil - Just regular olive oil; there is no need for EVOO (extra virgin).
    • onion - Yellow onions are the best option for low carb dishes.
    • low-carb tomato sauce - Use tomato sauce with no added sugar.
    • vegetable broth - You should also try to find broth with no added sugar for this keto recipe. You'd be surprised how many prepared broths contain sweetener.
    • heavy cream - Heavy cream is high fat and low carb, making it great for the keto diet.
    • bocconcini balls - Little balls of mozzarella cheese to add some vegetarian fat and protein.
    • zucchinis - The zucchinis will be spiralized to give them the shape of noodles, also called courgette noodles. Small to medium zucchinis are ideal for their flavor, over-sized can be bitter. If you have any zucchinis left over, make these zucchini mock crab cakes.

    *Check recipe card for full ingredients and amounts.

    Recipe Tweaks

    The simplicity of the ingredients makes this keto pasta recipe especially easy to customize.

    • Spice: Add a little heat with a sprinkle of red pepper flakes in the sauce.
    • Protein Boosters: Top with some funky aged Parmesan cheese for a little more salty, nutty complexity in the dish. You could also add meat such as diced chicken, salmon, keto meatballs or sausage.
    • Added Veg: Throw in some butter-sautéed mushrooms.
    • Sauce Options: Instead of a tomato sauce, try alfredo, garlic butter or simply olive oil and seasoning.

    How to Cook Zucchini Noodles (Zoodles)

    Diced onions in pot.

    Step 1. Sauté onions. Sauté the onions with olive oil in a pot over medium-low heat.

    Tomato sauce in pot.

    Step 2. Finish the sauce. Add the tomato sauce, vegetable broth, heavy cream and paprika, salt and pepper. Mix well and cook for 5 minutes. Keep warm.

    Spiralized zucchini noodles on cutting board.

    Step 3. Spiralize the noodles. Cut the ends off of the zucchini and then cut into long strips (like noodles) using a spiralizer or sharp knife. Discard the seedy core.

    Zucchini noodles in pan with seasoning.

    Step 4. Fry the zucchini pasta. Bring a pot or pan to medium heat. Heat the olive oil and add the garlic. Let it cook for 1 minute. Add the zucchini strips, salt, pepper and Italian herbs. Cook and stir for a couple of minutes.

    Chef's Note: Cooking the noodles in a pan, separately from the sauce, results in the best texture--no soggy, limp noodles here.

    Zucchini noodles (zoodles) with creamy tomato sauce in pan.

    Step 5. Combine. Combine the zucchini pasta with the tomato sauce.

    Zucchini noodles in bowl with bocconcini and fork.

    Step 6. Serve. Serve the keto zucchini noodles with one (or more) bocconcini in each dish.

    Make Ahead Tips

    • The zoodles: Spiralize the zucchini ahead of time, up to 2 days, and store in the fridge in a paper-towel lined, airtight container.
    • The sauce: The sauce can be made well ahead of time: up to 3 to 6 months if you freeze it and up to 3 to 5 days in the fridge. Thaw in the fridge and reheat in a pot over medium heat.

    Keto Zucchini Noodles FAQs

    Do zucchini noodles have carbs?

    Yes, they do have some carbs, although a fairly low amount. These zucchini noodles have approximately 17 grams of carbs per serving and that includes the sauce.

    Can you eat zoodles on a keto diet?

    Zucchini is a food that you can eat on a keto diet and this is the main ingredient in zoodles, in place of regular pasta. However, it will depend on the rest of your daily intake of food.

    What's the difference between zucchini noodles and zoodles?

    There is no difference. The words zucchini and noodles are combined to make 'zoodles'.

    How long can you store leftovers in the fridge?

    You can easily store any leftovers in the fridge for 2-3 days.

    Can you freeze keto zucchini noodles?

    Zucchini noodles freeze for even longer (up to 3 months for best quality), meaning you can have this delicious and nutritious meal prepped and ready for you at all times.

    Zucchini noodles in bowls with bocconcini cheese balls on purple background.

    More Delicious Low Carb Recipes to Try

    • Buffalo chicken dip with green onions in serving dish.
      Easy Slow Cooker Buffalo Chicken Dip
    • Hamburger scrambled eggs in cast iron pan.
      Hamburger Scrambled Eggs
    • Beef tenderloin covered in mushroom sauce
      Beef Tenderloin (With Bourbon Sauce)
    • Stuffed button mushrooms on black serving tray.
      Stuffed Button Mushrooms

    If you tried this Keto Zucchini Noodles (Zoodles) Recipe or any other recipe on my website, please leave a 🌟 star rating and let me know how it went in the 📝 comments below. And please share the recipe!

    📋Recipe

    Zucchini noodles in bowl with bocconcini.
    Print Pin
    5 from 2 votes

    Keto Zucchini Noodles (Zoodles)

    These keto Zucchini Noodles (Zoodles) are a delicious way to swap out your pasta for something that's a little more low carb.
    Course Main Course
    Cuisine American, Italian
    Diet Vegetarian
    Prep Time 15 minutes minutes
    Cook Time 13 minutes minutes
    Total Time 28 minutes minutes
    Servings 4
    Calories 343kcal
    Author Joss Dyckson

    Equipment

    • Spiralizer

    Ingredients

    For the Sauce

    • 1 tablespoon olive oil
    • ½ yellow onion chopped
    • 2 cups low-carb tomato sauce no added sugar
    • ½ cup vegetable broth
    • ⅔ cup heavy cream
    • 1 teaspoon paprika
    • 4 bocconcini balls or more if desired
    • salt and pepper to taste

    For the Zucchini Noodles

    • 1 tablespoon olive oil
    • 2 garlic cloves chopped
    • 4 zucchinis cleaned
    • 2 teaspoons Italian seasoning
    • salt and pepper to taste
    US Customary - Metric

    Instructions

    • Heat a pot to medium-low heat. Add the olive oil and sauté the onions until soft (5-10 minutes).
      1 tablespoon olive oil, ½ yellow onion
    • Add the tomato sauce, vegetable broth, heavy cream and paprika. Add salt and pepper, to taste. Mix well and cook for 5 minutes. Keep warm.
      2 cups low-carb tomato sauce, ½ cup vegetable broth, ⅔ cup heavy cream, 1 teaspoon paprika
    • Cut the ends off of the zucchini and then cut into long strips (like noodles) using a spiralizer or sharp knife. Discard the seedy core.
      4 zucchinis
    • Bring a pot to medium heat. Heat the olive oil and add the garlic. Let it cook for 1 minute. Add the zucchini strips and stir. Add salt, pepper and the Italian herbs. Cook for a couple of minutes.
      1 tablespoon olive oil, 2 garlic cloves, 2 teaspoons Italian seasoning
    • Serve the zucchini noodles with the tomato sauce and top with one bocconcini in each dish.
      4 bocconcini balls

    Video

    Notes

    • Fridge Storage: You can easily store both the sauce and the spiralized zucchinis in the fridge for 2-3 days.
    • Freezer Storage: They freeze for even longer (up to 3 months for best quality), meaning you can have this delicious and nutritious meal prepped and ready for you at all times.
    • Make Ahead Tips:
      • The zoodles: Spiralize the zucchini ahead of time, up to 2 days, and store in the fridge in a paper-towel lined, airtight container.
      • The sauce: The sauce can be made well ahead of time: up to 3 to 6 months if you freeze it and up to 3 to 5 days in the fridge. Thaw in the fridge and reheat in a pot over medium heat.

    Nutrition

    Calories: 343kcal | Carbohydrates: 17g | Protein: 10g | Fat: 28g | Saturated Fat: 12g | Polyunsaturated Fat: 2g | Monounsaturated Fat: 9g | Cholesterol: 55mg | Sodium: 746mg | Potassium: 963mg | Fiber: 5g | Sugar: 11g | Vitamin A: 1832IU | Vitamin C: 45mg | Calcium: 198mg | Iron: 3mg

    What is the Difference Between Chow Mein and Lo Mein?

    December 30, 2019 by Joss Dyckson Leave a Comment

    Noodles are a popular dish in a variety of different countries. Asian restaurants will usually offer many different meals including both chow mein and lo mein. Although these Chinese dishes are similar, many people wonder: what is the difference between Chow Mein and Lo Mein?

    Crunchy chow mein noodles with chopsticks.

    Chow mein and lo mein are both popular Chinese noodle dishes, but they have distinct differences in preparation, texture, and flavor. I will go over both delicious noodles delicious below to clear up any confusion you might have with these dishes.

    [feast_advanced_jump_to]

    What is Chow Mein?

    Crunchy chow mein noodles with chopsticks.

    Try my Chow Mein recipe here. (pictured above)

    The word "chow" means "fried" and "mein" translates to "noodles", therefore chow mein is fried noodles. These egg noodles are fried in oil.

    They usually end up with a crisp texture, which allows for the use of heavy sauces in this dish, after the initial frying. However, they can also be softer depending on how they are fried.

    The type of frying method can differ depending on the type of dish ordered. The vegetable and protein component can either be poured on top of the fried, crunchy noodles or stir-fried directly into the noodles.

    What is Lo Mein?

    Chicken lo mein noodles in red and black bowls with chop sticks.

    Try my Lo Mein recipe here. (pictured above)

    The word "lo" translates to "tossed", therefore lo mein is tossed noodles. Tossed noodles are made by a system of boiling and draining. Typically these noodles are added after the vegetables and protein are prepared. Once they are added to the mix, noodles are "tossed" in with a sauce and heated through.

    By strategically tossing the noodles in with all the other ingredients, the sauce can evenly mix into the dish and soak into the noodles. Lo mein noodles do not provide a crispy texture like chow mein, and typically have more sauce. The noodle texture will be soft.

    The Noodles

    Chow mein noodles.

    Buy Chow Mein Noodles Here

    Lo mein noodles.

    Buy Lo Mein Noodles Here

    • Chow Mein: Typically uses thin, crispy or slightly chewy noodles. The dish has a nice combination of textures with the crunchy noodles and tender vegetables.
    • Lo Mein: Uses soft, thicker noodles. The noodles absorb the flavors of the sauce well. The texture is more consistent and tender throughout the dish.

    Cooking Method

    • Chow Mein: They are often either pan-fried until they are crispy or parboiled and then stir-fried for a slight crisp. This gives chow mein a distinct texture with crispy and slightly chewy noodles.
    • Lo Mein: The noodles are fully cooked in boiling water first, then tossed with sauce and other ingredients in a wok or pan, making them softer. The focus is on the sauce coating the noodles rather than frying them.

    The Sauce

    • Chow Mein: The sauce is usually lighter and used more sparingly.
    • Lo Mein: The sauce is richer and more abundant, coating the noodles thoroughly. The end result is a more flavorful and saucy dish.

    Regional Variations

    • Chow Mein: There are many regional variations. In the United States, the dish can range from the crispy, fried "Hong Kong-style" to softer versions found in American-Chinese cuisine.
    • Lo Mein: Also has regional variations, but it is generally more consistent in being a saucy, noodle-heavy dish.

    Chow Mein vs. Lo Mein

    The texture and flavor of both noodle dishes can vary greatly. Although they may seem like two entirely different noodles, they are actually the same. The difference between both the chow mein and the lo mein lies in how they are cooked.

    While chow mein is made by frying the noodles to a crisp texture before the vegetables and other components are added, lo mein is made by boiling and then tossing noodles with the vegetables and sauce, resulting in a soft texture.

    Both chow mein and lo mein are a tasty, hearty dish that can be prepared with different vegetables, proteins and sauces. Understanding these differences can help you choose the right dish for your taste preference and cooking style.

    Related Noodle Dishes to Try

    • Kimchi udon in a bowl with chop sticks.
      Kimchi Udon Stir Fry
    • Zucchini noodles in bowl with bocconcini.
      Keto Zucchini Noodles (Zoodles)
    • Kimchi carbonara in a bowl.
      Kimchi Carbonara
    • Kimchi ramen noodle soup in bowl with wooden chopsticks.
      Delicious Kimchi Ramen

    Do you prefer lo mein or chow mein? If you enjoyed this post about The Difference Between Chow Mein and Lo Mein or any other post on my website, please let me know what you thought in the 📝 comments below. And please share the post!

    Electric Skillet Biscuits

    December 23, 2019 by Joss Dyckson Leave a Comment

    If you tend to shy away from the mess and hassle of baking in your kitchen, this recipe has you covered. Actually, I would rather call this a "food hack" rather than a recipe.

    These electric skillet biscuits are so simple, you will be tempted to make them every night! And why not? We all deserve to bite into a little extra comfort with our suppers.

    Electric skillet biscuits in a wooden tray.

    All you need is a can of pre-made dough and some ingredients you already have in your pantry and fridge. Your final result will be these fluffy and airy, golden-brown biscuits, surprisingly made in your electric frying pan. You can also make English muffins from scratch in your electric skillet!

    Electric skillet biscuits in a wooden tray.

    I love to listen for the hiss of the hot oil as the dough makes contact and slightly crisps up on the outside. Meanwhile, the inside bakes to give you a melt-in-your-mouth tenderness, exploding with warmth. Not to mention the butter and honey, giving just a hint of sweetness, melting on the surface of these freshly fried biscuits.

    Electric Skillet Biscuits with honey butter on the side, brown background.

    These electric skillet biscuits make it so easy to add a delightful warmth to any meal. Spend less than thirty minutes with your electric skillet and you are on your way.

    Using premade biscuit dough means no flour to clean off of your counters and much fewer dishes to do too. This really is the most delicious win-win situation when it comes to comfort food.

    Electric skillet biscuits in a wooden tray.

    For a savory addition, biscuits taste even better with sawmill gravy. What do you like to slather on your fresh, warm biscuits?

    Some more tasty recipes you might enjoy:

    • Keto Zucchini 'Noodles' with Creamy Tomato Sauce
    • Electric Skillet Oatmeal Cookies

    📋Recipe

    Electric skillet biscuits in a wooden tray.
    Print Pin
    5 from 1 vote

    Electric Skillet Biscuits

    These electric skillet biscuits are so simple, you will be tempted to make them every night! Your final result will be these fluffy and airy biscuits that are golden brown and crispy on the outside.
    Course Side Dish
    Cuisine American
    Diet Vegetarian
    Prep Time 5 minutes minutes
    Cook Time 4 minutes minutes
    Total Time 9 minutes minutes
    Servings 10 biscuits
    Calories 191kcal
    Author Joss Dyckson

    Equipment

    • Electric Skillet
    • Paper towel

    Ingredients

    • 12 ounces pre-made/pre-cut biscuit dough 1 can
    • 3 cups vegetable oil for frying
    • ⅓ cup butter at room temperature
    • ⅛ cup honey
    US Customary - Metric

    Instructions

    • Heat electric skillet to 400ºF. Add the oil and let it heat up.
    • Drop the dough discs into the oil (carefully and away from you so that the oil doesn't splash up). Fry them for 2 minutes per side, or until golden brown on both sides. Transfer them to a baking rack with paper towels underneath to catch any oil that drips.
    • In a small bowl, mix the butter and honey together until smooth.
    • Serve the biscuits with the honey butter.

    Notes

    • Store biscuits in an airtight container or resealable bag once cooled.
    • They can last up to two days at room temperature, up to 1 week in the fridge or up to 3 months in the freezer.

    Nutrition

    Calories: 191kcal | Carbohydrates: 20g | Protein: 2g | Fat: 12g | Saturated Fat: 5g | Cholesterol: 17mg | Sodium: 375mg | Potassium: 76mg | Fiber: 1g | Sugar: 5g | Vitamin A: 189IU | Calcium: 18mg | Iron: 1mg

    Electric Skillet Vegetable and Goat Cheese Frittata

    December 18, 2019 by Joss Dyckson 6 Comments

    This electric skillet frittata really has it all: health, convenience, and a touch of luxury. This colorful vegetarian dish has a light and airy texture as its base, with a slightly toasted crisp on top and on the edges. Then, you will discover surprising pockets of creamy goat cheese scattered throughout to truly enhance the richness of this dish.

    Electric Skillet Vegetable and Goat Cheese Frittata on a pie server and in a cast iron pan.

    As delicious as this all sounds, electric skillet eggs basically take zero skill in the kitchen to produce and ingredients you can probably already find in your fridge.

    You can watch the eggs bubble as they cook. Once they start puffing up, you know your frittata is done. Just like a pizza, a frittata is best-served when well-rested. So allow it to cool a little before slicing.

    Electric Skillet Vegetable and Goat Cheese Frittata in a cast iron pan, with eggs and cilantro on the side.

    Once you have mastered this meal, you'll realize just about anything can go into a frittata. I especially like it to absorb my leftover vegetables and cheese.

    It is such a versatile dish. Have it for breakfast with a slice of sour-dough toast and a pot of coffee. Or for brunch, serve this on top of an arugula salad and pair it with your favorite turkey sausage.

    A piece of Electric Skillet Vegetable and Goat Cheese Frittata on a pie server.
    A piece of Electric Skillet Vegetable and Goat Cheese Frittata on a pie server.

    For a complete meal you can take to work, slice the finished frittata and separate the pieces into meal-prep containers. This way, you can have delicious and portable meals for 1-2 days after preparation. Just chuck them in the microwave!

    To expand on the theme of convenience, this dish can be partially prepared beforehand. You can chop and sauté the vegetables ahead of time.

    Electric Skillet Vegetable and Goat Cheese Frittata in a cast iron pan, with eggs and cilantro on the side.

    These can be stored in an air-tight container for 1-2 days. Once you're ready for a fresh frittata, all you need to do is add in the eggs.

    Allow the simplicity and versatility of this dish to unleash your creativity. How would you personalize your frittata?

    Another tasty recipe you might enjoy: Electric Skillet Biscuits

    📋Recipe

    A piece of Electric Skillet Vegetable and Goat Cheese Frittata on a pie server.
    Print Pin
    5 from 2 votes

    Electric Skillet Vegetable and Goat Cheese Frittata

    This electric skillet frittata really has it all: health, convenience, and a touch of luxury. This colorful vegetarian dish has a light and airy texture as its base, with a slightly toasted crisp on top and on the edges.
    Course Breakfast
    Cuisine American, Italian
    Diet Vegetarian
    Prep Time 10 minutes minutes
    Cook Time 35 minutes minutes
    Total Time 45 minutes minutes
    Servings 2
    Calories 353kcal
    Author Joss Dyckson

    Equipment

    • Electric Skillet
    • Small cast iron pan (6")
    • Small baking rack

    Ingredients

    • 1 tablespoon olive oil
    • ¼ cup red bell pepper chopped
    • ¼ cup mushrooms sliced
    • ¼ cup onion chopped
    • ½ cup spinach chopped
    • 4 eggs
    • ¼ cup goat cheese
    • Salt and pepper
    US Customary - Metric

    Instructions

    • Heat an electric skillet to 375ºF. Add 1 tablespoon of olive oil. Sauté the peppers, mushrooms and onions until tender (around 4 minutes). Add the spinach and sauté for 1 more minute. Turn off the electric skillet.
    • In a bowl, beat the eggs. Add the sautéed vegetables, salt and pepper.
    • Grease a small cast iron pan and pour the egg mixture in. Add the goat cheese in chunks, scattered throughout the pan.
    • Clean the electric skillet and bring it to 375ºF again. Place a small baking rack inside electric skillet (to use it like an oven).
    • Place the cast iron pan on top of the baking rack, cover the skillet with the lid and bake for 30 minutes, or until cooked through.
    • Cool for a few minutes and serve.

    Notes

    • Just like a pizza, a frittata is best-served when well-rested. So allow it to cool a little before slicing.
    • Have it for breakfast with a slice of sour-dough toast and a pot of coffee. Or for brunch, serve this on top of an arugula salad and pair it with your favorite turkey sausage.
    • For a complete meal you can take to work, slice the finished frittata and separate the pieces into meal-prep containers. This way, you can have delicious and portable meals for 1-2 days after preparation. Just chuck them in the microwave!
    • This dish can be partially prepared beforehand. You can chop and sauté the vegetables ahead of time. These can be stored in an air-tight container for 1-2 days in the fridge. Once you're ready for a fresh frittata, all you need to do is add in the eggs and goat cheese and bake them together.
    • Leftover frittata can be stored in an airtight container in the fridge for up to 3 to 4 days. You can also freezer it for up to 2 months. It can be reheated in the microwave.

    Nutrition

    Calories: 353kcal | Carbohydrates: 4g | Protein: 18g | Fat: 30g | Saturated Fat: 9g | Cholesterol: 341mg | Sodium: 242mg | Potassium: 270mg | Fiber: 1g | Sugar: 2g | Vitamin A: 2067IU | Vitamin C: 27mg | Calcium: 98mg | Iron: 2mg

    Gingerbread Cake Pops

    December 11, 2019 by Joss Dyckson 3 Comments

    What better way to enjoy the Christmas season and spread the joy than with these gingerbread cake pops? These delightful, flavorful pops are a quick and tasty treat.

    Gingerbread cake balls on parchment, covered in powdered sugar.

    This simple recipe is a great treat to make by yourself, with friends, or with children if they like to get involved in the holiday baking. They are made in a cake pop baker without a cake pop coating and can be enjoyed as a snack or dessert.

    Made with seasonal ingredients and warm spices, they are indeed the best way to ring in the Christmas season. Great for bringing to holiday parties, or eating while curled up around a crackling fire, they're sure to become your next holiday tradition.

    Serve them with this hot gingerbread latte for even more gingerbread flavor. You can check out more of my holiday recipes for Christmas and cake pop recipes, if you're interested.

    [feast_advanced_jump_to]

    🫚 Ingredients

    Gingerbread cake pop ingredients prepped and labeled on light blue wooden background.
    • brown sugar - For deeper, richer flavor than white sugar.
    • cinnamon and nutmeg - Cinnamon and nutmeg are classic gingerbread spices.
    • molasses - I recommend fancy/light molasses for this recipe but cooking/dark molasses also works. Dark molasses isn't as strong as blackstrap but has a deeper flavor than fancy so the flavor should come through really well.
    • ginger - This recipe uses fresh ginger but you can substitute with dried: 1 teaspoon ground ginger = 1 tablespoon fresh grated ginger.
    • powdered sugar - To sprinkle over the cake balls. I also provide instructions for an alternative gingerbread sugar coating if you prefer. It's delicious and my kids love it!

    *Check recipe card for ingredient amounts.

    NEED TO SUBSTITUTE AN INGREDIENT?

    Ask ChatGPT suggestions on how to substitute the particular ingredient.

    ChatGPT

    🥄 Equipment

    You will need a cake pop maker for this recipe. It bakes the cake batter into little round balls within a few minutes, saving you on a large amount of prep time. For more details check out how to use a cake pop maker.

    🥣 How to Make Gingerbread Cake Pops

    Gingerbread cake batter in bowl.

    Step 1. Make the gingerbread cake batter.

    Gingerbread cake balls in cake pop maker.

    Step 2. Transfer the batter to a preheated cake pop maker and bake for 3 to 4 minutes. Let cool.

    Gingerbread cake pop in hand.

    Step 3. Insert treat sticks into the center of the cake balls and sprinkle with powdered sugar. Serve the gingerbread cake pops!

    Chef's Note: There is no need to adhere the treat sticks to the cake balls like you would with classic cake pops, because they don't have a chocolate coating, which keeps them light.

    🤎 Alternative Gingerbread Sugar Coating

    You can use this gingerbread sugar coating instead of the powdered sugar for the cake balls, if desired. I like to make half a batch of each and let guests pick their favorite.

    Gingerbread cake ball on plate of spiced sugar.

    Combine white sugar with cinnamon, ginger and nutmeg and spread it out on a plate. Dip the cake balls into a glaze made of icing sugar, milk and vanilla, then roll them into the gingerbread spice sugar. Let them set for at least 30 minutes and serve!

    *See recipe card for ingredient amounts.

    🍽️ Serving Suggestions

    Gingerbread cake balls on festive plate dusted with sugar.
    • You can serve them with or without the treat sticks. Gingerbread cake balls without lollipop sticks (as seen in the image above) are just as delicious and easy to serve.
    • Enjoy these gingerbread cake pops in the morning with a steaming cup of tea or coffee, or try dipping them in hot chocolate (I make these homemade hot chocolate spoons you could try) or hot apple cider.
    • Chocolate lovers can trade out the powdered sugar topping for cocoa powder or a decadent chocolate coating.

    🌡️ Storage

    • Store in an airtight container in a cool, dry place like your cupboard or pantry for up to 1 week.
    • You can freeze them for up to 3 months.
    A hand holding a gingerbread cake pop that has been bitten into.

    🎄 More Tasty Holiday Recipes to Enjoy

    • Christmas wreath salad on white background.
      Christmas Wreath Salad
    • Canadian butter tarts on Christmas themed plate.
      Canadian Butter Tarts
    • Fruit salad in dessert glass.
      Christmas Fruit Salad
    • Salmon and dill mousse with caviar in white dish.
      Salmon Mousse

    If you tried this Gingerbread Cake Pops Recipe or any other recipe on my website, please leave a 🌟 star rating and let me know how it went in the 📝 comments below. And please share the recipe!

    📋Recipe

    Gingerbread cake pops/balls on decorated plate.
    Print Pin
    5 from 3 votes

    Gingerbread Cake Pops

    What better way to enjoy the season, and spread the joy than with gingerbread cake pops? These delightful, flavorful pops are a quick and tasty treat with classic holiday flavors. They can also be served as cake balls without the sticks!
    Course Dessert
    Cuisine American, German
    Diet Vegetarian
    Prep Time 10 minutes minutes
    Cook Time 4 minutes minutes
    Total Time 14 minutes minutes
    Servings 28 cake pops
    Calories 66kcal
    Author Joss Dyckson

    Equipment

    • Cake Pop Maker

    Ingredients

    Gingerbread Cake Pops

    • ½ cup butter softened
    • ½ cup brown sugar
    • ¼ cup fancy molasses or light
    • ¼ cup water
    • 1 egg
    • 1 tablespoon ginger minced
    • 1 cup flour
    • 1 teaspoon baking powder
    • 1 teaspoon cinnamon
    • 1 teaspoon nutmeg
    • ½ teaspoon sea salt
    • 1 tablespoon powdered sugar to dust the cake balls with

    Optional Sugar Coating

    • ¼ cup white sugar
    • 1 tablespoon cinnamon powder
    • 2 teaspoons ginger powder
    • 1 teaspoon nutmeg
    • 1 cup icing sugar
    • 2 ½ tablespoons milk
    • ½ teaspoon vanilla extract
    US Customary - Metric

    Instructions

    Gingerbread Cake Pops

    • Plug in the cake pop maker to preheat it. In a medium bowl, combine the butter and brown sugar. Add the molasses, water, egg and ginger and mix well.
      ½ cup butter, ½ cup brown sugar, ¼ cup fancy molasses, ¼ cup water, 1 egg, 1 tablespoon ginger
    • Combine the dry ingredients (except for the powdered sugar) and then add them to the wet mixture.
      1 cup flour, 1 teaspoon baking powder, 1 teaspoon cinnamon, 1 teaspoon nutmeg, ½ teaspoon sea salt
    • Add the batter to a piping bag to make it easier to add to the cake pop maker, or you can use a teaspoon. Fill the cake pop maker holes until almost full (leaving about 1mm on top).
    • Close the lid and bake in the cake pop maker for 3 to 4 minutes, or until golden brown and a toothpick comes out clean from the center.
    • Remove from cake pop maker and let them cool for a few minutes. Repeat with remaining batter.
    • Insert treat sticks into the center of the cake balls, sprinkle with powdered sugar and serve.
      1 tablespoon powdered sugar

    Optional Gingerbread Sugar Coating

    • Combine the white sugar with the cinnamon, ginger and nutmeg and spread it out on a plate.
      ¼ cup white sugar, 1 tablespoon cinnamon powder, 2 teaspoons ginger powder, 1 teaspoon nutmeg
    • Combine the icing sugar, milk and vanilla in a measuring cup to form a glaze.
      1 cup icing sugar, 2 ½ tablespoons milk, ½ teaspoon vanilla extract
    • Dip the cake balls into the glaze, then roll them into the gingerbread spice sugar. Let them set for at least 30 minutes and serve!

    Notes

    • Treat sticks: There is no need to stick the treat sticks to the cake ball using melted chocolate because they don't have a coating, which keeps them light. You could even skip the treat sticks and serve them as cake balls instead.
    • Optional sugar coating for the cake balls: You can use the gingerbread sugar coating instead of the powdered sugar for the cake balls, if desired. Or, check out this alternative frosting for cake pops with tips and step by step photos.
    • Ginger powder: If you want to use ginger powder instead of fresh, you will need 1 teaspoon. However, I highly recommend using fresh ginger for its amazing flavor in the cake balls.
    • Room temp. storage: Store in an airtight container in a cool, dry place like your cupboard or pantry for up to 1 week.
    • Freezer storage: You can freeze them in a freezer safe container or zip-top bag for up to 3 months.

    Nutrition

    Calories: 66kcal | Carbohydrates: 9g | Protein: 1g | Fat: 3g | Saturated Fat: 2g | Cholesterol: 13mg | Sodium: 59mg | Potassium: 67mg | Fiber: 1g | Sugar: 6g | Vitamin A: 96IU | Calcium: 19mg | Iron: 1mg

    How to Make Cinnamon Buns

    December 9, 2019 by Joss Dyckson 4 Comments

    Is there any greater joy in life than eating a fresh cinnamon roll right out of the pan? To answer that question: No, there really isn't, in my opinion.

    Cinnamon rolls from scratch are one of those fantastic delicacies that not nearly enough people experience for themselves. This is made all the more tragic because of how easy it is to create them.

    Cinnamon Buns with cream cheese frosting drizzled on top in white serving dish.

    Let's right that wrong now and show you how to make cinnamon buns at home with cream cheese icing. This recipe uses quick yeast rising and simple ingredients to make a quality product at half the time you'd expect. The end result is so delicious you'll be kicking yourself for not trying this sooner.

    [feast_advanced_jump_to]

    Step #1. Prepare Ingredients

    Cinnamon bun ingredients prepped on white background.
    • instant yeast - Unlike active dry yeast, instant yeast doesn't require proofing in warm water. You can mix it directly into dry ingredients. It works quicker than active dry yeast.
    • flour - All purpose flour works great.
    • cream cheese - This is for the cinnamon bun icing, which will make them taste more like Cinnabon rolls, which are irresistible!
    • cinnamon - Cassia cinnamon is the most common cinnamon in the grocery stores so you'll have no trouble finding it, as it's probably already in your pantry. It has strong flavor so it's great for baking. Cinnabon uses Makara cinnamon in their rolls, which is really just high quality cassia cinnamon (Korintje).

    *Check recipe card for ingredient amounts.

    Step #2. Combine Dry Filling Ingredients

    A teaspoon of cinnamon and brown sugar mixture.

    Mix brown sugar, cinnamon and nutmeg together and reserve.

    Step #3. Prepare Cinnamon Bun Dough

    Cinnamon bun dough ingredients in a metallic bowl, cinnamon sticks on the side.

    Mix the flour, sugar and dry instant yeast together. Add all wet ingredients, except for the butter, and combine. Once you're at this point, it should look a bit flaky. Add the butter and incorporate with your hands until a dough ball forms.

    Cinnamon bun dough ingredients in a metallic bowl.
    Cinnamon bun dough ingredients in a metallic bowl.
    Cinnamon bun dough getting mixed.
    Cinnamon bun dough getting mixed.

    Step #4. Let the Dough Rest

    Dough ball in bowl with plastic wrap.

    Cover the dough loosely with plastic film and let it rest for 10 minutes.

    Step #5. Roll Out Dough

    Dough ball and rolling pin on marble counter top.

    Roll the dough out into a rectangular shape on a floured surface, using a rolling pin (try to make it about 12" wide).

    Rolling pin with cinnamon bun pastry on marble counter top.

    Step #6. Brush Butter Over Dough

    Pastry brush and cinnamon bun pastry rolled out.

    Preheat oven to 375ºF (190ºC). Use a pastry brush to cover the dough with melted butter.

    Step #7. Sprinkle Sugar on & Roll

    Cinnamon bun dough with brown sugar on it, marble background.

    Sprinkle the brown sugar mix on top and roll up the dough into a log.

    Raw cinnamon bun roll on wooden cutting board.

    Step #8. Cut Dough into Smaller Pieces

    Raw cinnamon buns on wooden cutting board.

    Cut the roll into smaller pieces (about 1.5 inches wide). You should get 8 individual pieces. Transfer to a baking pan.

    Step #9. Let the Buns Rise

    Raw cinnamon buns.

    Let them sit, covered with a damp towel, until they double in size (about 1 hour).

    Step #10. Bake the Cinnamon Buns

    Cinnamon buns.

    Bake in a 375ºF preheated oven for about 20 minutes - or until golden brown.

    Step #11. Prepare the Glaze

    A bowl with flour and spatula.

    While the cinnamon buns are baking, mix all of the glaze ingredients with an electric mixer or whisk until well combined and smooth. Set aside.

    A bowl with flour mixture and whisk.

    Step #12. Drizzle the Glaze Over & Serve

    Cinnamon Buns with cream cheese frosting drizzled on top in white serving dish.

    Drizzle the glaze over and sprinkle with some more cinnamon if desired. Serve and enjoy!

    Cinnamon Buns with cream cheese frosting drizzled on top in white serving dish.
    Cinnamon Buns with cream cheese frosting drizzled on top in white serving dish.

    Cinnamon buns are one of the greatest desserts in the world. Now you've got the skills to craft some of these soft, pillowy, spicy, creamy, and amazing rolls of flavor all your own with minimal hassle. Take what you've learned here and explore all the possibilities this delectable dessert has to offer.

    Before you bake, remember to account for spacing on the buns. Make sure they've got some breathing room and aren't touching prior to going in the oven. That lets them all bake and rise evenly and tear apart from each other without pinching all those flaky layers.

    Cinnamon Buns with cream cheese frosting drizzled on top in white serving dish.
    Cinnamon Buns with cream cheese frosting drizzled on top in white serving dish.

    You can safely store these buns in the fridge for around a week in an airtight container. If you expect you're not going to eat them all shortly after they come out of the oven, one thing you can do to help preserve their integrity is to hold off on icing them until you're ready to eat.

    That keeps the buns from getting soggy as they sit there while also making it easy to pop them back in the oven for a few minutes to heat them up after they've been in the fridge.

    Did you enjoy these cinnamon buns? Let us know in the comments how they turned out!

    Looking to further enhance your cooking skills? Check out...How to Make a London Fog

    📋Recipe

    Cinnamon Buns with cream cheese frosting drizzled on top in white serving dish.
    Print Pin
    5 from 1 vote

    Easy Homemade Cinnamon Buns

    There is no greater joy in life than eating a fresh cinnamon bun right out of the pan. I will show you exactly how to make cinnamon buns from scratch. This recipe uses quick rising yeast and simple ingredients to make a delish pastry that is sweet, soft and fluffy with a delicious cream cheese icing.
    Course Dessert
    Cuisine American, Swedish
    Diet Vegetarian
    Prep Time 30 minutes minutes
    Cook Time 20 minutes minutes
    Resting time 1 hour hour 10 minutes minutes
    Total Time 2 hours hours
    Servings 10 buns
    Calories 356kcal
    Author Joss Dyckson

    Equipment

    • Baking sheet
    • Whisk

    Ingredients

    Filling

    • ½ cup brown sugar
    • 2 teaspoons cinnamon
    • 1 teaspoon ground nutmeg
    • ¼ cup butter melted

    Pastry

    • 2 ¼ cups flour
    • ¼ cup sugar
    • 1 tablespoon instant yeast
    • 3.5 ounces milk (100 ml) heated to warm temperature
    • 1 large egg
    • 1 teaspoon vanilla
    • ¼ cup butter cubed

    Icing

    • ¾ cup cream cheese softened
    • ¾ cup icing sugar
    • 2 tablespoons hot water
    US Customary - Metric

    Instructions

    Filling

    • Mix the brown sugar, cinnamon and nutmeg together and reserve.
      ½ cup brown sugar, 2 teaspoons cinnamon, 1 teaspoon ground nutmeg

    Pastry

    • Mix the flour, sugar and dry instant yeast together. Add all wet ingredients (milk, egg, vanilla) and combine. Once you're at this point, it should look a bit flaky.
      2 ¼ cups flour, ¼ cup sugar, 1 tablespoon instant yeast, 3.5 ounces milk, 1 large egg, 1 teaspoon vanilla
    • Add the butter and incorporate with your hands until a dough ball forms. The dough should be slightly sticky but not too sticky that it's clinging to your hands. You can add a touch more flour if sticky.
      ¼ cup butter
    • Cover the dough loosely with plastic film and let it rest for 10 minutes.
    • Roll the dough out into a rectangular shape on a floured surface, using a rolling pin (try to make it about 12" to 14" wide).
    • Use a pastry brush to cover the dough with melted butter.
      ¼ cup butter
    • Sprinkle the brown sugar mix on top and roll up the dough into a log.
    • Cut the roll into smaller pieces (about 1.5 inches wide). You should get 8 to 10 individual pieces. Transfer to a baking pan, 1" to 2" apart. Let them sit, covered with a damp towel, until they double in size (about 1 hour).
    • Bake in a 375ºF preheated oven for about 18 to 20 minutes - or until golden brown. Let them cool for 10 to 15 minutes so they're warm but not hot.

    Icing

    • Mix all of the icing ingredients with an electric mixer or whisk until well combined and smooth.
      ¾ cup cream cheese, ¾ cup icing sugar, 2 tablespoons hot water
    • Push the cinnamon buns closer together so that they're touching and frost them with a spatula. Spread it out nice and even on top. Sprinkle with some more cinnamon. Serve and enjoy!

    Notes

    • Frosting the buns: If the buns are too hot, especially for cream cheese frosting, the fat in the frosting can melt and separate, making it greasy and runny. Some bakeries frost while the buns are warm, then add another light layer after they've cooled for extra richness and aesthetic appeal!
    • Storage: You can safely store the buns in the fridge for up to 4 to 5 days. Cool them first, wrap each individually in plastic wrap and transfer to an airtight container. If you expect you're not going to eat them all shortly after they come out of the oven, one thing you can do to help preserve their integrity is to hold off on icing them until you're ready to eat.
    • Reheating: You can reheat them in the microwave for a short time (20 to 30 seconds), until warmed up.
    • Even baking: Try to cut them close to the same size so that they bake evenly. Don't be afraid to pop out the ruler!

    Nutrition

    Calories: 356kcal | Carbohydrates: 48g | Protein: 5g | Fat: 16g | Saturated Fat: 10g | Polyunsaturated Fat: 1g | Monounsaturated Fat: 4g | Trans Fat: 0.4g | Cholesterol: 61mg | Sodium: 143mg | Potassium: 98mg | Fiber: 1g | Sugar: 26g | Vitamin A: 551IU | Vitamin C: 0.04mg | Calcium: 52mg | Iron: 2mg

    Brandy Alexander Cocktail

    December 4, 2019 by Joss Dyckson Leave a Comment

    The Christmas season is almost upon us. In addition to the lights, trees, presents, and all manner of other fun things, this holly jolly time of year also means tons of great food and drink. What's better on a cold winter night than a delicious holiday-themed cocktail? That's where the Brandy Alexander cocktail comes in.

    Brandy Alexander cocktail in a martini glass with cinnamon stick.

    While a Black Fog cocktail is more suited to Halloween, this creamy white cocktail is perfect for a snowy Christmas day. Whether you're making it for a party or for yourself after a long day, this drink scratches that festive but nostalgic itch in all the right ways.

    Pleasing a crowd at your next party will be a snap with this dessert drink, especially if you serve it after a hearty turkey dinner with all the trimmings.

    Simple and elegant all at once, this martini cocktail might even be good enough to be a year-round staple at your home bar. You can check out more holiday recipes for Christmas here.

    Some more delicious Christmas cocktails you might be interested in are: this Moscow mule with cranberry juice and spiked Christmas punch.

    [feast_advanced_jump_to]

    🍸 What is a Brandy Alexander?

    A Brandy Alexander is a rich, creamy and slightly spicy, retro cocktail with notes of cinnamon and chocolate from the dark crème de cacao; it's almost like a more booze-forward version of the classic hot cocoa (except for the hot part).

    🥃 Ingredients

    Brandy Alexander cocktail ingredients prepped and labeled on blue background.
    • brandy - Brandy is distilled wine.
    • crème de cacao - While I prefer dark crème de cacao, I find it very hard to get my hands on. It's usually sold out or not carried by the liquor stores I go to compared to clear crème de cacao, which I can always find. Clear crème de cacao is perfectly fine to use if you can't find dark. Dark has a richer flavor whereas light has more of a milk chocolate flavor.
    • cinnamon stick + cinnamon powder - This will be used as a garnish. The stick is also handy for stirring.
    • ice - To fill the cocktail shaker with and chill the drink.

    *Check recipe card for ingredient amounts.

    Chef's Note: You will also need a cocktail shaker and martini glass.

    🥄 How to Make a Brandy Alexander

    Cocktail shaker filled with ice, surrounded by Brandy Alexander ingredients.

    Step 1. Add Ice. Add ice to a cocktail shaker.

    Cocktail shaker on blue background with liqueur on the side.

    Step 2. Fill and Shake. Add the brandy, crème de cacao and heavy cream. Shake hard for about 12 to 15 seconds.

    Brandy Alexander cocktail in a martini glass with blue stem.

    Step 3. Serve. Pour into a martini glass. Sprinkle with cinnamon and garnish with a cinnamon stick. Serve!

    🍸 Another seasonal martini cocktail you might like is my pumpkin pie martini.

    💭 Top Tips

    There are a few secrets to make this Christmas cocktail even more amazing.

    • Use high quality ingredients. The easiest way to do this is using premium quality cinnamon when you serve it, enhancing the earthy, spicy punch of the original and really bringing out the complexity of the brandy and chocolate of the crème de cacao.
    • Chill it properly. This holiday beverage tastes best nice and chilled. Be sure to shake the ingredients in the cocktail shaker for at least 10 seconds. You will know it's cold enough when the outside of the shaker is frosted up. Your hands will likely feel it too.
    • Trick to keep it extra cool. To keep it even cooler, you can chill the martini glass ahead of time and add a few ice cubes to the glass before straining the alcohol mixture into it.

    ❓ Recipe FAQs

    Why is it called a Brandy Alexander?

    The origins are unknown but it might have been named after a bartender at a New York City restaurant named Troy Alexander, who created it in celebration of Phoebe Snow (singer/songwriter). Brandy is one of the liquors used in the drink. Another rumor is that it was named after Alexander II, who was a Russian tsar.

    What kind of cream is used in a Brandy Alexander cocktail?

    Heavy cream is one of the main ingredients in a Brandy Alexander.

    Brandy Alexander cocktail in a martini glass with blue stem.

    💚 More Holiday Recipes You Will Love

    • Gingerbread latte and gingerbread coffee syrup.
      Gingerbread Coffee Syrup (+ Latte)
    • Gingerbread cake pops/balls on decorated plate.
      Gingerbread Cake Pops
    • Top view of mulled wine with orange slices and cinnamon sticks.
      Electric Skillet Mulled Wine
    • Roasted beets and turnips in wooden serving bowl.
      Christmas Side Dish: Roasted Beet & Turnip Duo

    If you tried this Brandy Alexander Cocktail Recipe or any other recipe on my website, please leave a 🌟 star rating and let me know how it went in the 📝 comments below. And please share the recipe!

    📋Recipe

    Brandy Alexander cocktail in a martini glass with blue stem.
    Print Pin
    5 from 2 votes

    Brandy Alexander Cocktail

    The Brandy Alexander cocktail is a rich, slightly spicy drink with notes of cinnamon and chocolate. It's almost like a more booze-forward version of the classic hot cocoa (except for the hot part).
    Course Drinks
    Cuisine American
    Diet Vegetarian
    Prep Time 5 minutes minutes
    Total Time 5 minutes minutes
    Servings 1
    Calories 391kcal
    Author Joss Dyckson

    Equipment

    • Cocktail shaker

    Ingredients

    • 1 ½ ounces brandy
    • 1 ½ ounces heavy cream
    • 1 ½ ounces crème de cacao can use dark or light (clear)
    • 1 pinch cinnamon
    • cinnamon stick garnish
    • ice
    US Customary - Metric

    Instructions

    • Add ice to a cocktail shaker.
    • Add the brandy, crème de cacao and heavy cream.
    • Shake hard for about 12 to 15 seconds.
    • Pour into a martini glass. Sprinkle with cinnamon and garnish with a cinnamon stick. Serve!

    Notes

    • You can use clear (light) crème de cacao if you can't find dark. Dark has a richer flavor whereas light has more of a milk chocolate flavor. If you want your drink to be festively white for Christmas, use the clear crème de cacao.
    • This holiday beverage tastes best nice and chilled. Be sure to shake the ingredients in the cocktail shaker for at least 10 seconds. You will know it's cold enough when the outside of the shaker is frosted up. Your hands will likely feel it too.
    • To keep it even cooler, you can chill the martini glass ahead of time and add a few ice cubes to the glass before straining the alcohol mixture into it.

    Nutrition

    Calories: 391kcal | Carbohydrates: 24g | Protein: 1g | Fat: 15g | Saturated Fat: 10g | Polyunsaturated Fat: 1g | Monounsaturated Fat: 4g | Cholesterol: 48mg | Sodium: 12mg | Potassium: 42mg | Fiber: 0.1g | Sugar: 13g | Vitamin A: 626IU | Vitamin C: 0.3mg | Calcium: 30mg | Iron: 0.1mg

    Canadian Butter Tarts

    December 2, 2019 by Joss Dyckson 1 Comment

    The holiday season is rapidly approaching, and if you're an avid foodie like me, you might be wondering what mouthwatering, festive baked goods you can make this year. These old fashioned, melt-in-your-mouth Canadian butter tarts are a combination of flaky, buttery pastry and sticky, sweet filling.

    Butter tarts on Christmas themed plate.

    There's such a huge selection of tarts, from pecan to cranberry, that butter tarts are often overlooked. But come Christmas, these are definitely on my baking list alongside the Christmas cake pops and homemade Christmas cookies! My mom made these every year when I was a kid and we always looked forward to them.

    Rather than buying pre-made mini tart shells, this recipe gives you easy instructions on making the actual pastry (although you can use those too if you're in a pinch).

    The recipe is made without corn syrup, the filling sweetened instead with maple syrup, brown sugar, and the chewy addition of raisins.

    You can bake a ton of these little bite-sized pastries in preparation for family gatherings and holiday parties. They freeze quite well, sometimes even tasting better when cold.

    [feast_advanced_jump_to]

    What are Butter Tarts?

    Butter tarts are a dessert consisting of a mini tart pastry filled with a dark golden, sweet and gooey filling that sometimes includes raisins. Did you know that they are traditionally Canadian? That explains the maple syrup!

    Ingredients

    Butter tart ingredients labeled on marble background.
    • maple syrup - It's best to use real Canadian maple syrup, not the kind with added sugar.
    • flour - Your best option is cake and pastry flour for a nice, flaky crust but all-purpose is great too.
    • raisins - Raisins are totally optional as I know not everyone is a fan but I personally can't go without them. You can also add some chopped pecans if desired.

    *Check recipe card for ingredient amounts.

    How to Make Butter Tarts

    Butter tart wet ingredients in glass bowl.

    Step 1. Make the filling. Combine the filling ingredients in a bowl.

    Pastry dough and wooden rolling pin on counter.

    Step 2. Make the pastry. Combine the pastry ingredients and then knead until soft and smooth.

    Butter tart pastry cut out into circles on white surface.

    Step 3. Roll out the dough. Roll the dough out and cut 12 circles with a 3.5" circular cookie cutter.

    Butter tart pastry in muffin tin.

    Step 4. Transfer to muffin tin. Transfer the dough discs to a greased muffin tin.

    Chef's Note: The dough should go up the sides about 2 cm (or ¾ inches) from the bottom.

    Butter tart pastry and raisins in muffin tin.

    Step 5. Add raisins. Drop a few raisins into each tart shell.

    Unbaked butter tarts in muffin tin.

    Step 6. Add filling. Pour the filling over the raisins into each tart.

    Baked butter tarts in muffin tin.

    Step 7. Bake. Bake in a 425ºF oven for about 15 minutes, until the filling is set and the pastry is golden. Let them cool.

    Butter tarts on cooling rack.

    Step 8. Serve. Remove them from the pan. Serve the Canadian butter tarts.

    Joss' Top Tip

    If you're looking for an easy cheat, buy premade, mini tart shells. Then you simply have to make the filling and bake them in the oven. You can find the unbaked tart shells in the freezer section of the grocery store.

    Canadian Butter Tarts FAQs

    What does vinegar do in butter tarts?

    Some say because the filling is so wonderfully sweet, the apple cider vinegar helps balance it out for a rustic, full-bodied, tangy flavor. In the pastry itself, the vinegar helps to provide a tender, flaky crust by slightly inhibiting gluten development. It also prevents the dough from oxidizing.

    How do you make the filling more firm?

    Some people like a runny filling, but if you want a firmer filling, just add another egg.

    How do you store them?

    You can store homemade Canadian butter tarts at room temperature in an airtight container for up to 2 days, in the fridge for 5 days or in the freezer for 3 months. If freezing, make sure to wrap them individually and place in a freezer bag or freezer-safe container. Thaw in the fridge.

    How do you stop the filling from boiling over?

    It's important to leave room at the top of the pastry. Do not overfill.

    Canadian butter tarts arranged on holiday themed plate.

    More Tasty Holiday Treats

    • Sliced cheese strudel with a scoop of ice cream.
      Cheese Strudel
    • Brandy Alexander cocktail in a martini glass with blue stem.
      Brandy Alexander Cocktail
    • Coffee cake loaf with Christmas decorations.
      Christmas Coffee Cake
    • Cheesecake cake pops in holder.
      Cheesecake Cake Pops

    Do you like your tarts runny or firm? With or without raisins?! If you tried this Canadian Butter Tarts Recipe or any other recipe on my website, please leave a 🌟 star rating and let me know how it went in the 📝 comments below. And please share the recipe!

    📋Recipe

    Canadian butter tarts on Christmas themed plate.
    Print Pin
    5 from 2 votes

    Canadian Butter Tarts

    These old fashioned, melt-in-your-mouth Canadian butter tarts are a combination of flaky, buttery pastry and sticky, sweet filling.
    Course Dessert
    Cuisine Canadian
    Diet Vegetarian
    Prep Time 20 minutes minutes
    Cook Time 15 minutes minutes
    Total Time 35 minutes minutes
    Servings 12 butter tarts
    Calories 262kcal
    Author Joss Dyckson

    Equipment

    • Muffin pan
    • round cookie cutter

    Ingredients

    Butter Tart Filling

    • ⅔ cup brown sugar
    • ¼ cup unsalted butter melted
    • 1 egg
    • ⅓ cup maple syrup
    • 1 teaspoon vanilla extract
    • 1 teaspoon apple cider vinegar
    • ⅓ cup raisins optional

    Pastry

    • 1 ¾ cups flour either cake and pastry flour or all purpose
    • 1 pinch salt
    • ½ cup unsalted butter melted
    • ¼ cup cold water
    • 1 egg yolk
    • 1 teaspoon white vinegar
    US Customary - Metric

    Instructions

    • Combine the brown sugar, melted butter, egg, maple syrup, vanilla extract and apple cider vinegar thoroughly. Reserve.
      ⅔ cup brown sugar, ¼ cup unsalted butter, 1 egg, ⅓ cup maple syrup, 1 teaspoon vanilla extract, 1 teaspoon apple cider vinegar
    • Preheat oven to 425ºF. In a large mixing bowl, combine flour and salt. Add the butter and mix with a wooden spoon until partially blended. Add water, egg yolk and vinegar and continue combining with the wooden spoon. Once it's easy to manipulate, knead with your hands a bit, just until a soft and smooth dough ball forms.
      1 ¾ cups flour, 1 pinch salt, ½ cup unsalted butter, ¼ cup cold water, 1 egg yolk, 1 teaspoon white vinegar
    • Use a rolling pin to spread the dough out over a clean, floured surface. Cut out 12 circles with a 3.5" round cutter (3.75" will work too). You will have to gather up the scraps and roll it out again.
    • Oil a muffin tray and place the dough discs inside. They should be placed at the bottom and slightly up the edges (about ¾ inches/2 cm high). Place a few raisins in each tart.
      ⅓ cup raisins
    • Pour the brown sugar mixture over the raisins into each tart, leaving some room at the top of the pastry.
    • Bake for around 15 minutes or until the filling is set and the pastry is golden. Let them cool before removing from the muffin tin.
    • Serve and enjoy! They can be served warm or cold, whatever you prefer.

    Notes

    • Storage: You can store them at room temperature in an airtight container for up to 2 days, in the fridge for 5 days or in the freezer for 3 months. If freezing, make sure to wrap them individually and place in a freezer bag or freezer-safe container. Thaw in the fridge.
    • Filling consistency: Some people like a runny filling, but if you want a firmer filling, just add another egg.
    • Tart shell cheat: If you're looking for an easy cheat, buy premade, mini tart shells. Then you simply have to make the filling and bake them in the oven. You can find the unbaked tart shells in the freezer section of the grocery store.

    Nutrition

    Calories: 262kcal | Carbohydrates: 35g | Protein: 3g | Fat: 12g | Saturated Fat: 8g | Polyunsaturated Fat: 1g | Monounsaturated Fat: 3g | Trans Fat: 0.5g | Cholesterol: 60mg | Sodium: 17mg | Potassium: 100mg | Fiber: 1g | Sugar: 17g | Vitamin A: 396IU | Vitamin C: 0.2mg | Calcium: 31mg | Iron: 1mg

    Electric Skillet Mini Key Lime Pies

    November 27, 2019 by Joss Dyckson Leave a Comment

    A craving for tart, luscious, authentic Key lime pie? Check. A preference for those cute little mini pies? Me too. An electric skillet? Wait, what? Yes, I'm serious, you can bake in an electric skillet.

    Despite its claim to fame as a superior pancake griddle or a deep fryer, the electric skillet also has the capability to act as a mini oven: enter this recipe for electric skillet key lime pie.

    Key lime pie on plate.

    If you're craving easy and delicious, homemade desserts, whip these delectable beauties up. Armed with only 6 ingredients, six mini pie molds, and an electric skillet, you'll be noshing your way to Key lime bliss in no time.

    It really comes as no surprise, but Key Lime is Florida's official state pie. You can visit the Key Lime Festival every year in Key West.

    I also have these chilled desserts you might like: grasshopper pie, iced lemon mousse and papaya cream. And if you don't have one yet, check out the best electric skillet.

    [feast_advanced_jump_to]

    Electric Skillet Pie Ingredients

    Electric skillet pie ingredients labeled.
    • graham cracker crumbs - You can use the box of crumbs from the grocery store or grind your own.
    • butter - You can use salted or unsalted. If it's salted, it can help enhance the flavor.
    • sweetened condensed milk - This is found in a can in the baking aisle of the grocery store.
    • egg yolks - Egg yolks play a crucial role in the preparation of a key lime pie. The proteins in the yolks coagulate when heated, which helps thicken the pie filling and give it a custard-like texture.
    • key lime juice - Key limes are also known as Mexican or West Indian limes and are smaller than the common limes. Their flavor is slightly more intense and floral. If you can't find key limes, you can substitute with regular limes--juiced. I always use freshly squeezed juice for this recipe.
    • lime zest - Optional topping.
    • meringue cookies - These are also an optional topping.

    *Check recipe card for ingredient amounts.

    How to Make Electric Skillet Pie

    Graham crumb and melted butter in dish with spoon.

    Step 1. Preheat and mix crumbs. Preheat electric skillet to 350ºF. Mix the Graham crumbs and the melted butter until well combined (it should still be a bit grainy).

    Graham cracker crust in mini tart pans.

    Step 2. Press crumbs. Press the crumbs into the bottom and up the sides of 6 individual, mini pie/tart molds.

    Baking rack in electric skillet.

    Step 3. Add baking rack. Place a small baking rack inside the electric skillet.

    Mini tart shells with graham cracker crust in electric skillet.

    Step 4. Bake pie crust. Place the mini pie molds on top and cook with the lid on for around 15 minutes. Let them cool.

    Key lime pie filling in bowl with whisk.

    Step 5. Make the filling. For the pie filling, mix the condensed milk and egg yolks with a whisk until well combined. Add the lime juice and lime zest and whisk together.

    Raw key lime pies getting filled on baking rack.

    Step 6. Add filling to crusts. Pour the lime pie filling into the cooled pie crusts.

    Raw key lime pies in electric skillet.

    Step 7. Bake. Return the tart pans to the electric skillet (on top of the rack) and bake with the lid on for about 25 minutes (until the center is set - but still jiggly).

    Baked mini key lime pies on baking rack.

    Step 8. Chill. Let them chill in the fridge for at least 3 hours.

    Key lime pie getting topped with broken meringue and lime slices.

    Step 9. Add toppings. Top with broken meringue cookies and lime zest. Serve the electric skillet pie!

    Key lime pie on plate with spoons on the side.

    Joss' Tips

    • Smooth crust. Getting the crust to lie smooth and with no cracks can be a challenge, but I've found that pressing it with a small measuring cup helps.
    • Baking rack alternative. If you don't have a small baking rack on hand that can fit in your skillet, you can use metal skewers or balls of foil and place them in the bottom of the skillet. This way the pie molds are not touching the bottom. Just be careful not to scratch the skillet with the skewers.
    • Don't jiggle the custard. Now I know it's tempting, but don't poke or jiggle the molds until after the three-hour setting period is over--even if they look like they've set enough--or else you risk unsightly sloshing, fingerprints, or holes. It'll be worth the wait once you sink your teeth into the rich custardy texture.
    • Garnish idea. Once they're ready to serve the electric skillet pie, you can also garnish each with a couple of candied limes for extra pizzazz.
    • Easy clean up. If you're unsure how to clean your electric frying pan afterwards, check out my tutorial for how to clean an electric skillet. I also have a tutorial with tips for how to use an electric skillet.

    Storage

    • Fridge: If for some odd reason they don't end up eaten right away, you can refrigerate them for up to 3 to 5 days. Cover them well.
    • Freezer: You can also freeze them after wrapping tightly with foil or plastic wrap and sliding into a freezer bag. They should be consumed within 6 months.
    • Thaw: Thaw in the refrigerator.
    Mini electric skillet key lime pies on plate and baking rack.

    More Delicious Electric Skillet Recipes

    • A piece of Electric Skillet Vegetable and Goat Cheese Frittata on a pie server.
      Electric Skillet Vegetable and Goat Cheese Frittata
    • Bananas Foster on black plate with ice cream.
      Easy Bananas Foster (Flambéed Bananas)
    • Peach cobbler in electric skillet.
      Electric Skillet Peach Cobbler
    • Uncut brownies in a pan in the electric skillet.
      Electric Skillet Brownies

    If you tried this 🍋‍🟩 Electric Skillet Pie Recipe or any other recipe on my website, please leave a 🌟 star rating and let me know how it went in the 📝 comments below. And please share the recipe!

    📋Recipe

    Key lime pie on plate topped with lime and broken meringue cookies.
    Print Pin
    5 from 1 vote

    Electric Skillet Key Lime Pie

    If you're craving an easy and delicious dessert, whip these delectable, electric skillet key lime pies up. Armed with only six ingredients, six mini pie molds, and an electric skillet, you'll be noshing your way to Key lime bliss in no time.
    Course Dessert
    Cuisine American
    Diet Vegetarian
    Prep Time 10 minutes minutes
    Cook Time 40 minutes minutes
    Chill Time 3 hours hours
    Total Time 3 hours hours 50 minutes minutes
    Servings 6
    Calories 416kcal
    Author Joss Dyckson

    Equipment

    • Electric Skillet
    • 6 mini pie molds (approximately 4")
    • Small baking rack

    Ingredients

    For the Crust

    • 1 ½ cups graham cracker crumbs
    • ¼ cup butter melted

    For the Pie Filling

    • 1 can sweetened condensed milk
    • 4 egg yolks
    • ½ cup key lime juice you can substitute with regular limes if needed--juiced
    • 1 tablespoon lime zest

    For the Topping (Optional)

    • meringue cookies broken into pieces
    • key limes zested
    US Customary - Metric

    Instructions

    • Preheat electric skillet to 350ºF. Mix the Graham crumbs and the melted butter until well combined (it should still be a bit grainy).
    • Press the crumbs into the bottom and up the sides of 6 individual, mini pie/tart molds.
    • Place a small baking rack inside the electric skillet, place the mini pie molds on top and cook with the lid on for around 15 minutes. Let them cool. (See baking rack alternatives in the notes section.)
    • For the pie filling, mix the condensed milk and egg yolks with a whisk until well combined. Add the lime juice and lime zest and whisk together.
    • Pour the lime pie filling into the molds and return to the electric skillet (on top of the rack) and bake with the lid on for about 25 minutes (until the center is set - but still jiggly).
    • Let them chill in the fridge for at least 3 hours.
    • Top with broken meringue cookies and lime zest if desired and serve.

    Notes

    • If you don't have a small baking rack on hand, you can use metal skewers or balls of foil and place them in the skillet. This way the pie molds are not touching the bottom of the skillet. Just be careful not to scratch the skillet with the skewers.
    • Getting the crust to lie smooth and with no cracks can be a challenge, but I've found that pressing it with a small measuring cup helps.
    • Now I know it's tempting, but don't poke or jiggle the molds until after the three-hour setting period is over--even if they look like they've set enough--or else you risk unsightly sloshing, fingerprints, or holes.
    • Store leftover pie in the fridge for up to 3 to 5 days. Cover them well.
    • You can also freeze them after wrapping tightly with foil or plastic wrap and sliding into a freezer bag. They should be consumed within 6 months. Thaw in the refrigerator.

    Nutrition

    Calories: 416kcal | Carbohydrates: 54g | Protein: 9g | Fat: 19g | Saturated Fat: 10g | Cholesterol: 174mg | Sodium: 299mg | Potassium: 319mg | Fiber: 1g | Sugar: 41g | Vitamin A: 606IU | Vitamin C: 8mg | Calcium: 225mg | Iron: 1mg

    Electric Skillet Pork Tenderloin with White Wine Sauce

    November 20, 2019 by Joss Dyckson 8 Comments

    Pork tenderloin is a delicious but occasionally tricky cut of meat to eat. While the tenderloin is the most tender part of the pig (obviously), it also lacks a lot of the fat you can find on other cuts. As a result, it can sometimes be difficult to cook a tenderloin to completion without drying it out, especially if you want to keep it whole and impress your Christmas dinner guests.

    To help ensure you give this fantastic cut of pork the respect it deserves, here is a recipe for an electric skillet pork tenderloin. Tender, juicy, perfectly cooked, and with a delicious pan sauce to go with it, it's sure to become one of your holiday season favorites in no time at all.

    Sliced pork tenderloin in white serving dish with orange white wine sauce.
    [feast_advanced_jump_to]

    Ingredients

    You will need these ingredients to make this recipe:

    • pork tenderloin
    • garlic
    • olive oil
    • orange juice
    • white wine
    • brown sugar
    • corn starch
    • salt and pepper
    • fresh oregano - optional garnish
    Sliced pork tenderloin in spoon with wine sauce.

    How to Make it in the Electric Skillet

    1. Season. Season pork with salt, pepper and garlic. Heat electric skillet to 375ºF.
    2. Sear pork. Add the olive oil and sear pork until golden on all sides, about 10 minutes.
    3. Cook. Lower heat to 250ºF and add the orange juice, wine and brown sugar. Stir together. Cook with the lid on for 25 minutes or more (until it reaches an internal temperature of at least 145ºF).
    4. Thicken sauce. Remove the tenderloin and let the sauce thicken. You can add one tablespoon of cornstarch dissolved in a bit of cold water to the sauce while it simmers, to make it creamier and help thicken it (it should take about 1 minute).
    5. Serve. Serve the pork with the white wine sauce and fresh oregano leaves.

    💬 I also have a Christmas dinner beef tenderloin recipe you might like.

    Sliced pork tenderloin in white serving dish with orange white wine sauce and fresh herbs.

    Side Suggestions

    This pork tenderloin recipe goes great with any of the classic sides you'd imagine ranging from fresh vegetables to mashed potatoes to skillet macaroni and cheese. To really get everyone in the holiday mood, serve it with this Christmas wreath salad!

    Enjoy this holiday dinner with a glass of wine or holiday cocktail such as the Brandy Alexander or cranberry flavored Moscow mule.

    Storage

    • Refrigerate: If you happen to have any leftovers, you can store them easily in a covered container for up to 4 days. The sauce will keep about as long, if you've got any extra.
    • Reheat: Reheat the tenderloin in the electric skillet, oven or microwave.
    Sliced pork tenderloin in white serving dish with orange white wine sauce.

    Did you enjoy this Christmas pork tenderloin dinner with your guests? If so, please let me know how it turned out and share the recipe!

    HUNGRY FOR MORE? TRY OUR: Electric Skillet Key Lime Pie

    📋Recipe

    Sliced pork tenderloin in white serving dish with orange white wine sauce.
    Print Pin
    5 from 5 votes

    Electric Skillet Pork Tenderloin with White Wine and Orange Sauce

    Tender, juicy, perfectly cooked, and with a delicious pan sauce to go with it, this electric skillet pork tenderloin is sure to become one of your holiday season favorites in no time!
    Course Main Course
    Cuisine American
    Prep Time 10 minutes minutes
    Cook Time 35 minutes minutes
    Total Time 45 minutes minutes
    Servings 6
    Calories 325kcal
    Author Joss Dyckson

    Equipment

    • Electric Skillet

    Ingredients

    • 2 pounds pork tenderloin
    • 1 teaspoon garlic chopped
    • 2 tablespoons olive oil
    • 3 cups orange juice
    • ¾ cup white wine
    • 1 tablespoon brown sugar
    • 1 tablespoon cornstarch
    • salt and pepper
    • fresh oregano to garnish
    US Customary - Metric

    Instructions

    • Season the pork with salt, pepper and garlic.
    • Heat an electric skillet to 375ºF. Add the olive oil and sear the pork until golden on all sides, about 10 minutes.
    • Lower heat to 250ºF and add the orange juice, wine and brown sugar. Stir together.
    • Cook with the lid on for 25 minutes or more (until it reaches an internal temperature of at least 145ºF).
    • Remove the tenderloin and let the sauce thicken. You can add one tablespoon of cornstarch dissolved in a bit of cold water to the sauce while it simmers, to make it creamier and help thicken it (it should take about 1 minute).
    • Serve the pork with the white wine sauce and fresh oregano leaves.

    Notes

    • Store the tenderloin in the fridge, covered, for up to 4 days.
    • Reheat the tenderloin in the electric skillet, oven or microwave.

    Nutrition

    Calories: 325kcal | Carbohydrates: 19g | Protein: 32g | Fat: 11g | Saturated Fat: 2g | Cholesterol: 98mg | Sodium: 83mg | Potassium: 864mg | Fiber: 1g | Sugar: 13g | Vitamin A: 248IU | Vitamin C: 62mg | Calcium: 27mg | Iron: 2mg

    What is the Difference Between Jam and Jelly?

    November 18, 2019 by Joss Dyckson Leave a Comment

    Those of us who love bread and bagels for breakfast, know how important it is to add a sumptuous topping to a perfectly-browned piece of toast, whether it be jelly, jam or other spreads.

    What is the difference between jam and jelly anyway? Read on to learn the key differences between these two sweet, fruity condiments.

    Jams and jellies in a row, surrounded by fresh fruits.

    I also answer some of your other food related questions like What is the Difference Between Chow Mein and Lo Mein?.

    [feast_advanced_jump_to]

    So Which is Which? Let's Talk about Jelly

    Let's start with jelly. Jelly is fruit juice boiled together with a large amount of sugar, along with other ingredients that give it its unique consistency.

    • The texture of jelly is similar to gelatin.
    • It starts out as a very sweet juice that gradually transforms into a gel-like solid thanks to its combination of ingredients.
    • This process has been performed from generation to generation.

    What Goes in Jelly?

    The key ingredients that go into the making of jelly are:

    Fresh orange juice in a glass, wooden background.

    Fruit juice (from crushing the fruit and straining) or fruit flavor. Fruit juice is the most important part of the jelly making process because it contains the fruity, clear liquid component, that when combined with other ingredients, can help achieve the ultimate gel-like texture.

    It's also what sets jelly apart from jam. Most of the juice in jelly comes from crushed fruit, both ripe and under-ripe.

    Sugar cubes.

    Sugar. Though fruit juice already contains sugar, more sugar needs to be added in the jelly-making process. Sugar, in large amounts, prevents mold and also helps in the making of the jelly's consistency.

    A lemon cut in half.

    Acid. The acidity needed to make jelly can come from several sources. One is the fruit itself, so you may need to do some homework on which fruits are higher in acid than others. The second source is lemon juice, which you can use to add acidity to your recipe.

    The third source is citric acid, which you can use in lieu of lemon juice. Each jelly recipe will require its own unique amount of acid.

    Fruit pectin on white background.

    Pectin. You can find it here. This natural substance is already found in fruits. Ripe fruit do not contain as much pectin as under-ripe fruit and some fruits have a higher pectin content than others.

    This is the reason why both types of fruit are suggested to be included when extracting fruit juice to make jelly.

    However, you want to add a higher amount of pectin to achieve the consistency of jelly. Hence, a jelly can be made out of combining fruits that are high in pectin, or by simply adding commercial pectin products such as powdered or liquid fruit pectin.

    Here is a Neat Fact:

    Cranberries have one of the highest pectin content of all fruits. The more you cook them, the more pectin they release. Next time you open a can of cranberry sauce, notice how it naturally comes out as jelly. That's pectin on steroids for you.

    What Does Jelly Look Like?

    Apricot jelly in jars.

    Jelly is meant to be firm, clear, and should not have "bits" of fruit in it. This is the whole purpose of it: to be a gel-like type of fruit juice, strained and all.

    Clear jelly in a jar, white background.

    What does Jelly Taste Like?

    Unless you have made a special batch of jelly meant to taste like something else, the original purpose of jelly is for it to taste sweet, maybe even a little tarty, fresh and smooth.

    Try it in my grilled PBJ sandwiches! Or, this jelly roll cake recipe.

    Pump Up the Jam!

    Raspberry jam on a white background, with raspberries on the side.

    Now, let's talk about jam. Jam is actual crushed fruit, cooked together with a large amount of sugar, and reduced to an organic texture that is spreadable. Contrary to jelly, jam does not have to have a gelatin-like consistency because it will contain crushed pieces of fruit, seeds, and even bits of peel.

    • Like jellies, jams were used by generations, prior to the era of refrigeration, in an aim to preserve fruits.
    • It can be used as a spread, but also as a filling for cakes and pies.
    • Some popular fruit jams include strawberry jam, apricot or peach jam and blueberry jam.

    What Goes in Jam?

    The key ingredients that go into the making of jam are:

    Mixed berries.

    Crushed Fruit. This is the key difference between jelly and jam. Jam focuses on the fruit while jelly is more about the fruit's juice.

    Sugar cubes.

    Sugar. Jam also has added sugar for preservation and to work with the acid/pectin.

    A lemon cut in half.

    Acid. Most of the acid in jams comes from lemon juice, which lowers the pH level and results in safer canning.

    Fruit pectin, white background.

    Pectin. Pectin is optional in jam, due to its natural bulky consistency. For this reason, you may opt to add more pectin to your mixture of fruit and sugar, or simply allow the fruits to release their natural pectin and do the magic themselves.

    What Does Jam Look Like?

    Red jam in a jar, wooden background.

    Jam is thick, has bits of fruit and seeds in it, and is not meant to be clear or transparent. It looks like mushed fruit, with a firmer and less watery consistency than cranberry sauce.

    What Does Jam Taste Like?

    Typically the best jams taste like a sweeter version of the original fruit. This means that they are sweet, tarty, lemony, and fresh.

    Conclusion - Jam vs. Jelly

    Jellies and jams have been in family recipes for years. Both spreads have fed generations of people who love sweet, fruity tastes. They are both quite easy to make, and it does not take a big budget to whip up a couple of jars of each for yourself.

    Now you know, the main difference between jam and jelly is the use of crushed fruit in jam vs. fruit juice in jelly.

    Jams lined up on a wooden shelf and in open jars with text overlay that says 'Jam vs. Jelly What is the difference?'.

    Related Fruit-Filled Recipes to Consider

    • Strawberry parfait in stemmed glasses.
      Strawberry Parfait
    • Blackberry galette with brie cheese and thyme in cast iron pan.
      Blackberry Brie Galette
    • Blackberry smoothie bowl with fruit and seed toppings and a watermelon popsicle.
      Blackberry Watermelon Smoothie Bowl
    • Strawberry orange compote in jar with spoon and toast on the side.
      Easy Homemade Strawberry Compote

    Do you have a ❤️ favorite recipe for jelly or jam? If you enjoyed this food talk article about What is the Difference Between Jam and Jelly? or any other recipe on my website, please let me know what you thought in the 📝 comments below. And please share the post!

    Electric Skillet Chili

    November 13, 2019 by Joss Dyckson Leave a Comment

    Chili is hearty and comforting at any time of year, but it takes a long time to cook, right? Not necessarily! Flavorful chili can be fast, easy, and simple enough to cook in an electric skillet. Enter this electric skillet chili.

    The trick is: you add the aromatic onion, pepper, garlic, and spices first, and cook them just a bit to release their full flavor. Then the rest of this easy recipe comes right together.

    Electric Skillet Chili in a white bowl with blue polka dots, wooden background, tortillas chips on the side. and a wooden spoon.

    Electric skillet chili will become a fast favorite both for its rich flavor and quick cooking time. It's an easy and quick dinner option, like my sheet pan beef and broccoli. I use ground beef as the base but I also love me a bison chili.

    Electric Skillet Chili in a white bowl with blue polka dots, wooden background, tortillas chips on the side.

    Chili as we know and love it is classic Tex-Mex cuisine, first made by working-class Mexican women in southern Texas--the Chili Queens of San Antonio. Today, chili has become a staple all-American dish and is the official state food of Texas.

    Electric Skillet Chili in a white bowl with blue polka dots, wooden background, tortillas chips on the side. and a spoon of chili

    I love this chili served steaming hot in a bowl with cheddar cheese on top, which melts beautifully over the heat of the chili. If the spice of the chili is too much for you, consider adding a dollop of sour cream.

    Dairy can help counteract the heat of the chili. You could add less Mexican spice, or more hot sauce if you like your chili fiery.

    Electric Skillet Chili in a white bowl with blue polka dots, tortilla chips on the side.
    Electric Skillet Chili in a white bowl with blue polka dots, wooden background, tortillas chips on the side.

    If you have leftovers you can use them to make Frito pie by using a cup of chili over a handful of corn chips and topping with onion, jalapeno and cheese. This also tops chili dogs or my electric skillet macaroni and cheese to make chili mac.

    • Sliced pork tenderloin in white serving dish with orange white wine sauce.
      Electric Skillet Pork Tenderloin with White Wine Sauce
    • Skillet British beans in tomato sauce.
      Skillet Baked Beans (British Style)
    • Pizza on a serving board.
      Electric Skillet Pizza
    • Pork chops with gravy, mushrooms and fresh thyme sprigs.
      Electric Skillet Pork Chops

    If you tried this Electric Skillet Chili Recipe or any other recipe on my website, please leave a 🌟 star rating and let me know how it went in the 📝 comments below. And please share the recipe!

    📋Recipe

    Electric Skillet Chili in a white bowl with blue polka dots, wooden background, tortillas chips on the side.
    Print Pin
    5 from 1 vote

    Electric Skillet Chili

    Electric skillet chili will become a fast favorite both for its rich flavor and because you can cook it in less than 20 minutes.
    Course Main Course
    Cuisine American, Mexican
    Prep Time 23 minutes minutes
    Cook Time 17 minutes minutes
    Total Time 40 minutes minutes
    Servings 4
    Calories 445kcal
    Author Joss Dyckson

    Equipment

    • Electric frying pan

    Ingredients

    • 2 tablespoons vegetable oil
    • 1 onion chopped
    • ½ red bell pepper chopped
    • 2 garlic cloves chopped
    • 1 pound lean ground beef
    • 1 cup canned kidney beans drained and rinsed (reserve the liquid)
    • 1 cup mushrooms cleaned and sliced
    • 2 cups canned tomatoes blended
    • 1 tablespoon Mexican spice seasoning or chili powder
    • 2 teaspoons ground cumin
    • 1 teaspoon paprika
    • 1 teaspoon hot sauce optional
    • Salt and pepper to taste

    Toppings

    • fresh cilantro chopped
    • cheddar cheese shredded
    • tortilla chips
    US Customary - Metric

    Instructions

    • Heat the electric frying pan to 350ºF.
    • Heat the oil in the pan and then add the onion and red pepper. Sprinkle on some salt and pepper and let them cook for 5 minutes, stirring frequently. Add the garlic cloves and let them cook for 1 minute, until fragrant.
    • Add the ground beef and stir with a wooden spoon, breaking the meat into chunks. Brown the ground beef thoroughly. Add the beans and the rest of the ingredients.
    • Lower heat to 250ºF and continue cooking with the lid on the electric skillet for 10 minutes.
    • If you feel it is too thick, you can pour the reserved liquid from the beans into the chili, until desired consistency. If needed, season again with salt and pepper, to taste.
    • Serve with toppings.

    Notes

    • I love this chili served steaming hot in a bowl with cheddar cheese on top, which melts beautifully over the heat of the chili.
    • If the spice of the chili is too much for you, consider adding a dollop of sour cream. Dairy can help counteract the heat of the chili. You could also add less Mexican spice.
    • Add more hot sauce if you like your chili fiery.
    • Leftovers keep for up to 3 to 4 days in the fridge, in air tight containers. Freeze for up to 3 months. Thaw in the refrigerator.

    Nutrition

    Calories: 445kcal | Carbohydrates: 19g | Protein: 24g | Fat: 31g | Saturated Fat: 15g | Cholesterol: 81mg | Sodium: 607mg | Potassium: 742mg | Fiber: 6g | Sugar: 6g | Vitamin A: 1581IU | Vitamin C: 30mg | Calcium: 89mg | Iron: 6mg

    Homemade Dill Veggie Dip

    November 11, 2019 by Joss Dyckson Leave a Comment

    A party's not a party until the dip comes out. There are plenty of fantastic flavor options for what to eat with your vegetables out there, and you want to avoid it being something bland. Thankfully, that won't be a problem here, as this recipe for amazing, homemade veggie dill dip will make sure everyone goes home happy.

    Dill dip in a glass serving dish with fresh dill sprigs and a small white spoon.

    If you're a fan of creamy sauces, bright herbs, and a little citrus pop, this is sure to become one of your all time favorite party foods the second you lay your lips on it.

    Besides vegetables for dipping, it also tastes amazing with chips and corn nuggets (check out how to make corn nuggets here). You can also serve it as a sauce for crispy salmon.

    [feast_advanced_jump_to]

    What is Dill Dip?

    This homemade dill dip is made from mayo, fresh dill and a few other other choice ingredients (similar to my honey dill sauce) that make it the perfect complement to raw vegetables and all kinds of party snacks. It can also be called dill sauce.

    Ingredients

    Dill dip ingredients prepped and labeled.

    This recipe makes just over ½ cup dip. You can easily adjust the servings in the recipe card to make a larger batch.

    • fresh dill - Check out how to chop dill for this recipe.
    • yellow mustard - Or Dijon mustard if you prefer.
    • baby capers - Make sure to drain them from the brine and pat them dry with paper towel before adding to the dip.
    • mayonnaise - Can use regular or go make this dip vegan with vegan mayo.
    • lime - Or lemon if you prefer.

    *Check recipe card for ingredient amounts.

    Tweaks

    • There are a lot of great ways to dress it up, too. Add a little shake of cayenne pepper over the top for some extra visual intrigue and a spicy kick.
    • Diced chives would also be a good topper.
    • If you're missing the zip of a sauce with sour cream, you could try cutting the mayonnaise with some sour cream or plain Greek yogurt for a little extra funky freshness.
    • You could even sub in a bit of cream cheese.

    How to Make it

    Dill being chopped with a knife on cutting board.

    Step #1. Chop the Dill. Chop the dill finely.

    Dill dip ingredients in a bowl.

    Step #2. Add Ingredients to Bowl. Add the dill, mustard and capers to the mayo in a small bowl. Squeeze in some lime or lemon juice, to taste. Start out with a small amount and go from there.

    Dill dip in a bowl with a whisk.

    Step #3. Combine. Mix all dill dip ingredients very well. Season with salt and pepper, to taste (if needed).

    Dill dip in a glass serving dish with a fresh dill sprig.

    Step #4. Serve. Serve the dill dip.

    What to Serve With Dill Dip

    This simple and delicious dill sauce will spice up any party or event you're hosting from now on. As equally important as the dip itself is what to provide your guests to dip into it with.

    Make a selection of chips, crackers, baguette slices, veggie sticks (such as celery, zucchini and carrot), or whatever else you like most for transferring sauces into your mouth. You can eat it by the spoon if you really like. I'm not here to judge.

    As for something more filling, you can try chicken fingers, fries, puff pastry chicken balls or electric skillet honey-mustard glazed salmon.

    Recipe FAQs

    How long will dill dip last?

    Cover the dip and store in the fridge for up to 3 to 4 days. I personally think it tastes better after a day of chilling!

    Can you freeze it?

    I do not recommend freezing the dip. The ingredients may split when thawed due to the mayo. However, if you do freeze it, thaw it in the fridge and stir really well before serving.

    Dill dip in a glass serving dish with fresh dill sprigs.

    More Dill Recipes You Will Love

    • Dill pickle cream cheese bagel spread on bagel and in small glass dish on cutting board.
      Dill Pickle Cream Cheese
    • Salmon and dill mousse with caviar in white dish.
      Salmon Mousse
    • Red lentil and dill soup in bowl.
      Easy Red Lentil Soup
    • Roasted white asparagus with capers and fresh dill.
      Roasted White Asparagus

    If you tried this Homemade Dill Veggie Dip Recipe or any other recipe on my website, please leave a 🌟 star rating and let me know how it went in the 📝 comments below. And please share the recipe!

    📋Recipe

    Dill dip in serving bowl with fresh dill on top.
    Print Pin
    5 from 1 vote

    Homemade Dill Veggie Dip

    If you're a fan of creamy sauces, bright herbs, and a little citrus pop, this homemade dill veggie dip is sure to become one of your all time favorite party foods.
    Course Condiment, Sauce
    Cuisine American
    Diet Vegetarian
    Prep Time 5 minutes minutes
    Total Time 5 minutes minutes
    Servings 10 tablespoons
    Calories 80kcal
    Author Joss Dyckson

    Ingredients

    • 1 tablespoon fresh dill
    • 2 tablespoons yellow mustard or Dijon mustard if you prefer
    • 1 teaspoon baby capers
    • ½ cup mayonnaise
    • 1 lime or lemon
    • salt and pepper to taste
    US Customary - Metric

    Instructions

    • Chop the dill finely.
      Dill being chopped with a knife on cutting board.
    • Add the dill, mustard and capers to the mayo. Squeeze in some lime or lemon juice, to taste. Start out with a small amount and go from there.
      Dill dip ingredients in a bowl.
    • Mix all dill dip ingredients very well. Season with salt and pepper, to taste (if needed).
      Dill dip in a bowl with a whisk.
    • Serve with chips, crackers, celery, zucchini and carrot sticks, or whatever you like dipping with. You can also serve it as a sauce over salmon.
      Dill dip in a glass serving dish with a fresh dill sprig.

    Notes

    • Cover the dip and store in the fridge for up to 3 to 4 days.
    • I do not recommend freezing the dip. The ingredients may split when thawed due to the mayo. If you do freeze it, thaw it in the fridge and stir really well before serving.

    Nutrition

    Calories: 80kcal | Carbohydrates: 1g | Protein: 1g | Fat: 9g | Saturated Fat: 1g | Cholesterol: 5mg | Sodium: 119mg | Potassium: 15mg | Fiber: 1g | Sugar: 1g | Vitamin A: 121IU | Vitamin C: 2mg | Calcium: 5mg | Iron: 1mg

    Chocolate Crinkle Cookies

    November 6, 2019 by Joss Dyckson Leave a Comment

    There are few things better than delicious chocolatey treats. Chocolate chip cookies, chocolate caramel bars, Cuban lunch chocolate bars, hot chocolate stirring spoons and more all make for a fantastic dessert that doubles as a fun excuse to do some baking.

    As good as these are, sometimes you want to mix things up. That's where these amazing chocolate crinkle cookies come in.

    Chocolate crinkle cookies on paper plate.
    [feast_advanced_jump_to]

    What are Chocolate Crinkle Cookies?

    Chocolate crinkle cookies are a unique but simple take on chocolate cookies with a fun, crinkly exterior. This is achieved by freezing the dough and then rolling them in icing sugar before baking.

    Sweet, soft, crunchy, and more, even just a single bite will cement them as one of your all time favorite cookies, though it's doubtful you'll stop after eating just one.

    Ingredients

    This recipe makes 1 dozen cookies but you can easily double or triple the batch.

    • dark chocolate
    • butter
    • eggs
    • white sugar
    • vanilla
    • baking powder
    • flour
    • powdered sugar

    💡 I also love making gourmet chocolate truffles and chocolate cookie mix in a jar to give out as food gifts!

    How to Make Them

    Soft inside, crispy outside, and 100% addictive all adds up to one of the best cookies you can shove in your face. I will cover exactly how to make them here:

    1. Melt the chocolate and butter together using a double boiling method (bring water to a simmer in a pot, and place a metallic bowl on top of it, so it heats from the steam - add the chocolate and butter to the metal bowl).
    2. Beat the eggs and sugar with an electric mixer until creamy. Add the chocolate mixture and vanilla to the beaten eggs.
    3. Whisk the flour and baking powder together. Add it to the chocolate mixture and mix with a wooden spoon, just until combined.
    4. Cover the cookie dough and freeze for 20 minutes.
    5. Preheat oven to 350ºF. Cover a cookie sheet with parchment paper. Place the powdered sugar on a plate.
    6. Form balls with the cookie dough and roll them in the icing sugar to cover completely. Place them on the parchment-covered cookie sheet about 1 inch apart.
    7. Bake for 10 to 13 minutes in the preheated oven.
    8. Cool and serve.
    Chocolate crinkle cookies on paper plate.

    Tweaks

    The basic cookie is a thing of magic but even magic can be made better with a little something extra. Double down on your chocolate cravings by dropping some whole chocolate bits or chips into the mix.

    Try browning your butter before you introduce it to the rest of the ingredients for some extra complexity and depth of flavor. There's a ton you can try that would be absolutely amazing.

    Sprinkle a touch of sea salt on top of the just-baked cookies to intensify the flavors.

    Storage

    While the idea of leftovers is pretty absurd when we're talking about warm and chewy chocolate cookies, they're fairly easy to store in an airtight container.

    • Room temperature storage: Store in a covered container for up to 2 to 3 weeks.
    • Fridge storage: If you want them to stay fresh for longer, they can last for up to 2 months in the fridge.
    • Freezer storage: You can freeze them for up to 8 to 12 months.

    🌟If you're interested in more warm and chewy cookies, check out these delicious Christmas cookies.

    Chocolate crinkle cookies stacked on blue background.

    More Chocolate Recipes to Try

    • Cranberry white chocolate cake pops sprinkled with cinnamon in decorative jar.
      Cranberry White Chocolate Cake Pops
    • Chocolate mug cake mix in a red mug with Christmas gift label.
      Food Gift Recipe: Fudgy Chocolate Mug Cake
    • Orange chocolate chip muffin cut open.
      Orange Chocolate Chip Muffins
    • Cheesecake cake pops in holder.
      Cheesecake Cake Pops

    If you tried this 🍪 Chocolate Crinkle Cookies Recipe or any other recipe on my website, please leave a 🌟 star rating and let me know how it went in the 📝 comments below. And please share the recipe!

    📋Recipe

    Chocolate crinkle cookies stacked on blue background.
    Print Pin
    5 from 1 vote

    Chocolate Crinkle Cookies Recipe

    Chocolate crinkle cookies are a unique but simple take on chocolate cookies with a fun, crinkly exterior. Soft inside, crispy outside, and 100% addictive!
    Course Dessert
    Cuisine American
    Diet Vegetarian
    Prep Time 20 minutes minutes
    Cook Time 10 minutes minutes
    Chill Time 20 minutes minutes
    Total Time 50 minutes minutes
    Servings 12 cookies
    Calories 261.28kcal
    Author Joss Dyckson

    Equipment

    • Metallic bowl and pot (or double boiler)
    • Electric mixer

    Ingredients

    • 8.5 ounces dark chocolate
    • 1.8 ounces butter
    • 2 eggs
    • ½ cup sugar
    • 1 teaspoon vanilla
    • ½ teaspoon baking powder
    • 1 ¼ cups flour
    • ½ cup powdered sugar
    US Customary - Metric

    Instructions

    • Melt the chocolate and butter together using a double boiling method (bring water to a simmer in a pot, and place a metallic bowl on top of it, so it heats from the steam - add the chocolate and butter to the metal bowl).
    • Beat the eggs and sugar with an electric mixer until creamy. Add the chocolate mixture and vanilla to the beaten eggs.
    • Whisk the flour and baking powder together. Add it to the chocolate mixture and mix with a wooden spoon, just until combined.
    • Cover the cookie dough and freeze for 20 minutes.
    • Preheat oven to 350ºF. Cover a cookie sheet with parchment paper. Place the powdered sugar on a plate.
    • Form balls with the cookie dough and roll them in the icing sugar to cover completely. Place them on the parchment-covered cookie sheet about 1 inch apart.
    • Bake for 10 to 13 minutes in the preheated oven.
    • Cool and serve.

    Notes

    • Room temperature storage: Store in a covered container for up to 2 to 3 weeks.
    • Fridge storage: If you want them to stay fresh for longer, they can last for up to 2 months in the fridge.
    • Freezer storage: You can freeze them for up to 8 to 12 months.

    Nutrition

    Calories: 261.28kcal | Carbohydrates: 32.65g | Protein: 3.87g | Fat: 12.84g | Saturated Fat: 7.35g | Cholesterol: 37.02mg | Sodium: 45.42mg | Potassium: 184.46mg | Fiber: 2.54g | Sugar: 18.13g | Vitamin A: 153.7IU | Calcium: 28.96mg | Iron: 3.12mg

    Electric Skillet Mac and Cheese

    October 30, 2019 by Joss Dyckson Leave a Comment

    A favorite dish that withstands the test of time, classic macaroni and cheese simply cannot be beat. It is delicious on its own, and it can be tweaked to suit the tastes of many different palates.

    Everyone needs a go-to recipe for this staple food, which may be served as a meal or as a side dish, and this electric skillet mac and cheese recipe will hopefully be it!

    Electric Skillet Mac and Cheese in white bowls, a blue and white striped kitchen towel underneath and a succulent plant on the side.

    If you really love cheese like me, consider adding mozzarella pearls to your macaroni to amp up the cheese level. Talk about the ultimate comfort food!

    Electric Skillet Mac and Cheese in white bowls, a blue and white striped kitchen towel underneath and a succulent plant on the side.

    If you want a simple way to make your mac and cheese a little bit more healthy, try adding some frozen vegetables while you are preparing it. Some people like to add bread crumbs to the top for a bit of crunch.

    Electric Skillet Mac and Cheese in white bowls, a blue and white striped kitchen towel underneath and a succulent plant on the side.

    For those with a palate that craves some spice, try adding buffalo wing sauce to your mac.

    As you make your macaroni and cheese, get creative with ways to make it delicious. What do you think would be a good addition to this classic meal? My most creative mac and cheese recipe would be this mac and cheese ice cream.

    Electric Skillet Mac and Cheese in white bowls, a blue and white striped kitchen towel underneath and a succulent plant on the side.

    I love the classic mac and cheese flavor of this recipe. Let know what you thought in the comments and please share!

    You might also enjoy:

    • How to Make a Roux
    • Electric Skillet Chili

    📋Recipe

    Mac and Cheese in white ramekin.
    Print Pin
    5 from 2 votes

    Electric Skillet Mac and Cheese

    Everyone needs a go-to recipe for this staple food, which may be served as a meal or as a side dish, and this electric skillet mac and cheese recipe will hopefully be it!
    Course Main Course, Side Dish
    Cuisine American, Italian
    Prep Time 15 minutes minutes
    Cook Time 15 minutes minutes
    Total Time 30 minutes minutes
    Servings 6
    Calories 444kcal
    Author Joss Dyckson

    Equipment

    • Electric Skillet

    Ingredients

    • 1 pound elbow macaroni pasta
    • 1 tablespoon butter
    • 1 tablespoon flour
    • 1 cup milk
    • 1 teaspoon mustard
    • 1 cup cheddar cheese grated
    • ½ cup Parmesan cheese grated
    • salt and pepper to taste
    US Customary - Metric

    Instructions

    • Cook pasta according to package instructions in the electric skillet: Add the water (about 8 cups in a 12" skillet) to the skillet. Heat the electric skillet to the maximum temperature available. Bring the water to a boil, add a pinch of salt and cook pasta until done (about 10 minutes). You can leave the lid slightly open while boiling and keep an eye on it so that it doesn't boil over.
    • Drain the water and reserve the pasta in a bowl, covered with a towel.
    • Heat the electric skillet to 375ºF and melt the butter. Add the flour and whisk until well combined and golden - about 30 seconds to 1 minute.
    • Add the milk and mustard, and combine well. Continue whisking until it begins to thicken. Turn the skillet down to 250ºF. Add the cheeses and stir until fully melted.
    • Add the macaroni to the sauce and mix well to completely cover it with the cheese sauce. Heat through. Add salt and pepper, to taste.
    • Serve!

    Notes

    • Optional: Once seasoned, you can add a bit more cheese on top and bake with the skillet lid on until melted.
    • For those with a palate that craves some spice, try adding buffalo wing sauce to your mac and cheese.
    • Store leftovers in a covered container in the fridge for up to 3 to 4 days.

    Nutrition

    Calories: 444kcal | Carbohydrates: 61g | Protein: 19g | Fat: 13g | Saturated Fat: 8g | Cholesterol: 36mg | Sodium: 293mg | Potassium: 251mg | Fiber: 2g | Sugar: 4g | Vitamin A: 388IU | Calcium: 290mg | Iron: 1mg

    Steel Cut Oats VS Rolled Oats

    October 28, 2019 by Joss Dyckson 2 Comments

    You might be wondering what the difference between steel cut oats vs rolled oats is. Both are billed as healthy breakfast choices, but what does that mean for you? Though they have a very different appearance and cooking time, there are some similarities as well. Let's compare and look at the differences between the two.

    Steel and rolled outs in spoons on wooden board.
    [feast_advanced_jump_to]

    Steel Cut and Rolled Oats Comparison

    Steel cut oats in pink bowl with wooden spoon.

    Steel-Cut Oats:

    • Small, cylinder-like shape
    • Derive from oat groats
    • Minimally processed by slicing oat groats
    • Takes longer to absorb liquid and therefore has a longer cooking time
    • Most of the fiber remains intact in the manufacturing process
    • Also referred to as 'Irish Oats'
    • Typical single serving is ¼ cup
    Rolled oats in blue bowl with wooden spoon.

    Rolled Oats:

    • Flat, round shape
    • Derive from oat groats
    • Slightly more processed - flattened with large disks
    • Absorbs liquid very readily, cooks faster
    • Loses some of the fiber in the manufacturing process
    • Also refered to as 'Old-Fashioned Oats'
    • Typical single serving is ½ cup

    A Closer Look at Steel-Cut Oats

    Steel cut oats in small pink bowl.

    Appearance

    Steel-cut oats look like the whole form oat groat (similar to the shape of rice) but cut into pieces.

    Manufacturing Process

    Oat groats are picked and minimally-processed after pieces of them are lightly toasted and chopped into a few pieces using steel, giving you 'steel cut oats'. Steel-cut oats don't go through as much processing as rolled oats do.

    Flavor Profile

    Steel cut oats on wooden spoon.

    You will find that steel-cut oats are thicker and more difficult to chew than rolled oats are. They also give off a nutty flavor that rolled oats do not. They are heavier, and therefore, make for a more filling breakfast than rolled oats.

    Nutritional Value

    Steel-cut oats have nearly the same nutritional value as other oats, however the fiber content can sometimes be double compared to rolled. Less processing allows them to retain more of the bran that provides the fiber content. They also have a lower glycemic index due to a slower rate of digestion.

    Cooking Time & Preparation

    Steel-cut oats can take 20 to 30 minutes to cook as they absorb liquid at a slower rate. Soaking the oats ahead of time can help reduce the cooking time. A single serving size is ¼ cup. They are typically used for oatmeal.

    You often have to shop at specialized health food or grocery stores in order to find steel-cut oats. They are also commonly found for sale at farmers markets. You may even want to consider buying them in bulk if you can.

    A Closer Look at Rolled Oats

    Rolled oats in blue bowl and wooden spoon.

    Appearance

    Rolled oats have a flattened circular shape.

    Manufacturing Process

    Rolled oats are steamed and flattened, which means they are slightly more processed than steel-cut oats.

    Flavor Profile

    Rolled oats on wooden spoon.

    For a milder oat, you want to eat them rolled. The consistency of rolled oats is much softer than steel-cut are. This is because they are steamed, which prevents them from breaking during the flattening process.

    Rolled oats can be purchased as 'old fashioned oats'. When you purchase old fashioned rolled oats, you will notice they are thinner and also less textured than steel-cut oats are.

    Nutritional Value

    Rolled oats have a low glycemic index, only it's not as low as steel-cut oats. The nutritional value of rolled oats is very similar to that of steel cut oats; both are considered healthy breakfast options.

    Cooking Time & Preparation

    Rolled oats have a much lower cooking time than steel-cut oats. Due to their overall size, they are quick to finish cooking, about 5 minutes. For this reason, they are often used in baking. They also retain their shape well when cooked.

    You will probably find it a lot easier to find rolled oats in grocery stores than steel-cut as they are more common.

    'Quick oats' or 'instant oats' are further-processed rolled oats, and are the thinnest of the oat types. They can take as little as 1 minute to cook. Just keep in mind that they also, when used in recipes, may turn out mushy.

    Benefits of Oats

    Oats, a gluten-free whole grain, are filled with nutritional benefits such as protein, fiber, anti-oxidants and numerous vitamins and minerals such as: manganese, copper, iron, zinc, vitamin B, folate, calcium, phosphorous etc.

    Oats specifically contain Beta-Glucan fiber, which can help to reduce cholesterol levels and give you a feeling of fullness as well as increase the growth of good gut bacteria.

    Conclusion

    When planning a healthy diet, it helps to know the difference between steel cut oats vs rolled oats. Incorporating them into your diet can help provide you with much-needed nutrients. Neither is a bad choice, it's just a question of which one you prefer and for what purpose you will be using them.

    • Rolled oats are preferred for baking but also make a nice oatmeal.
    • Steel-cut oats can provide you with a hearty bowl of oatmeal, but might not work as well in the baking department.

    There are arguments for having both steel cut and rolled/instant oats as part of your diet. They can be used in desserts, breakfast and more. Paired with food such as plain yogurt, they can give you an energetic start to any day. With so many ways to use oats, it is easy to incorporate these grains into your diet.

    Some of my recipes that use oats:

    • Christmas Coffee Cake with an Oat Crumble
    • Gluten Free Carrot Cupcakes
    • Fruit Salad
    • Oatmeal Cookies
    • Oatmeal Porridge With 4 Topping Ideas

    More Foodie Questions Answered

    • Brown rice in bowl with mushrooms.
      How to Cook Brown Rice on the Stove
    • Jam and jelly side by side in jars.
      What is the Difference Between Jam and Jelly?
    • Cooked barley on a spoon.
      How to Cook Barley
    • Butternut squash sliced open on cutting board.
      How to Clean, Save and Roast Butternut Squash Seeds

    Do you prefer steel cut or rolled oats? If you enjoyed this post about steel cut oats vs rolled oats or any other post on my website, please let me know what you thought in the 📝 comments below. And please share the post!

    Naked Cake Pops

    October 23, 2019 by Joss Dyckson 4 Comments

    Here is a simple recipe for naked cake pops. And by 'naked' I mean without any coating or sprinkles, just an easy, no-frills recipe.

    Naked chocolate cake pops on black dish with yellow cloth.

    Have you noticed the cake pop craze going around and found yourself wanting to try your hand at them? You absolutely should! One of the most easy and efficient ways to make cake pops is to use a cake pop maker.

    With this nifty device, making these fun, sweet little morsels is even easier than you could imagine, and I have a great, basic recipe for you to start out with.

    They're easier to make than strawberry cake balls, red velvet cake pops and even cake mix cake pops because you don't have to fuss over a coating or try to get the treat sticks to stay attached to the cake ball. You can check out more easy cake pop recipes here.

    [feast_advanced_jump_to]

    Ingredients

    • 1 cup flour
    • 1 cup sugar
    • ¾ cup cocoa powder
    • ¼ teaspoon baking soda
    • ½ teaspoon baking powder
    • ½ teaspoon salt
    • 1 large egg
    • 1 cup buttermilk
    • ½ cup vegetable oil

    How to Make Naked Cake Pops

    1. Make Batter. Lightly oil the cake pop baker cooking plates and plug it in to heat it up (it only takes a few minutes). Sift dry ingredients together in a bowl. Add the wet ingredients to the middle of the flour mixture and combine well.
    2. Bake. Pour the batter into the cake pop maker cavities using a teaspoon (fill them about 1mm from the top). Close the lid and bake them until done, about 4 minutes. Remove the cake balls and let them cool for a few minutes.
    3. Serve. You may have to take off some excess cake that leaked around the ball. Simply break it off. Insert the treat sticks and serve.
    Naked chocolate cake pop in hand.

    Pro Tips

    Once they've baked and completely cooled, you can enjoy them just the way they are! However, now that you've got the basics covered, next time you may want to try taking things to the next level.

    If you've changed your mind and would rather coat the cake pops, you can try dipping the naked cake pops into melted chocolate or softened chocolate frosting for even more chocolaty bliss.

    Mix and match different cake pop frosting flavors for more options and add some color with sprinkles and designs made with other colors of frosting!

    If you accidentaly over bake them and the cake balls turn out dry, try this tutorial: how to moisten a dry chocolate cake. No cake is too small to fix!

    Storage

    • Room temperature: To store your cake pops, they can be left at room temperature in a sealed container or a plastic bag for up to a week.
    • Fridge: To keep them longer however, store them in an airtight container in the fridge for up to two weeks.
    • Freezer: Freeze in plastic freezer bags to keep up to three months.
    Naked cake pops on black dish with yellow cloth.

    More Tasty Cake Pop Maker Recipes to Try

    • Gingerbread cake pops/balls on decorated plate.
      Gingerbread Cake Pops
    • Mini shrimp ball with a bite taken out of it in hand.
      Cake Pop Maker Mini Shrimp Balls
    • Banana cake pops upside down on a black tray with colorful, striped treat sticks.
      Banana Cake Pops
    • Mini pizza bites on black board with marinara sauce.
      Homemade Mini Pizza Bites

    Do you have a cake pop maker? If you tried this Naked Cake Pops Recipe or any other recipe on my website, please leave a 🌟 star rating and let me know how it went in the 📝 comments below. And please share the recipe!

    📋Recipe

    Naked cake pops with blue treat sticks on serving tray.
    Print Pin
    5 from 2 votes

    Naked Cake Pops

    Here is a simple recipe for naked cake pops made in a cake pop maker. This means no coating or sprinkles, just an easy, no-frills recipe.
    Course Dessert
    Cuisine American
    Diet Vegetarian
    Prep Time 10 minutes minutes
    Cook Time 4 minutes minutes
    Total Time 14 minutes minutes
    Servings 56 cake pops
    Calories 45kcal
    Author Joss Dyckson

    Equipment

    • Cake Pop Maker
    • Treat sticks

    Ingredients

    • 1 cup flour
    • 1 cup sugar
    • ¾ cup cocoa powder
    • ¼ teaspoon baking soda
    • ½ teaspoon baking powder
    • ½ teaspoon salt
    • 1 large egg
    • 1 cup buttermilk
    • ½ cup vegetable oil
    US Customary - Metric

    Instructions

    • Lightly oil the cake pop maker cooking plates and plug it in to heat it up (it only takes a few minutes).
    • Sift dry ingredients together in a bowl. Add the wet ingredients to the middle of the flour mixture and combine well.
    • Pour the batter into the cake pop maker cavities using a teaspoon (fill them about 1mm from the top). Close the lid and bake them until done, about 4 minutes. Remove the cake balls and let them cool for a few minutes.
    • You may have to take off some excess cake that leaked around the ball. Simply break it off. Insert the treat sticks and serve.

    Notes

    • To store your cake pops, they can be left at room temperature in a sealed container or a plastic bag for up to a week.
    • To keep them longer, store them in an airtight container in the fridge for up to two weeks.
    • Freeze in plastic freezer bags to keep for up to three months.

    Nutrition

    Calories: 45kcal | Carbohydrates: 6g | Protein: 1g | Fat: 2g | Saturated Fat: 2g | Cholesterol: 3mg | Sodium: 29mg | Potassium: 31mg | Fiber: 1g | Sugar: 4g | Vitamin A: 11IU | Calcium: 9mg | Iron: 1mg

    How to Make Apple Crisp

    October 21, 2019 by Joss Dyckson 2 Comments

    If you're looking to break away from the same old desserts, then learn how to make apple crisp without oats (technically a crumble in some parts of the world). With its sweet, warm filling and irresistible crunchy topping, it's sure to please even the pickiest eaters.

    Apple crisp on white dessert plate.
    [feast_advanced_jump_to]

    There's all manner of delicious desserts out there just waiting for you to indulge in their flavor. That being said, the old standard can get a bit played out after a while and it can be nice to switch things up.

    An apple crisp is the best way to do this in the fall when apples are in season. It's also a fitting choice for a Thanksgiving feast. These mini apple pies are another great option.

    🍂 Reasons to Make This Apple Crisp This Fall

    • Few Ingredients: If you love desserts with few ingredients and loads of delicious, warm and cozy flavor, you'll love this fall apple dessert.
    • Seasonal Flavors: Apple crisp features warm, comforting flavors like cinnamon and fresh apples (similar to my apple cinnamon chips), which perfectly complement the cozy, autumnal feel of Thanksgiving.
    • Crowd-Pleaser: The combination of sweet apple filling with a crunchy, buttery topping is universally loved, making it a great choice for gatherings.
    • Versatile: It can be served warm or at room temperature, and it's delicious on its own or topped with a scoop of vanilla ice cream or a dollop of whipped cream.

    🍎 Apple Crisp Ingredients

    Apple crisp ingredients prepped and labeled.
    • apples - Some great choices are Granny Smith, Honeycrisp or Golden Delicious.
    • cinnamon - Warm spices like cinnamon perfectly complement apples.
    • flour - Binds and gives structure to the topping.
    • brown sugar - Brown sugar gives a beautiful golden-brown color when the topping bakes and pairs well with the warm flavors.
    • powdered milk - In this version, I make a topping of powdered milk without oats. It has a slightly different texture than you'd expect from a classic apple crisp that I find quite enjoyable.
    • butter - For the crisp topping.

    *Check recipe card for ingredient amounts.

    📖 Recipe Tweaks

    Apple crumbles/crisps are a super versatile dish with tons of ways to customize them to your liking.

    • Spice it up. Add some different spices for a more robust flavor or mix some oats into the top crust for an old fashioned oatmeal kind of experience.
    • Sweet tooth. If you like it extra sweet, add 1 or 2 tablespoons of sugar to the apple slices.
    • Creamy toppings. Serve it with a nice scoop of vanilla ice cream or a dollop of whipped cream on top.

    There's a ton to try that you might enjoy, so don't be afraid to experiment (and tell me how things turn out).

    🔪 Instructions for How to Make Apple Crisp

    Sliced apples in pie dish.

    Step #1. Peel & Core the Apples. Preheat oven to 350°F (180°C). Peel, core and slice the apples. Place them in an 8" or 9" baking dish. Sprinkle with the cinnamon and pour water over them evenly.

    Apple crisp crumble ingredients in bowl.

    Step #2. Prepare the Topping. Mix the flour, brown sugar, powdered milk and butter in a bowl - press with a fork or your fingers until the crumble forms.

    Apples and cinnamon in pie dish.

    Step #3. Add the Crumble. Cover the apples with the crumble mixture evenly.

    Unbaked apple crisp in a pie dish with foil on top.

    Step #4. Cover with Foil. Cover the baking dish with foil.

    Baked, golden apple crisp in a pie dish.

    Step #5. Bake. Bake for 30 minutes covered. Remove the foil for another 5 to 10 minutes, until golden on top.

    Baked, homemade, apple crisp.

    Step #6. Serve. Let cool for a bit. Serve and enjoy!

    Now you know exactly how to make apple crisp. Easy, delicious, and even close to healthy, it's a fantastic dessert for weeknights, holidays or basically any other occasion you might have for serving up something amazing and making your guests feel right at home.

    ✅ Tips for Success

    • Consistency: Peel, core, and slice the apples evenly to ensure they cook at the same rate. Thicker slices will hold their shape better, while thinner slices can create a softer filling.
    • Don't Overmix the Topping: When combining the butter with the dry ingredients, mix until just combined to achieve a nice, crispy-crumbly texture.
    • Keep an Eye on the Crumble When Baking: Bake the crumble until the topping is golden brown and the fruit filling is bubbling around the edges. Keep an eye on it to prevent burning.
    • Let it Rest: Let the apple crumble cool for a few minutes after baking. This will help the filling thicken and settle, making it easier to serve.

    ❓ Recipe FAQs

    How do you store leftovers?

    Store your apple crisp in a covered container in the fridge for up to 5 days.

    What temperature do you reheat it at?

    Reheat in the oven at 350°F until warmed through.

    Can you freeze it?

    Yes! It can be frozen before or after baking. Cover it well with foil and into a freezer-safe bag for up to 3 to 6 months. If it was already baked, thaw in the fridge overnight before reheating in the oven. If it was unbaked before freezing, it can go straight into the oven from the freezer. Remember to cover it with foil for the first 30 minutes of baking.

    What is the difference between apple crisp and apple crumble?

    In the U.K. and Australia, the term "Apple Crumble" is often used interchangeably with "Apple Crisp." But, in Canada and the U.S., an apple crumble is a distinct dessert. Both apple crisp and crumble feature a baked apple filling with a streusel-like topping. The main difference is that the crumble topping typically does not contain oats or nuts.

    Apple crisp on white dessert plate with a spoon on the side.

    🧡 More Delicious Fall Recipe Tutorials to Try

    • Thanksgiving stuffing/dressing in white bowl with fresh herbs.
      How to Make Stuffing (From Scratch)
    • Butternut squash sliced open on cutting board.
      How to Clean, Save and Roast Butternut Squash Seeds
    • London fog tea latte in a clear glass mug with tea biscuits on the side.
      How to Make a London Fog
    • Cabbage rolls stacked on plate.
      How to Make Cabbage Rolls

    What's your favorite way to serve up a hot slice of 🍎 homemade apple crisp? Do you eat it on its own or with ice cream? If you tried this 📋 recipe tutorial for 🍏 How to Make Apple Crisp or any other recipe on my website, please leave a 🌟 star rating and let me know how it went in the 📝 comments below. And please share the recipe!

    📋Recipe

    Apple crisp in white dish.
    Print Pin
    5 from 1 vote

    How to Make Apple Crisp

    If you're tired of the same old desserts, then learn how to make an apple crisp from scratch, without oats. Sweet and warm with an amazing crunchy topping, it's sure to please even the pickiest eaters.
    Course Dessert
    Cuisine American, British
    Diet Vegetarian
    Prep Time 20 minutes minutes
    Cook Time 35 minutes minutes
    Total Time 55 minutes minutes
    Servings 6
    Calories 477kcal
    Author Joss Dyckson

    Equipment

    • 8" or 9" baking dish
    • Foil

    Ingredients

    • 6 apples such as Granny Smith, Honeycrisp or Golden Delicious
    • ¼ cup water
    • 1 tablespoon ground cinnamon
    • ¾ cup flour
    • ¾ cup brown sugar
    • ¾ cup powdered milk
    • ½ cup butter softened
    US Customary - Metric

    Instructions

    • Preheat oven to 350°F (180°C). Peel, core and slice the apples. Place them in an 8" or 9" baking dish. Sprinkle with the cinnamon and pour water over them evenly.
      Sliced apples in pie dish.
    • Mix the flour, brown sugar, powdered milk and butter in a bowl - press with a fork or your fingers until the crumble forms.
      Apple crisp crumble in bowl with spoon.
    • Cover the apples with the crumble mixture. Cover the baking dish with foil. Bake for 30 minutes in the preheated oven. Remove the foil and bake for another 5 to 10 minutes, until golden on top.
      Unbaked apple crisp in a pie dish.
    • Let cool for a bit. Serve and enjoy!
      Baked, golden apple crisp in a pie dish.

    Notes

    • Fridge Storage & Reheating: Store your apple crisp in a covered container in the fridge for up to 5 days. Reheat in the oven at 350°F.
    • Freezer Storage & Reheating: It can be frozen before or after baking. Cover it well with foil and in a freezer-safe bag for up to 3 to 6 months. If it was already baked, thaw in the fridge overnight before reheating in the oven. If it was unbaked before freezing, it can go straight into the oven from the freezer. Remember to cover it with foil for the first 30 minutes of baking.
    • Toppings: It can be served with a scoop of vanilla ice cream or a dollop of whipped cream on top.
    • Consistency: Peel, core, and slice the apples evenly to ensure they cook at the same rate. Thicker slices will hold their shape better, while thinner slices can create a softer filling.
    • Don't Overmix the Topping: When combining the butter with the dry ingredients, mix until just combined to achieve a nice, crispy-crumbly texture.
    • Keep an Eye on the Crumble When Baking: Bake the crumble until the topping is golden brown and the fruit filling is bubbling around the edges. Keep an eye on it to prevent burning.
    • Let it Rest: Let the apple crumble cool for a few minutes after baking. This will help the filling thicken and settle, making it easier to serve.

    Nutrition

    Calories: 477kcal | Carbohydrates: 72g | Protein: 7g | Fat: 20g | Saturated Fat: 12g | Cholesterol: 56mg | Sodium: 205mg | Potassium: 471mg | Fiber: 6g | Sugar: 52g | Vitamin A: 720IU | Vitamin C: 10mg | Calcium: 211mg | Iron: 1mg

    Over 40 Hot and Spicy Jalapeño Recipes

    October 16, 2019 by Joss Dyckson 1 Comment

    Craving something spicy to nibble or sip on? If you aren't quite sure how to spice it up, this list of jalapeño recipes is sure to give you some inspiration! From jalapeño popper pinwheels to mango margaritas, I've got you covered when it comes to adding some heat to your eats!

    Green jalapeno chili peppers, sliced and whole. White background.

    I'm always craving something spicy, but needed a little more variety so I came up with this spicy jalapeño food and drink compilation. My favorite on this list are the grilled jalapeño poppers because not only are they spicy but they are smoky too from the magic of the outdoor grill.

    You can also check out these aphrodisiac recipes and fresh passion fruit recipes.

    [feast_advanced_jump_to]

    Appetizers

    There are so many great ideas when it comes to jalapeño appetizer recipes. I have a mix of hot, melty, cheesy, comfort food favorites with a couple of cold and light, delicious bites.

    1
    Jalapeño Cheese Balls
    Monsoon Magic
    Jalapeño Cheese Balls
    These spicy, cheese balls look incredible! One bite into these would reveal a melty jalapeño and cheese mixture, covered in a crunchy, potato crust. Serve them with a tomato ketchup or get adventurous with a range of creamy, sweet and/or tangy dips! Whatever you serve them with is open to your imagination.
    Jalapeño Cheese Balls Recipe
    2
    Oh My Creative
    Jalapeño Cream Cheese Bacon Bites
    Is anyone else on the bacon-everything bandwagon? Bacon somehow has the ability to make both savory and sweet dishes taste amazing, such as these 3-cheese bacon bites with both homemade bacon bits and smoked-bacon cheddar to double up on that smoky flavor. Bacon in jalapeño recipes is always a hit!
    Jalapeño Cream Cheese Bacon Bites Recipe
    3
    Spicy Deviled Eggs with Bacon and Jalapeño
    Chef Sous Chef
    Spicy Deviled Eggs with Bacon and Jalapeño
    You can surely liven up your classic deviled eggs by throwing some bacon and jalapeño into the egg yolk mixture and topping with little crunchy bits of bacon crumble and diced jalapeño. Yum!
    Deviled Eggs with Bacon and Jalapeño Recipe
    4
    Deep fried candied jalapeno slices in a wooden dish.
    Sonoma Farm
    Deep Fried Tex-Mex Candy Jalapeno Slices Recipe
    This recipe from Sonoma Farms calls for battering 'bread and butter' pickled jalapeños and then deep frying them until golden brown and crispy. They can be eaten as a snack or added to sandwiches, burgers, etc. for some added spice and crunch.
    Tex-Mex Candy Jalapeño Slices Recipe
    5
    Cranberry jalapeno dip in a clear glass bowl.
    Sparrows and Lily
    Cranberry Jalapeño Cream Cheese Dip
    When it comes to jalapeño recipes, mixing sweet and spicy is always a good plan. That's exactly the kind of flavor combination Sparrows and Lily achieved with this cranberry jalapeño dip made for the holiday season. It's a refreshing way to use up your cranberries when a simple cranberry sauce just doesn't seem to cut it.
    Cranberry Jalapeño Dip Recipe
    6
    Jalapeño Popper Pinwheels Recipe
    A Few Shortcuts
    Jalapeño Popper Pinwheels Recipe
    Here are those jalapeño popper pinwheels I was talking about. The nice thing about this recipe is the use of premade puff pastry dough, perfect for making an appetizer in a pinch! We are talking under 30 minutes and only 5 ingredients.
    Jalapeño Popper Pinwheels Recipe
    7
    Chicken Jalapeño Popper Cups
    Homemade Interest
    Chicken Jalapeño Popper Cups
    You are looking at another easy jalapeño recipe that utilizes premade phyllo pastry already shaped into cute little shells for your convenience. The cups house a mixture of three cheeses, shredded chicken, diced jalapeños, green chilies and mayo.
    Chicken Jalapeño Popper Cups Recipe
    8
    Jalapeño Popper Pigs in a Blanket
    A Gouda Life
    Jalapeño Popper Pigs in a Blanket
    Another unique way to serve jalapeño poppers is by turning them into a 'pigs in a blanket' appetizer. Sausage links and a spicy, cream cheese mixture are rolled into crescent dough and baked to golden, crispy perfection. This is a great jalapeño appetizer idea to work into your game day menu!
    Jalapeño Popper Pigs in a Blanket Recipe
    9
    Jalapeño Tequila Shrimp
    We Are Not Martha
    Jalapeño Tequila Shrimp
    Looking for jalapeño recipes for a backyard gathering? These Tequila Jalapeño Shrimp Skewers could easily be an appetizer or main dish, depending on the occasion. Perfect for a backyard party or BBQ, all that's missing is the hot tub!
    Tequila Jalapeño Shrimp Recipe

    Side Dish Jalapeño Recipes

    For a pop of heat, add a spicy, jalapeño side dish to your meal with one of these delicious options.

    10
    Jalapeño Cheddar Biscuits
    Will Cook for Smiles
    Jalapeño Cheddar Biscuits
    Moving on from appetizers, we are now entering side-dish territory with these zesty, buttermilk biscuits. Lyuba from 'Will Cook For Smiles' offers up many suggestions for serving these fluffy biscuits; you might want to give them all a try!
    Jalapeño Cheddar Buttermilk Biscuits Recipe
    11
    Roasted Jalapeños
    Foodies
    Roasted Jalapeños
    Roasted jalapeños are quick and easy to make and can amp up the flavors of many, many dishes such as: pizza, scrambled eggs, tacos, enchiladas, burgers, nachos. They can even be added to soups, stews and sauces. Get creative with it!
    Roasted Jalapeños Recipe
    12
    Crispy Jalapeño Fries
    Slow the Cook Down
    Crispy Jalapeño Fries
    This is the kind of share food you secretly don't want to share! You won't find any potato in these fries; just some simple, fried, panko-breaded strips of juicy, crispy jalapeños, served with some creamy ranch dressing and marinara dips, no big deal.
    Crispy Jalapeño Fries Recipe

    Jalapeño Popper Recipes

    Here I not only included jalapeño poppers themselves but dishes that replicate that cheesy, spicy, smoky flavor.

    13
    Jalapeño Popper Corn Dip
    Delish
    Jalapeño Popper Corn Dip
    There seems to be a tight relationship forming between jalapeños and bacon, as we are starting to see in this list. And with good reason...I mean just look at this dip! This is one of those jalapeño recipes you will want to come back to again and again.
    Jalapeño Popper Corn Dip Recipe
    14
    Grilled jalapeño poppers on black serving board.
    Grilled Jalapeño Poppers
    By now you've surely tried jalapeño poppers baked in the oven, but have you tried them grilled on the BBQ? If not, this recipe visually shows you each step of the process with the end result being a smoky, cheesy, mildly spicy bite, that are always a huge hit at our barbecues! This is one of my favorite jalapeño recipes to make at home.
    How to Grill Jalapeño Poppers Recipe
    15
    Jalapeño Popper Hasselback Chicken
    The Girl on Bloor
    Jalapeño Popper Hasselback Chicken
    The Girl on Bloor turns your classic jalapeño popper appetizer into a flavorful main by stuffing the spicy, cheese mixture into the scores of a chicken breast.
    Hasselback Jalapeño Popper Chicken Recipe
    16
    Jalapeño Popper Monkey Bread
    Living la Vida Holoka
    Jalapeño Popper Monkey Bread
    Don't worry, you will not need to spend hours rising and baking bread, just use store-bought pizza dough to make this jalapeño popper monkey bread! Dough balls are filled with that popper mixture we all know and love, and then baked in a bundt cake pan, forming a pull-apart style bread that is perfect for serving a crowd.
    Jalapeño Popper Monkey Bread Recipe
    17
    Jalapeño Popper Quiche
    Living la Vida Holoka
    Jalapeño Popper Quiche
    If you're thinking this quiche may be too heavy for you with such ingredients as pie crust, cream, bacon and brie cheese, you need not worry as Jessica offers up low calorie variations and tips while still maintaining the delicious factor.
    Jalapeño Popper Quiche Recipe

    Main Dish Jalapeño Recipes

    I was able to find so many jalapeño recipes for dinner that I found it hard to narrow the list down but I'm sure you'll enjoy all of these deliciously, spicy ideas.

    18
    Jalapeño Popper Tater Tot Chicken Casserole
    The Country Cook
    Jalapeño Popper Tater Tot Chicken Casserole
    The textures and flavors of a jalapeño popper just happen to work extremely well in a casserole. You can simply pick up an already-cooked rotisserie chicken, some frozen tater tots and of course the popper ingredients. It's a simple, one-dish meal that delivers!
    Jalapeño Popper Tater Tot Chicken Casserole Recipe
    19
    Jalapeño Pepper Jack Chicken Burger
    Butter Your Biscuit
    Jalapeño Pepper Jack Chicken Burger
    Is your stomach growling after looking at this juicy, loaded chicken burger? I know mine is! This recipe includes a roasted garlic mayo to top it all off.
    Jalapeño Pepper Jack Chicken Burger Recipe
    20
    Jerk Pork Carnitas Tacos
    No Spoon Necessary
    Jerk Pork Carnitas Tacos
    These jerk carnitas are made with beer-braised pork, a spicy jerk sauce, charred corn tortillas, shredded cabbage and a spicy pineapple jalapeño salsa, all of those bright and tasty flavors you would expect from Mexican-Jamaican cuisine.
    Jerk Pork Carnitas Tacos Recipe
    21
    Jalapeño Lime Chicken Soup
    Pinch of Yum
    Jalapeño Lime Chicken Soup
    Besides the fresh combination of jalapeño and lime, this chicken soup has the addition of salsa verde, white beans and garnishes. Another fall soup to add to the meal plan!
    Jalapeño Lime Chicken Soup Recipe
    22
    Artisan Jalapeño Cheddar Sausage
    Bob Bradham
    Artisan Jalapeño Cheddar Sausage
    This video shows you exactly how to make spicy pork-butt sausages, and it does not skimp on the spice! (Although this can be adjusted according to your taste.) The pork chunks are marinated overnight before grinding, at which point you are adding jalapeño and cheddar chunks and making a test patty to adjust the seasonings. Then you're good to go with the casing process and out comes a sausage ring to be proud of!
    Artisan Jalapeño Cheddar Sausage Recipe
    23
    Spicy Armadillo Eggs
    Dish n the Kitchen
    Spicy Armadillo Eggs
    These 'armadillo eggs' are basically jalapeño poppers stuffed into loose chorizo sausage and wrapped in bacon! If you are a meat and potatoes kind of person and you like grilling, these spicy meat bombs are for you.
    Spicy Armadillo Eggs Recipe
    24
    How to Make Jalapeño Cheddar Stuffed Meatloaf
    The Stay At Home Chef
    How to Make Jalapeño Cheddar Stuffed Meatloaf
    Who doesn't like surprises? This is a meatloaf with a spicy, cheesy surprise in the middle (an entire 8 oz. brick of cheddar!). It's covered in a ketchup glaze and topped with sliced jalapeños.
    Jalapeño Cheddar Stuffed Meatloaf Recipe
    25
    White Chicken Lasagna
    Mom Dot
    White Chicken Lasagna
    This white chicken lasagna is spicy on so many levels! You've got your fresh jalapeños, your jalapeño cheddar and some chili powder to boot. The cool Mexican crema balances out the spiciness factor and the cheesy, shredded chicken mixture nestled into layers of lasagna noodles screams of deliciousness!
    White Chicken Lasagna Recipe

    ⭐ Speaking of chili powder, you might also like my skillet chili.

    Cocktails

    I couldn't forget to add some hot jalapeño cocktails to literally spice up your beverage selection.

    26
    Spicy Mango Margarita on the Rocks
    Fork in the Kitchen
    Spicy Mango Margarita on the Rocks
    Move over strawberry slushy margaritas! The tequila cocktail itself consists of not only mango juice but fresh mango and jalapeños as well, keeping it real and full of natural flavors! The rimmer you see on this mango margarita is spiced with chili powder for a nice kick each time you take a sip.
    Spicy Mango Margarita Recipe
    27
    Jalapeño Moscow Mule
    The Lemon Bowl
    Jalapeño Moscow Mule
    If you like cocktails that are not too sweet, but big on zest and spice, then you will certainly enjoy this jalapeño moscow mule. If you've got 10 minutes to spare, then you can let your guests wait around for a short time with some appies (I'm sure they won't mind) while you play bartender.
    Jalapeño Moscow Mule Recipe
    28
    Grapefruit Jalapeño Margarita
    Monika Hibbs
    Grapefruit Jalapeño Margarita
    If mangoes and mules don't float your boat, can I entice you with a grapefruit jalapeño margarita? This is an elegant, classy-looking cocktail, with a spicy and zesty personality.
    Grapefruit Jalapeño Margarita Recipe
    29
    Strawberry Jalapeño Margarita Popsicles
    The Little Epicurean
    Strawberry Jalapeño Margarita Popsicles
    These strawberry jalapeño margarita popsicles are such a fun idea for a pool party or backyard bash/BBQ on a hot, summer day! I'll be dreaming of making these next summer…
    Strawberry Jalapeño Margarita Popsicles Recipe

    BBQ Sauces

    Add some heat to this delicious summer condiment with these jalapeño BBQ sauce recipes.

    30
    Spicy Mango Jalapeño BBQ Sauce
    Vindulge
    Spicy Mango Jalapeño BBQ Sauce
    The nice thing about this homemade BBQ sauce recipe is that it has no added, processed sugars, which is a common thing for most commercial BBQ sauces. This version is naturally sweetened with fresh mango. All the more reason to make your own!
    Spicy Mango Jalapeño BBQ Sauce Recipe
    31
    Spicy Honey BBQ Sauce
    Chili Pepper Madness
    Spicy Honey BBQ Sauce
    Sweet with heat is the direction Mike was going with this BBQ sauce. It contains both jalapeño and habanero peppers for some variation. You can adjust the heat by adding more or less of the seeds and membrane from the chili peppers or just switching the type of peppers altogether. Whatever heat level you choose, no heat or max heat, it's sure to be flavorful!
    Spicy Honey BBQ Sauce Recipe
    32
    Sweet And Spicy Jalapeño Barbecue Sauce
    Dad With a Pan
    Sweet And Spicy Jalapeño Barbecue Sauce
    You can't have a barbecue without a good barbecue sauce. What sets this BBQ sauce apart from the rest is the smoky flavor brought to you by roasting the jalapeño peppers directly over the burner before blending it into the tomato sauce.
    Sweet And Spicy Jalapeño Barbecue Sauce Recipe

    Canned Jalapeño Recipes

    Sometimes you simply want a plain old pickled jalapeño or spicy jelly to snack on and these canned jalapeño recipes provide you with just that.

    33
    Canned jalapeno slices in 2 small jars.
    Flavour and Savour
    Quick Refrigerator Pickled Jalapeños
    They may come out of a jar, but there are actually no canning skills required here. This recipe takes about 15 minutes from start to finish, quicker than running to the grocery store and back! They can be stored for several weeks in the refrigerator.
    Quick Refrigerator Pickled Jalapeños Recipe
    34
    3-Ingredient Candied Jalapeños
    Brooklyn Farm Girl
    3-Ingredient Candied Jalapeños
    If you have too many jalapeños sitting in your fridge then you know what to do with, this is the perfect recipe to use them up! Also known as 'Cowboy Candy', this is a sweet and spicy treat you will want to try at least once.
    3-Ingredient Candied Jalapeños Recipe
    35
    Jalapeño Pepper Jelly
    The Grateful Girl Cooks
    Jalapeño Pepper Jelly
    Jalapeño jelly isn't as common as a strawberry or crabapple type, but it's worth giving it a try if you want to jazz up an appetizer (by spreading it over a block of cream cheese and serving with crackers perhaps). Or you could even warm it and use it as a glaze for pork or chicken.
    Jalapeño Pepper Jelly Recipe
    36
    Perfect Pickled Jalapeño Peppers
    Frugal Mom Eh
    Perfect Pickled Jalapeño Peppers
    These are some straight-up pickled jalapeño slices without any distractions. It doesn't get any easier than this when it comes to canning this fiery topping.
    Perfect Pickled Jalapeño Peppers Recipe

    More Jalapeño Recipes

    These are miscellaneous jalapeño recipes that I found to be unique and creative as well as an authentic salsa recipe.

    37
    Jalapeño Hot Sauce
    White Thunder BBQ
    Jalapeño Hot Sauce
    Adding a dash of hot sauce can liven up many a dish. This hot sauce starts out as charred and chopped jalapeños and onions, and by the end of it, you've got a smooth and saucy, spicy concoction.
    Jalapeño Hot Sauce Recipe
    38
    Honey Jalapeño Cornbread Muffins
    Closet Cooking
    Honey Jalapeño Cornbread Muffins
    Don't these look scrumptious with the honey drizzling and butter melting all over these moist, cornbread muffins? Try adding a jalapeño slice to the top of each muffin to let everyone know these muffins are hot and spicy on the inside.
    Honey Jalapeño Cornbread Muffins Recipe
    39
    Halloween Bacon Jalapeño Mummies
    Butter Your Biscuit
    Halloween Bacon Jalapeño Mummies
    It's October, Halloween month, and so it was necessary to include a jalapeño recipe for the season! Try making these bacon jalapeño mummies and see what your guests think. They may just look too cute to take a bit out of! Then again, they look and sound too tasty to pass up.
    Halloween Bacon Jalapeño Mummies Recipe
    40
    Easy and Fast Jalapeño Salsa
    Everyday Latina
    Easy and Fast Jalapeño Salsa
    I don't know about you, but we use up A LOT of salsa in our home. If you're looking for a salsa that will become a staple in your kitchen, this is it. It's the combination of jalapeños and romas that make up the base of this super easy, cooked salsa.
    Easy and Fast Jalapeño Salsa Recipe
    41
    Jalapeño Hummus
    Five Heart Home
    Jalapeño Hummus
    What haven't we spiced up yet in this list? I can't forget about hummus, a vegetarian staple. Once you know how easy it is to make hummus at home, you likely won't bother picking up the premade kind. The great thing about homemade hummus, is the opportunity to add your favorite ingredients to make it your own, like the jalapeños in this recipe.
    Jalapeño Hummus Recipe
    42
    Chili Powder
    Brooklyn Farm Girl
    Chili Powder
    Do you grow your own jalapeños? Or you're just in the mood to try something new and fun with your leftover chili peppers? This recipe shows you how to dry and grind the peppers into a chili powder or flakes if you are looking for something more course.
    Crushed Chili Powder Recipe
    43
    Spicy Skillet Cornbread
    Kitchen Fairy
    Spicy Skillet Cornbread
    Did you already know you can bake cornbread in a skillet, or did I just blow your mind? The jalapeños in this recipe make the cornbread pop!
    Spicy Skillet Cornbread Recipe

    Jalapeño FAQs

    How many jalapeños in a pound?

    You will get approximately 20 jalapeños in a pound. This can vary depending on the size of the jalapeños.

    When to harvest jalapeños?

    You will know your jalapeños are ready to pick when they are approximately 3" to 5" in length, firm to the touch and a dark green color.

    How many carbs in a jalapeño?

    One jalapeño pepper will have approximately 0.9 g carbs.

    How to make jalapeños less hot?

    There are several ways to make jalapeño peppers less hot including removing the seeds and membrane, cooking them and/or pickling them.

    Final Thoughts on Jalapeño Recipes

    I really enjoyed bringing this collection of some of the best jalapeño recipes together, as I love eats and drinks with some heat. I hope you found at least one or two recipes that piqued your interest.

    ❤️ More Recipe Round Ups You Will Love

    • Marzipan recipe treats collage.
      23 Creative & Delectable Marzipan Recipes
    • BBQ buffalo wings in dish with sauce on the side.
      37 Easy and Delicious Electric Skillet Recipes
    • Kimchi in a bowl.
      28 of Our Best Kimchi Recipes
    • Bison recipes collage.
      14 of Our Best Bison Recipes

    If you enjoyed this Jalapeño Recipes Round Up or any other post on my website, please let me know what you thought in the 📝 comments below. And please share the post!

    Pumpkin Spice Oatmeal Muffins

    October 14, 2019 by Joss Dyckson Leave a Comment

    What better way to enter the fall season than with these warm, aromatic, pumpkin spice oatmeal muffins? Beautiful orange pumpkin with bits of red cranberry and brown oats are combined into a delicious baked good. Enjoying one of these muffins is how I love to start my autumn mornings alongside my marshmallow latte. The kids love them, too!

    Pumpkin muffins with cranberries and oats on wooden background.

    Part pumpkin pie, part pumpkin pie spice oatmeal, and all delicious, they're an easy way to warm up with something great to eat. This muffin recipe is not only delicious but satisfying (I think you'd also love my chocolate orange muffins).

    Here I'll show you how to make them from scratch, loaded with fresh ingredients and spice that would feel like an autumn indulgence even in the dead of winter (though you could certainly enjoy these whenever you like). Let's get making these pumpkin cranberry muffins!

    [feast_advanced_jump_to]

    Ingredients for Pumpkin Spice Oatmeal Muffins

    Pumpkin muffin ingredients labeled.
    • flour - All purpose flour works great.
    • brown sugar - I like the flavor of brown sugar for fall-flavored muffins.
    • pumpkin pie spice mix - Usually consists of cinnamon, ginger, nutmeg and cloves.
    • vegetable oil - I like to use canola oil, sunflower oil, safflower oil or avocado oil.
    • pumpkin purée - You can either use canned pumpkin purée from the supermarket or fresh purée. I have instructions for both. To make your own purée you will need 1 pumpkin - peeled, seeded and roughly chopped.
    • oats - You can use old-fashioned rolled oats or quick oats.
    • cranberries - I use dried rather than fresh.

    *Check recipe card for ingredient amounts.

    Recipe Tweaks

    There are a ton of different ways you can change up these muffins to your particular taste.

    • Swap the cranberries for another dried fruit like blueberries or raisins.
    • Add some chocolate for some extra sweetness.
    • Toss in some chopped or puréed apples for a bit more complexity in flavor or to take some apple pie inspiration.
    • Add some chopped nuts like pecans or walnuts.
    • Maybe even experiment with adding bits of goat cheese. The combination is amazing in my cranberry goat cheese shots, and might even work in this recipe.
    • Experiment away and see what might happen.

    How to Make Pumpkin Muffins

    Chef's Note: If you are making your own fresh pumpkin purée instead of canned, follow the step below (otherwise skip straight to making the muffins).

    For Fresh Pumpkin Purée (Optional)

    Pumpkin puree in bowl with masher.

    Heat the oven to 350ºF. Spread the chopped pumpkin pieces out onto a lightly greased baking sheet and cover with foil. Bake the pumpkin for 1 hour, until soft. Using a blender, purée the pumpkin until smooth.

    You will only need 1 cup of the purée for this recipe. The remaining pumpkin can be frozen for later use for up to 3 months.

    For the Muffins

    Pumpkin muffin dry ingredients in a bowl.

    Step #1. Mix the Dry Ingredients. Preheat the oven to 400ºF. In a bowl, combine the flour, brown sugar, baking powder, pumpkin pie spice, and a pinch of salt.

    Pumpkin muffin batter ingredients in a bowl.

    Step #2. Add the Wet Ingredients. Add the eggs, oil and pumpkin purée to the dry ingredients and combine.

    Pumpkin muffin batter in a bowl.

    Step #3. Add Oats & Cranberries. Fold in the oats and cranberries.

    Unbaked pumpkin muffin matter in silicon molds on baking sheet.

    Step #4. Bake the Pumpkin Spice Muffins. You can either grease individual muffin silicone cups or place muffin liners in a muffin pan and scoop the batter in. Sprinkle some more oats and cranberries on top. Bake for 15 to 20 minutes, or until you insert a toothpick in the center and it comes out clean.

    Pumpkin muffins in silicone muffin molds.

    Step #5. Serve. Let them cool for a few minutes and serve the pumpkin spice oatmeal muffins. They taste great when served warm with some butter.

    Now that you're all finished baking your delicious pumpkin-cranberry muffins, check out my post about leftover pumpkin pie filling ideas with many ideas for your leftover purée.

    Tips For Success

    • Sweeten with Brown Sugar: Brown sugar adds a deeper, caramel-like flavor that is perfect for Autumn, plus extra moisture.
    • Use Pure Pumpkin Purée: Opt for 100% pure pumpkin purée, not pumpkin pie filling, which contains added sugars and spices.
    • Don't Overmix the Batter: Mix just until the dry ingredients are moistened.
    • Cool Properly: Let the muffins cool in the muffin tin for a few minutes before transferring them to a wire rack.

    Storage & Reheating

    • Room Temperature: They can be stored at room temperature in an airtight container for 1 to 2 days but they will become dry over time this way.
    • Freezer: To store in the freezer, let them cool completely, transfer them to a freezer bag and into the freezer for up to 3 months for best quality.
    • Reheat: I like to freeze my muffins and pull them out for breakfast. They taste great warmed up in the microwave straight from frozen, cut open and served with butter.
    Pumpkin muffins with cranberries and oats on wooden background.

    More Fall Treats to Enjoy

    • Apple crisp in white dish.
      How to Make Apple Crisp
    • Pumpkin pie dessert hummus in black bowl with sweet biscuits on the side.
      Pumpkin Pie Dessert Hummus
    • Mini apple pies stacked and one sliced open.
      Mini Apple Pies: A Fall School Snack Recipe
    • Blackberry galette with brie cheese and thyme in cast iron pan.
      Blackberry Brie Galette

    If you tried this Pumpkin Spice Oatmeal Muffins Recipe or any other recipe on my website, please leave a 🌟 star rating and let me know how it went in the 📝 comments below. And please share the recipe!

    📋Recipe

    Pumpkin muffins with cranberries and oats.
    Print Pin
    5 from 1 vote

    Pumpkin Spice Oatmeal Muffins

    These pumpkin spice oatmeal muffins with cranberries are made from scratch, loaded with fresh ingredients and spices that would feel like an autumn indulgence even in the dead of winter.
    Course Breakfast, Snack
    Cuisine American
    Diet Vegetarian
    Prep Time 15 minutes minutes
    Cook Time 15 minutes minutes
    Total Time 30 minutes minutes
    Servings 12 muffins
    Calories 273kcal
    Author Joss Dyckson

    Equipment

    • Silicone muffin mold or muffin pan with liners
    • Mixing bowl

    Ingredients

    For the Pumpkin Muffins

    • 2 cups flour
    • ¾ cup brown sugar
    • 1 tablespoon baking powder
    • 1 tablespoon pumpkin pie spice mix
    • 1 pinch salt
    • 2 eggs
    • ½ cup vegetable oil
    • 1 cup pumpkin purée canned or fresh
    • ½ cup oats
    • 1 cup dried cranberries

    For the Pumpkin Purée - Optional (if making from scratch)

    • 1 pumpkin peeled, seeded and roughly chopped
    US Customary - Metric

    Instructions

    For the Pumpkin Purée (Optional Step)

    • Heat the oven to 350ºF. Spread the chopped pumpkin pieces out onto a lightly greased baking sheet and cover with foil. Bake the pumpkin for 1 hour, until soft.
    • Using a blender, purée the pumpkin until smooth. (You will only need 1 cup of the purée for this recipe. The remaining pumpkin can be frozen for later use for up to 3 months.)

    For the Pumpkin Muffins

    • Preheat the oven to 400ºF. In a bowl, combine the flour, brown sugar, baking powder, pumpkin pie spice, and a pinch of salt.
      2 cups flour, ¾ cup brown sugar, 1 tablespoon baking powder, 1 tablespoon pumpkin pie spice mix, 1 pinch salt
    • Add the eggs, oil and pumpkin purée to the dry ingredients and combine. Fold in the oats and cranberries.
      2 eggs, ½ cup vegetable oil, 1 cup pumpkin purée, ½ cup oats, 1 cup dried cranberries
    • You can either grease individual muffin silicone cups or place muffin liners in a muffin pan and scoop the batter in. Sprinkle some more oats and cranberries on top. Bake for 15 to 20 minutes, or until you insert a toothpick in the center and it comes out dry. Let cool.
    • Serve and enjoy!

    Notes

    • Don't Overmix the Batter: Mix just until the dry ingredients are moistened.
    • Make sure to let the muffins cool in the muffin tin for a few minutes before transferring them to a wire rack.
    • These muffins can be left out at room temperature for 1 to 2 days.
    • I like to freeze mine and pull them out for breakfast. They taste great warmed up in the microwave, cut open and served with butter.
    • To store in the freezer, let them cool completely, transfer them to a freezer bag and into the freezer for up to 3 months for best quality.

    Nutrition

    Calories: 273kcal | Carbohydrates: 43g | Protein: 4g | Fat: 11g | Saturated Fat: 8g | Cholesterol: 27mg | Sodium: 21mg | Potassium: 242mg | Fiber: 2g | Sugar: 21g | Vitamin A: 3217IU | Vitamin C: 1mg | Calcium: 88mg | Iron: 2mg

    Fall Pumpkin Party Punch

    October 9, 2019 by Joss Dyckson 5 Comments

    A unique way to enjoy the pumpkin spice frenzy this season is a glass of Fall Pumpkin Party Punch. It contains REAL pumpkin, not just a flavored syrup (although I love that too), spiced rum, orange liqueur and more!

    Fall Pumpkin Party Punch in a clear glass with a thin orange slice garnish clipped on with a clothespin.

    This Fall Party Punch is a Sip of Autumn Magic

    • Quick and Easy: It takes only 5 minutes to whip up a batch, so next time you're having a fall gathering such as a dinner party, Halloween festivity or Thanksgiving meal, keep this recipe in mind, your guests will be intrigued.
    • Unique and Festive: Pumpkin-flavored drinks are not as common as other flavors, making this punch a unique party beverage. It adds a festive touch to any fall celebration.
    • Alcoholic or Non: This spiked punch is not as strong as, say, a pumpkin vodka martini but you can adjust the alcohol levels or omit them for a non-alcoholic option.
    • Great for Batch-Making: This pumpkin punch is perfect for large gatherings as it comes together in a blender and can be easily made in large batches.
    • Visually Appealing: Its warm, golden-orange color adds a beautiful, autumnal touch to your drink table and complements fall-themed decor, especially if you place the bowl next to these mini apple pies.
    • Make Ahead: You can make it a day in advance since it doesn't contain any carbonation, so there's no need to worry about it going flat.

    Featured Comment

    From Trish: ⭐⭐⭐⭐⭐ "I love this punch and so did my guests!"

    🍹 You might also like my Shirley Temple Punch and Christmas morning alcoholic punch.

    [feast_advanced_jump_to]

    Ingredients

    Fall pumpkin party punch ingredients labeled on wooden background.
    • pumpkin purée - Canned or freshly puréed from your fall harvest will work.
    • sweetener - Use honey or agave nectar for best results. Agave combines better into the drink without sticking to the edges of the blender. Amber or dark maple syrup would also be a nice option.
    • pumpkin pie spice - Pumpkin pie spice includes a mixture of spices like nutmeg, cinnamon, ginger, cloves and allspice and you can find premixed blends at the grocery store or make your own pumpkin pie spice mix.
    • spiced rum - I like to use Captain Morgan but you can use your favorite.
    • orange liqueur - Meaghers, Grand Marnier, Cointreau etc. are all perfect.

    *Check recipe card for ingredient amounts.

    Recipe Tweaks

    • Pulp: Not everyone likes pulp in their cocktail. If you prefer it without the pulp, you have two options:
      • Strain: Pour the blended beverage through a fine mesh sieve or cheesecloth to make it more clear.
      • Leave it out: Or, omit the pumpkin purée, sweetener and pumpkin pie spices and use this pumpkin spice simple syrup to add sweet pumpkin flavor.
    • Sweetness: You could omit the sweetener completely since the orange and pineapple juices hold plenty of sweetness. Go by taste.

    How to Make Fall Pumpkin Party Punch

    It's super easy to make this fall alcoholic punch:

    Fall pumpkin punch in a blender.

    Step #1. Combine. Combine all ingredients, except for the garnishes, in a blender.

    Fall pumpkin party punch in a fall-themed glass bottle.

    Step #2. Transfer. Transfer the punch to a punch bowl, pitcher or keep it in the blender.

    Fall Pumpkin Party Punch in a clear glass with ice and orange slice garnish.

    Step #3. Serve. Serve the fall party punch in glasses with ice. Use cherries and orange slices to garnish the glasses.

    Joss' Tips

    • Hosting a crowd? Make a big batch for parties: Although this recipe serves 4, you are welcome to double or triple the batch and let your guests experience this fun fall beverage out of a punch bowl.
    • Stir before serving: The pumpkin does tend to settle over time, so it is best served on the day of preparation, but is completely drink-worthy the next day as well. It's nothing a little stir can't fix.
    • Offer a non-alcoholic version: Leave out the alcohol and replace it with some sparkling apple cider right before serving. If you're serving both versions, pop on some cute, festive labels so mistakes don't happen.

    Recipe FAQs

    How long does pumpkin punch last in the fridge?

    This fall punch is best served immediately but can be stored in the fridge for no longer than a few days.

    How do you serve pumpkin party punch without a punch bowl?

    You can use a pitcher or even a blender to hold the beverage. Some more creative options include: a hollowed out pumpkin, beverage dispenser, mason jars or large glass jars, vintage jugs, wine decanters or a large bowl.

    Should you put ice cubes in the punch?

    To keep the punch from becoming diluted, it's best to add ice cubes to individual glasses rather than the punch bowl. Or, try freezing some orange or apple juice in an ice cube tray and use those to chill the punch instead.

    Can I use canned pumpkin pie filling instead of purée?

    Yes, you can give that a try! However, I would hold off on adding any extra sweeteners until you've taste tested it first because canned pumpkin pie filling is already sweetened.

    Pumpkin punch in a glass with a pitcher of punch in the background.

    ❤️ More Pumpkin Recipes You Will Love

    • Frosted pumpkin cream cheese bread sliced open.
      Frosted Pumpkin Cream Cheese Bread
    • Pumpkin pie filling in jar with spoon and Autumn decorations.
      What to Do With Leftover Pumpkin Pie Filling: Tips & Recipes
    • Oven baked pumpkin spice oatmeal in baking dish.
      Pumpkin Pie Spice Baked Oatmeal
    • Pumpkin muffins with cranberries and oats.
      Pumpkin Spice Oatmeal Muffins

    If you tried this Fall Pumpkin Party Punch Recipe or any other recipe on my website, please leave a 🌟 star rating and let me know how it went in the 📝 comments below. And please share the recipe!

    📋Recipe

    Fall pumpkin party punch in a glass with orange slice garnish.
    Print Pin
    5 from 3 votes

    Fall Pumpkin Party Punch

    A unique way to enjoy the pumpkin spice frenzy this season is a glass of this alcoholic Fall Pumpkin Party Punch with REAL pumpkin flavor.
    Course Drinks
    Cuisine American, Canadian
    Diet Vegetarian
    Prep Time 5 minutes minutes
    Total Time 5 minutes minutes
    Servings 4
    Calories 225kcal
    Author Joss Dyckson

    Equipment

    • Glass pitcher or punch bowl
    • Blender

    Ingredients

    For the Punch

    • ½ cup pumpkin purée
    • 2 teaspoons sweetener honey or agave nectar
    • ¾ teaspoon pumpkin pie spice
    • 1 ½ cups orange juice
    • 1 ½ cups pineapple juice
    • ½ cup spiced rum
    • ¼ cup orange liqueur

    Garnishes

    • 4 cherries
    • 4 orange slices
    US Customary - Metric

    Instructions

    • Combine all ingredients, except for the garnishes, in a blender.
      ½ cup pumpkin purée, 2 teaspoons sweetener, ¾ teaspoon pumpkin pie spice, 1 ½ cups orange juice, 1 ½ cups pineapple juice, ½ cup spiced rum, ¼ cup orange liqueur
    • Transfer the punch to a punch bowl, pitcher or keep it in the blender.
    • Serve with ice. Use cherries and orange slices to garnish the glasses.

    Notes

    • Alcohol content: You can add more or less rum, depending on your preference. Remember to drink responsibly!
    • Pumpkin pulp: If you prefer it without the pulp, you have two options:
      • Pour the blended beverage through a fine mesh sieve or cheesecloth to make it more clear.
      • Or, omit the pumpkin purée, sweetener and pumpkin pie spices and use this pumpkin spice simple syrup to add sweet pumpkin flavor.
    • Leftover storage: This fall punch can be stored in the fridge for no longer than a few days. The pumpkin does tend to settle over time, so it is best served on the day of preparation, but is completely drink-worthy the next day or two as well.
    • How to serve the punch without a punch bowl: You can use a pitcher or even a blender to hold the beverage. Some more creative options include: a hollowed out pumpkin, beverage dispenser, mason jars or large glass jars, vintage jugs, wine decanters or a large bowl.
    • Ice cube tip: To keep the punch from becoming diluted, it's best to add ice cubes to individual glasses rather than the punch bowl. Or, try freezing some orange or apple juice in an ice cube tray and use those to chill the punch instead.

    Nutrition

    Calories: 225kcal | Carbohydrates: 31g | Protein: 1g | Fat: 1g | Saturated Fat: 1g | Sodium: 6mg | Potassium: 364mg | Fiber: 1g | Sugar: 25g | Vitamin A: 4952IU | Vitamin C: 57mg | Calcium: 36mg | Iron: 1mg

    How to Make Pumpkin Pie Spice

    October 7, 2019 by Joss Dyckson Leave a Comment

    Do you want to know how to make pumpkin pie spice from scratch? This easy, quick recipe is a simple blend of cinnamon, nutmeg, ginger and cloves. These four spices are all you need to flavor a variety of pumpkin dishes from muffins and pies to pumpkin spice lattes.

    Pumpkin pie spice mix on wooden spoon.

    While I start to get sad that summer is coming to an end, there is at least one thing I can really look forward to: pumpkin spice season. I can't get enough of the warm flavor that it brings to delicious, autumn baked goods and hot and cold, spiced drinks.

    Some of my favorite desserts and drinks to add this spice blend to are pumpkin cake pops, PSL's (the BEST), pumpkin cream cheese bread and this easy pumpkin martini recipe.

    [feast_advanced_jump_to]

    Pumpkin Pie Spice Ingredients

    Ground cinnamon and cinnamon sticks on white, wooden background.

    3 tablespoons ground cinnamon

    Ground and whole nutmeg on white, wooden background.

    2 teaspoons ground nutmeg

    Ground and fresh ginger on white, wooden background.

    2 teaspoons ground ginger

    Ground and whole cloves on white, wooden background.

    1 ½ teaspoons ground cloves

    You will also need measuring spoons, a small bowl and a storage container for the finished DIY spice mix.

    Step #1. Combine Ingredients

    Pumpkin pie spice mix in wooden bowl with wooden spoon.

    Combine all of the spices in a small bowl.

    Step #2. Transfer to Container

    Pumpkin pie spice mix in wooden bowl with wooden spoon and a storage container.

    Transfer to an airtight container.

    How to Use it

    Pumpkin pie spice mix on wooden spoon beside metal spice container.

    Use in baking and/or beverages such as pumpkin pie (or this crystal clear pumpkin pie), pumpkin muffins, pumpkin spice lattes (PSL;s), London fog lattes, etc. Use whatever amount the recipe calls for.

    Now you know how to make pumpkin spice at home. This recipe is a tested favorite, but feel free to substitute or add different spices to make it your own (such as allspice).

    Top Tip

    When it comes to adding this spice mix to taste, start out with a very small amount and work your way up, because it can be potent.

    Storage

    • Storage is very easy; no refrigeration is necessary.
    • Just keep the mix in an airtight container or baggie in a cool, dark cabinet until you need it!
    • Its shelf life should be as long as the spices on your spice rack, which means that you can use it all year round! This can be up to two to three years when stored properly.
    • Another great thing is that if you run out, you can stir up another batch in under 10 minutes.

    Pumpkin Pie Spice Recipe FAQs

    Is pumpkin pie spice similar to allspice?

    Allspice is a common ingredient in pumpkin spice, so you could say that it tastes similar, but it is only one of a combination of spices.

    What is the actual flavor of pumpkin spice?

    It has the flavor of pumpkin pie because it uses the same warm spices to create a premixed blend, perfect for autumn baking and hot drinks.

    Why does pumpkin spice taste like cinnamon?

    Cinnamon is the main ingredient in pumpkin spice blend.

    What tastes similar to pumpkin spice?

    Although not exact, chai spice mix is similar, as it includes clove and cinnamon.

    Pumpkin pie spice mix on wooden spoon.

    Recipes to Use Homemade Pumpkin Spice In

    • Oven baked pumpkin spice oatmeal in baking dish.
      Pumpkin Pie Spice Baked Oatmeal
    • Pumpkin fluff dip in a bowl with crushed Biscoff cookies.
      Pumpkin Fluff Dip Dessert
    • Fall pumpkin party punch in a glass with orange slice garnish.
      Fall Pumpkin Party Punch
    • Pumpkin spice coffee creamer pouring into glass mug of coffee.
      Homemade Pumpkin Spice Coffee Creamer

    If you tried this 📋 recipe tutorial for 🥧 How to Make Pumpkin Pie Spice or any other recipe on my website, please leave a 🌟 star rating and let me know how it went in the 📝 comments below. And please share the recipe!

    📋Recipe

    Pumpkin pie spices in bowl with spoon.
    Print Pin
    5 from 1 vote

    How to Make Pumpkin Pie Spice

    Do you want to know how to make pumpkin pie spice from scratch? This easy, quick recipe is a simple blend. These four spices are all you need to flavor a variety of pumpkin dishes from muffins and pies to pumpkin spice lattes.
    Course Condiment, Flavoring
    Cuisine American, British, Canadian
    Diet Vegan, Vegetarian
    Prep Time 5 minutes minutes
    Total Time 5 minutes minutes
    Servings 14 teaspoons
    Calories 14kcal
    Author Joss Dyckson

    Equipment

    • Measuring spoons
    • Spice container

    Ingredients

    • 3 tablespoons cinnamon ground
    • 2 teaspoons nutmeg ground
    • 2 teaspoons ginger ground
    • 1 ½ teaspoons cloves ground
    US Customary - Metric

    Instructions

    • Combine all of the spices in a bowl and store in an airtight container.
      Pumpkin pie spice mix in wooden bowl with wooden spoon.
    • Use in baking and/or beverages such as pumpkin pie, pumpkin muffins, pumpkin spice lattes, etc.
      Pumpkin pie spice mix on wooden spoon beside metal spice container.

    Notes

    • You can store the spice mix in a cool and dark place, like a cupboard or pantry, for up to 2 to 3 years.
    • Use whatever amount the recipe calls for. When it comes to adding this spice mix to taste, start out with a very small amount and work your way up, because it can be potent.

    Nutrition

    Calories: 14kcal | Carbohydrates: 3g | Protein: 1g | Fat: 1g | Saturated Fat: 1g | Sodium: 2mg | Potassium: 22mg | Fiber: 2g | Sugar: 1g | Vitamin A: 9IU | Vitamin C: 1mg | Calcium: 36mg | Iron: 1mg

    Strawberry Champagne Cake Balls

    October 2, 2019 by Joss Dyckson 1 Comment

    If you're looking for a tasty and fun treat, try these Strawberry Champagne Cake Balls coated in white chocolate. Not only are they delicious but they are very easy to make, especially with the use of a cake pop maker.

    Strawberry champagne cake balls on clear glass dish with strawberries in the background.

    These scrumptious, alcoholic cake balls require minimal baking on a hot summer's day. They are also a perfect, elegant treat for special holidays like Valentine's Day, Galentine's Day, birthdays or a romantic date night!

    Besides champagne, you can also sip on strawberry juice or fresh strawberry milk while you eat this strawberry cake pop treat, for a non-alcoholic option.

    [feast_advanced_jump_to]

    🍰 What is Champagne Cake?

    It's a fluffy cake made with 🍾 champagne or sparking wine, which gives it an airy texture and subtle champagne flavor that pairs great with the strawberries.

    🍓 Ingredients

    Strawberry champagne cake balls ingredients prepped and labeled.
    • fresh strawberries - Some of the strawberries will be blended with the champagne to give it strawberry flavor and some will simply be diced for chunks of strawberries in the cake balls.
    • champagne - Pick your favorite. If you don't want to spend the big bucks, you can substitute with a cheaper sparkling wine.
    • 1 box vanilla cake mix - I use a 15.2 ounces/432 grams box. If you're using a 13.25 oz box, use only ⅓ cup vegetable oil instead of ½ cup. I also make these cake pops with cake mix that you might want to try.
    • vegetable oil - Can substitute with canola oil or avocado oil.
    • white chocolate - To coat the cake balls with. You can use candy melts if you prefer.
    • a few drops of pink food coloring - This is optional if you want to color the chocolate coating and/or the batter.

    *Check recipe card for ingredient amounts.

    🍽 Equipment

    For this recipe, you will need a cake pop maker. Browse cake pop maker reviews here.

    🥣 How to Make Strawberry Champagne Cake Balls

    Making cake pops or cake balls can sometimes be quite challenging. However, you will see what a breeze it can be to make cake pops with a cake pop maker compared to making them by hand; and that uniform shape of each cake ball is a bonus.

    Strawberries and champagne in blender.

    Step 1. Pulse. Pulse the ½ cup chopped strawberries with the champagne a couple of times in the blender, until just combined. If needed, top it up with some more champagne to equal 1 cup liquid.

    Strawberry champagne cake batter in bowl with wooden spoon.

    Step 2. Prepare batter. Prepare the cake batter by combining the cake mix, oil, eggs, strawberry champagne mixture and diced strawberries. Plug in the cake pop maker to preheat it.

    Strawberry champagne cake balls in cake pop maker.

    Step 3. Bake. Fill the cake pop maker cavities with the batter. Close the lid and bake them in the cake pop maker for 3-4 minutes, or until golden and a toothpick comes out clean from the center.

    White chocolate melted in measuring glass with small wooden spoon.

    Step 4. Melt chocolate. Prepare a double boiler by placing a metal bowl over a pot with simmering water. Melt the white chocolate in the metal bowl. Mix in a few drops of the pink or red food coloring (optional).

    Strawberry champagne cake ball covered in white chocolate on dipping fork.

    Step 5. Coat cake balls. Coat the cake balls with the melted white chocolate by dipping them in with a fork. Let them set at room temperature.

    Strawberry champagne cake balls on clear glass dish with champagne glasses and fresh strawberries on the side.

    Step 6. Serve. Serve with a glass of champagne if desired.

    Chef's Note: If you'd like to make champagne cake pops instead of cake balls, check out how to make cake pops. My detailed post will show you how to add treat sticks and coat them properly.

    ✔️ Joss' Tips

    • It's better to overfill the cake pop maker holes than to underfill and end up with flat cake balls. You can simply let them cool and then cut off the excess cake around the ball.
    • When it comes to dipping the cake balls into melted chocolate or other coatings, be quick. Roll them around until they are completely covered.
    • You can also use a chocolate dipping tool to coat the cake balls.
    • If the melted chocolate is too thick to coat the cake balls properly: you can thin it out by mixing in some canola oil or coconut oil, 1 teaspoon at a time, until it reaches the right consistency.
    • If you don't have a double boiler, you can melt the chocolate in the microwave in 20 second intervals, stirring each time, until fully melted.

    🌡️ Storage

    These cake balls can be stored in an airtight container for up to 1 week in the fridge or up to 3 months in the freezer.

    Because of the use of freshly diced strawberries, I don't recommend keeping them at room temperature.

    Strawberry champagne cake ball cut open in a hand.

    ❤️ More Bite-Sized Desserts to Try

    • Naked chocolate cake pops on black dish with yellow cloth.
      Naked Cake Pops
    • Black Forest cake balls stacked on plate.
      Black Forest Cake Balls
    • Marzipan ball dusted in icing sugar.
      Marzipan Balls
    • Maple bacon cake pops on plate.
      Maple Bacon Cake Pops

    If you tried this 🍓🍾 Strawberry Champagne Cake Balls Recipe or any other recipe on my website, please leave a 🌟 star rating and let me know how it went in the 📝 comments below. And please share the recipe!

    📋Recipe

    Strawberry champagne cake balls stacked on plate.
    Print Pin
    5 from 2 votes

    Strawberry Champagne Cake Balls

    If you're looking for a tasty and fun treat, try these Strawberry Champagne Cake Balls. Not only are they delicious but they are very easy to make, especially with the use of a cake pop maker.
    Course Dessert
    Cuisine American
    Diet Vegetarian
    Prep Time 10 minutes minutes
    Cook Time 18 minutes minutes
    Cooling Time 20 minutes minutes
    Total Time 48 minutes minutes
    Servings 72 cake balls
    Calories 95kcal
    Author Joss Dyckson

    Equipment

    • Cake Pop Maker
    • Blender

    Ingredients

    • ½ cup strawberries cleaned and chopped
    • ½ cup champagne
    • 1 box vanilla cake mix 15.2 ounces/432 grams
    • ½ cup vegetable oil
    • 3 eggs
    • ¼ cup strawberries cleaned and diced
    • 24 ounces white chocolate To coat
    • a few drops of pink or red food coloring optional
    US Customary - Metric

    Instructions

    • Pulse the ½ cup chopped strawberries with the champagne a couple of times in a blender, until just combined. If needed, top it up with some more champagne to equal 1 cup liquid. The idea is to replace the liquids that your cake mix requires (usually 1 cup water or milk) for the champagne and strawberry mixture.
      ½ cup strawberries, ½ cup champagne
    • Prepare the cake batter by combining the cake mix, oil, eggs, strawberry champagne mixture and diced strawberries. (If you want the batter to be pink, add a few drops of food coloring.) Plug in the cake pop maker to preheat it. There should be an indicator light to tell you when it's ready - mine takes only a few minutes.
      1 box vanilla cake mix, ½ cup vegetable oil, 3 eggs, ¼ cup strawberries
    • Fill the cake pop maker cavities with the batter (fill them to the top of the cavity--it's better to overfill than to underfill). Do this step quickly. Close the lid and bake them in the cake pop maker for 3-4 minutes, or until golden and a toothpick comes out clean from the center.
    • Prepare a double boiler by placing a metal bowl over a pot with simmering water. Melt the white chocolate in the metal bowl. Mix in a few drops of the pink or red food coloring (optional). *See notes for alternative microwave instructions.
      24 ounces white chocolate
    • Coat the cake balls with the melted white chocolate by dipping them in with a fork. Let them set at room temperature on wax paper until hardened.
    • Serve with a glass of champagne if desired.

    Notes

    • Thinner coating: If the melted chocolate is too thick to coat the cake balls properly: you can thin it out by mixing in some canola oil or coconut oil, 1 teaspoon at a time, until it reaches the right consistency.
    • Cake mix box size: If you're using a 13.25 oz box, use only ⅓ cup vegetable oil instead of ½ cup (or the amount stated on the box).
    • *Microwave option: If you don't have a double boiler, you can melt the chocolate in the microwave in 20 second intervals, stirring each time, until fully melted.
    • Dipping tool: You can also use a chocolate dipping tool to coat the cake balls.
    • Storage: These cake balls can be stored in an airtight container for up to 1 week in the fridge or up to 3 months in the freezer.

    Nutrition

    Calories: 95kcal | Carbohydrates: 12g | Protein: 1g | Fat: 5g | Saturated Fat: 3g | Cholesterol: 9mg | Sodium: 61mg | Potassium: 38mg | Fiber: 1g | Sugar: 9g | Vitamin A: 13IU | Vitamin C: 1mg | Calcium: 36mg | Iron: 1mg

    How to Make Mole Sauce

    September 30, 2019 by Joss Dyckson Leave a Comment

    If you're a fan of traditional Mexican cuisine, you've likely had mole sauce before. There are a ton of different takes on mole sauce out there with plenty of great results. I've got an easy recipe tutorial for how to make mole sauce from scratch using red chilies and dark chocolate that is loaded with delicious flavor.

    Mole sauce in a bowl with cilantro and black sesame seeds.

    A rich, sweet, fragrant, and spicy combination of chilies, herbs, spices, and chocolate, it's got a multitude of uses in the kitchen from eating on its own with some tortilla chips to serving with enchiladas and more. I like to serve it as a dip alongside my guacamole dip and over my grilled corn on the cob.

    This rich, thick, and spicy part of Mexican cooking has been enchanting taste buds across the world.

    [feast_advanced_jump_to]

    What is Mole Sauce?

    Mole (meaning 'sauce') is a type of sauce used in many types of Mexican cuisine. While contemporary use of the word can refer to a lot of different varieties (such as mole negro and mole poblano - the official dish of Cinco de Mayo!), the version that we're making today keeps things simple and flavorful for a first time cook.

    Components of mole. In general, it is said that five classes of ingredients are used in creating this sauce, those being chilies, sour things, sweet things, spices, and thickeners with many options for what to use in each category.

    Traditional techniques. Traditionally, the ingredients are roasted and ground down into a paste by hand, which is a very lengthy process. This method isn't as commonplace these days with the introduction of mills. The paste is then combined with water or broth and simmered until very thick.

    Forms of mole. Mole can be found in paste and powder form. Versatile and delicious, it goes great with anything ranging from chicken to lamb (try this shepherd's pie made with lamb) to pork and more.

    Mole Sauce Ingredients

    Mole sauce ingredients prepped and labeled on wooden background.
    • dried hot peppers - try to find different varieties of red peppers: chipotle, guajillo, ancho, ñora, etc.
    • chicken broth - mole is often served with chicken and the chicken broth complements that well - you can use homemade or store-bought
    • dark chocolate - find a high quality dark chocolate bar or even Mexican chocolate if you can find (it contains cinnamon)
    • ground anise - the anise is optional but I personally love the unique flavor it brings to the mole sauce
    • toppings - fresh cilantro and sesame seeds are optional

    *Check recipe card for full ingredient amounts.

    Pro Tip: Additionally, a neat way to add some extra body and thickness to your sauce that many traditional chefs use is to blend in a lightly toasted tortilla or some stale white bread, emulsifying it into the sauce as it cooks.

    Mole Chili Pepper Options

    There are many ways to mix up your mole sauce to your particular tastes, the easiest being to change the type of chilies you use. You can use whatever combination of chili peppers you desire in your mole, even if it's just one type. Peppers that are fruitier, hotter, or anything in between can make a world of difference in the end result. Here are a few mole chili pepper options:

    Chipotle

    Chipotles are simply smoked, dried jalapenos. They are medium-hot.

    Guajillo

    Guajillo chili peppers.

    Guajillo chilies are dried mirasol peppers. They are highly popular in Mexico and are mild to moderately hot.

    Ancho

    Ancho chilies, which are dried poblanos, are very commonly used in moles. They are mild in heat and fruity in flavor.

    Pasilla (Negro)

    The pasilla is a dried chilaca chili pepper. It is rich, woodsy and mild to hot.

    Recipe Steps

    Chili peppers soaking in a bowl filled with water.

    Step #1. Soak the dried peppers. Place the peppers in warm water and let them soak for at least 30 minutes, until softened. Remove the seeds and hard parts.

    Mole sauce ingredients in food processor.

    Step #2. Process ingredients. Add all of the ingredients to a food processor and blend until smooth.

    Mole sauce in food processor with wooden spoon.
    Mole sauce in saucepan.

    Step #3. Simmer. Place the mole in a saucepan and simmer it at medium-low temperature until desired thickness.

    Mole sauce in a bowl with cilantro and black sesame seeds.

    Step #4. Serve! Sprinkle toppings over the mole sauce and enjoy.

    Chef's Note: The more you simmer it, the thicker it will be.

    Ways to Serve Mole

    • as a dip for tortilla chips or added into other dips
    • a sauce for skillet chicken enchiladas, creamy burrito casserole, soft or hard bison tacos and other Mexican dishes
    • drizzled over proteins like chicken and other poultry, pork, tofu, etc.
    • combined with shredded chicken
    • over cooked veggies
    • added to soups and stews for extra flavor

    Storage & Reheating

    • Fridge: The mole can be stored in the refrigerator for up to 3 to 4 days in a covered container.
    • Freezer: Or, you can even freeze it for up to 6 months, but make sure it has completely cooled first.
    • Reheat: Reheat the mole on the stove over medium heat.

    Recipe FAQs

    Is mole sauce spicy?

    This will depend on the specific mole sauce, as some can be spicier than others based on the peppers used and amounts. When you remove the seeds and membrane from the peppers, they are less spicy.

    Does mole sauce taste like chocolate?

    The chocolate isn't a dominating flavor in mole sauce, but it provides some sweetness, thickness and depth of flavor.

    How do you pronounce mole?

    Mole is pronounced "moh-lay".

    Mole sauce in a bowl with cilantro and black sesame seeds.

    ❤️More Mexican Recipes You Will Love

    • Mexican soup in black bowls.
      Slow Cooker Mexican Soup
    • Chorizo and eggs on plate with fork.
      Mexican Chorizo and Eggs
    • Taco in a bag with forks and toppings on the side.
      How to Make Walking Tacos (aka Taco in a Bag)
    • Baked taco cups in white dish with lentils on decorative cloth.
      Mini Taco Cups

    If you tried this recipe tutorial for How to Make Mole Sauce or any other recipe on my website, please leave a 🌟 star rating and let me know how it went in the 📝 comments below. And please share the recipe!

    📋Recipe

    Mole sauce in a bowl with cilantro and black sesame seeds.
    Print Pin
    5 from 7 votes

    How to Make Mole Sauce

    Here is an easy recipe tutorial for how to make mole sauce from scratch. A rich, sweet, fragrant, and spicy combination of chilies, herbs, spices, and chocolate, it's got a multitude of uses in the kitchen from eating on its own with some tortilla chips to serving with chicken enchiladas and much more.
    Course Condiment, Sauce
    Cuisine Mexican
    Prep Time 5 minutes minutes
    Cook Time 10 minutes minutes
    Soak Time 30 minutes minutes
    Total Time 45 minutes minutes
    Servings 6 ¼ cup servings
    Calories 103kcal
    Author Joss Dyckson

    Equipment

    • Food processor

    Ingredients

    • 4-5 dried peppers Try to find different varieties of red peppers: chipotle, guajillo, ancho, ñora, negro, etc.
    • 1 cup chicken broth
    • 3 ounces dark chocolate melted
    • ¼ yellow onion chopped
    • 1 garlic clove chopped
    • 1 teaspoon canola oil
    • 1 teaspoon cumin
    • 1 teaspoon ground anise optional
    • salt and pepper to taste

    Toppings:

    • fresh cilantro chopped
    • black sesame seeds
    US Customary - Metric

    Instructions

    • Place the peppers in warm water and let them soak for at least 30 minutes, until softened. Remove the seeds and hard parts.
      Chili peppers soaking in a bowl filled with water.
    • Add all of the ingredients to a food processor and blend until smooth.
      Mole sauce ingredients in food processor.
    • Place the mole in a saucepan and simmer it at medium-low temperature until desired thickness (the more you simmer it, the thicker it will be).
      Mole sauce in saucepan.
    • Sprinkle toppings over the mole sauce and enjoy.
      Mole sauce in a bowl with cilantro and black sesame seeds.

    Video

    Notes

    • Storage. Store leftover sauce in a covered container in the fridge for up to 3 to 4 days or in the freezer for up to 6 months. Make sure it has cooled first.
    • Reheating. Reheat the mole on the stove over medium heat.
    • Serving. Ways to serve mole:
      • as a dip for tortilla chips or added into other dips
      • a sauce for enchiladas, burritos, soft or hard tacos and other Mexican dishes
      • drizzled over proteins like chicken, pork, tofu, etc.
      • combined with shredded chicken
      • over cooked veggies
      • added to soups and stews for extra flavor

    Nutrition

    Calories: 103kcal | Carbohydrates: 8g | Protein: 2g | Fat: 7g | Saturated Fat: 4g | Cholesterol: 1mg | Sodium: 148mg | Potassium: 172mg | Fiber: 2g | Sugar: 4g | Vitamin A: 99IU | Vitamin C: 3mg | Calcium: 26mg | Iron: 3mg

    Electric Skillet Yogurt Cake

    September 25, 2019 by Joss Dyckson Leave a Comment

    A labor-saving twist on a dessert made famous by French grandmas, this particular electric skillet cake compromises none of the moist, light flavor of an original yogurt cake while sparing the chef the inconvenience of firing up the oven for one small sweet treat.

    The ingredients were originally measured in the charming glass jars in which French yogurt was traditionally sold. Fortunately, these measurements are easily converted to the more conventional ones of the following recipe.

    Electric Skillet Yogurt Cake dusted in icing sugar, 2 white flowers on top on a clear plate, blue wooden background, pie server on the side.
    [feast_advanced_jump_to]

    Serving

    This cake goes well with coffee or any of coffee's fancier Italian cousins, cappuccino, macchiato, café latte and so on. It is delicious topped with crème fraiche or fresh fruit but can also be eaten plain. It has a more complex flavor the day after baking but can be eaten when warm or cooled.

    Electric skillet yogurt cake dusted with icing sugar, 2 white flowers on top, blue wooden background.

    Storage

    • If wrapped well, it can last up to 3 days at room temperature.
    • It can be refrigerated for up to 5 to 6 days.
    • It also freezes well and can last as long as 2 to 3 months in the freezer.

    Tips

    For best results, the yogurt and the eggs should be at room temperature. Ingredients blended at room temperature trap air that expands during baking, creating lighter, more evenly baked goods.

    If you don't have a wire rack that fits in the skillet, you can ball up aluminum foil into roughly large pea or small grape-sized beads and place them under your baking pan, about 8 should be enough. You can also use metal skewers in a pinch, just be careful not to scratch your skillet. Keeping the baking pan raised above the skillet allows for the even distribution of heat and prevents burning.

    If it turned out dry, don't worry! Check out my tutorial for how to make a cake moist.

    Electric Skillet Yogurt Cake, 1 piece cut out, dusted in icing sugar, 2 white flowers on top on a clear plate, blue wooden background.
    Electric Skillet Yogurt Cake dusted in icing sugar, 2 white flowers on top on a clear plate, blue wooden background.
    Electric Skillet Yogurt Cake dusted in icing sugar, 2 white flowers on top on a clear plate, blue wooden background, pie server on the side.

    Did you try out this yogurt cake in your electric frying pan? Let us know in the comments how it turned out!

    Check out our choice for the best electric skillet!

    HUNGRY FOR MORE? TRY OUR:

    • Grapefruit Vanilla Cake
    • Electric Skillet Mac and Cheese

    📋Recipe

    Yogurt cake on clear plate held by hands.
    Print Pin
    5 from 1 vote

    Electric Skillet Yogurt Cake

    A labor-saving twist on a dessert made famous by French grandmas, this particular electric skillet cake compromises none of the moist, light flavor of an original yogurt cake while sparing the chef the inconvenience of firing up the oven for one small sweet treat.
    Course Dessert
    Cuisine American, French
    Diet Vegetarian
    Prep Time 15 minutes minutes
    Cook Time 35 minutes minutes
    Total Time 50 minutes minutes
    Servings 10
    Calories 241kcal
    Author Joss Dyckson

    Equipment

    • Electric Skillet
    • 9" round cake pan
    • Small baking rack

    Ingredients

    • ¾ cup vanilla Greek yogurt at room temperature
    • ½ cup canola oil
    • ½ cup sugar
    • 3 eggs at room temperature
    • 1 teaspoon vanilla
    • 1 ½ cups all-purpose flour
    • 2 teaspoons baking powder
    • Confectioner's sugar to dust the cake with
    US Customary - Metric

    Instructions

    • Heat the electric skillet to 400°F, covered. Grease a round 9" or 10" pan lightly with baking spray or oil and flour.
    • Whisk together the yogurt, canola oil, sugar, eggs, and vanilla in a large bowl.
    • Mix the baking powder with the flour in a separate bowl. Add directly into the wet ingredients and stir just until there are no more lumps.
    • Place a small baking rack into the bottom of the electric skillet.
    • Pour the batter into the cake pan, place on the baking rack in the electric skillet and bake for approximately 35 minutes, covered (until a toothpick inserted into the center comes out clean).
    • Cool in the pan on a wire rack for 10 minutes.
    • Loosen from the pan and invert the cake carefully onto a serving dish. Dust with confectioner's sugar. Serve the cake warm or at room temperature.

    Notes

    • This cake goes well with coffee or any of coffee's fancier Italian cousins, cappuccino, macchiato, café latte and so on.
    • It is delicious topped with crème fraiche or fresh fruit but can also be eaten plain.
    • It has a more complex flavor the day after baking but can be eaten when warm or cooled.
    • If wrapped well, it can last up to 3 days at room temperature. It can be refrigerated for up to 5 to 6 days. It also freezes well and can last as long as 2 to 3 months in the freezer.
    • If you don't have a wire rack that fits in the skillet, you can ball up aluminum foil into roughly large pea or small grape-sized beads and place them under your baking pan, about 8 should be enough. You can also use metal skewers in a pinch, just be careful not to scratch your skillet. Keeping the baking pan raised above the skillet allows for the even distribution of heat and prevents burning.

    Nutrition

    Calories: 241kcal | Carbohydrates: 27g | Protein: 5g | Fat: 13g | Saturated Fat: 1g | Cholesterol: 50mg | Sodium: 25mg | Potassium: 153mg | Fiber: 1g | Sugar: 12g | Vitamin A: 71IU | Calcium: 53mg | Iron: 1mg

    How to Make a Roux

    September 23, 2019 by Joss Dyckson Leave a Comment

    Knowing how to make roux is a handy skill to have in the kitchen when it comes to thickening gravies, sauces, soups and stews. There is more to a roux than a simple fat and flour combination. It's important to know the different ratio, colors, cooking times and amounts for desired thickness. I go over all of that below so that you can feel confident with this technique!

    3 colors of roux in ramekins on white wooden background.

    Roux is commonly used in nacho cheese sauce, soups and gravies like this homemade sawmill gravy. Without it, your sauces will be thin, liquidy and simply run off of your food rather than smother it with salty goodness.

    [feast_advanced_jump_to]

    What is Roux?

    A roux is the perfect mixture of fat and flour that chefs use to thicken soup, gravy, sauce and other food products of similar textures. There are three specific types of roux used in the culinary world: white, blond, and brown. These types are used for different textures and flavors.

    The roux color reflects the length of cook time, meaning the longer the simmer the darker the roux. It is important to know that the darker the roux, the less thickening ability it will have.

    Roux Ratio

    Maintaining a roux ratio of 1 part fat to 1 part flour by weight will make for a successful sauce, gravy, or soup.

    Ingredients

    Roux ingredients prepped on white wooden background.

    For a roux you simply need equal parts fat and flour. I use butter for this recipe but you can also use bacon grease or cooking oil.

    • butter - Can use salted or unsalted.
    • flour - All purpose flour.

    *Check recipe card for ingredient amounts.

    Instructions for How to Make a Roux

    Melted butter in pan.

    Step #1. Melt the Butter. Heat a pot to medium heat and melt the butter in it.

    Butter and flour in pan.

    Step #2. Add Flour. Add the flour to the butter and mix well. Stir constantly while the flour gets cooked. (You want it to gently bubble as it cooks. If it is bubbling too vigorously, turn the heat down.)

    White roux in pan with wooden spoon.

    Chef's Note: The mixture will start out thick and dry and eventually become more liquidy as it cooks.

    White roux in pan.

    Step #3. Cook Until Desired Color. You can make this in 3 roux colors depending on the sauce or plate you'll make afterwards:

    For a White Roux

    For a light colored roux, cook until you get a light color (about 4 minutes).

    USES: White roux is ideal for bechamel sauce, cheese sauce and other light sauces.

    Blond roux in pan.

    For a Blond Roux

    For a medium (blond) roux, continue cooking until lightly browned and nutty smelling (about 7 minutes).

    USES: Medium roux is ideal to thicken chicken or vegetable stock and gravies. It will add a little more flavor than white.

    Brown roux in pan.

    For a Brown Roux

    For a dark (brown) roux, cook until darkly browned (about 12-15 minutes). For an even darker brown you can cook it longer.

    USES: Dark roux has a toasted flavor, so it's ideal for beef stock.

    How Much Roux to Use Per 1 Cup Liquid?

    This table below outlines generally how much roux to use per 1 cup of liquid based on how thick you would like the soup or sauce to be. You can use it as a general guide.

    ThicknessAmount of Roux Per 1 Cup Liquid
    Thin Sauce:1 tablespoon butter/1 tablespoon flour
    Medium Sauce:2 tablespoons butter/2 tablespoons flour
    Thick Sauce:3 tablespoons butter/3 tablespoons flour

    How to Use it

    You can now use the roux to thicken soups, sauces, gravies and stews. If you just made the roux and it is hot in the saucepan:

    👩🏻‍🍳Chef's Note: make sure you check out how much roux to use above before you begin.

    1. Slowly whisk in the liquid that you will be using for the sauce.
    2. Simmer until thickened.

    It's that simple!

    If your roux is cold or room temp: If you are using the roux at a later time and it is cold or room temperature, simply whisk it into the simmering sauce until it thickens.

    This basic recipe is excellent for:

    • gumbo
    • electric skillet classic beef stew or other stews
    • beef gravy
    • Southern tomato gravy
    • gravy for ham
    • a potato soup or chowder
    • Creole Shrimp Étouffée
    • béchamel
    • espagnole
    • hardy cheese sauce or a filling mac and cheese
    3 colors of roux in ramekins on white wooden background.

    Joss' Tips

    Mastering this quick technique for developing a thickening agent will step your food game up a notch, putting your dishes on par with your favorite restaurants.

    • Some tips and tricks for making and keeping a delicious roux include making it with patience. Roux must be combined and stirred well. That mixing should be continued as flour is very gradually added to prevent clumping.
    • Note that the time it takes to achieve each roux color is approximate. Be vigilant as you watch the colors turn for the type of roux you would like to achieve.
    • Also note that the less flour and fat you use, the quicker it will cook.
    • When adding a liquid to a roux, it should be added slowly and constantly whisked.

    Storage

    • Fridge storage: If you aren't using the roux immediately, you can store it in the fridge for up to 6 months.
    • Freezer storage: Or in the freezer for up to 1 year in an air tight container.
    • Thawing instructions: Thaw in the fridge.

    How to Make a Roux FAQs

    What are the 3 ingredients in a roux?

    A roux consists of 2 ingredients: flour and fat (like butter or bacon grease) which are combined, cooked and added to a liquid.

    How much roux for 4 cups of liquid?

    For a thin sauce, use 4 tablespoons butter and 4 tablespoons flour, for a medium sauce use ½ cup of each and for a thick sauce use ¾ cup of each.

    Do you use oil or butter for a roux?

    You can use either. Butter is a popular choice for dairy-based sauces whereas oil is used in some Southern sauces like a tomato gravy.

    How do I know if I burnt my roux?

    You can easily tell because it will be very dark and have a strong, undesirable, burnt smell.

    3 colors of roux in small, white ramekins.

    More Cooking Tutorials to Try

    • Mole sauce in a bowl with cilantro and black sesame seeds.
      How to Make Mole Sauce
    • Cabbage rolls stacked on plate.
      How to Make Cabbage Rolls
    • Butternut squash sliced open on cutting board.
      How to Clean, Save and Roast Butternut Squash Seeds
    • Fresh dill.
      How to Chop Dill

    If you tried this 📋 recipe tutorial for How to Make a Roux (White Blond and Brown) or any other recipe on my website, please leave a 🌟 star rating and let me know how it went in the 📝 comments below. And please share the recipe!

    📋Recipe

    3 colors of roux in ramekins on white wooden background.
    Print Pin
    5 from 2 votes

    How to Make a Roux (White Blond and Brown)

    A roux is the perfect mixture chefs use to thicken soup, gravy, sauce and other food products of similar textures. I will show you how to make roux with the roux colors used in the culinary world: white, blond, and brown.
    Course Sauce, Soup, Thickener
    Cuisine French
    Diet Vegetarian
    Prep Time 1 minute minute
    Cook Time 4 minutes minutes
    Total Time 5 minutes minutes
    Servings 8 tablespoons
    Calories 134kcal
    Author Joss Dyckson

    Equipment

    • Saucepan
    • Whisk or wooden spoon

    Ingredients

    • 3.5 ounces butter
    • 3.5 ounces flour
    US Customary - Metric

    Instructions

    • Heat a pot to medium heat and melt the butter.
      Melted butter in pan.
    • Add the flour to the butter and mix well. Stir constantly while the flour gets cooked - you can make this in 3 colors depending on the sauce or plate you'll make afterwards. (You want it to gently bubble as it cooks. If it is bubbling too vigorously, turn the heat down.)
      Butter and flour in pan.
    • For a light colored (white) roux, cook until you get a light color (about 4 minutes).
      White roux in pan.
    • For a medium (blond) roux, continue cooking until lightly browned (about 7 minutes).
      Blond roux in pan.
    • For a dark (brown) roux, cook until brown in color (about 12 to 15 minutes). For an even darker brown you can cook it longer.
      Brown roux in pan.
    • You can now use the roux to thicken soups and sauces. See notes below for ratio and liquid amounts.
      3 colors of roux in ramekins on white wooden background.

    Notes

    • The times are approximate and will vary. Note that the time it takes to achieve each roux color is approximate. Watch closely for the color change as you are mixing. Also note that the less flour and fat you use, the quicker it will cook.
    • Add liquid slowly. When adding a liquid to a roux, it should be added slowly and constantly whisked.
    • General roux color. The medium (blond) roux is a good general-purpose roux that you can use for gravy.
    • Roux ratio. Roux ratio is 1:1 fat to flour by weight
    • Amount to use per 1 cup liquid (use as a general guide):
      • thin sauce: 1 tablespoon butter/1 tablespoon flour
      • medium thickness sauce: 2 tablespoons butter/2 tablespoons flour
      • thick sauce: 3 tablespoons butter/3 tablespoons flour
    • Darker roux = less thickening power. The darker the roux, the less thickening power it has.
    • When to add the liquid. If you are using the roux immediately and you just finished this tutorial, this would be the point where you slowly whisk in the liquid you are using and simmer until thickened.
    • How to tell if it's burnt: You can easily tell because it will be very dark and have a strong, undesirable, burnt smell.
    • Storage. If you aren't using the roux immediately, you can store it in the fridge for up to 6 months or in the freezer for up to 1 year in an air tight container. Thaw in the fridge.

    Nutrition

    Calories: 134kcal | Carbohydrates: 9g | Protein: 1g | Fat: 10g | Saturated Fat: 6g | Cholesterol: 27mg | Sodium: 89mg | Potassium: 13mg | Fiber: 1g | Sugar: 1g | Vitamin A: 310IU | Calcium: 5mg | Iron: 1mg

    Homemade Roasted Garlic Tomato Soup

    September 18, 2019 by Joss Dyckson 1 Comment

    Craving the warm and fuzzy feeling you get from a bowl of soup? Try your hand at one of the most popular soups made to date - tomato soup! My homemade, roasted garlic tomato soup recipe is easy to make, full of flavor, and sure to satisfy your craving no matter the occasion.

    Roasted tomato soup in white bowl with toast points and Roma tomatoes on the side.
    [feast_advanced_jump_to]

    🍲 A Fall Favorite Soup

    This delicious soup is a great way to use up your fall tomato bounty from the garden. You can only freeze and can so many tomatoes, after all.

    It's also great for entertaining guests for lunch - or for freezing and keeping it all to yourself. Whatever the case may be, this recipe will be one that you want to print off and keep in your drawer or recipe book for a go-to meal.

    The oven-roasted tomatoes add a deeper, more concentrated tomato flavor. For more of my hot and cozy soup recipes, try this savory pumpkin soup, Thai Tom Yum seafood soup and easy red lentil dill soup.

    🍅 Ingredients

    Roasted garlic tomato soup ingredients labeled on wooden background.
    • Roma tomatoes - Roma tomatoes have a lower water content compared to other types of tomatoes plus fewer seeds. This makes them meatier and less watery, which is ideal for making a thick, rich soup, especially when roasted ahead of time.
    • garlic cloves - We will be roasting the garlic cloves with the tomatoes, which adds a delicious, pungent flavor to the soup.
    • vegetable broth - If you are serving this soup to vegan diners, make sure you double check the vegetable broth ingredients to make sure they are vegan-friendly. Most vegetable broths are vegan, but not all.
    • agave nectar - Or your preferred sweetener.

    * Check recipe card for ingredient amounts.

    📝 Recipe Tweaks

    • 🥛 Creamy: This recipe is vegan as is but feel free to add a little milk or a splash of cream for a creamier version. For a creamy, vegan alternative, try some coconut cream.
    • 🍲 Chunky: Instead of a blended soup, you could try a more rustic, chunky version.
    • 🌶️ Spicy: Or, you can simply customize the recipe by adding a few secret ingredients of your own. Feeling spicy? Toss in some red pepper flakes for a heat boost.
    • 🧀 Cheesy: Feeling cheesy? Pull out shredded cheddar or mozzarella and sprinkle some on top for some extra gooey goodness.

    🔪 How to Make Roasted Garlic Tomato Soup

    Sliced tomatoes and garlic on parchment-lined sheet pan.

    Step 1. Roast the tomatoes. Roast the tomatoes and garlic in a 250ºF oven for at least 1 hour, or until browned and shriveled around the edges. Let them cool and remove the skin from the tomatoes (this will result in a smoother soup).

    Roasted tomatoes and broth in pot.

    Step 2. Cook the soup. Place the roasted tomatoes and garlic in a pot. Add the paprika and vegetable broth and heat until boiling. Remove from heat and let it cool a bit.

    Roasted tomato garlic soup in pot.

    Step 3. Blend the soup. Process the tomato soup in a blender, until smooth. Season again with salt and pepper to taste, as well as the agave nectar if using.

    Roasted tomato soup in white bowl with toast points and spoons on the side.

    Step 4. Serve. If needed, you can return it to the pot and bring it up to a hot temperature. Serve with toasted bread and fresh thyme leaves.

    🥗 Serving Suggestions

    • Want to take your roasted tomato soup to the next level? Consider throwing a slice of cheese in between your pieces of rye bread and grilling it in your skillet or try these toast points! Nothing says comfort food like dipping a golden brown grilled cheese triangle into your soup in between spoonfuls.
    • Serve a classic green salad on the side or this burrata salad recipe.
    • This kimchi quesadilla recipe is also a hit.
    • Fresh basil is another great addition; add it towards the end of cooking the soup for a flavor enhancer.

    🤔 Recipe FAQs

    How long do leftovers last?

    Your homemade roasted tomato soup can be stored in the refrigerator for up to 3 to 4 days. Be sure to use an airtight container.

    Can you freeze this soup?

    Yes! You can freeze the soup for up to 6 months (3 months for best quality). Thaw in the refrigerator overnight.

    How do you reheat the leftovers?

    Reheat on the stove over medium heat.

    Roasted tomato soup in a bowl with fresh thyme and toast points.

    🍽️ Related Side Dishes to Try

    • Dill pickle pasta salad on clear, glass plate.
      Dill Pickle Pasta Salad
    • Cooked barley on a spoon.
      How to Cook Barley
    • Falafel on black plate with fresh dill.
      Cake Pop Maker Mini Falafel Bites
    • Kimchi grilled cheese sandwiches stacked on serving tray with skewer.
      Kimchi Grilled Cheese Sandwiches

    If you tried this 🍅 Homemade Roasted Garlic Tomato Soup Recipe or any other recipe on my website, please leave a 🌟 star rating and let me know how it went in the 📝 comments below. And please share the recipe!

    📋Recipe

    Homemade roasted garlic tomato soup in white soup bowl.
    Print Pin
    5 from 2 votes

    Homemade Roasted Garlic Tomato Soup

    This homemade roasted garlic tomato soup recipe is easy to make, full of flavor, and sure to satisfy your craving no matter the occasion.
    Course Soup
    Cuisine American
    Diet Vegan, Vegetarian
    Prep Time 10 minutes minutes
    Cook Time 1 hour hour
    Total Time 1 hour hour 10 minutes minutes
    Servings 4 bowls
    Calories 173kcal
    Author Joss Dyckson

    Ingredients

    For the Soup

    • 4 pounds Roma tomatoes cut into 3 slices each
    • 4 garlic cloves peeled
    • 2 tablespoons olive oil
    • 2 teaspoons fresh thyme chopped
    • 2 teaspoons paprika
    • 1 ½ cups vegetable broth
    • 1 tablespoon agave nectar or to taste (optional)
    • salt and pepper to taste

    To Serve

    • 4 rye bread slices toasted
    • fresh thyme optional
    US Customary - Metric

    Instructions

    • Preheat oven to 250ºF. Prepare a large baking sheet by covering it with foil or parchment paper. You might need two baking sheets to fit all of the tomatoes.
    • Place the tomato slices and garlic on the baking sheet and drizzle with olive oil. Sprinkle with salt, pepper and thyme. Bake for 1 hour or more, or until browned and shriveled around the edges. Keep an eye on them.
      4 pounds Roma tomatoes, 4 garlic cloves, 2 tablespoons olive oil, 2 teaspoons fresh thyme
    • Let them cool and remove the skin from the tomatoes (this will allow the soup to be smoother but it's optional).
    • Place the roasted tomatoes and garlic in a pot. Add the paprika and vegetable broth and heat until boiling.
      2 teaspoons paprika, 1 ½ cups vegetable broth
    • Remove from heat, let it cool a bit and process in a blender, until smooth. Season again with salt and pepper (to taste) as well as the agave nectar, if using.
      1 tablespoon agave nectar
    • Serve with toasted bread and fresh thyme.

    Notes

    • Leftover Fridge Storage: Your homemade roasted tomato soup can be stored in the refrigerator for up to 3 to 4 days. Be sure to use an airtight container.
    • Freezer Storage: You can also freeze the soup for up to 6 months (3 months for best quality). Thaw in the refrigerator.
    • Reheating: Reheat on the stove over medium heat.

    Nutrition

    Calories: 173kcal | Carbohydrates: 25g | Protein: 4g | Fat: 8g | Saturated Fat: 1g | Polyunsaturated Fat: 1g | Monounsaturated Fat: 5g | Sodium: 377mg | Potassium: 1116mg | Fiber: 6g | Sugar: 16g | Vitamin A: 4506IU | Vitamin C: 66mg | Calcium: 57mg | Iron: 2mg
    « Previous Page
    Next Page »
    Joss Dyckson author photo.

    Hi, I'm Joss!

    I am the creator and editor of In the Kitch. I am inviting you on this food journey with me to learn, grow and bring out that inner chef in you. I hope to inspire you to get creative in your own kitchen!

    More about me →

    Patriotic Recipes

    • 4th of July themed charcuterie board on red plate with red, white and blue stars.
      4th of July Charcuterie Board
    • Grilled burgers on metal flipper, grill grates in the background.
      How to Grill Frozen Burgers
    • Blueberry mojito mocktail with fresh mint in cocktail glass.
      Blueberry Mojito Mocktail
    • 4th of July pulled pork sliders on parchment lined serving tray.
      4th of July Pulled Pork Sliders
    • Canada Day raspberry cheesecake in jars with red and white spoons.
      Raspberry Cheesecake in a Jar (Canada Day Dessert)
    • Watermelon basil cocktail in wine glass with watermelon swizzle stick.
      Frozen Watermelon Basil Cocktail

    Popular

    • Cake pop frosting in bowl with spatula.
      Cake Pop Frosting & Coating
    • Collage of coffee syrups.
      12 Coffee Syrup Recipes to Upgrade Your Brew
    • Pictures of passion fruit recipes collage.
      16 Easy Passion Fruit Recipes To Make This Summer
    • BBQ buffalo wings in dish with sauce on the side.
      37 Easy and Delicious Electric Skillet Recipes
    • Peanut butter soup in a speckled bowl.
      Peanut Butter Soup
    • Corn tortillas on foil.
      How to Heat Corn Tortillas (3 Ways)

    Footer

    ↑ back to top

    In the Kitch

    • Privacy Policy
    • Terms & Conditions
    • Disclaimer
    • Accessibility Statement

    About

    • About
    • The Team

    Contact

    • Contact

    As an Amazon Associate I earn from qualifying purchases.

    Copyright © 2026 In the Kitch

    Rate This Recipe

    Your vote:


    A rating is required
    A name is required
    An email is required