In the Kitch

menu icon
go to homepage
  • Patriotic Recipes
  • Recipe Index
  • Guides
  • Tutorials
  • Subscribe
    • Facebook
    • Pinterest
    • YouTube
  • search icon
    Homepage link
    • Patriotic Recipes
    • Recipe Index
    • Guides
    • Tutorials
    • Subscribe
    • Facebook
    • Pinterest
    • YouTube
  • ×
    In the Kitch » Recipes

    Homemade Ranch Dressing (With Sour Cream)

    September 14, 2020 by Joss Dyckson Leave a Comment

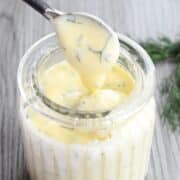
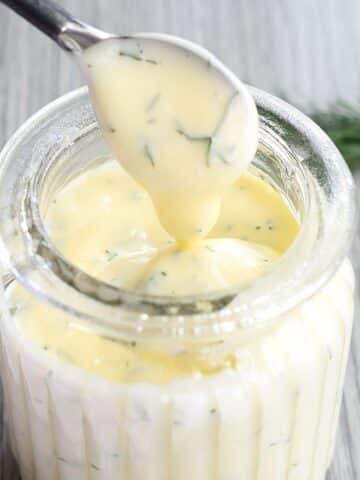
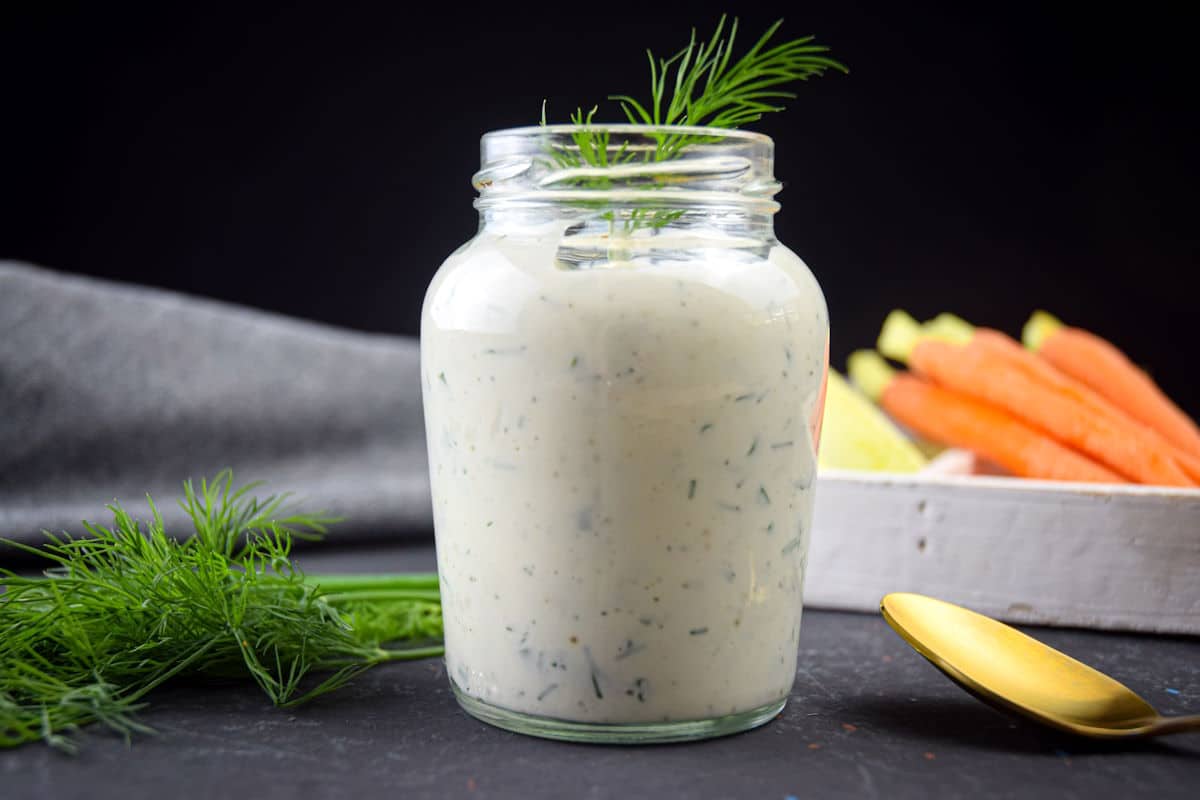
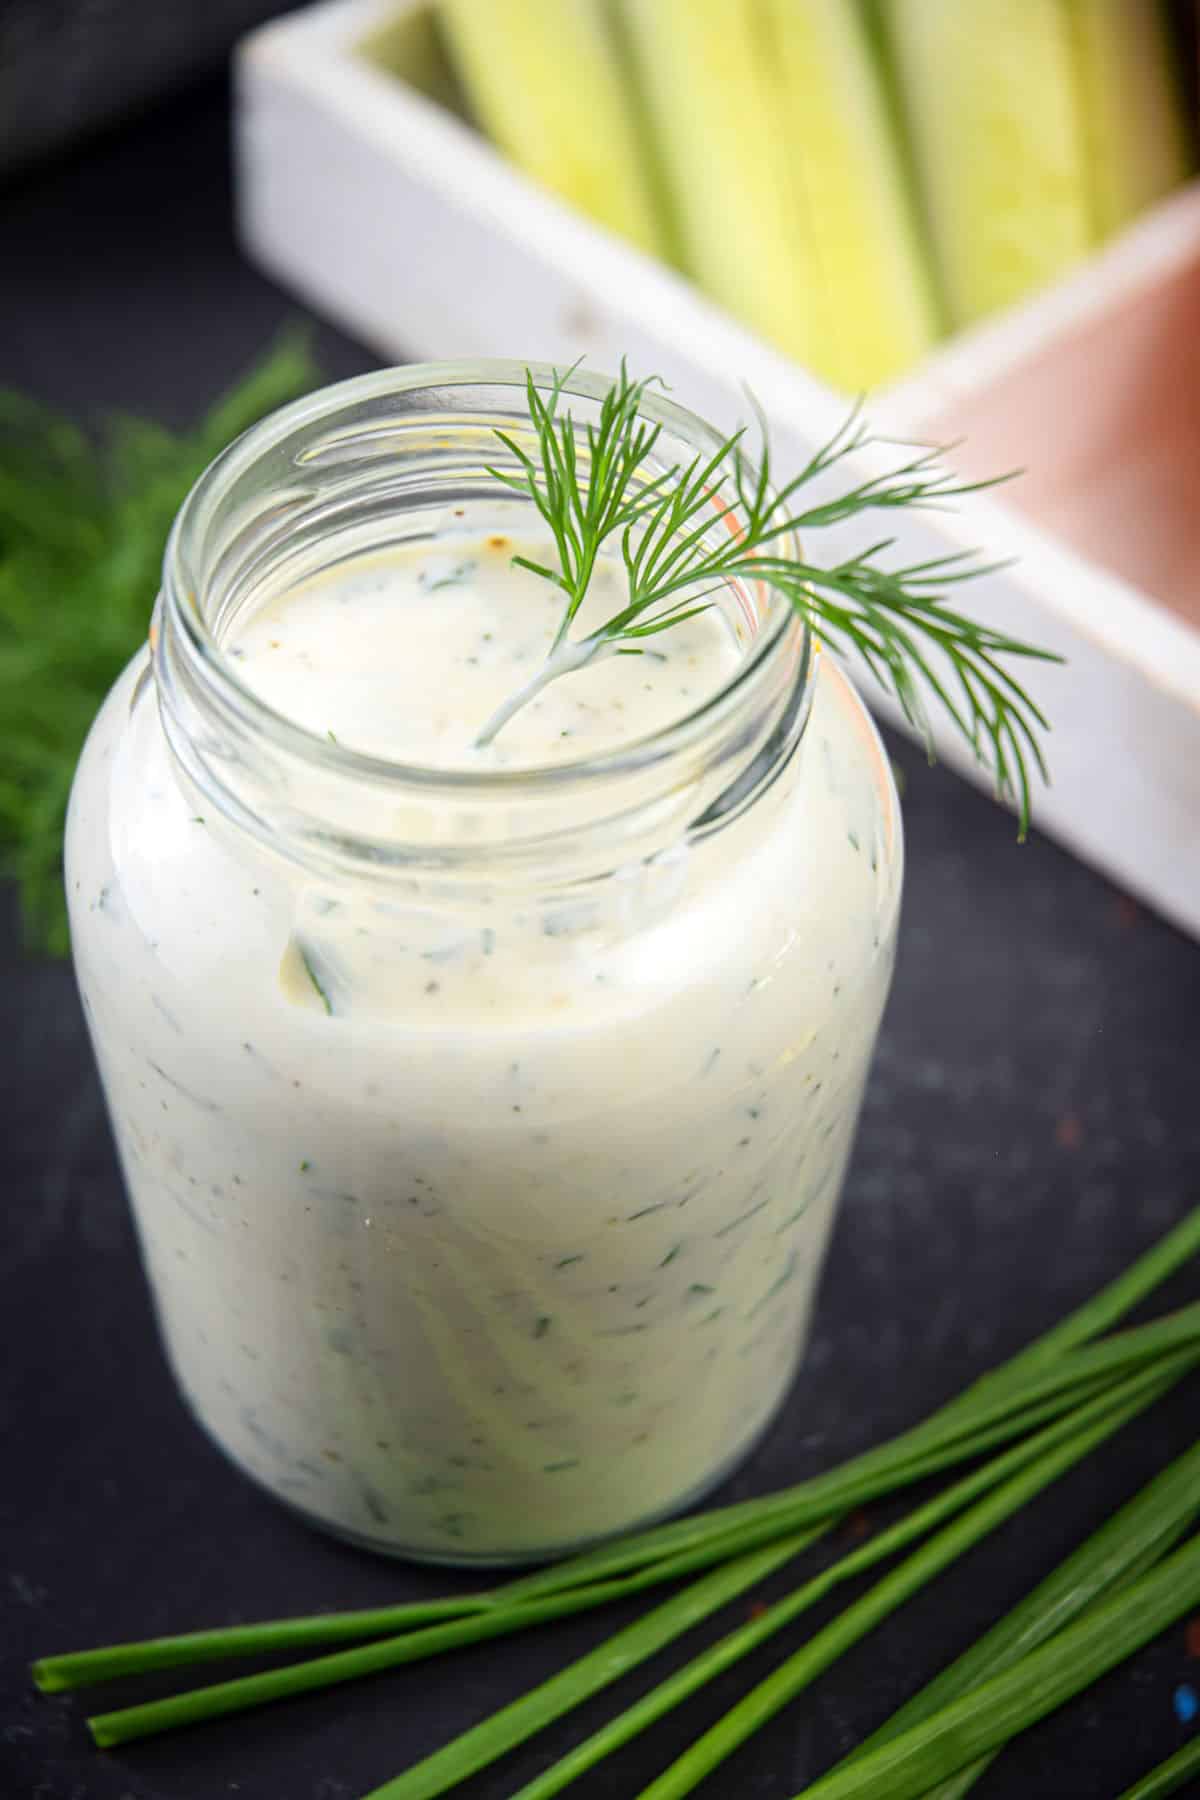
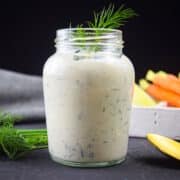
    Have you ever wondered how to make your own homemade ranch dressing? It's simple to make, easily customizable and just as good as the stuff that comes in the bottle - only you know exactly what's going in it. Impress your whole family with this creamy, herbaceous ranch dressing with sour cream that you can make at home in only 10 minutes or less!

    Homemade ranch dressing in a jar with fresh dill and a golden spoon on the side.
    [feast_advanced_jump_to]

    What is Ranch Dressing?

    Ranch dressing is an American salad dressing with its main ingredients being buttermilk, garlic, onion, dill and either sour cream or yogurt.

    Ingredients

    Homemade ranch dressing ingredients prepped and labeled on brown wooden background.
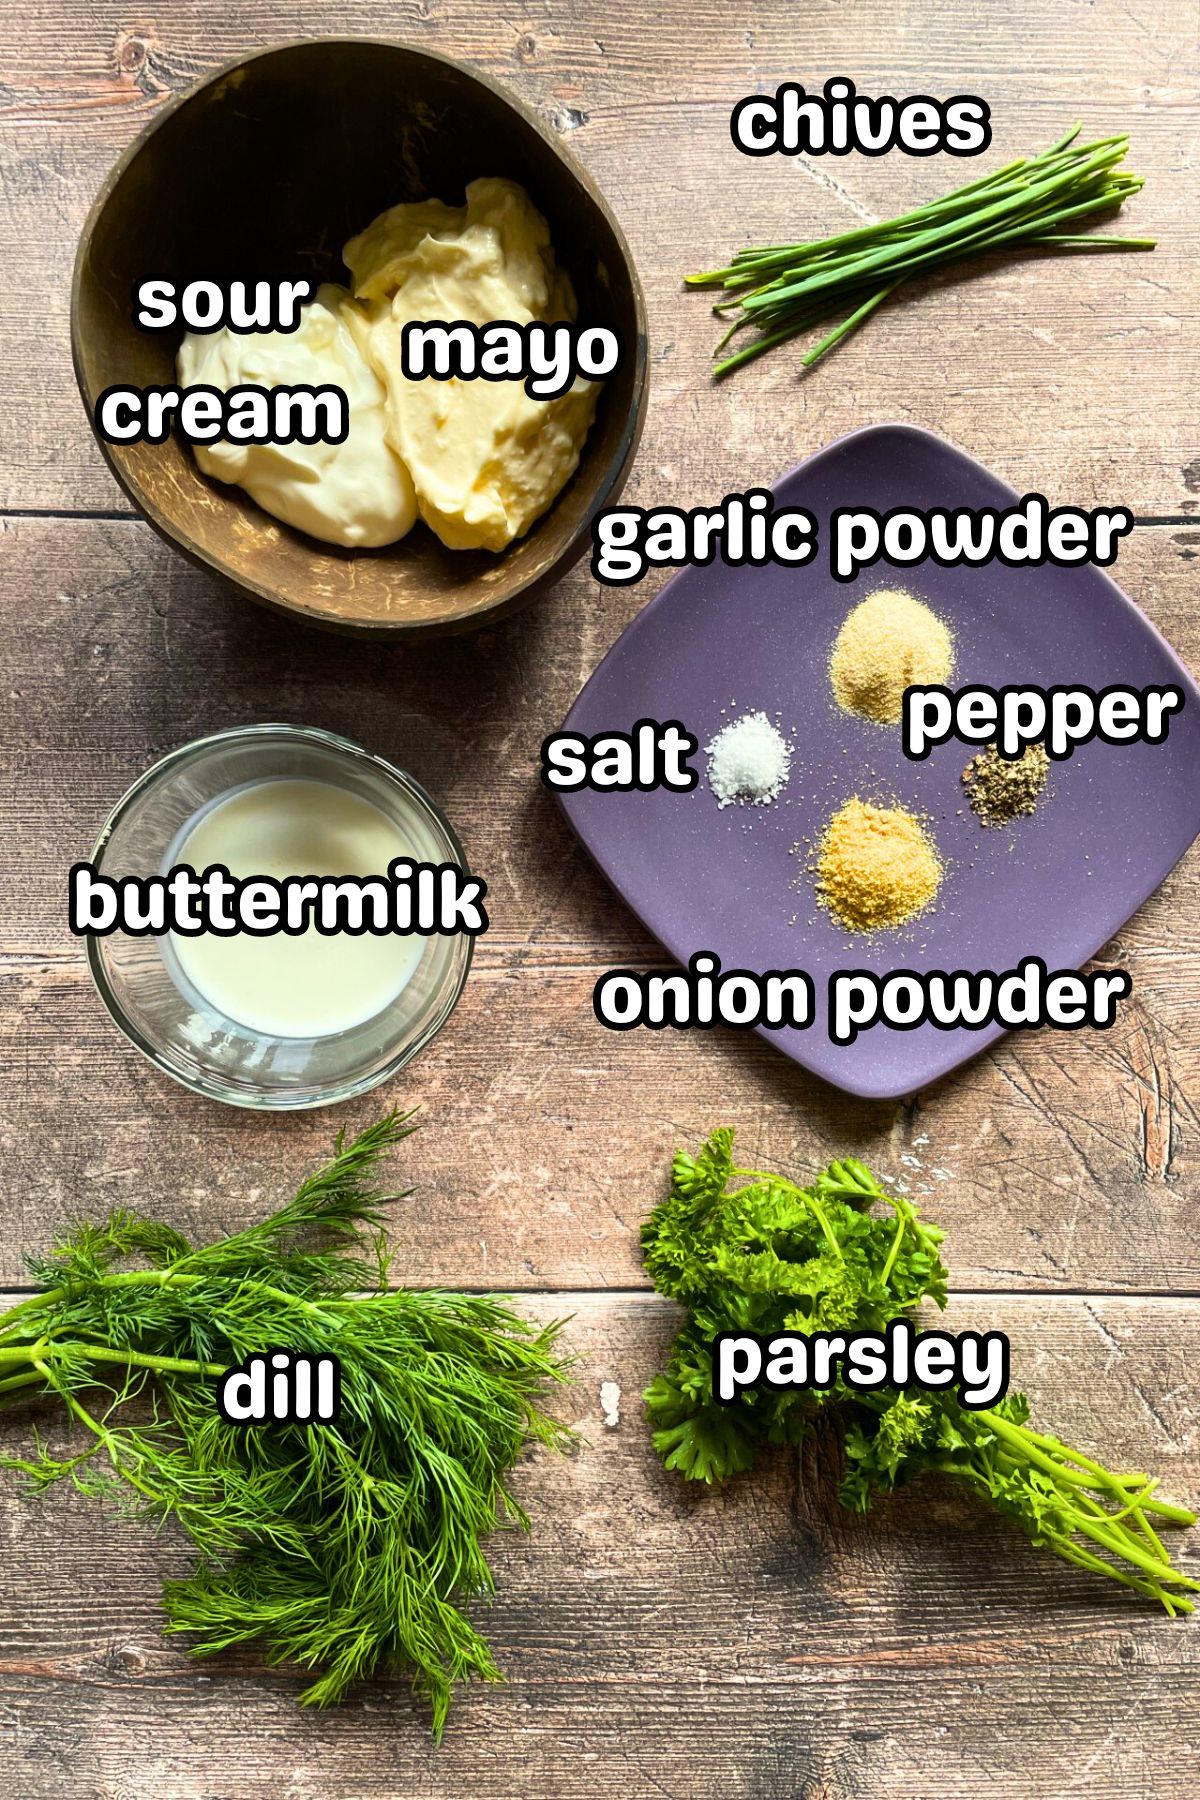
    • mayonnaise - This is the base of the dressing (and the base of most sauces like my smoky maple burger sauce).
    • sour cream or Greek yogurt - Whichever you prefer but I like to go with sour cream.
    • buttermilk - If you don't have any on hand combine a tad less than 1 cup milk with 1 tablespoon of white vinegar and let sit for 5 to 10 minutes.
    • garlic and onion powder - The garlic and onion powder really add to that classic ranch dressing flavor.
    • fresh chives, parsley and dill - The fresh taste from the herbs completely sets homemade ranch dressing apart from the store-bought stuff (check out how to chop dill like a pro here).

    *Check recipe card for full ingredients and amounts.

    Tweaks

    To customize your dressing, look at the different flavors you can find in the grocery story and try to replicate those (think bacon ranch, jalapeño ranch, peppercorn ranch, etc.). That way you know the flavors work or you can experiment with your own ideas.

    How to Make Ranch Dressing

    It's easy to make this dressing from scratch. Here is all you need to do:

    Ranch dressing ingredients in coconut bowl.

    Step 1. Add all of the ingredients, except for the buttermilk, into a small bowl.

    Ranch dressing ingredients in bowl with whisk.

    Step 2. Combine the ingredients until smooth.

    Ranch dressing ingredients combine in bowl with whisk.

    Chef's Note: At this point it will be quite thick.

    Ranch dressing whisked together with buttermilk in a small bowl.

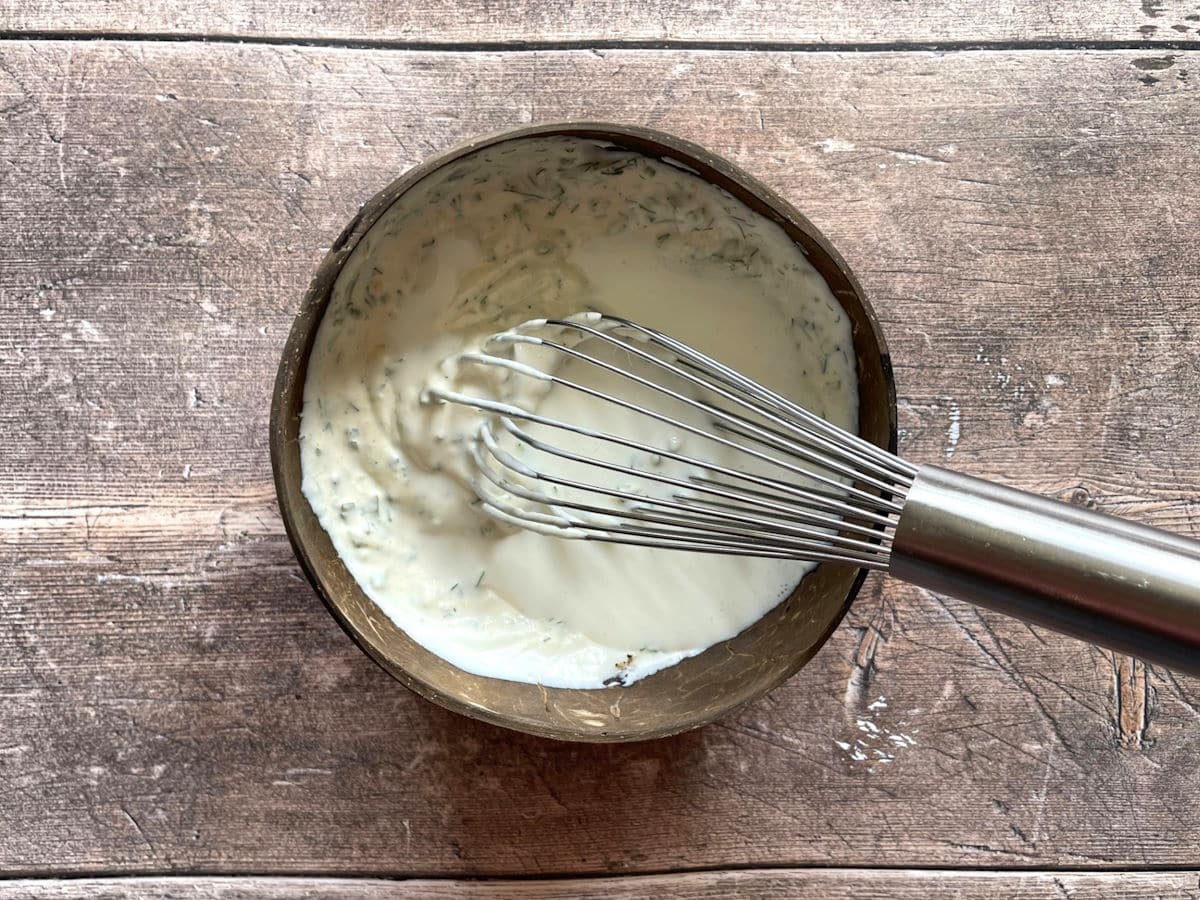
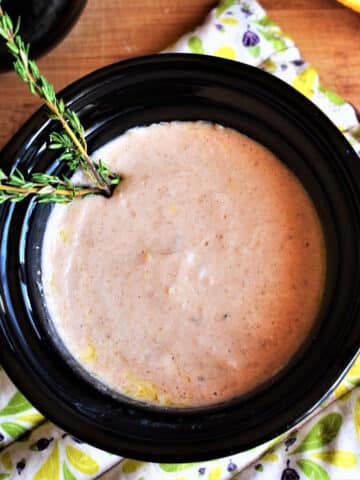
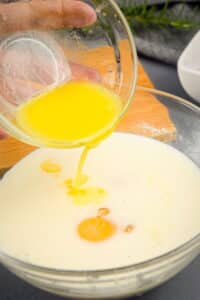
    Step 3. Once combined, add the buttermilk and whisk until smooth.

    Homemade ranch dressing combined in small, brown bowl.

    Chef's Note: This is the consistency of ranch dressing that I love. If you want a thinner dressing, add a little more buttermilk.

    Homemade ranch dressing in a jar with fresh dill, carrots, cucumbers and a golden spoon on the side.

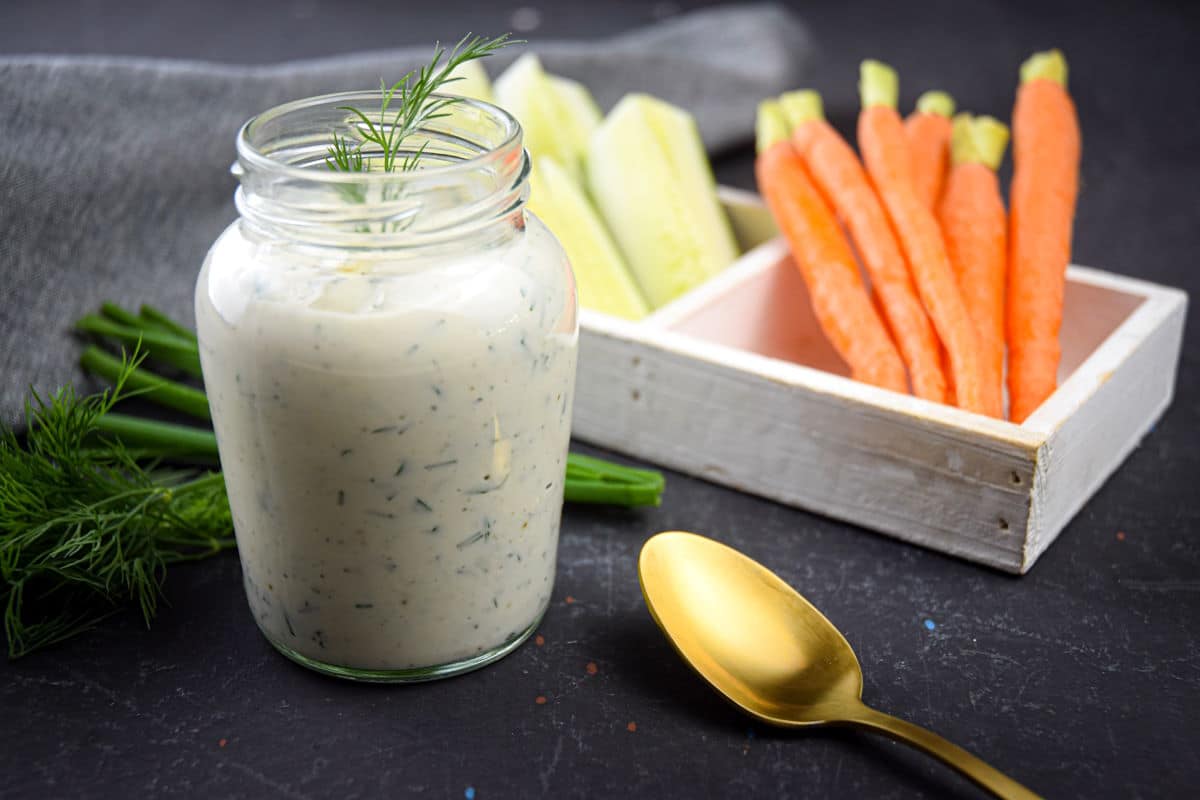
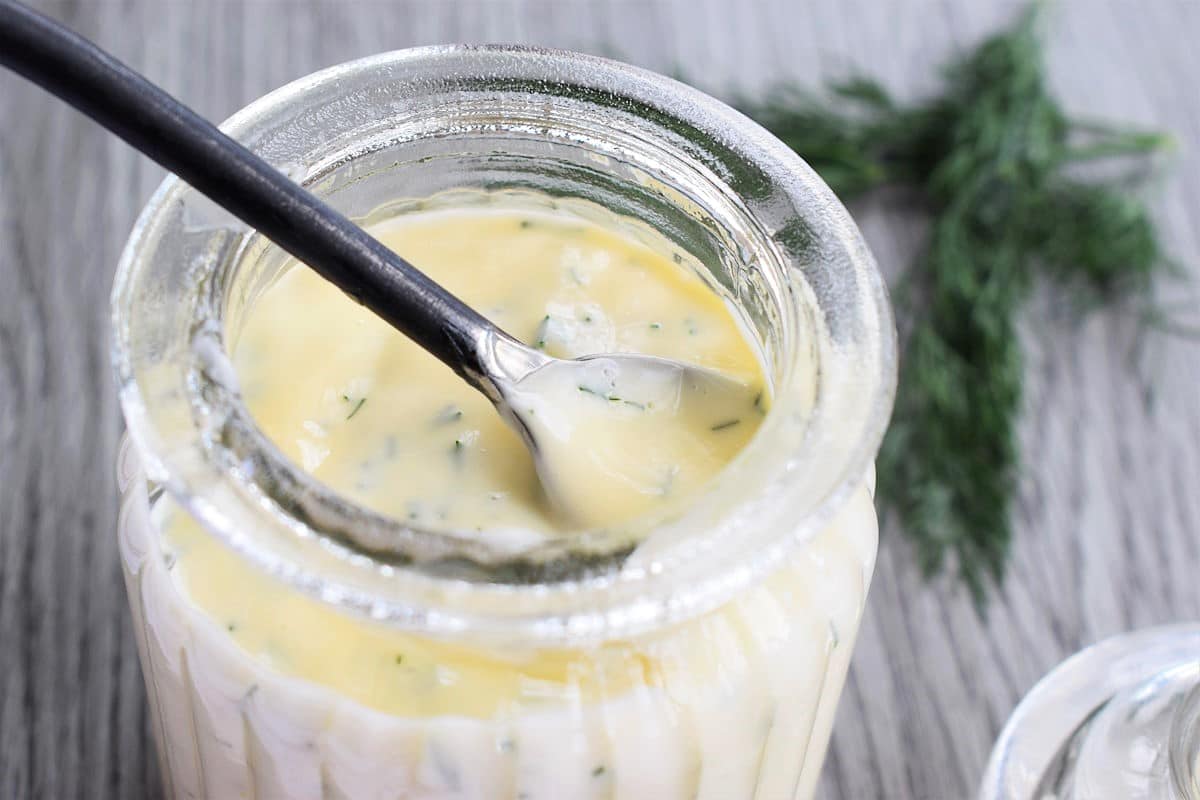
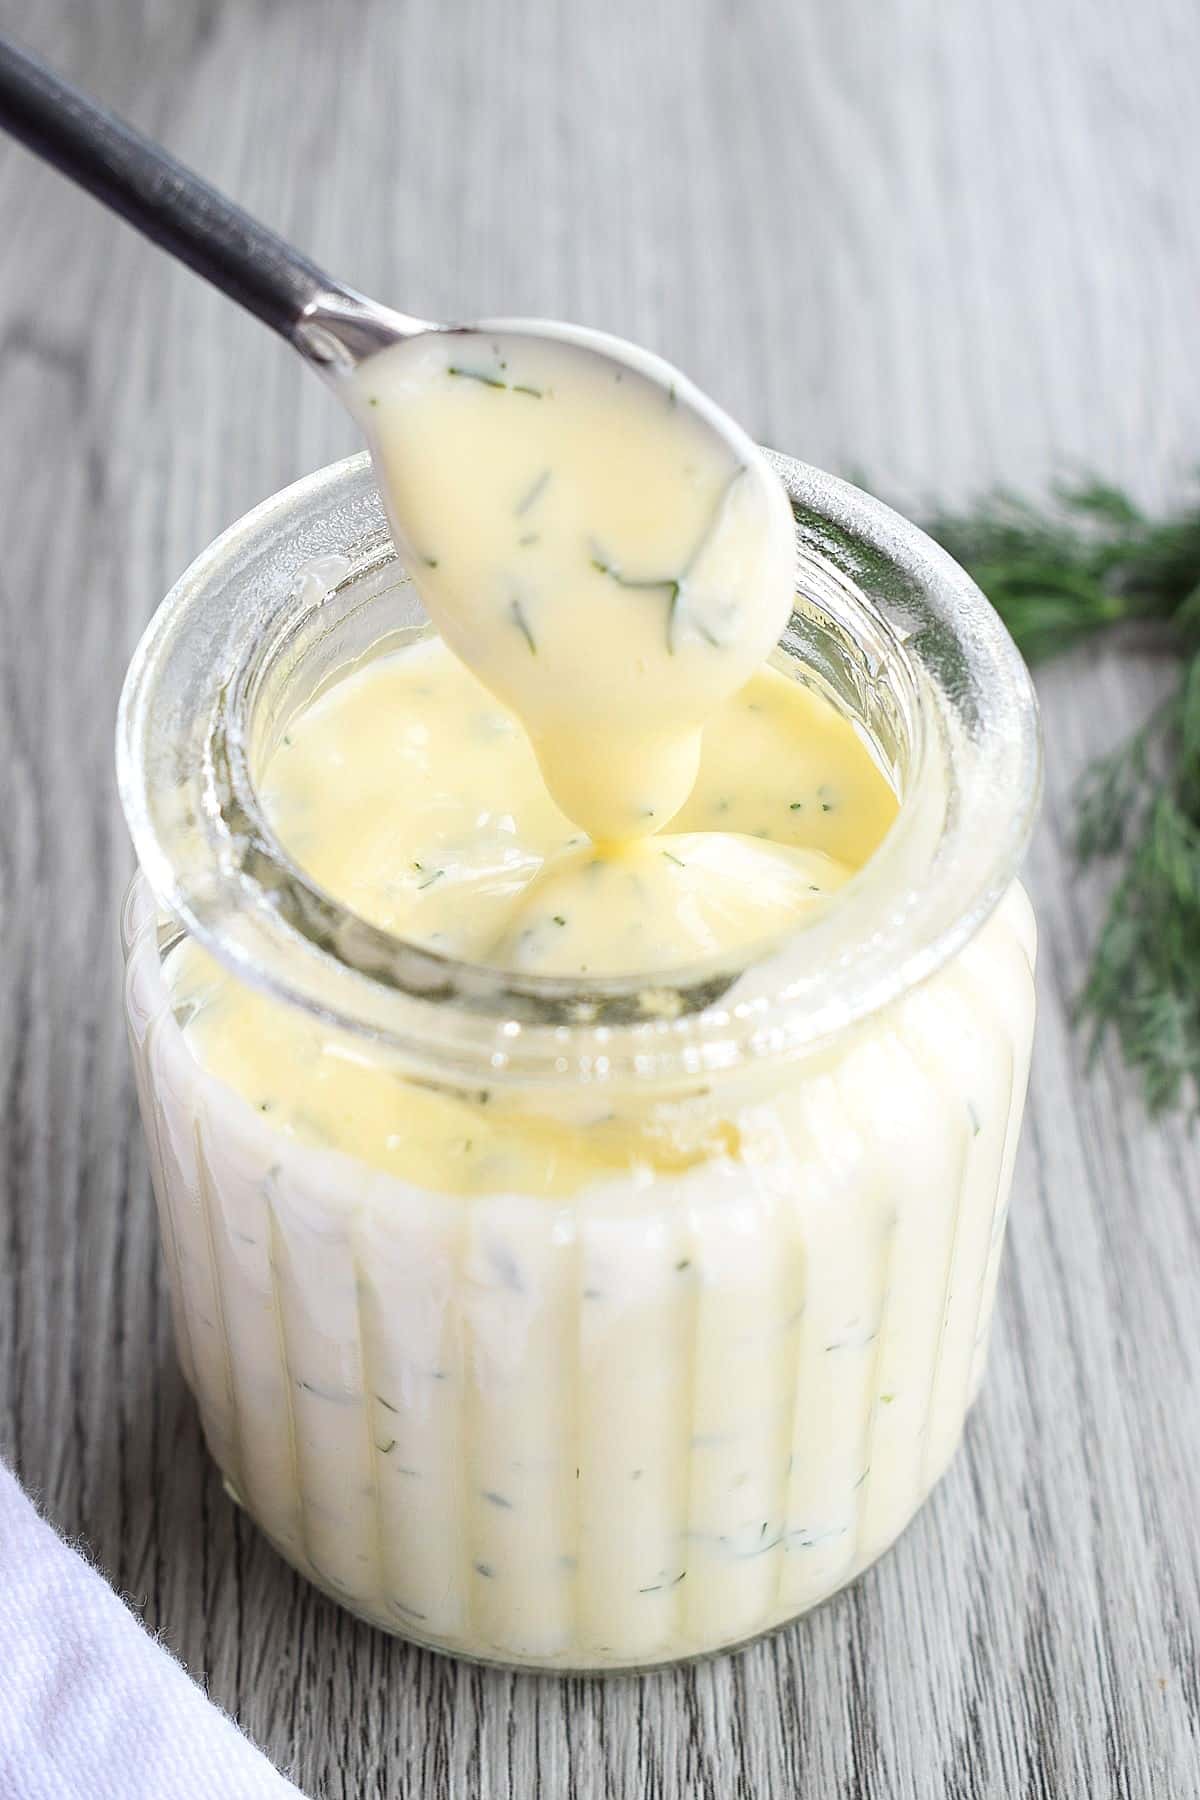
    Step 4. Serve. It can be served immediately or chilled in the refrigerator for a couple of hours. Store in an airtight container such as a jar or plastic squeeze bottle in the refrigerator.

    👩🏻‍🍳Pro Tip: If you're using a squeeze bottle to store the dressing, make sure to chop the herbs very finely so that the bottle doesn't get plugged up.

    How to Thicken Ranch Dressing

    Homemade ranch tends to be a little runnier than store-bought because it doesn't have the additives. To thicken your ranch dressing, you can either use less buttermilk to begin with or sprinkle a small amount of guar gum into the dressing while whisking (start with only ¼ teaspoon - it will thicken even more when refrigerated).

    What to Put it on

    • You can use it as a salad dressing (the main purpose of it!)
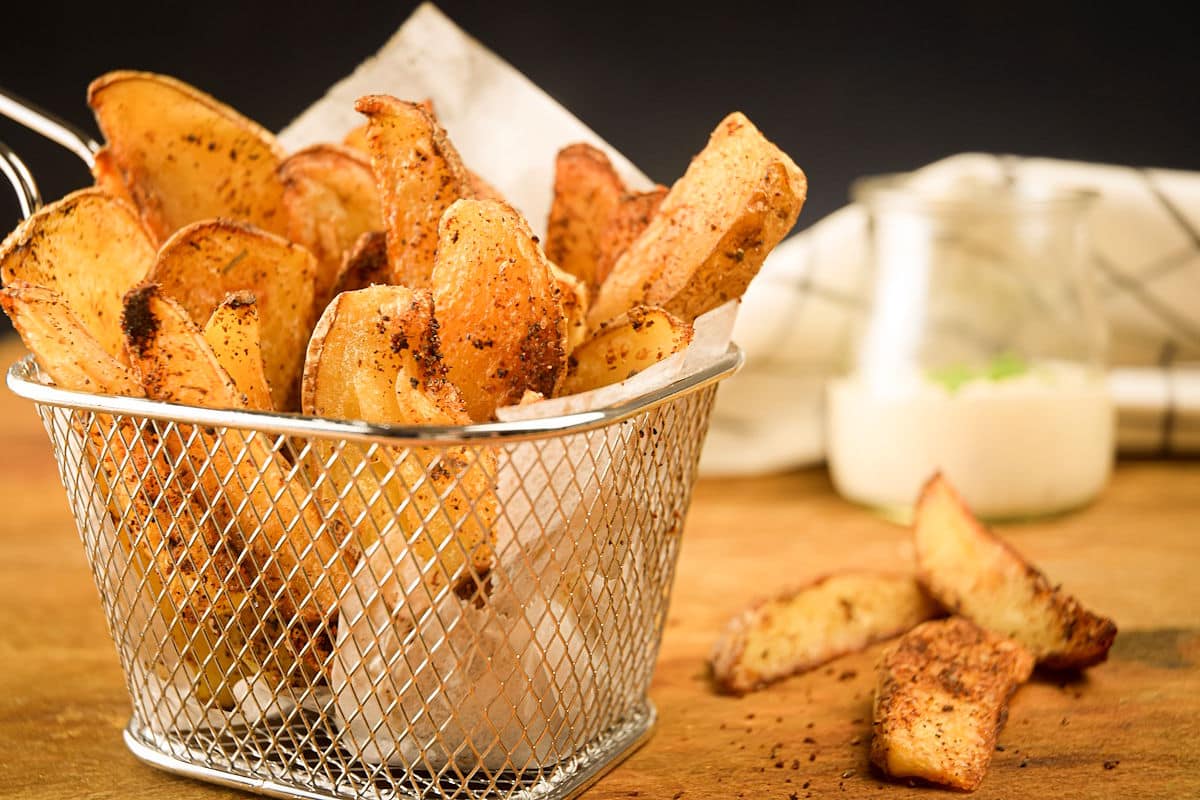
    • Use it as a dip for veggies, chips, fries, skillet-fried lemon pepper chicken wings, my grilled jalapeño poppers, or any fried food really!
    • Ranch is a popular flavor for tortilla chips and other crunchy snacks.
    • It's one of my secret ingredients for creamy mashed potatoes (trust me on this…).

    Recipe FAQs

    Is ranch dressing gluten free?

    Yes, the ingredients in this recipe are all gluten free.

    Who invented ranch dressing?

    It was developed by a Nebraskan cowboy. Him and his wife started a ranch in California. Due to the popularity of his perfected salad dressing recipe for their guests, they began to mail it in packets all over of the country under a name I'm sure you've heard of: 'Hidden Valley Ranch'. The company was bought out eventually and the sauce was then bottled for stores in the 80's. The rest is history!

    How do you store homemade ranch dressing?

    Store in an airtight container in the refrigerator for up to two weeks.

    Homemade ranch dressing in a jar with fresh dill.

    Related Dressing and Salad Recipes to Consider

    • Strawberry vinaigrette dressing drizzling down spoon into small jar.
      Easy Strawberry Vinaigrette Dressing
    • Watermelon salad with basil in black salad bowl.
      Watermelon Basil Salad
    • Kimchi salad in salad bowl on wooden background.
      Kimchi Salad
    • Fruit salad in a glass dish on white tile.
      How to Make Fruit Salad

    What did you drizzle your ranch on? If you tried this Homemade Ranch Dressing Recipe (With Sour Cream) or any other recipe on my website, please leave a 🌟 star rating and let me know how it went in the 📝 comments below. And please share the recipe!

    📋Recipe

    Ranch dressing in small jar on black background.
    Print Pin
    5 from 1 vote

    Homemade Ranch Dressing (With Sour Cream)

    Impress your whole family with this creamy, herbaceous homemade ranch dressing with sour cream that you can make at home in only 10 minutes! It's easily customizable and just as good as the stuff that comes in the bottle.
    Course Sauce
    Cuisine American
    Diet Vegetarian
    Prep Time 5 minutes minutes
    Total Time 5 minutes minutes
    Servings 6 ¼ cup servings
    Calories 156kcal
    Author Joss Dyckson

    Ingredients

    • ½ cup mayonnaise
    • ¼ cup sour cream or Greek yogurt
    • ½ teaspoon garlic powder
    • ½ teaspoon onion powder
    • 2 teaspoons fresh chives finely chopped
    • 1 ½ teaspoons fresh dill finely chopped
    • 1 teaspoon fresh parsley finely chopped
    • ⅛ teaspoon salt or to taste
    • ⅛ teaspoon pepper or to taste
    • ¼ cup buttermilk or to desired consistency
    US Customary - Metric

    Instructions

    • Combine all ingredients, except for the buttermilk, in a bowl.
    • Once combined, add the buttermilk and whisk until smooth. If you want a thinner dressing, add a little more buttermilk.
    • It can be served immediately or chilled in the refrigerator for a couple of hours.

    Notes

    • Store in an airtight container in the refrigerator for up to two weeks.
    • This recipe yields about 1 ½ cups dressing.
    • To thicken the dressing if it is too thin, slowly sprinkle ¼ teaspoon guar gum into the dressing while whisking.
    • Make sure to chop the herbs very finely, if transferring the dressing to a squeeze bottle, so that it doesn't get plugged up.

    Nutrition

    Calories: 156kcal | Carbohydrates: 2g | Protein: 1g | Fat: 16g | Saturated Fat: 3g | Cholesterol: 14mg | Sodium: 178mg | Potassium: 36mg | Fiber: 1g | Sugar: 1g | Vitamin A: 324IU | Vitamin C: 3mg | Calcium: 25mg | Iron: 1mg

    Homemade Vegan Matcha Powder Mix (+ Latte)

    September 9, 2020 by Joss Dyckson Leave a Comment

    Green and earthy, your morning lattes will never be the same with this homemade vegan matcha latte powder mix. You can make and store the powder for another time or follow the directions to make a steaming latte pronto! Find out why everyone's been raving about matcha with this quick and delicious, plant-based recipe.

    Vegan matcha latte in 2 white mugs with a spoon.

    Normally I enjoy a London fog latte in the morning, but sometimes I like to switch it up with this hot matcha beverage. If you've never had matcha before, you'll be pleased to find that it tastes great! Matcha has a smooth earthiness that's mildly sweet and reminiscent of the finest green teas.

    This recipe makes enough for one cup of homemade vegan matcha latte. It can easily be scaled up by dragging the servings slider on the recipe card if you want to make it in bulk and store in the cupboard or to take on the go.

    You can find matcha lattes in most coffee shops, but why spend the money on an expensive latte when you can make your own vegan matcha lattes at home? Start your day right with the earthy flavor of matcha, accompanied by the sweet creaminess of coconut milk.

    I also have this marshmallow pumpkin latte and gingerbread syrup for coffee that you might like for a fall/winter pick me up!

    [feast_advanced_jump_to]

    🍵Homemade Vegan Matcha Latte Powder Ingredients

    Vegan matcha latte powder in small jar unmixed.
    • matcha tea powder - Can be purchased online or found at most major retailers.
    • powdered sugar - I use powdered because it blends nicely in the powdered mix and dissolves quickly but feel free to use coconut sugar or granulated sugar as an alternative.
    • coconut milk powder - You can also find coconut powder online or at health food stores.

    *Check recipe card for ingredient amounts.

    Chef's Note: Another optional ingredient to add to the powder for extra flavor is vanilla powder! You can find it easily online or check out how to make vanilla powder at home. Or, try adding a touch of almond extract to the prepared matcha tea latte.

    🥣How to Make it

    Vegan matcha latte powder in small jar.

    Step 1. Combine the Ingredients. Sift the matcha, powdered sugar and powdered coconut milk together. Sifting will help to avoid clumps.

    Now you have 2 options: 1) Either store the powdered mix for later or 2) prepare a latte with the instructions that follow.

    Vegan matcha latte in 2 white mugs with pink polka dots.

    Step 2: Add Powder to Mug. To prepare a latte: add the homemade vegan matcha latte mix to 1 cup of hot water. Mix well.

    Vegan matcha latte in 2 white mugs with pink polka dots.

    Step 3: Serve. Serve the homemade vegan matcha latte and enjoy!

    Pro Tip: (Optional but highly recommended) Use a hand-held milk frother to make it extra smooth and frothy. I always keep one on hand in my kitchen.

    🫖Serving Suggestions

    • You can mix this recipe in large quantities and store it in your kitchen in a jar for daily use, or throw it together any time of day whenever the mood strikes you.
    • Take the mix with you on a camping trip as all you will need is some hot water to enjoy this soothing beverage! These flavored chocolate spoons work the same way!
    • If you do plan on making a large batch of the powder to have on hand, just be sure to add a small amount of the mix to the mug of hot water to begin with, and work your way up from there, to taste.

    💡Blender Trick

    If you have a blender around, you could blend the powder mixture with 1 cup hot water to make it extra frothy and smooth by: opening the vent hole on the lid and placing a kitchen towel over it loosely.

    The vent hole needs to be open to prevent pressure build-up. The kitchen towel will prevent splashing of the hot liquid through the vent hole while still allowing steam to escape.

    Start blender on low and speed up gradually, until blended.


    ❓Homemade Vegan Matcha Latte Powder FAQs

    Is there coffee in a matcha latte?

    No, matcha latte is a tea-based latte, not coffee-based.

    Is there caffeine in a matcha latte?

    Matcha can contain almost as much caffeine as a cup of coffee (70 mg in matcha vs. 70 mg to 140 mg in coffee), so you can save money and give yourself a better energy boost. It can be a great alternative to those sugar- and syrup-filled drinks you get at the local coffee shop.

    A hand holding vegan matcha latte powder in small jar unmixed.

    ☕Related Hot Beverage Recipes to Try

    • 4 colors of coffee beans on wooden board with a mug of coffee on the side.
      How to Roast Coffee Beans
    • Cinnamon orange glögg in wine glass.
      Swedish Glögg
    • Irish coffee in coffee mug with 4 leaf clover, whipped cream and chocolate curls.
      Irish Coffee Cocktail
    • Top view of mulled wine with orange slices and cinnamon sticks.
      Electric Skillet Mulled Wine

    If you tried this 🍵 Homemade Vegan Matcha Powder Mix (+ Latte) Recipe or any other recipe on my website, please leave a 🌟 star rating and let me know how it went in the 📝 comments below. And please share the recipe!

    📋Recipe

    Matcha latte in mugs with spoon.
    Print Pin
    5 from 1 vote

    Homemade Vegan Matcha Latte Powder (and Latte) Recipe

    Green and earthy, your morning lattes will never be the same with this homemade, vegan matcha latte powdered mix. You can make and store the powder for another time or follow the directions to make a latte pronto!
    Course Drinks
    Cuisine American, Japanese
    Diet Vegan, Vegetarian
    Prep Time 5 minutes minutes
    Total Time 5 minutes minutes
    Servings 1
    Calories 273kcal
    Author Joss Dyckson

    Ingredients

    • 1 teaspoon matcha powder
    • 1 tablespoon powdered sugar or to taste
    • 2 tablespoons coconut milk powder
    US Customary - Metric

    Instructions

    • Sift the matcha, powdered sugar and powdered coconut milk together.
      Vegan matcha latte powder in small jar unmixed.
    • To prepare a latte: add the matcha latte mix to 1 cup of hot water. Mix well.
      A hand holding vegan matcha latte powder in small jar unmixed.
    • Optional but highly recommended: Use a hand-held milk frother to make it smooth and frothy. Serve!
      Vegan matcha latte in 2 white mugs with pink polka dots.

    Notes

    • You can easily adjust the amount of each ingredient, according to taste.
    • I use powdered because it blends nicely in the powdered mix and dissolves quickly but feel free to use coconut sugar or granulated sugar as an alternative.
    • This recipe makes enough for one cup of matcha latte, but can easily be scaled up by dragging the serving size slider on the recipe card if you want to make it in bulk and store in the cupboard or to take on the go.
    • If you do plan on making a large batch of the powder to have on hand, just be sure to add a small amount of the mix to the mug of hot water to begin with, and work your way up from there, to taste.
    • Matcha can contain almost as much caffeine as a cup of coffee (70 mg in matcha vs. 70 mg to 140 mg in coffee).
    • Blender Trick:
      • If you have a blender around, you could blend the powder mixture with 1 cup hot water to make it extra frothy and smooth by: opening the vent hole on the lid and placing a kitchen towel over it loosely.
      • The vent hole needs to be open to prevent pressure build-up. The kitchen towel will prevent splashing of the hot liquid through the vent hole while still allowing steam to escape. Start blender on low and speed up gradually, until blended.

    Nutrition

    Calories: 273kcal | Carbohydrates: 24g | Protein: 5g | Fat: 18g | Saturated Fat: 15g | Sodium: 59mg | Sugar: 17g | Vitamin A: 246IU | Iron: 1mg

    Hearty Beef & Cabbage Soup

    September 7, 2020 by Joss Dyckson Leave a Comment

    Loaded with meat and vegetables and seasoned with fresh herbs and spices, this hearty beef and cabbage soup is the perfect recipe to warm your bones on a cold winter day.

    Beef and cabbage soup in a blue bowl.

    This simmering soup is packed with that down-home country flavor that'll remind you of holiday meals you enjoyed at your grandparents' house, or sitting around eating stew in front of a campfire. It's chunky and satisfying, much like my kimchi ramen soup.

    I created this recipe as a way to use up all of my favorite garden produce in a way that tastes delicious. Feel free to switch up a few of the vegetables with the leftover produce sitting in your own fridge and avoid waste.

    It's easy to prep and cook in one pot. It has a tomato-base, just like my slow cooker Mexican soup, using stewed or diced tomatoes.

    Some more of my hearty beef recipes you might like are this taco pasta salad with Doritos and ground beef and scrambled eggs. I also have this step-by-step cooking tutorial for how to make a reuben sandwich.

    [feast_advanced_jump_to]

    🍲 What is Beef and Cabbage Soup?

    Beef and cabbage soup is a soup made of ground beef, cabbage and mixed vegetables. It is also called Hamburger Soup.

    🥘 Ingredients

    Beef and cabbage soup ingredients labeled.
    • ground beef - I use lean.
    • vegetables - Yellow onion, garlic cloves, celery, carrots, potatoes, green bell pepper and green cabbage.
    • Worcestershire sauce - Worcestershire sauce is a fermented condiment with delicious, savory flavor that originates from the city of Worcester in Worcestershire, England.
    • canned stewed tomatoes - Or canned diced tomatoes.
    • chicken broth - I like the flavor of the chicken broth for this soup, but you can substitute with beef broth if desired.
    • red wine vinegar - To brighten the overall flavor of the soup.
    • sugar - Or agave nectar.
    • dried herbs - Ground thyme, oregano and basil.
    • fresh parsley - To garnish.
    • salt and pepper - Not pictured.

    *Check recipe card for ingredient amounts.

    🔪 How to Make Beef and Cabbage Soup

    Ground beef cooking in Dutch oven pot.

    Step 1. Brown the beef. Heat a large pot or dutch oven to medium-high heat. Add the ground beef and cook until browned, breaking it into large chunks as it cooks. Drain the grease if needed.

    Vegetables and ground beef in large pot.

    Step 2. Cook the vegetables. Add the vegetables and Worcestershire sauce. Cook for 5 minutes, stirring often.

    Beef and cabbage soup simmering in large pot.

    Step 3. Simmer. Pour in the diced tomatoes and broth. Add the red wine vinegar, sugar, dried herbs, salt and pepper. Mix well. Bring to a boil. Turn the heat down and simmer with the lid on until the vegetables are tender (about 25 minutes).

    Beef and cabbage soup in a blue bowl with sourdough loaf.

    Step 4. Serve. Stir in the freshly chopped parsley. Ladle the soup into bowls and serve.

    🥗 Serving Suggestions

    This beef and cabbage soup is great for fall and winter, but you can also enjoy it in the heat of summer. And this soup is so flavorful that when your bowl is empty, you might be tempted to tilt it back and drink the remaining broth!

    If you're an experienced cook, you can customize this soup by adding and subtracting vegetables and herbs or adding cooked barley.

    For an extra touch, serve this soup with a side of sausage rolls, dinner rolls, toast points or warm skillet cornbread. You can also garnish this soup with a sprinkling of the fresh parsley.

    If you're having a lot of guests over and don't know how to cook for a large group, this recipe is a crowd pleaser that can accommodate a large amount of people, but you can also tweak the servings in the recipe card to serve an even larger crowd.

    ❓ Recipe FAQs

    Do you drain hamburger meat for soup?

    The leaner the ground beef, the less likely you will need to drain the fat. If you see a large amount of grease after cooking, you should drain it before adding the other ingredients.

    How do you store leftovers?

    I like to make a large pot of this hearty soup, as it lasts 3 to 4 days in the fridge and leftovers taste great!

    How do you reheat it?

    Simply reheat the soup on the stove to a boil.

    How to thicken up hamburger soup?

    You can try adding some tomato paste or a cornstarch slurry of 1 tablespoon cornstarch mixed with 3 tablespoons of cool water. Stir the slurry into the soup as it's cooking and it will thicken within 1 to 2 minutes.

    Beef and cabbage soup in a bowl with a wooden soup spoon.

    ❤️More Recipes With Cabbage You Will Love

    • Cabbage rolls stacked on plate.
      How to Make Cabbage Rolls
    • Red cabbage shredded with knife.
      How to Shred Cabbage 3 Ways
    • Ground beef stir fry with veggies in bowl with chopsticks.
      Ground Beef Stir Fry
    • Sliced bison roast on white serving dish with vegetables.
      Slow Cooker Bison Roast

    If you tried this 🍲 Hearty Beef and Cabbage Soup Recipe or any other recipe on my website, please leave a 🌟 star rating and let me know how it went in the 📝 comments below. And please share the recipe!

    📋Recipe

    Beef and cabbage soup in blue soup bowl.
    Print Pin
    5 from 1 vote

    Hearty Beef & Cabbage Soup

    Loaded with meat and vegetables and seasoned with fresh herbs and spices, this hearty beef and cabbage soup is the perfect recipe to warm your bones on a cold winter day.
    Course Soup
    Cuisine Canadian
    Prep Time 15 minutes minutes
    Cook Time 35 minutes minutes
    Total Time 50 minutes minutes
    Servings 8
    Calories 264kcal
    Author Joss Dyckson

    Equipment

    • Large pot

    Ingredients

    • 2 pounds lean ground beef
    • ½ yellow onion sliced
    • 3 garlic cloves minced
    • 3 stalks celery chopped
    • 2 carrots peeled and chopped
    • 3 potatoes chopped
    • ½ green bell pepper chopped
    • 1 cup green cabbage sliced
    • 2 tablespoons Worcestershire sauce
    • 1 can diced tomatoes 28 ounces
    • 6 cups chicken broth
    • 1 tablespoon red wine vinegar
    • 1 tablespoon sugar or agave nectar
    • 1 teaspoon ground thyme
    • 1 teaspoon dried oregano
    • 1 teaspoon dried basil
    • ¼ cup fresh parsley chopped
    • salt and pepper to taste
    US Customary - Metric

    Instructions

    • Heat a large pot or dutch oven to medium-high heat. Add the ground beef and cook until browned, breaking it into large chunks as it cooks. Drain the grease if needed.
    • Add the vegetables and Worcestershire sauce. Cook for 5 minutes, stirring often.
    • Pour in the diced tomatoes and broth. Add the red wine vinegar, sugar, dried herbs, salt and pepper. Mix well.
    • Bring to a boil. Turn the heat down and simmer with the lid on until the vegetables are tender (about 25 minutes).
    • Stir in the freshly chopped parsley. Serve.

    Notes

    • Serving size: If you're having a lot of guests over and don't know how to cook for a large group, this recipe is a crowd pleaser that can accommodate a large amount of people, but you can also tweak the servings in the recipe card to serve an even larger crowd.
    • Storage: I like to make a large pot of this hearty soup, as it lasts 3 to 4 days in the fridge and leftovers taste great!
    • Reheating: Simply reheat it on the stove to a boil.
    • Grease: The leaner the ground beef, the less likely you will need to drain the fat. If you see a large amount of grease after cooking, you should drain it before adding the other ingredients.
    • If you would like to thicken the soup: You can try adding some tomato paste or a cornstarch slurry of 1 tablespoon cornstarch mixed with 3 tablespoons of cool water. Stir the slurry into the soup as it's cooking and it will thicken within 1 to 2 minutes.

    Nutrition

    Calories: 264kcal | Carbohydrates: 23g | Protein: 28g | Fat: 6g | Saturated Fat: 3g | Polyunsaturated Fat: 0.4g | Monounsaturated Fat: 3g | Trans Fat: 0.4g | Cholesterol: 74mg | Sodium: 820mg | Potassium: 1040mg | Fiber: 4g | Sugar: 6g | Vitamin A: 2888IU | Vitamin C: 35mg | Calcium: 78mg | Iron: 5mg

    Electric Skillet Butter Chicken

    September 4, 2020 by Joss Dyckson 2 Comments

    This recipes uses an electric skillet to cook butter chicken in one-pot, including the rice, for a convenient and quick week-night dinner.

    Butter chicken in a white specked bowl with wooden tongs on the side.

    Butter chicken is a classic Indian dish that's been making waves in the Western world. If you've never tried it, you're in for an explosion of flavor that combines fragrant Indian spices with a rich, buttery sauce.

    Butter chicken is definitely a favorite chicken dish of mine, right up there with Cajun blackened chicken!

    Like most Indian dishes, it is traditionally served over a bed of rice or sopped up with a piece of pumpkin garlic naan bread. It's comforting, hearty and delicious, and the perfect introduction to a whole new world of Indian cuisine.

    Most of the ingredients can be found at the local grocery store, and the specialty spices can be found at the nearest global foods market.

    Skip the barbecue sauce and discover a totally new way to use that leftover chicken you've got lying around in your freezer.


    Fan Fave

    Recipe Review From Jess: ⭐⭐⭐⭐⭐ "Followed exactly and found the flavors to be spot on. Was delicious!"

    [feast_advanced_jump_to]

    What is Butter Chicken?

    So what gives butter chicken its delicious, savory-sounding name? The chicken is cooked in a sauce made from butter, coconut milk, tomato sauce and fresh Indian spices.

    Butter chicken originated in restaurants in India back in the 1950s. Since then, it's traveled all over the world to become one of the most recognizable Indian dishes.

    This dish may be full of Indian spices, but it is fairly mild compared to some of the spicier Indian dishes out there.

    One of the best parts of Indian food is the sauce, so make sure you serve this dish with plenty of bread so your guests can mop up their plates.

    How to Make One Pan Electric Skillet Butter Chicken

    Butter chicken in a white specked bowl with wooden tongs, rice and spices on the side.
    1. Add rice, 2 cups of water, butter and salt to the electric skillet. Heat it to 375ºF. When it starts boiling, lower to 200ºF and cook for 10-12 minutes, covered. Reserve.
    2. Season the chicken with garlic, salt and pepper. In a bowl, whisk the coconut milk with the spices.
    3. Heat electric skillet to 375ºF. Add vegetable oil and chicken pieces. Sauté until golden on each side and cooked through (about 10 minutes).
    4. Add the butter, onions, broth and tomato paste. Mix everything together. Cook with the lid on for 2 minutes.
    5. Add coconut milk with spices. Cook until thickened (around 5 more minutes).
    6. Season to taste. Serve over rice and top with chopped cilantro.

    Recipe FAQs

    How long do leftovers last in the fridge?

    Store leftovers in an airtight container in the fridge for up to 3 to 4 days.

    How do you reheat it?

    You can reheat it in the electric skillet over medium heat or in a pot on the stove.

    Butter chicken in a bowl with wooden tongs, rice and spices on the side.

    More Delicious One Pan Dinners to Try

    • Beef and cabbage soup in blue soup bowl.
      Hearty Beef & Cabbage Soup
    • Quinoa stir fry in skillet.
      Quinoa Stir Fry (w/ Shrimp & Veggies)
    • Electric skillet spaghetti alfredo on plate.
      Electric Skillet Spaghetti
    • Crunchy chow mein noodle dish on white plate.
      Electric Skillet Chow Mein Noodles

    If you tried this 🧈🍗 Electric Skillet Butter Chicken Recipe or any other recipe on my website, please leave a 🌟 star rating and let me know how it went in the 📝 comments below. And please share the recipe!

    📋Recipe

    Butter chicken in a bowl.
    Print Pin
    5 from 2 votes

    Electric Skillet Butter Chicken

    If you've never tried electric skillet butter chicken, you're in for an explosion of flavor that combines fragrant Indian spices with a rich, buttery sauce.
    Course Main Course
    Cuisine American, Indian
    Diet Gluten Free
    Prep Time 15 minutes minutes
    Cook Time 30 minutes minutes
    Total Time 45 minutes minutes
    Servings 4
    Calories 802kcal
    Author Joss Dyckson

    Equipment

    • Electric Skillet

    Ingredients

    For the Butter Chicken

    • 1 ½ pounds chicken breast diced
    • 2 tablespoons garlic chopped
    • 1 cup coconut milk
    • 2 teaspoons Garam Masala
    • 1 teaspoon curry powder
    • 1 teaspoon ginger powder
    • 1 tablespoon vegetable oil
    • ½ cup butter
    • 1 cup onion diced
    • ¾ cup chicken broth
    • ½ cup tomato paste
    • 2 tablespoons cilantro chopped (garnish)
    • salt and pepper

    For the Rice

    • 1 cup white rice
    • 2 cups water
    • 1 tablespoon butter
    • ½ teaspoon salt
    US Customary - Metric

    Instructions

    • Add rice, 2 cups of water, butter and salt to the electric skillet. Heat it to 375ºF. When it starts boiling, lower to 200ºF and cook for 10-12 minutes, covered. Reserve.
      1 cup white rice, 2 cups water, 1 tablespoon butter, ½ teaspoon salt
    • Season the chicken with garlic, salt and pepper. In a bowl, whisk the coconut milk with the spices.
      1 ½ pounds chicken breast, 2 tablespoons garlic, 1 cup coconut milk, 2 teaspoons Garam Masala, 1 teaspoon curry powder, 1 teaspoon ginger powder
    • Heat electric skillet to 375ºF. Add vegetable oil and chicken pieces. Sauté until golden on each side and cooked through (about 10 minutes).
      1 tablespoon vegetable oil
    • Add the butter, onions, broth and tomato paste. Mix everything together. Cook with the lid on for 2 minutes.
      ½ cup butter, 1 cup onion, ¾ cup chicken broth, ½ cup tomato paste
    • Add coconut milk with spices. Cook until thickened (around 5 more minutes).
    • Season to taste. Serve over rice and top with chopped cilantro.
      2 tablespoons cilantro

    Notes

    • Storage: Store leftovers in an airtight container in the fridge for up to 3 to 4 days.
    • Reheating: You can reheat it in the electric skillet over medium heat or in a pot on the stove.

    Nutrition

    Calories: 802kcal | Carbohydrates: 53g | Protein: 44g | Fat: 47g | Saturated Fat: 31g | Cholesterol: 178mg | Sodium: 1108mg | Potassium: 1336mg | Fiber: 4g | Sugar: 6g | Vitamin A: 1851IU | Vitamin C: 20mg | Calcium: 90mg | Iron: 5mg

    Mini Apple Pies: A Fall School Snack Recipe

    September 2, 2020 by Joss Dyckson Leave a Comment

    What's more charming than an apple pie? How about mini apple pies that perfectly capture that warm, cozy feeling of coming home from school on a crisp autumn afternoon? Whether tucked into lunchboxes or waiting on the counter after school, they're a fall school snack kids can't resist.

    Mini apple pies stacked.
    [feast_advanced_jump_to]

    🥧 About Mini Muffin-Tin Apple Pies

    These miniature apple pies made in muffin tins are a delicious snack that your kids will look forward to, whether you're a parent looking for the perfect treat to pack in your kids' lunch boxes or for an after-school or home-school snack.

    They're easy to make and bursting with fresh fruit, sweet brown sugar and cinnamon. You can choose your favorite apples to make them with. You might even sneak a pie or two for yourself!

    If you love mini treats like myself, you might also like these electric skillet mini pies, fudgy chocolate brownie bites and delicious, blueberry pancake balls. And, if you are interested in making snacks in muffin tins that aren't muffins, try these taco cups.

    🍎 Mini Apple Pie Ingredients

    • frozen puff pastry - thawed
    • large apple - some choices include Granny Smith, McIntosh, Honeycrisp, Gala and Pink Lady
    • brown sugar - I use dark brown sugar
    • all-purpose flour - for the filling and to roll out dough scraps
    • ground cinnamon - cinnamon adds that nostalgic, comforting aroma, which contributes to the classic apple pie experience
    • vanilla extract - can use artificial or pure
    • egg - to brush on the pies and give them a glossy appearance

    *Check recipe card for ingredient amounts.

    🥣 How to Make Mini Apple Pies

    1. Prep the filling. Heat oven to 425°F. In a bowl, mix the apples with the sugar, flour, cinnamon and vanilla. Cover and set aside while working on the puff pastry.
    2. Cut circles out of the puff pastry. Unroll puff pastry onto a work surface. Cut into 36 small circles using a cookie cutter (1.75"). Gather the scraps and roll it again over a lightly floured surface to make more circles, if needed.
    3. Arrange in muffin tin. Press 18 of the circles into the cavities of a mini-muffin tin. They should come up the sides a bit. Add apple mixture evenly to each of the muffin cups (about a teaspoon). Cover with the remaining 18 circles and press down around the edges (they will be lower than the top of the cavity). Brush the tops with the beaten egg.
    4. Bake. Bake for 16 to 18 minutes, until golden brown and bubbly.
    5. Cool and serve. Let them cool in the pan for 20 minutes. Carefully loosen and remove from muffin tin. Serve!
    Mini apple pies on baking rack and stacked on the side.

    🍽️ Serving Suggestions

    These delicious little pies are a perfect snack for kids, both in and out of the classroom (kids also love my mini falafels!). If you've got a class party coming up, they are a great way to surprise your students. Anyone can bake cookies or brownies, but when's the last time you saw someone bring in homemade, mini pies?

    You can even turn it into a lesson for your students by inviting them to make their own miniature pies in the classroom.

    These pies are also a great option for parents looking for an after-school snack. They're made with real ingredients like fresh apples, ground cinnamon, brown sugar and vanilla.

    To make the mini apple pies even more special, you can cut strips out of the spare dough and layer it in a criss-cross pattern over the filling for that classic apple pie look.

    When your child gets home from school, sit down with a pie or two and talk to them about their day. You can even make it a routine that they look forward to after school. What better way to bond with your child than by having a conversation accompanied by a tasty snack?

    ✔️Tips For Success

    • Try not to overstuff the pies. The filling can bubble through and cause a mess plus less filling in the end. A teaspoon of filling per mini pie is usually enough for this recipe.
    • Cool Before Removing. Let the pies cool slightly before removing them from the muffin tin. This helps them set and reduces the chance of breaking the crust. Use a butter knife to gently loosen the edges if needed.
    • Add a Sprinkle of Sugar: For extra sweetness and a bit of crunch, sprinkle a little sugar (or cinnamon sugar) on top of the egg wash before baking.

    ❓ Recipe FAQs

    Can you leave them out on the counter?

    Yes, you can, but only for a day or two and then you will want to pop them into the fridge or freezer.

    How long can you store mini apple pies in the fridge?

    If you want to make them ahead of time, they can be stored in an air-tight container in the fridge for 3 to 4 days.

    Can you freeze them?

    Yes! You can freeze them by wrapping them in plastic wrap, then transferring to freezer bags or a container. Freeze for up to 3 months.

    How do you thaw and reheat frozen mini apple pies?

    They can be thawed in the fridge. To reheat, place them on a baking sheet in a 300°F oven for a short time--until warmed through.

    Mini apple pies on baking rack.

    🧡 More Homemade Fall Treats You Will Love

    • Cinnamon apple chips in a bowl.
      Cinnamon Apple Chips
    • Pumpkin fluff dip in a bowl with crushed Biscoff cookies.
      Pumpkin Fluff Dip Dessert
    • Pumpkin pie dessert hummus in black bowl with sweet biscuits on the side.
      Pumpkin Pie Dessert Hummus
    • Pumpkin cake pops in small basket.
      Pumpkin Spice Cake Pops

    If you tried this 🍎🥧 Mini Apple Pies Recipe or any other recipe on my website, please leave a 🌟 star rating and let me know how it went in the 📝 comments below. And please share the recipe!

    📋Recipe

    Mini apple pies stacked and one sliced open.
    Print Pin
    5 from 1 vote

    Mini Apple Pies - Fall School Snack

    These mini apple pies perfectly capture that warm, cozy feeling of a crisp autumn afternoon. Whether tucked into lunchboxes or waiting on the counter after school, they're a fall school snack kids can't resist.
    Course Dessert, Snack
    Cuisine American, British
    Diet Vegetarian
    Prep Time 20 minutes minutes
    Cook Time 16 minutes minutes
    Total Time 36 minutes minutes
    Servings 18 mini pies
    Calories 79kcal
    Author Joss Dyckson

    Equipment

    • Mini muffin tin
    • Cookie cutter (1.75")

    Ingredients

    • 8 ounces frozen puff pastry thawed
    • 1 large apple peeled, cored and finely chopped ( ¼ -inch pieces)
    • 1 tablespoon brown sugar
    • ½ teaspoon all-purpose flour plus more to roll out dough scraps
    • ¼ teaspoon ground cinnamon
    • ½ teaspoon vanilla
    • 1 egg beaten
    US Customary - Metric

    Instructions

    • Heat oven to 425°F. In a bowl, mix the apples with the sugar, flour, cinnamon and vanilla. Cover and set aside while working on the puff pastry.
    • Unroll puff pastry onto a work surface. Cut into 36 small circles using a cookie cutter (1.75"). Gather the scraps and roll it again over a lightly floured surface to make more circles, if needed.
    • Press 18 of the circles into the cavities of a mini-muffin tin. They should come up the sides a bit.
    • Add the apple mixture evenly to each of the muffin cups (about a teaspoon). Cover with the remaining 18 circles and press down around the edges (they will be lower than the top of the cavity). Brush the tops with the beaten egg.
    • Bake for 16 to 18 minutes, until golden brown and bubbly.
    • Let them cool in the pan for 20 minutes. Carefully loosen and remove from muffin tin. Serve!

    Notes

    • Make sure to let the pies cool slightly before removing them from the muffin tin. This helps them set and reduces the chance of breaking the crust. Use a butter knife to gently loosen the edges if needed.
    • If you want to make them ahead of time, they can be left on the counter for a day or two. They can also be stored in an air-tight container in the fridge for 3 to 4 days.
    • You can freeze them by wrapping them in plastic wrap, then transferring to freezer bags or a container. Freeze for up to 3 months.
    • They can be thawed in the fridge. To reheat, place them on a baking sheet in a 300°F oven for a short time--until warmed through.
    • To make the pies even more special, you can cut strips out of the spare dough and layer it in a criss-cross pattern over the filling for that classic apple pie look.
    • Some apple choices include Granny Smith, McIntosh, Honeycrisp, Gala and Pink Lady.

    Nutrition

    Calories: 79kcal | Carbohydrates: 8g | Protein: 1g | Fat: 5g | Saturated Fat: 1g | Sodium: 32mg | Potassium: 19mg | Fiber: 1g | Sugar: 2g | Vitamin A: 5IU | Vitamin C: 1mg | Calcium: 3mg | Iron: 1mg

    Creamy Tuna Macaroni Casserole

    September 1, 2020 by Joss Dyckson 1 Comment

    This cheesy, creamy tuna macaroni casserole with tangy sun-dried tomatoes, Parmesan cheese, short-cut pasta and a creamy, tomato-pesto Alfredo sauce is a delicious, easy meal for the whole family to enjoy. Includes easy freezing and make-ahead instructions!

    Tuna casserole in casserole dish with marble background.

    While tuna casserole is a classic comfort meal on its own, this elevated recipe gives the traditional combination of creamy Alfredo and tuna a fresh update with added sun-dried tomatoes and a tomato-based pesto.

    The combination of tomatoes and cream works beautifully, just like in my creamy skillet Tuscan chicken and delicious burrito casserole.

    The end result is hearty without being too heavy, and is finished cooking in about 25 to 30 minutes, including the pasta. I like to serve a light hemp salad or burrata and greens salad on the side.

    This is one of our special, homemade, comfort-food dishes that my family loves to dig into on a regular basis, but I've also noticed that it's very popular around Thanksgiving. Enjoy!

    SUMMARIZE & SAVE THIS CONTENT ON

    ChatGPT
    Google AI
    Perplexity
    Grok
    [feast_advanced_jump_to]

    Ingredients

    Creamy tuna macaroni casserole ingredients labeled.
    • dry macaroni (elbow) pasta - Or another short-cut pasta like medium shells or rigatoni. Medium shells have become my favorite because their shape and size make the dish extra creamy. Elbow pasta is smaller and packs tighter, so when you measure by volume, you end up with more pasta than you would with shells. That is something to keep in mind when choosing a pasta.
    • sun-dried tomato pesto - I have no problem finding tomato pesto in the pasta aisle of the grocery store. You can also find it online.
    • Alfredo sauce - Every time I make this casserole I try a different flavor of Alfredo, including garlic, 4-cheese, mushroom, roasted red pepper...so don't be afraid to experiment here or use your favorite Alfredo sauce. The Alfredo adds lots of creaminess without the can of cream soup.
    • milk - I use whole milk but you can go with lighter milk if you prefer.
    • oil-packed/sliced sundried tomatoes - I drain the oil from the sun-dried tomatoes before adding them to my milk and Alfredo sauce. Sun-dried tomatoes also add some textural contrast to the tuna with their chewiness.
    • canned solid white tuna - This type of tuna fish is also known as albacore tuna. It's much better than flaked for this recipe.
    • Parmesan cheese - Parmesan's natural nuttiness lends another layer of flavor without having to add much extra. It adds a cheesy top layer to this already-delicious casserole.

    *Check recipe card for ingredient amounts.

    Recipe Tweaks

    • Spices: You can add whichever extra spices you like, but I like to keep it simple with salt and pepper as to not overpower tuna's delicate flavor or change the sauce's flavor profile.
    • Tuna: I like to use solid white tuna (Albacore) for its firmer texture and milder flavor but you can substitute with light flaked tuna, which is cheaper.

    How to Make Creamy Tuna Casserole

    Short cut pasta in casserole dish.

    Step #1. Cook pasta. Preheat oven to 425°F. Cook pasta according to package directions. Drain and transfer to a 9" x 13" casserole dish.

    Tomato alfredo sauce in bowl with whisk.

    Step #2. Make the sauce. In a bowl, combine the pesto, Alfredo sauce, milk, and sun-dried tomatoes.

    Short cut pasta noodles with sauce, mushrooms and sun-dried tomatoes in casserole dish.

    Step #3. Add sauce to pasta. Add the sauce to the pasta, stirring to coat. Fold in the tuna and mushrooms. Add salt and pepper, to taste.

    Unbaked tuna macaroni pasta topped with Parmesan cheese in casserole dish.

    Step #4. Add cheese. Sprinkle the Parmesan cheese and parsley on top.

    9" x 13" pan covered with foil.

    Step #5. Bake. Cover the dish with foil and bake for about 20 minutes or until hot and bubbly and the cheese is melted.

    Creamy tuna casserole on a plate with a fork.

    Step #6. Serve. Serve the creamy tuna macaroni casserole!

    What to Serve it With

    If you're looking for some side dish ideas for your tuna macaroni casserole, you're going to want to go with something light like: 🥬 a green salad, 🥒 cucumber salad, 🧄 garlic bread or 🥖 dinner rolls. If you're making it in the summer, serve it with Mediterranean grilled vegetables or summer caprese salad.

    For a drink pairing, I recommend a crisp white wine like a Sauvignon Blanc or Chardonnay, as they are a good match with cream-based sauces and tuna.

    Joss' Tips

    • Clean the mushrooms without water, using dry paper towel to rub the dirt off instead.
    • Cook your noodles al dente (cooked but still a bit firm) for the best texture.
    • If you would like a crispy, golden topping, remove the foil for the last 10 minutes. I personally prefer to bake this tuna macaroni casserole with the foil on all the way through so that it's extra creamy and cheesy.
    • After baking, let the casserole rest for 5-10 minutes to firm up; this way it's easier to scoop into the serving dishes.

    Creamy Tuna Macaroni Casserole FAQs

    How long does it take to cook tuna casserole?

    You will know your tuna casserole is finished when the cheese is fully melted, hot and bubbly: about 20 minutes covered.

    Can you make it in advance?

    Yes! You can fully prep and assemble the tuna casserole up to 1 day in advance, before baking. Keep it covered in the fridge and then bake when ready. It might take an extra 5 to 10 minutes to get hot and bubbly.

    How long do leftovers last?

    This tuna casserole keeps well in the fridge in an air-tight container for 3 to 4 days.

    Can you freeze tuna casserole?

    Absolutely! You can freeze the cooled leftovers for up to 3 months in an airtight container. Thaw in the fridge and then reheat in an un-preheated 350°F oven, covered with foil, until heated through. This will take approximately 20 to 30 minutes.

    Tuna casserole in casserole dish with marble background. Plate with forks on the side.

    More Amazing Tuna Recipes to Try

    • Tuna pasta salad with quail eggs.
      Cold and Creamy Tuna Pasta Salad
    • Tuna watermelon tartare on clear glass plate.
      Tuna and Watermelon Tartare
    • Kimchi salad in salad bowl on wooden background.
      Kimchi Salad

    If you tried this Creamy Tuna Macaroni Casserole Recipe or any other recipe on my website, please leave a 🌟 star rating and let me know how it went in the 📝 comments below. And please share the recipe!

    📋Recipe

    Creamy tuna macaroni casserole in baking dish.
    Print Pin
    5 from 2 votes

    Creamy Tuna Macaroni Casserole

    Dig into this cheesy, creamy tuna macaroni casserole with tangy sun-dried tomatoes, mushrooms, Parmesan cheese, shell pasta and a creamy, tomato-pesto Alfredo sauce.
    Course Main Course
    Cuisine American
    Prep Time 10 minutes minutes
    Cook Time 25 minutes minutes
    Total Time 35 minutes minutes
    Servings 6
    Calories 564kcal
    Author Joss Dyckson

    Equipment

    • 9" x 13" casserole dish

    Ingredients

    • 3 cups dry macaroni elbow pasta or medium shells
    • 3 tablespoons sun-dried tomato pesto
    • 1 ¾ cups Alfredo sauce
    • ¼ cup milk
    • 2 cans solid white tuna drained and broken into chunks
    • ¼ cup oil-packed sun dried tomatoes drained of the oil and sliced
    • 1 cup mushrooms sliced
    • 1 cup fresh Parmesan cheese finely shredded
    • 2 tablespoons fresh parsley chopped
    • salt and pepper to taste
    US Customary - Metric

    Instructions

    • Preheat oven to 425°F. Cook pasta according to package directions. Drain and transfer to a 9" x 13" casserole dish.
      3 cups dry macaroni elbow pasta
    • In a bowl, combine the pesto, Alfredo sauce and milk.
      3 tablespoons sun-dried tomato pesto, 1 ¾ cups Alfredo sauce, ¼ cup milk
    • Add the sauce to the pasta, stirring to coat. Fold in the tuna, sun-dried tomatoes and mushrooms. Add salt and pepper, to taste.
      2 cans solid white tuna, ¼ cup oil-packed sun dried tomatoes, 1 cup mushrooms
    • Sprinkle the Parmesan cheese and parsley on top.
      1 cup fresh Parmesan cheese, 2 tablespoons fresh parsley
    • Cover the dish with foil and bake for about 15 to 20 minutes or until hot and bubbly and the cheese is melted.
    • Serve!

    Notes

    • Tuna type: I like to use solid white tuna (Albacore) for its firmer texture and milder flavor but you can substitute with light flaked tuna which is cheaper.
    • Cleaning the mushrooms: Clean the mushrooms without water, using dry paper towel to rub the dirt off instead.
    • Short cut pasta: Medium shells have become my favorite because their shape and size make the dish extra creamy. Elbow pasta is smaller and packs tighter, so when you measure by volume, you end up with more pasta than you would with shells. That is something to keep in mind when choosing a pasta.
    • Al dente: Cook your noodles al dente (cooked but still a bit firm) for the best texture.
    • Crispy or creamy: If you would like a crispy, golden topping, remove the foil for the last 10 minutes. I personally prefer to bake this casserole with the foil on all the way through so that it's extra creamy and cheesy.
    • Rest the pasta: After baking, let the casserole rest for 5-10 minutes to firm up; this way it's easier to scoop into the serving dishes.
    • Fridge storage: This tuna casserole keeps well in the fridge in an air-tight container for 3 to 4 days.
    • Freezer storage: You can freeze the cooled leftovers for up to 3 months in an airtight container. Thaw in the fridge and then reheat in an un-preheated 350°F oven, covered with foil, until heated through. This will take approximately 20 to 30 minutes.
    • Make Ahead: You can fully prep and assemble the tuna casserole up to 1 day in advance, before baking. Keep it covered in the fridge and then bake when ready. It might take an extra 5 to 10 minutes to get hot and bubbly.

    Nutrition

    Calories: 564kcal | Carbohydrates: 60g | Protein: 31g | Fat: 21g | Saturated Fat: 10g | Polyunsaturated Fat: 4g | Monounsaturated Fat: 5g | Trans Fat: 0.01g | Cholesterol: 87mg | Sodium: 1085mg | Potassium: 466mg | Fiber: 3g | Sugar: 4g | Vitamin A: 385IU | Vitamin C: 7mg | Calcium: 194mg | Iron: 2mg

    How to Make a Reuben Sandwich

    August 27, 2020 by Joss Dyckson Leave a Comment

    This is one of the best hot sandwiches that you need to try if you haven't yet! I will show you exactly how to make a Reuben sandwich at home, from scratch.

    Reuben sandwiches stacked with a toothpick.

    Layers of corned beef, melted Swiss cheese and crunchy, tangy sauerkraut between grilled slices of multigrain bread with a homemade Russian dressing make up the classic Reuben sandwich. It really is as delicious as it sounds.

    The process of making a restaurant-style version of Reuben sandwiches is similar to that of grilled cheese sandwiches; nice and easy! Butter, assemble and fry both sides to crispy, golden perfection, allowing the cheese to melt all over the beef and possibly ooze out the sides. You're allowed to get a little messy with it.

    Check out more hearty and delicious beef recipes.

    [feast_advanced_jump_to]

    Reuben Sandwich Ingredients

    The key ingredients in the sauce for the Reubens are the horseradish and Worcestershire. If you've had these ingredients on their own, you know how much flavor they bring to the table. They combine beautifully with the mayo/ketchup base and go perfectly with the corned beef.

    Reuben sandwich and Russian sauce ingredients prepped and labeled.
    Swiss cheese and corned beef slices on board, labeled.

    For the Russian Dressing:

    • ½ cup mayonnaise
    • 3 tablespoons ketchup
    • 2 tablespoons horseradish
    • 2 teaspoons Worcestershire sauce
    • 1 tablespoon granulated sugar
    • spices: salt, pepper, paprika

    For the Sandwich:

    • 8 slices multigrain bread
    • 4 tablespoons butter, softened
    • 8 slices Swiss cheese
    • 16 slices corned beef
    • 1 cup sauerkraut

    Variations

    There are a few slight variations for this recipe, including:

    • The Montreal version where Montreal-style smoked meat is used in place of the corned beef. You can also use pastrami which is similar.
    • In some cases, Russian dressing is swapped out for Thousand Island.
    • While Swiss is the classic choice for Reubens, you can easily swap it with Munster, provolone, or mozzarella as they all offer a mild flavor.

    Instructions

    A bowl of Russian dressing with a whisk.

    Step 1: Make the Sauce. In a medium bowl, whisk the mayo, ketchup, horseradish, Worcestershire sauce, sugar, and paprika together. Season with salt and pepper, to taste.

    A knife buttering a piece of multigrain bread.

    Step 2: Butter the Bread. Butter one side of each slice of bread.

    Sauerkraut, corned beef and Swiss cheese on bread.

    Step 3: Add the Sandwich Fillings. Top half of the bread slices (not the buttered side) with 2 pieces of cheese, 4 slices corned beef, ¼ cup sauerkraut and desired amount of Russian dressing.

    Reuben sandwich in frying pan.

    Step 4: Top with 2nd Slice of Bread. Top each sandwich with remaining slices, butter side up. (The butter should be on the outside part of the sandwiches.)

    ❤️You might also love my blackened chicken sandwich.

    Reuben sandwich in frying pan.

    Step 5: Fry the Reuben Sandwiches. Heat a skillet over medium heat. Place a sandwich in the skillet and cook until golden on each side and the cheese is melted, about 3 minutes per side. Repeat until all sandwiches are made.

    Knife slicing through a reuben sandwich.

    Step 6: Cut the Sandwiches in Half. Cut the sandwiches in half diagonally.

    Reuben sandwiches stacked with a toothpick on parchment.

    Step 7: Serve the Reuben Sandwiches. Serve the Reuben sandwiches with extra sauce!

    Serving Suggestions

    If you want a side dish to serve with your sandwiches, you can try coleslaw, potato salad, roasted garlic tomato soup, fries or chips for some crunch.

    Reuben sandwiches stacked with a toothpick on parchment.

    Reuben Sandwich Recipe FAQs

    Why is it called a Reuben?

    The Reuben is supposedly named after the American inventor of the sandwich and created in the early 1900's, although the origins are unclear.

    How do you store leftovers?

    If you happen to have leftover sandwiches, make sure you cover them well and place them in the fridge for up to 3 days.

    How do you reheat Reuben sandwiches?

    They can be reheated in the pan or oven to retain crispiness or you can eat them cold.

    How do you keep a Reuben from getting soggy?

    Make sure to drain off any extra liquid from the sauerkraut before putting it on your Reuben sandwich to avoid sogginess. Serve your Reubens soon after pan-frying so that the bread is at its crispiest.

    Are Reubens better hot or cold?

    While a Reuben sandwich can be enjoyed cold, its flavors and textures truly shine when served hot, as per this recipe. Melted cheese, when it's cooled, just isn't as appetizing as when it is hot and melty.

    Reuben sandwiches stacked with a toothpick on parchment.

    ❤️More Sandwich Recipes You Will Love

    • Grilled PBJ sandwiches cut in half in serving dish.
      Grilled PBJ Sandwiches
    • Kimchi grilled cheese sandwiches stacked on serving tray with skewer.
      Kimchi Grilled Cheese Sandwiches
    • Triple meat sub sandwich on parchment lined cutting board.
      Triple Meat Sub Sandwich
    • Tripleta sandwiches and chips.
      Puerto Rican Tripleta Sandwich

    If you tried this 📋 recipe tutorial for How to Make a Reuben Sandwich or any other recipe on my website, please leave a 🌟 star rating and let me know how it went in the 📝 comments below. And please share the recipe!

    📋Recipe

    Reuben sandwiches stacked on each other with a toothpick.
    Print Pin
    5 from 1 vote

    How to Make a Reuben Sandwich

    I will show you exactly how to make a Reuben sandwich at home, from scratch. This Reuben sandwich consists of layers of corned beef, melted Swiss cheese and crunchy, tangy sauerkraut between grilled slices of multigrain bread with a homemade Russian dressing.
    Course Main Course
    Cuisine American
    Prep Time 5 minutes minutes
    Cook Time 6 minutes minutes
    Total Time 11 minutes minutes
    Servings 4 sandwiches
    Calories 612kcal
    Author Joss Dyckson

    Equipment

    • Frying pan

    Ingredients

    For the Russian Dressing

    • ½ cup mayonnaise
    • 3 tablespoons ketchup
    • 2 tablespoons horseradish
    • 2 teaspoons Worcestershire sauce
    • 1 tablespoon granulated sugar
    • ¼ teaspoon paprika
    • salt to taste
    • freshly ground black pepper to taste

    For the Sandwich

    • 8 slices multigrain bread
    • 4 tablespoons butter softened
    • 8 slices Swiss cheese
    • 16 slices corned beef
    • 1 cup sauerkraut
    US Customary - Metric

    Instructions

    For the Russian Dressing

    • In a medium bowl, whisk the mayo, ketchup, horseradish, Worcestershire sauce, sugar, and paprika together. Season with salt and pepper, to taste.
      A bowl of Russian dressing with a whisk.

    For the Sandwich

    • Butter one side of each slice of bread. Top half of the bread slices (not the buttered side) with 2 pieces of cheese, 4 slices corned beef, ¼ cup sauerkraut and desired amount of Russian dressing. Top each sandwich with remaining slices, butter side up. (The butter should be on the outside part of the sandwiches.)
      Sauerkraut, corned beef and Swiss cheese on bread.
    • Heat a skillet over medium heat. Place a sandwich in the skillet and cook until golden on each side and the cheese is melted, about 3 minutes per side. Repeat until all sandwiches are made.
      Reuben sandwich in frying pan.
    • Cut the sandwiches in half diagonally. Serve with extra sauce.
      Reuben sandwiches stacked with a toothpick on parchment.

    Notes

    • If you happen to have leftover sandwiches, make sure you cover them well and place them in the fridge for up to 3 days.
    • They can be reheated in the pan or oven to retain crispiness or you can eat them cold.
    • Make sure to drain off any extra liquid from the sauerkraut before putting it on your Reuben sandwich to avoid sogginess.
    • Serve your Reubens soon after pan-frying so that the bread is at its crispiest.

    Nutrition

    Calories: 612kcal | Carbohydrates: 35g | Protein: 18g | Fat: 45g | Saturated Fat: 18g | Cholesterol: 77mg | Sodium: 1012mg | Potassium: 310mg | Fiber: 5g | Sugar: 12g | Vitamin A: 878IU | Vitamin C: 9mg | Calcium: 350mg | Iron: 2mg

    Vegetarian Zucchini 'Crab' Cakes

    August 26, 2020 by Joss Dyckson 3 Comments

    With fresh zucchini, herbs and spices, and the classic Old Bay seasoning, these vegetarian zucchini crab cakes are bursting with so much flavor that you won't even miss the crab. They're perfect for vegetarians, but anyone could enjoy them as a delicious appetizer or snack!

    Vegetarian Zucchini Crab Cakes on a white plate with chopped parsley.

    Mock Crab Cakes Can Be Just as Tasty

    Vegetarian crab cakes can be just as delicious as the seafood kind. The patty stays in tact really well and they have a meaty texture to them. And they're cheaper, too--no need to buy expensive crab cuts at the supermarket. These zucchini mock crab cakes, though plant-based and dairy free, are easy, tasty and filling.

    At first glance, zucchini might seem like a strange substitute for crab. But like most vegetables, zucchini can replace just about anything (as you can see in these keto zucchini 'noodles') if you've got the right seasoning. The Old Bay seasoning out of Maryland, typically used in seafood dishes, gives it that perfect "crab cake" flavor.

    They also look just like crab cakes, and they're prepared in the same way. In fact, if you give them to your family members without saying anything, they might not even notice the difference!

    It's the perfect way to use up garden produce and get more vegetables and fiber into your diet without sacrificing the taste of your favorite foods. These vegetarian corn nuggets are also great for this purpose.

    Another bonus? You can do all of the prep work ahead of time and chill until you're ready to fry them up, perfect for stress-free entertaining.

    [feast_advanced_jump_to]

    Ingredients

    Vegetarian zucchini crab cakes ingredients prepped and labeled.
    • zucchini - The zucchini will be shredded and moisture removed to mimic the crab meat.
    • eggs - To bind it all together.
    • breadcrumbs - Breadcrumbs aren't just for bulking up the crab cake. They will help them to keep their shape, and give the cakes some nice crispy crunch on the exterior.
    • mayonnaise - Mayo makes 'crab' cakes moist, tender and flavorful. It also helps bind the ingredients.
    • Old Bay seasoning - Old Bay seasoning is a staple of crab cakes. It's a blend of herbs and spices such as celery salt and paprika.

    *Check recipe card for ingredient amounts.

    How to Make Vegetarian Zucchini Crab Cakes

    Shredded zucchini in mesh strainer.

    Step 1. Remove moisture. Drain moisture from the shredded zucchini by pressing against it in a strainer.

    Uncooked zucchini crab cake mixture in bowl.

    Step 2. Combine. Mix the zucchini with the other ingredients in a bowl.

    Zucchini crab cake mixture formed into 3" circles on cutting board.

    Step 3. Use the mold. Place a 3" mold on wax paper and spoon the mix into the mold (around ½ inch thick). Remove the mold to release the cake and repeat.

    Zucchini crab cakes frying in pan with hot oil.

    Step 4. Transfer to pan. In a frying pan over medium heat, add the canola oil. Once hot, transfer the zucchini crab cakes to the frying pan with a spatula.

    Chef's Note: Make sure you add the cakes to the frying pan away from you and gently to avoid getting splashed with hot oil. Also, don't crowd the pan or the heat will lower and they won't brown or crisp up as nicely!

    Golden zucchini crab cakes in pan with hot oil.

    Step 5. Fry. Cook for about 3 minutes per side or until golden and cooked through.

    Zucchini crab cakes stack on plate and on a fork.

    Step 6. Serve. Transfer the zucchini crab cakes to a baking grid to cool for a couple of minutes. Serve with fresh parsley and tartar sauce.

    Serving Suggestions

    Sauces. Crab cakes are traditionally served with a dollop of tartar sauce. If you're having guests over, you might want to add a few other accents to spruce up their plate such as my honey dill sauce or tomatillo hot sauce. An artistic drizzle of sauce can also help turn your plate into a restaurant-quality dish.

    Garnishes. You can add cut lemon wedges on the side for a pop of zesty taste--just like you would with traditional seafood--and decorate the plate with sprigs of parsley.

    Alcohol. If you're serving alcohol, try finding a wine or an artisanal beer that pairs with traditional crab cakes like champagne or pilsners. You could also try this mango ginger cocktail that is fruity and tropical and contains dark rum--a classic pairing with crab cakes.

    Add ins. You can even experiment by adding different vegetables, like corn or diced tomatoes.

    Veggie burgers. If you have leftovers, these zucchini cakes work great as a veggie burger!

    Vegetarian Zucchini Crab Cakes FAQs

    How long do leftovers keep?

    They should keep covered in the fridge for up to 5 days.

    Can they be frozen?

    Yes, for up to 3 months. For best results, transfer them to a freezer bag once cooled.

    How do you reheat them?

    Reheat them in the oven at 350ºF for about 10 minutes, until heated through. I recommend putting them on an oven-safe baking grid over a sheet pan to keep the top and bottom nice and crisp.

    Can you make them ahead of time before frying?

    Yes! After forming the zucchini cakes, keep them covered in the fridge for up to 1 day before frying.

    Can you make them keto friendly?

    Yes, you can. Swap out the breadcrumbs for a low-carb alternative such as crushed pork rinds, coconut flour or almond meal.

    Vegetarian zucchini crab cakes stacked on top of each other on a plate with a spoon of tartar sauce.

    More Fun & Flavorful Appetizers to Try

    • Buffalo chicken dip with green onions in serving dish.
      Easy Slow Cooker Buffalo Chicken Dip
    • Red wine cheese dip in mini slow cooker.
      Red Wine & Cheese Dip (for Mini Slow Cooker)
    • Baked taco cups in white dish with lentils on decorative cloth.
      Mini Taco Cups
    • 4th of July themed charcuterie board on red plate with red, white and blue stars.
      4th of July Charcuterie Board

    If you tried this Vegetarian Zucchini Crab Cakes Recipe or any other recipe on my website, please leave a 🌟 star rating and let me know how it went in the 📝 comments below. And please share the recipe!

    📋Recipe

    Vegetarian zucchini crab cakes stacked with a dollop of tartar sauce.
    Print Pin
    5 from 3 votes

    Vegetarian Zucchini 'Crab' Cakes

    With fresh zucchini, herbs and spices, these vegetarian zucchini crab cakes are bursting with so much flavor that you won't even miss the crab.
    Course Appetizer, Snack
    Cuisine American
    Diet Vegetarian
    Prep Time 14 minutes minutes
    Cook Time 6 minutes minutes
    Total Time 20 minutes minutes
    Servings 12 cakes
    Calories 173kcal
    Author Joss Dyckson

    Equipment

    • Fine mesh strainer
    • Cookie mold (3")

    Ingredients

    • 3 cups zucchini shredded
    • 3 eggs
    • 1 ½ cups breadcrumbs plain
    • 1 ½ tablespoons mayonnaise
    • 2 teaspoons Old Bay seasoning
    • ½ teaspoon salt
    • ½ teaspoon ground black pepper
    • ½ cup canola oil for frying
    • 1 tablespoon fresh parsley finely chopped
    • tartar sauce to serve
    US Customary - Metric

    Instructions

    • Place the shredded zucchini in a strainer and press with a fork or the back of a spoon to drain as much water as possible.
      3 cups zucchini
    • Mix the zucchini with the eggs, breadcrumbs, mayo, seasoning, salt and pepper in a bowl.
      3 eggs, 1 ½ cups breadcrumbs, 1 ½ tablespoons mayonnaise, 2 teaspoons Old Bay seasoning, ½ teaspoon salt, ½ teaspoon ground black pepper
    • Lay a piece of wax paper out on your work surface. Place the mold on the wax paper and spoon the mix into the mold (around ½ inch thick). Remove the mold to release the cake and repeat until all of the mixture has been used.
    • Heat a frying pan to medium heat (or 300°F in an electric skillet) and add the canola oil.
      ½ cup canola oil
    • Use a spatula to release the zucchini cake from the wax paper. Transfer to the frying pan. (Add the cakes to the frying pan away from you and gently to avoid getting splashed with hot oil.)
    • Cook for about 3 minutes or until golden on the bottom. Carefully flip them over using tongs. Fry for around 2 to 3 more minutes or until golden on both sides and cooked through.
    • Remove them to a baking grid with paper towel underneath it. Cool for a couple of minutes.
    • Serve with fresh parsley and tartar sauce.

    Notes

    • Add ins: You can experiment by adding different vegetables, like corn or tomatoes but don't over do it or they might not stay together as well. They can be served with lemon wedges on the side.
    • Drink pairing: If you're serving alcohol, try finding a wine or an artisanal beer that pairs with traditional crab cakes like champagne or pilsners.
    • Reheating: If you have leftovers, these zucchini cakes even work great as a veggie burger! The patty stays in tact really well and they have a meaty texture to them. Just reheat them in the oven at 350ºF for about 10 minutes, until heated through. I recommend putting them on an oven-safe baking grid over a sheet pan to keep them crisp.
    • Make ahead: You can do all of the prep work ahead of time. After forming the zucchini cakes, keep them covered in the fridge for up to 1 day before frying.
    • Fridge storage: Keep leftovers refrigerated in an airtight container for up to 5 days. 
    • Freezer storage: They can be frozen for up to 3 months. For best results, transfer them to a freezer bag once cooled.
    • Keto friendly: Swap out the breadcrumbs for a low-carb alternative such as crushed pork rinds, coconut flour or almond meal.

    Nutrition

    Calories: 173kcal | Carbohydrates: 12g | Protein: 4g | Fat: 13g | Saturated Fat: 1g | Cholesterol: 42mg | Sodium: 209mg | Potassium: 135mg | Fiber: 1g | Sugar: 2g | Vitamin A: 247IU | Vitamin C: 7mg | Calcium: 47mg | Iron: 1mg

    Electric Skillet Honey-Mustard Glazed Salmon

    August 22, 2020 by Joss Dyckson 2 Comments

    Are you looking for an easy 15-minute dinner? Try out this delicious electric skillet honey-mustard glazed salmon.

    The wild salmon is glazed with a quick, homemade, whole grain mustard and honey sauce, cooked in an electric frying pan and garnished with fresh parsley. Serve it with rice, potatoes, salad, roasted vegetables or your favorite side dish.

    Wild salmon with fresh parsley and tomatoes on a plate with a fork.
    Wild salmon with fresh parsley and tomatoes on a plate with a fork and yellow dish towel.

    This is a great family dinner that we serve often in our house for its simplicity, health and flavor. Some of the health benefits of salmon include decreased inflammation, the ability to lower blood pressure and improved cell function.

    Wild salmon with fresh parsley and tomatoes on a plate.
    Wild salmon with fresh parsley and tomatoes on a plate with a fork.
    Wild salmon with fresh parsley and tomatoes on a plate with a fork.

    Honey-mustard salmon just tastes great! And the electric skillet need not only be used in the kitchen. They are great for taking camping as well, as long as you have a serviced campsite or room in the RV.

    This recipe uses basic ingredients and takes only 15 minutes to make, which gives you more time to enjoy the scenery and relax on your trip without compromising good eats.

    If you have leftovers, chop it up and make a salmon pasta salad. You could also try it with this Manitoba honey dill sauce.

    Did you give this salmon recipe a go? Let us know how it turned out in the comments and if you enjoyed it, please share!

    Hungry for more? Try our Vegetarian Zucchini 'Crab' Cakes

    📋Recipe

    Wild salmon with fresh parsley and tomatoes on a plate with a fork.
    Print Pin
    5 from 1 vote

    Electric Skillet Honey-Mustard Glazed Salmon

    Are you looking for an easy 15-minute dinner? Try out this delicious electric skillet honey-mustard glazed salmon.
    Course Main Course
    Cuisine American
    Prep Time 5 minutes minutes
    Cook Time 10 minutes minutes
    Total Time 15 minutes minutes
    Servings 4
    Calories 236kcal
    Author Joss Dyckson

    Equipment

    • Electric Skillet

    Ingredients

    • 1 pound wild salmon fillets with skin
    • 3 tablespoons whole grain mustard
    • 3 tablespoons liquid honey
    • 1 tablespoon olive oil
    • ¼ cup fresh parsley chopped
    • Salt and pepper to taste
    US Customary - Metric

    Instructions

    • Heat electric skillet to 325ºF. In a bowl, mix the mustard and honey. Reserve half of it for serving.
    • Brush the other ½ of the honey-mustard glaze over the top of the salmon fillets (not the skin side).
    • Grease the electric skillet with olive oil and add the salmon fillets, skin side down.
    • Cover and cook for 10-12 minutes (or until desired doneness).
    • Serve with chopped fresh parsley and the rest of the honey-mustard glaze.

    Notes

    • Serve it with rice, potatoes, salad, roasted vegetables or your favorite side dish.
    • Electric skillets are great for taking camping, as long as you have a serviced campsite or room in the RV.
    • Store leftovers in a covered container in the fridge for up to 3 to 4 days.

    Nutrition

    Calories: 236kcal | Carbohydrates: 10g | Protein: 23g | Fat: 11g | Saturated Fat: 2g | Cholesterol: 62mg | Sodium: 178mg | Potassium: 592mg | Fiber: 1g | Sugar: 9g | Vitamin A: 361IU | Vitamin C: 5mg | Calcium: 25mg | Iron: 1mg

    Tomato Watermelon Gazpacho Soup

    August 19, 2020 by Joss Dyckson 1 Comment

    Cool, light, sweet, and refreshing - this tomato and watermelon gazpacho soup is the perfect appetizer for summer! From ice cream to backyard barbecues, summer really is one of the best times to be a foodie. If you're both adventurous in pallet and looking for a new way to cool off, try out this delicious, vegan recipe.

    Watermelon gazpacho in a glass jar with a spoon, held in hands.
    [feast_advanced_jump_to]

    🍉 Summer in a Bowl - Fresh Gazpacho with a Juicy Twist

    Unlike a hot bowl of roasted garlic tomato soup, this variation is served cold. It took me a few tries to get used to the temperature of a gazpacho and to really appreciate how it transforms the flavor, and I'm glad I gave it a chance because it's delicious and refreshing.

    My take on the appetizer using watermelon, tomatoes and other fresh vegetables is the perfect way to spice up and cool down a hot summer. And if you need to cool down any further with something watermelon-flavored, try this frozen watermelon cocktail.

    It might sound like an odd combination but the watermelon adds a touch of natural sweetness to balance the acidity of the tomatoes. Not only that, but watermelon is THE fruit of the summer, giving the cold soup another layer of summery freshness.

    A piece of grilled bread is just right for scooping and savoring every spoonful. Enjoy!

    🍅 Ingredients

    Watermelon gazpacho ingredients labeled on wooden background.
    • cubed watermelon - If you're unsure how, see my easy tutorial for how to cube watermelon.
    • cucumber - I use English cucumbers because they are easy to find, have a thin skin and clean flavor.
    • tomatoes - Roma tomatoes work great for this recipe because of their meaty texture, lower amount of seeds and garden-fresh flavor. The more ripe, the better flavor.
    • green onions - Also called scallions.
    • lemon juice - I always use freshly squeezed.
    • olive oil - Use extra virgin olive oil for best quality.

    *Check recipe card for ingredient amounts.

    📖 Recipe Tweaks

    • Old method: For another take on how to make this dish, if you'd prefer a bit more texture in the finished product or if you simply don't have a blender, you can try the old method of grinding the ingredients in a mortar.
    • Traditional garnish: If you're thinking about dressing things up a little more, one tasty but less vegan way to do this would be with the addition of some thinly sliced ham. This is a traditional garnish for gazpacho and really goes well with the watermelon flavor in this take on the recipe. It's also a soft contrast to the crunchier bits of vegetable that are also on top of the dish.
    • Spice it up: For a spicy variation, try adding some cayenne pepper or blending in a couple of chili peppers to the mix.

    🥣 How to Make Watermelon Gazpacho

    Watermelon gazpacho ingredients in blender.

    Blend ingredients. All you need to do is process the ingredients in a blender, season and then chill in the fridge for a few hours. I like to chill it right in the blender: just pop the lid on and transfer to the fridge and then it's easy to pour into bowls later.

    Watermelon tomato gazpacho in small jars.

    Serve. This tomato watermelon gazpacho soup is served as an appetizer, so use small bowls for serving. Garnish with the diced vegetables and drizzle a little more olive oil on top.

    Chef's Note: For an even smoother texture, strain the gazpacho through a fine mesh sieve after blending.

    ✅ Joss' Tips

    • Make sure to buy seedless watermelons--or remember to remove the seeds before blending!
    • Chopping the vegetables before you blend, while it's a little extra prep, will give you a more smooth gazpacho.
    • Don't over-blend or it can become foamy.
    • Another fun way to serve this watermelon gazpacho as an appetizer is in shooter glasses.
    • Don't skip the chilling step! It gives the flavors time to mix and develop. Optionally, you can chill the bowls ahead of time.

    ❓ Tomato Watermelon Gazpacho Soup FAQs

    What is watermelon gazpacho?

    Watermelon gazpacho is a variation of the cold, raw, Spanish soup that's traditionally made with tomatoes. Simple and made with fresh ingredients, it's easy enough for anyone to make and good for you, too!

    How do you store the leftovers?

    To store any leftovers you might have, just seal up the serving jars with a lid or plastic wrap and place them in the fridge. They'll keep for 3 to 5 days like this and even longer if you freeze them. Stir well before serving.

    What do you serve it with?

    You can serve gazpacho with crackers and breads like garlic bread, cheesy bread or toast points that are perfect for soup. Try some toppings like herbs, slices of hard-boiled eggs, chopped nuts etc.

    Watermelon gazpacho in a glass jar.

    ❤️ More Watermelon Recipes You Will Love

    • Fruit salad in a glass dish on white tile.
      How to Make Fruit Salad
    • Blackberry smoothie bowl with fruit and seed toppings and a watermelon popsicle.
      Blackberry Watermelon Smoothie Bowl
    • Watermelon salad with basil in black salad bowl.
      Watermelon Basil Salad
    • Tuna watermelon tartare on clear glass plate.
      Tuna and Watermelon Tartare

    If you tried this Tomato Watermelon Gazpacho Soup Recipe or any other recipe on my website, please leave a 🌟 star rating and let me know how it went in the 📝 comments below. And please share the recipe!

    📋Recipe

    Tomato & Watermelon Gazpacho Soup in a small, wide jar.
    Print Pin
    5 from 2 votes

    Tomato & Watermelon Gazpacho Soup

    Cool, light, sweet, and refreshing - this tomato and watermelon gazpacho soup is the perfect appetizer for summer! Simple and made with fresh ingredients, it's easy enough for anyone to make.
    Course Appetizer, Soup
    Cuisine Spanish
    Diet Low Salt
    Prep Time 15 minutes minutes
    Chill Time 3 hours hours
    Total Time 3 hours hours 15 minutes minutes
    Servings 4
    Calories 186kcal
    Author Joss Dyckson

    Equipment

    • Blender

    Ingredients

    • 4 cups watermelon seedless, cubed
    • 1 cucumber diced (reserve half)
    • 3 Roma tomatoes quartered
    • 1 red bell pepper diced (reserve half)
    • ½ cup green onions chopped (reserve half)
    • 1 garlic clove peeled
    • 3 tablespoons lemon juice
    • 3 tablespoons extra virgin olive oil
    • salt and pepper to taste
    US Customary - Metric

    Instructions

    • Process all ingredients in a blender until smooth (except for the reserved vegetables). Season with salt and pepper, to taste. Optional: Strain the mixture through a fine mesh strainer if you would like it to be smoother.
    • Chill for 3 to 4 hours.
    • Serve in small bowls. Garnish with the reserved vegetables and drizzle a little more olive oil on top.

    Notes

    • For another take on how to make this dish, if you'd prefer a bit more texture in the finished product or if you simply don't have a blender, you can try the old method of grinding the ingredients in a mortar.
    • Don't over-blend or it can become foamy.
    • My post on how to slice watermelon 3 ways: triangles, cubes & sticks is helpful for this recipe.
    • You can serve gazpacho with crackers and breads like garlic bread, cheesy bread or toast points. Try some toppings like herbs, slices of hard-boiled eggs, chopped nuts etc.
    • To store any leftovers you might have, just seal up the serving jars with a lid or plastic wrap and place them in the fridge. They'll keep for 3 to 5 days like this and even longer if you freeze them.

    Nutrition

    Calories: 186kcal | Carbohydrates: 20g | Protein: 3g | Fat: 12g | Saturated Fat: 2g | Sodium: 11mg | Potassium: 600mg | Fiber: 3g | Sugar: 15g | Vitamin A: 2743IU | Vitamin C: 72mg | Calcium: 39mg | Iron: 1mg

    Simple Honey Dill Sauce

    August 15, 2020 by Joss Dyckson 3 Comments

    This simple, homemade, honey dill sauce takes less than 5 minutes to prepare and is perfect for dipping your chicken fingers, French fries and veggies into. It's my recreation of the famous Manitoba sauce.

    Honey dill sauce in small jar with mini serving spoon, fresh dill on the side.

    ✔️ Tried & True Copycat Honey Dill

    To this day, my most ordered meal at restaurants is the chicken finger meal, and I almost always order it with honey-dill (if available). I first tried honey-dill dip at a family restaurant when I was a kid and this recipe is basically a re-creation of that, from what I can remember!

    I have tried other copycat versions but they just didn't taste the way I remember, so I came up with my own. I personally like using fresh dill instead of dried and love the simplicity of the basic 3 ingredients in this recipe. The sweetness perfectly complements the saltiness of the crispy, chicken fingers.

    You can buy versions of the sauce in-store, but I don't see the point when it's so easy, cheap and quick to make at home.

    ⭐ I also have this red wine cheese dip and easy xo sauce you might like.

    Featured Comment

    From Berni: ⭐⭐⭐⭐⭐ "Just made this and Im in heaven. Simply perfect."

    [feast_advanced_jump_to]

    🍁 About the Famous Sauce

    Honey-dill sauce was created at a restaurant in Manitoba, Canada--called 'Mitzi's'-- for dipping chicken fingers and fries into. It is said to have been made by mistake while trying to copy the sauce from another restaurant, by memory, but everyone was raving about it and so it was here to stay.

    🍯 Ingredients

    Honey dill sauce ingredients labeled on white wooden background.

    My version of this honey dill dip requires only 3 ingredients:

    • mayonnaise - I use full fat but you can use light if desired.
    • honey - Make sure to use liquid honey.
    • fresh dill - Chop the dill nice and finely (check out how to chop dill here). I use fresh if it's available over dried to get that full dill flavor in the dip.

    *You can check ingredient amounts in recipe card.

    📖 Variations

    • ➕ Add-Ins: Some variations include adding some lemon juice and mustard powder for some extra zing. Personally, I like it without but you're welcome to experiment.
    • 🔁 Dried Dill Substitution: Dried dill can also be used in place of fresh, but be sure to lower the amount as dried is more potent. 1 tablespoon fresh dill = 1 teaspoon dried dill.
    • 💚 Vegan: If you are looking for a vegan version of this dip, try using vegan mayo with agave nectar instead. I find agave to be a great substitute for honey in a lot of recipes.
    • 🥣 From Scratch Mayo: This is a very easy and quick recipe to whip up, but if you're feeling like going the extra mile, you can make your very own mayo from scratch.

    🥣 How to Make Honey Dill Sauce

    Honey dill sauce ingredients in small glass bowl.

    Step 1. Add Ingredients. Add all of the ingredients to a small bowl.

    Honey dill sauce in bowl with whisk.

    Step 2. Whisk. Whisk together until smooth and fully combined.

    Honey dill sauce in small jar.

    Step 3. Serve. Use as a dipping sauce for chicken fingers, fries, etc. That's it!

    🍟 Serving Suggestions

    • This sauce was created for the purpose of dipping chicken fingers and fries into but it also tastes amazing with veggies (celery, carrot sticks, cucumbers).
    • For something a little different from your classic potato fries, try it with these turnip fries.
    • It also tastes amazing with salmon.
    • What else can you use for dipping? Try some homemade corn nuggets.

    ❓ Recipe FAQs

    How long does this dipping sauce last?

    Store in a jar, squeeze bottle or other air-tight container in the refrigerator for up to one week.

    Who invented honey dill dipping sauce?

    It was invented at Mitzi's Chicken Finger Restaurant in Winnipeg, Manitoba. It is a Canadian condiment.

    Can you freeze it?

    It's not ideal to freeze mayo-based sauces because they will separate once thawed.

    Can I make honey dill sauce without mayonnaise?

    You can, but it won't taste as much like the original sauce. The closest ingredient match to mayo for this recipe would be plain Greek yogurt.

    Honey dill sauce in small jar with mini serving spoon.

    ❤️ More Dill Recipes You Will Love

    • Dill pickle cream cheese bagel spread on bagel and in small glass dish on cutting board.
      Dill Pickle Cream Cheese
    • Roasted white asparagus with capers and fresh dill.
      Roasted White Asparagus
    • Red lentil and dill soup in bowl.
      Easy Red Lentil Soup
    • Mediterranea meatballs with fresh dill pesto on plate.
      Cake Pop Maker Mediterranean Meatballs

    If you tried this Honey Dill Sauce Recipe or any other recipe on my website, please leave a 🌟 star rating and let me know how it went in the 📝 comments below. And please share the recipe!

    📋Recipe

    Honey dill sauce in small jar with mini serving spoon.
    Print Pin
    5 from 5 votes

    Simple Honey Dill Sauce

    This easy-to-make honey dill sauce is perfect as a dip for chicken fingers, veggies and fries, or even as a salad dressing! It's my recreation of the famous Manitoba sauce.
    Course Condiment, Sauce
    Cuisine Canadian
    Diet Vegetarian
    Prep Time 5 minutes minutes
    Total Time 5 minutes minutes
    Servings 15 tablespoons
    Calories 83kcal
    Author Joss Dyckson

    Ingredients

    • ¾ cup mayonnaise
    • 2 tablespoons honey
    • 1 tablespoon fresh dill finely chopped
    US Customary - Metric

    Instructions

    • Whisk all sauce ingredients together in a small bowl.
      ¾ cup mayonnaise, 2 tablespoons honey, 1 tablespoon fresh dill
    • Use as a dipping sauce for chicken fingers, fries, etc.

    Notes

    • Store in a jar or air-tight container in the refrigerator for up to one week.
    • Some variations of the honey dill sauce include adding some lemon juice and mustard powder for some extra zing. Personally, I like it without but you're welcome to experiment.
    • Dried dill can also be used in place of fresh, but be sure to lower the amount as dried is more potent. 1 tablespoon fresh dill = 1 teaspoon dried dill.

    Nutrition

    Calories: 83kcal | Carbohydrates: 2g | Protein: 1g | Fat: 8g | Saturated Fat: 1g | Cholesterol: 5mg | Sodium: 72mg | Potassium: 7mg | Fiber: 1g | Sugar: 2g | Vitamin A: 83IU | Vitamin C: 1mg | Calcium: 3mg | Iron: 1mg

    Grilled Halibut Tacos

    August 12, 2020 by Joss Dyckson 1 Comment

    These grilled halibut tacos are filled with fresh halibut and loaded with salsa, vegetables, and spices to make a flavorful entrée that's as colorful as it is delicious. The halibut takes up the bright flavors of the Mexican-spiced lime marinade and smoky flavor from the grill.

    Halibut tacos with salsa, mango and fresh veggies on plate.
    [feast_advanced_jump_to]

    Street-Style Halibut Tacos You Can Make at Home

    Think of the best tacos you've ever had in your life. Not the frozen beef tacos you bought from the grocery store, but the spicy, sizzling, flavor-packed fish tacos you bought from a street vendor or an authentic Mexican restaurant.

    Now imagine making tacos of that caliber at home--no restaurant trip or week-long vacation required. That's where this taco recipe comes in. They are absolutely delicious! I also make these ground bison tacos and kimchi fish tacos that are delicious too.

    When you're preparing a light, flaky fish, you want a salsa verde that's spicy and savory but not overpowering.

    This salsa verde was specially formulated to go well with the grilled halibut but it is optional if you're pressed for time. It also goes amazingly with my slow cooker Mexican shredded chicken recipe.

    The salsa can be made a few days in advance but you can of course use store-bought salsa verde to save on time. As another bonus, fish is quicker to cook than other proteins like chicken and beef!

    Ingredients

    For the Salsa Verde (Optional)

    Grilled halibut taco salsa ingredients prepped and labeled.
    • tomatillos - Tomatillos are little green tomato-looking fruits with a husk. You will need to remove the husks before roasting. I have a collection of tasty tomatillo recipes if you're curious about this ingredient.
    • yellow onion - You can also use white onion instead of the yellow.
    • garlic cloves - Roasting the garlic for this salsa gives it amazing flavor.
    • olive oil - Just regular olive oil works because we are roasting with it. No need for EVOO.
    • fresh cilantro leaves - I love using cilantro in many recipes. There are some people who despise cilantro, and it's okay to skip them from this salsa if needed.
    • serrano pepper - You can substitute with jalapeño peppers if you can't find serrano; I find that they are easier to find in the grocery store. Serrano peppers are similar in taste but thinner and hotter than jalapeños.

    For the Tacos

    Halibut taco ingredients prepped and labeled.
    • Mexican seasoning mix - If you can't find Mexican seasoning, you can use taco seasoning. It's pretty close in flavor and spices used.
    • halibut fillets - Halibut is a large, flat-bodied fish with a very mild, slightly sweet flavor, which makes it an excellent choice for anyone who doesn't like a strong fishy taste. The texture is firm and dense and it holds together well during cooking, which is one reason it is in my top 3 favorite fish to cook with and eat. However, it's expensive! If you don't want to break the bank, go with haddock or cod.
    • corn tortillas - 6 inch tortillas work great. You can also use flour tortillas or a corn-flour mix if preferred.
    • red cabbage - The shredded cabbage adds nice crunch and color to the tacos. Check out how to shred cabbage for tacos here or some more raw purple cabbage recipes.
    • mango - Mango might seem like an unusual ingredient for grilled halibut tacos, but it adds the perfect burst of sweetness to an otherwise meaty, spicy dish. Spicy food is complemented by cold condiments and side dishes.

    *Check recipe card for full ingredient amounts.

    How to Make Grilled Halibut Tacos

    For the Salsa Verde (Optional)

    If you've never made salsa verde before (green salsa), it might seem a little intimidating, but it's actually quite a simple process: simply roast the vegetables, mix them together in your food processor, and you're ready to go.

    Tomatillos, onions and garlic on sheet pan drizzled with olive oil.

    Roast the vegetables. You are going to drizzle the tomatillos, onion and garlic with olive oil and cover with foil. Bake until tender and then let them cool.

    Cooked tomatillo salsa ingredients in food processor.

    Blend. Transfer the vegetables to a food processor or blender. Add the cilantro, serrano pepper and lime juice. Cover and pulse until chunky. Season and refrigerate until serving time.

    Chef's Note: This salsa can be made in advance as it generally lasts up to 7 days in the fridge if covered well. It can also be frozen for up to 2 months.

    For the Tacos

    Halibut in marinade in zip-top bag.

    Marinate the halibut. In a large plastic bag or in a bowl if you prefer, add the marinade ingredients and shake to combine. Add the halibut, making sure to coat all of the fish well, seal and refrigerate for up to 1 hour.

    Halibut fillets on the outdoor grill.

    Grill the halibut. Lightly oil the cooking grates to make sure the fish doesn't stick! Grill the halibut over medium-high heat for 4-6 minutes on each side or until the fish flakes easily with a fork. Remove and let rest for a few minutes.

    Chef's Note: Keep an eye on it because fish cooks quickly!

    Corn tortillas on the outdoor grill.

    Warm tortillas. Warm the tortillas by heating them on the grill over medium-low heat.

    Grilled halibut flaked on a cutting board.

    Season and flake the fish. Season the fish again, if needed and flake into 1 ½" pieces.

    Chef's Note: For alternatives to warming the tortillas, check out this post: How to Warm Corn Tortillas

    Halibut tacos on plate with green salsa on the side.

    Serve the grilled halibut tacos. To serve the grilled halibut tacos, top the warmed tortillas with the cabbage, fish, diced mango and tomatillo salsa. Garnish with red chili peppers, lime wedges and more fresh cilantro.

    Joss' Top Tips

    • Don't over marinate. Don't marinate the fish for more than 1 hour or the fish will start to break down.
    • Prevent sticking. Don't forget to oil those cooking grates because the fish can easily stick and turn into a mess. Avoid moving the fish too soon to allow a crust to form.
    • Use a fish spatula. It's thinner and more flexible, making it easier to flip the fish.
    • Keep the tortillas warm. After heating them on the grill, you can keep the tortillas warm on a plate, covered with a clean kitchen towel.

    What do you Serve With Halibut Fish Tacos?

    • Many people serve their grilled halibut tacos with sour cream, but you could also serve a Mexican pasta salad, corn pudding or a summery cold soup like watermelon gazpacho.
    • Make sure you've got plenty of milk on hand for your friends who aren't used to spicy dishes.
    • If you aren't making the tomatillo salsa, you could try different sauces like my tomatillo hot sauce, this lime sauce for fish tacos or even a honey dill sauce. Experiment with it.
    • Some sides that would complement halibut tacos well are guacamole, Caesar salad, coleslaw, cucumber salad, white queso dip, cilantro-lime rice and grilled corn. I have a recipe tutorial on how to grill corn to make it easy for you.
    • Creamy desserts go well with these flavor-packed tacos. You might consider serving a traditional Mexican dish like flan or something entirely different like this mochi ice cream. The sweeter and creamier, the better--after those delicious sizzling tacos, your guests will appreciate something a little milder.
    • As for drinks: try a light beer, this strawberry frozen margarita recipe or sauvignon blanc. For a non alcoholic option, try this mojito mocktail that complements the tacos perfectly.

    Grilled Halibut Tacos FAQs

    What temperature should halibut be grilled at?

    Halibut should be grilled over medium or medium-high heat. You don't want it to be on the grill too long or it can dry out, so a quick cook is ideal. Foodsafety.gov recommends cooking white fish to an internal temperature of 145°F.

    How long can you store grilled halibut tacos in the fridge?

    If you have leftovers, cooked fish will last up to 3 to 4 days in the fridge, according to USDA.

    Can I use frozen halibut for tacos?

    Yes! Make sure to fully thaw it in the fridge and then pat dry with clean paper towel.

    Halibut tacos on a brown serving plate with tomatillo salsa, mango, lime and red cabbage.

    More Delicious Seafood Recipes You Will Love

    • Bacon wrapped scallops with parsley on blue plate.
      Bacon Wrapped Scallops (Oven)
    • Salmon fillet with grilled lemon slices on top.
      How to Cook Salmon with Skin (Crispy)
    • Tom yum soup with shrimp in bowls.
      Thai Tom Yum Seafood Soup
    • Creamy tuna macaroni casserole in baking dish.
      Creamy Tuna Macaroni Casserole

    If you tried this Grilled Halibut Tacos Recipe or any other recipe on my website, please leave a 🌟 star rating and let me know how it went in the 📝 comments below. And please share the recipe!

    📋Recipe

    Grilled halibut tacos on brown serving tray.
    Print Pin
    5 from 2 votes

    Grilled Halibut Fish Tacos

    These grilled halibut tacos are filled with fresh halibut and loaded with salsa, vegetables, and spices to make a flavorful entrée that's as colorful as it is delicious. The halibut takes up the bright flavors of the Mexican-spiced lime marinade and smoky flavor from the grill.
    Course Main Course
    Cuisine Mexican
    Diet Low Salt
    Prep Time 15 minutes minutes
    Cook Time 40 minutes minutes
    Marinating Time 1 hour hour
    Total Time 1 hour hour 55 minutes minutes
    Servings 8 tacos
    Calories 187kcal
    Author Joss Dyckson

    Equipment

    • Outdoor grill
    • Food processor or blender

    Ingredients

    For the Salsa Verde (Optional)

    • 1 pound tomatillos husks removed and sliced in half
    • 1 yellow onion sliced
    • 4 garlic cloves peeled
    • 2 tablespoons olive oil
    • ½ cup fresh cilantro leaves
    • 1 serrano pepper seeded
    • 1 tablespoon lime juice
    • salt and pepper to taste

    For the Halibut Tacos

    • ¼ cup lime juice freshly squeezed
    • ¼ cup olive oil
    • 3 tablespoons Mexican seasoning mix or taco seasoning
    • 1 pound halibut fillets
    • 8 corn tortillas 6 inches--or flour tortillas if preferred
    • 2 cups red cabbage shredded
    • 1 cup mango diced
    • red chili pepper sliced, to garnish
    • sour cream optional topping
    • salt and pepper
    US Customary - Metric

    Instructions

    For the Salsa Verde (Optional)

    • Preheat oven to 325°F. Place the tomatillos, onion and garlic on a baking pan. Drizzle with the olive oil and cover with foil. Bake until tender (about 30 mins.). Cool to room temperature.
      1 pound tomatillos, 1 yellow onion, 4 garlic cloves, 2 tablespoons olive oil
    • Transfer the cooked vegetables to a food processor or blender. Add the cilantro, serrano pepper and lime juice. Cover and pulse until chunky. Season with salt and pepper. Refrigerate until serving.
      ½ cup fresh cilantro leaves, 1 serrano pepper, 1 tablespoon lime juice

    For the Grilled Halibut Tacos

    • In a large plastic bag, add the lime juice, oil, salt, and Mexican seasoning mix and shake to combine. Add the halibut fillets. Seal the bag and turn to coat the fish evenly. Refrigerate for up to 1 hour.
      ¼ cup lime juice, ¼ cup olive oil, 3 tablespoons Mexican seasoning mix, 1 pound halibut fillets
    • Drain and discard the marinade. Lightly oil the cooking grates. Grill the halibut over medium-high heat for 4-6 minutes on each side or until the fish flakes easily with a fork. Keep an eye on it as it cooks quickly. Remove to a cutting board and let rest for a few minutes. Season again, if needed.
    • Meanwhile, warm the tortillas by heating the grill to medium-low. Grill them until warm, about 1 minute per side or less. You can keep them warm on a plate, covered with a clean kitchen towel.
      8 corn tortillas
    • Flake the fish into 1 ½" pieces.
    • To serve, top the tortillas with the cabbage, fish, diced mango and tomatillo salsa. Garnish with red chili peppers, lime wedges and more fresh cilantro.

    Notes

    • You can use store-bought salsa verde to save on some time if you prefer. The homemade salsa can be pre-made and refrigerated for up to 1 week or frozen for up to 2 months.
    • You can use frozen halibut, but make sure to fully thaw it in the fridge and then pat dry with clean paper towel.
    • Don't marinate the fish for more than 1 hour or the fish will start to break down.
    • If you have leftovers, cooked fish will last up to 3 to 4 days in the fridge.
    • Halibut should be grilled over medium or medium-high heat. You don't want it to be on the grill too long or it can dry out, so a quick cook is ideal. Foodsafety.gov recommends cooking white fish to an internal temperature of 145°F.

    Nutrition

    Calories: 187kcal | Carbohydrates: 22g | Protein: 13g | Fat: 6g | Saturated Fat: 1g | Polyunsaturated Fat: 1g | Monounsaturated Fat: 3g | Cholesterol: 28mg | Sodium: 134mg | Potassium: 571mg | Fiber: 4g | Sugar: 7g | Vitamin A: 738IU | Vitamin C: 30mg | Calcium: 48mg | Iron: 1mg

    Puerto Rican Tripleta Sandwich

    August 5, 2020 by Joss Dyckson 8 Comments

    Piled high with meat, cheese, and fresh vegetables, the tripleta sandwich is a Puerto Rican standard that puts a new twist on the classic Cuban sandwich. The tripleta combines 3 meats (hence the name): cold lunch meat with cooked pork and chicken to make a hot, filling sandwich that's practically spilling over with ingredients.

    Tripleta sandwiches and chips.

    🌯 About the Tripleta

    It's basically a meaty sub sandwich, but with Caribbean flair. Make one for yourself for a yummy summer meal, or pile a whole plate with them for a delicious party entrée that your family's sure to love.

    Back in Puerto Rico, the tripleta sandwich is traditionally served with a topping of fries or crispy potato sticks.

    I like to serve it with chips on the side, but if you want to give your family the authentic tripleta experience, cut up a potato into tiny shoestring fries and throw them in the fryer. Top the sandwich with the fries for an extra burst of crunch.

    Made It & Loved It

    From Jacob D: ⭐⭐⭐⭐⭐ "This recipe is really good. I am in culinary arts, and I am making this to present to my class."

    SUMMARIZE & SAVE THIS CONTENT ON

    ChatGPT
    Google AI
    Perplexity
    Grok
    [feast_advanced_jump_to]

    🍖 Ingredients

    Tripleta sandwich ingredients labeled on blue wooden background.
    • Puerto Rican sandwich bread (pan sobao) - It's pillowy and soft like a sub bun, so your favorite sub bun or French baguette would also work well. It should be about 10" to 12" long, which will make 2 sandwiches.
    • smoked ham slices - For the smoked ham, you can either slice up a pre-cooked, smoked ham roast or simply pick some slices up from the deli.
    • chicken breast - I like using chicken in my tripleta but to be more traditional you could opt for grilled steak like carne asada. Check out how to cook carne asada on the grill here.
    • plain chips - I like to serve chips on the side for some crunch but this is optional.

    *Check recipe card for ingredient amounts.

    📝 Recipe Tweaks

    For a true Puerto Rican experience, add strips of fried plantain to the sandwich. It might seem like an unusual sandwich ingredient, but plantain chips are crispy and chewy and starchy, just like a potato. You could also try turnip fries.

    You can also customize your sandwich by adding (or removing) different sauces, but don't stray too far--part of this sandwich's unique flavor comes from the distinct combination of ketchup, mustard, mayonnaise, and Worcestershire sauce.

    Some options would be white barbecue sauce, my own creation of homemade smoky maple sauce or spicy chipotle sauce.

    🥖 How to Make a Tripleta Sandwich

    Chicken and pork marinating in blue dish.

    Step 1. Season the meat. Season the raw chicken and pork with salt, pepper, cumin, parsley, olive oil and Worcestershire sauce. Cover and chill in the fridge for 2 hours.

    Pork and chicken in frying pan.

    Step 2. Cook the meat. Cook the chicken and pork in a frying pan over medium heat until fully cooked (350ºF in an electric skillet).

    🌡️ Chef's Note: The internal temperature should be 165°F for chicken and 145°F for pork.

    Cooked pork and chicken pieces in bowl with worcestershire sauce.

    Step 3. Cut the meat into pieces. Cut the chicken and pork into small pieces. Place in a bowl and add a little more Worcestershire sauce, to taste.

    Tripleta sandwiches and chips, mustard and ketchup in the background.

    Step 4. Assemble and serve. Slice the baguette open and add the condiments, meat, cheese, lettuce and tomato. Slice the Puerto Rican tripleta sandwich in half and serve!

    🍽️ Tripleta Sandwich Serving Suggestions

    Being a street-food favorite in Puerto Rico, this tripleta sandwich is a great outdoor food. It's perfect for picnics, camping trips, packed lunches and backyard get-togethers.

    It has hot, filling ingredients like pork and chicken, but the cold, fresh ingredients keep you from feeling sluggish and weighed-down in the heat. It's also fine to serve cold.

    If you prefer, you can grill the tripleta sandwich after assembly to crisp up the bread and melt the cheese; a sandwich press would work perfectly!

    If you're not going to be serving it right away, put it in the fridge for a while to keep it fresh and hold off on the condiments until it's time to dig in.

    Leftovers can be stored in the fridge for up to 2 to 3 days, but keep in mind that the wet ingredients can make the bread soggy, the longer it sits. It's best to store vegetables separately.

    👉 Joss' Top Tip

    If you want to give your guests the chance to get creative, try setting up a "Make Your Own Tripleta Sandwich" bar where they can grab a sliced baguette and pile on their own choice of ingredients and condiments. This is also great for picky eaters.

    Tripleta sandwiches with chips and condiments on the side.

    💜 Hungry For More? Check Out These Mains

    • Grilled halibut tacos on brown serving tray.
      Grilled Halibut Tacos
    • Ground beef stir fry with veggies in bowl with chopsticks.
      Ground Beef Stir Fry
    • Taco in a bag with forks and toppings on the side.
      How to Make Walking Tacos (aka Taco in a Bag)
    • Korean kimchi chicken thighs in bowl with lemon wedges.
      Korean Kimchi Chicken

    Did this tasty sandwich make it to your dinner table? If you tried this 🌯 Puerto Rican Tripleta Sandwich Recipe or any other recipe on my website, please leave a 🌟 star rating and let me know how it went in the 📝 comments below. And please share the recipe!

    📋Recipe

    Tripleta sandwiches and chips.
    Print Pin
    5 from 2 votes

    Puerto Rican Tripleta Sandwich

    Piled high with meat, cheese, and fresh vegetables, the tripleta sandwich is a Puerto Rican standard that puts a new twist on the classic Cuban sandwich.
    Course Main Course
    Cuisine Puerto Rican
    Prep Time 10 minutes minutes
    Cook Time 10 minutes minutes
    Chill Time 2 hours hours
    Total Time 2 hours hours 20 minutes minutes
    Servings 2
    Calories 858kcal
    Author Joss Dyckson

    Equipment

    • Frying pan

    Ingredients

    • 1 chicken breast boneless & skinless
    • 1 boneless pork chop
    • 1 teaspoon cumin powder
    • 1 tablespoon fresh parsley chopped
    • 2 tablespoons olive oil
    • 1 tablespoon Worcestershire sauce + more to taste
    • 1 French baguette or sub bun 10" to 12"
    • 3 slices smoked ham
    • 3 slices Gouda cheese
    • 1 tomato sliced
    • lettuce
    • condiments mayo, mustard, ketchup
    • salt and pepper
    • chips optional (to serve on the side)
    US Customary - Metric

    Instructions

    • Season the raw chicken and pork with salt, pepper, cumin, parsley, olive oil and Worcestershire sauce. Cover and chill in the fridge for 2 hours.
      1 chicken breast, 1 boneless pork chop, 1 teaspoon cumin powder, 1 tablespoon fresh parsley, 2 tablespoons olive oil, 1 tablespoon Worcestershire sauce
    • Remove the chicken and pork from the marinade. Cook in a frying pan over medium heat, until fully cooked (350ºF in an electric skillet). It should take around 10 to 15 minutes, flipping halfway through (the internal temperature should be 165°F for chicken and 145°F for pork).
    • Cut the chicken and pork into small pieces. Place in a bowl and add a little more Worcestershire sauce, to taste.
    • Slice the baguette open and add some mayo, mustard and ketchup.
      1 French baguette or sub bun
    • Assemble sandwiches with the smoked ham slices, Gouda cheese, chicken and pork, lettuce and tomato. Cut in half to make 2 sandwiches.
      3 slices smoked ham, 3 slices Gouda cheese
    • Serve with chips on the side!

    Notes

    • For a true Puerto Rican experience, add strips of fried plantain to the sandwich. It might seem like an unusual sandwich ingredient, but plantain chips are crispy and chewy and starchy, just like a potato.
    • This sandwich might have a few hot ingredients, but it's actually fine to serve cold, too.
    • If you prefer, you can grill the sandwich after assembly to crisp up the bread and melt the cheese; a sandwich press would work perfectly.
    • Leftovers can be stored in the fridge for up to 2 to 3 days, but keep in mind that the wet ingredients can make the bread soggy, the longer it sits.

    Nutrition

    Calories: 858kcal | Carbohydrates: 69g | Protein: 55g | Fat: 39g | Saturated Fat: 13g | Cholesterol: 147mg | Sodium: 1699mg | Potassium: 1025mg | Fiber: 5g | Sugar: 5g | Vitamin A: 1419IU | Vitamin C: 20mg | Calcium: 460mg | Iron: 7mg

    How to Roast Garlic in the Oven (Cloves, Bulbs + in Foil)

    July 29, 2020 by Joss Dyckson 2 Comments

    It would be hard to find anyone out there who doesn't love garlic. A cornerstone of dishes from across the world, garlic adds a uniquely pungent taste you can't get enough of. Plus, the smell is amazing. Did you know there's a way to make garlic taste even better? Check out how to roast garlic in the oven three ways.

    Roasted garlic head in pan.

    Whether you'd rather work with peeled cloves or a whole head, with or without foil, these three methods of roasting fresh garlic will give you great results.

    We start with raw garlic that has a strong, pungent bite and by the end of this tutorial, you are left with garlic that has roasty, caramelized, sweet, rich flavor.

    It is amazing to eat roasted garlic as is or it can be added to so many dishes, some of my favorites being this kimchi potato salad and Italian sausage sandwich. But honestly, I am tempted to add it to most of my dishes because I can't get enough of the taste and aroma.

    You might also want to check out my tutorials for how to chop garlic and how to slice garlic.

    [feast_advanced_jump_to]

    Option 1: How to Roast a Whole Head of Garlic

    I find this option to be the easiest because there is no need to peel the individual cloves (you just squish them out later) and the loaf pan keeps it all nicely contained while roasting.

    Ingredients

    Head of garlic.
    • 1 head of garlic - also called a garlic bulb
    • 1 tablespoon olive oil - standard olive oil is recommended over EVOO for cooking in temperatures of higher than 350°F-415°F so I would save the expensive EVOO for drizzling over salads, dunking bread etc.
    • salt - optional but recommended

    Steps

    Head of garlic with outer layer removed.

    Step 1: Peel the outer layer. Preheat oven to 400°F. Gently peel the outer skin from the garlic head, leaving the cloves intact in their casings.

    Raw garlic head on cutting board.

    Step 2: Cut the top off. Cut the very top part of the garlic head off. All of the cloves need to be slightly exposed to roast properly.

    💭Pro Tip: You don't want to cut it too low or you will lose a lot of the garlic. If you find that some of the end cloves aren't exposed because they are shorter, cut those tips off individually.

    Head of garlic in pan with olive oil.

    Step 3: Coat with oil and salt. Place your prepared head of garlic into the bread pan and add the olive oil and salt, coating the heads evenly.

    Loaf pan covered in foil.

    Step 4: Cover with foil. Cover the pan with aluminum foil.

    Roasted garlic head in loaf pan.

    Step 5: Roast in the oven. Roast in the oven for approximately 40-45 minutes, or until the garlic is soft, caramelized and aromatic.

    Option 2: How to Roast a Garlic Bulb in a Foil Pouch in the Oven

    This option is nice for having less clean up as we aren't using any pans, just a simple, foil pouch.

    Ingredients

    Head of garlic.
    • 1 head of garlic
    • 1 tablespoon olive oil
    • salt (optional)

    Steps

    Head of garlic in hands.

    Step 1: Peel. Preheat oven to 400°F. Gently peel the outer skin from the garlic head, leaving the cloves intact in their casings.

    Raw garlic head on cutting board.

    Step 2: Cut the top off. Cut the very top part of the garlic head off. All of the cloves need to be slightly exposed to roast properly.

    Head of garlic on parchment with oil.

    Step 3: Place garlic in foil. Cut out 1 piece of parchment paper and 1 piece of foil into a square. Place the parchment square on top of the foil square and add the garlic head to the center.

    Head of garlic on parchment with salt.

    Step 4: Add oil and salt. Drizzle with the olive oil and sprinkle with some salt.

    👩🏻‍🍳Chef's Note: The foil square should be a bit larger than the parchment square, but both should be big enough to wrap around the garlic head completely.

    Foil wrapped around garlic head.

    Step 5: Close the pouch. Close the parchment/foil squares around the garlic head, crumpling the foil at the top to create a pouch.

    Roasted garlic head in opened foil pouch.

    Step 6: Roast. Transfer the pouch directly to the middle oven rack. Roast in the hot oven for approximately 40-45 minutes, until the cloves are tender.

    Option 3: How to Roast Peeled Garlic Cloves

    If you do the work of peeling ahead of time, the roasted cloves are immediately available to use after roasting and if you don't want to roast a whole bulb, you don't have to.

    Ingredients

    Clove of garlic.
    • 1 head of garlic, cloves separated and peeled
    • 1 tablespoon olive oil
    • salt (optional)

    Steps

    To get started, preheat the oven to 375°F.

    Peeled garlic cloves in a small baking dish with olive oil.

    Step 1: Coat garlic cloves. In a small, oven-safe, ceramic bowl with a lid, spread out the peeled garlic cloves in a single layer. Add the olive oil and some salt. Cover the ceramic bowl with its lid.

    Roasted garlic cloves in small baking dish.

    Step 2: Roast the cloves. Transfer the covered bowl to the oven. Roast the garlic cloves for 45-50 minutes, until the cloves are tender and golden.

    How to Remove the Roasted Garlic Cloves

    Roasted garlic clove squeezing out of peel.

    For options 1 and 2: Remove the roasted cloves one by one by gently squeezing the clove out of each casing. It should come fairly easy now that the cloves have been softened in the roasting process.

    Storage

    • Fridge: Put the roasted garlic in an airtight container, jar or zip-top bag and store in the refrigerator for up to 3 days.
    • Freezer: Or you can also freeze it for up to 3 months. One way is to mash it and fill an ice cube tray so that it is pre-portioned.
    • Thaw: Thaw the garlic in the fridge overnight.

    👩🏻‍🍳Chef's Note: For options 1 and 2, you can keep the cloves in the casings when refrigerating.

    What to Do With Roasted Garlic

    Roasted garlic cloves in small bowl.

    Now the only thing that remains is what to do with your new bounty of flavorful roast garlic.

    • I can seriously eat a whole bulb of roasted garlic on it's own. But there are of course other ways to use it!
    • If you're wondering how to eat roasted garlic, the secret is that you can swap it into just about any dish that calls for garlic to add an extra helping of deliciousness.
    • The roasted, caramelized flavor the garlic will add goes great with tons of dishes from salads to sandwiches to stews and beyond. Try this smoked salmon pasta salad or kimchi beef stew.
    • More specifically, individual garlic cloves are great for smashing and mixing into things like basil hummus, mashed potatoes, homemade aioli or sauces and can even be spread onto bread or toast like butter.
    • For a large bulb, you can toss it into a pot to make stock (try this bison stock) for some seriously delicious soup. Or, serve it on a charcuterie board and let diners spread it onto their crackers and crusty bread.

    Recipe FAQs

    Does roasted garlic make your breath smell?

    Roasted garlic does have a more mild flavor than raw garlic, but I still find the scent can linger in my mouth afterwards--albeit not as strong.

    Which side of garlic do you cut for roasting?

    You will cut the top side of the garlic bulb, not the root end.

    Do you need to wash garlic before roasting it?

    You do not need to wash the garlic bulb but do brush off any dirt you find or use a moist paper towel. You will be removing the outer papery layer anyway and this helps eliminate any dirt.

    ❤️More Cooking Tutorials To Consider

    • Reuben sandwiches stacked on each other with a toothpick.
      How to Make a Reuben Sandwich
    • Butternut squash sliced open on cutting board.
      How to Clean, Save and Roast Butternut Squash Seeds
    • Jerk sauce in food processor.
      How to Make Jerk Sauce
    • Thanksgiving stuffing/dressing in white bowl with fresh herbs.
      How to Make Stuffing (From Scratch)

    If you tried this recipe tutorial for 🧄 How to Roast Garlic in the Oven (Cloves, Bulbs + in Foil) or any other recipe on my website, please leave a 🌟 star rating and let me know how it went in the 📝 comments below. And please share the recipe!

    📋Recipe

    Roasted garlic head/bulb in tin.
    Print Pin
    5 from 2 votes

    How to Roast Garlic in the Oven: 3 Ways

    I will show you how to roast garlic in the oven 3 ways to enhance the flavor of your favorite dishes! The caramelized garlic adds an amazing taste you can't get enough of.
    Course Snack
    Cuisine American
    Diet Vegan, Vegetarian
    Prep Time 5 minutes minutes
    Cook Time 45 minutes minutes
    Total Time 50 minutes minutes
    Servings 1
    Calories 165kcal
    Author Joss Dyckson

    Equipment

    • Option 1: Bread pan
    • Option 2: Foil and parchment paper
    • Option 3: Small baking dish

    Ingredients

    Option 1: How to Roast a Whole Head of Garlic

    • 1 head garlic
    • 1 tablespoon olive oil
    • salt optional

    Option 2: How to Roast Garlic in a Foil Pouch in the Oven

    • 1 head garlic
    • 1 tablespoon olive oil
    • salt optional

    Option 3: How to Roast Individual Garlic Cloves

    • 1 head garlic cloves separated and peeled
    • 1 tablespoon olive oil
    • salt optional
    US Customary - Metric

    Instructions

    Option 1: How to Roast a Whole Head of Garlic

    • Preheat oven to 400°F. Gently peel the outer skin from the garlic head, leaving the cloves intact in their casings.
      Head of garlic in hands.
    • Cut the very top part of the garlic head off. All of the cloves need to be slightly exposed to roast properly.
      Raw garlic head on cutting board.
    • Place your prepared head of garlic into the bread pan and add the olive oil and salt, coating the heads evenly.
      Head of garlic in pan with olive oil.
    • Cover the pan with aluminum foil.
      Loaf pan covered in foil.
    • Roast in the oven for approximately 40-45 minutes, or until the garlic is soft, caramelized and aromatic.
      Roasted garlic head in loaf pan.

    Option 2: How to Roast Garlic in a Foil Pouch in the Oven

    • Preheat oven to 400°F. Gently peel the outer skin from the garlic head, leaving the cloves intact in their casings.
      Head of garlic in hands.
    • Cut the very top part of the garlic head off. All of the cloves need to be slightly exposed to roast properly.
      Raw garlic head on cutting board.
    • Cut out 1 piece of parchment paper and 1 piece of foil into a square. (The foil square should be a bit larger than the parchment square, but both should be big enough to wrap around the garlic head completely.) Place the parchment square on top of the foil square and add the garlic head to the center. Drizzle with olive oil and salt.
      Head of garlic on parchment with salt.
    • Close the parchment/foil squares around the garlic head, crumpling the foil at the top to create a pouch.
      Foil wrapped around garlic head.
    • Transfer the pouch to the middle oven rack. Roast in the hot oven for approximately 40-45 minutes, until the cloves are tender.
      Roasted garlic head in opened foil pouch.

    Option 3: How to Roast Individual Garlic Cloves

    • Preheat the oven to 375°F. In a small, oven-safe, ceramic bowl with a lid, spread out the peeled garlic cloves in a single layer. Add the olive oil and some salt. Cover the ceramic bowl with its lid.
      Peeled garlic cloves in a small baking dish with olive oil.
    • Transfer the covered bowl to the oven. Roast garlic for 45-50 minutes, until the cloves are tender and golden.
      Roasted garlic cloves in small baking dish.

    Removing the Roasted Garlic Cloves

    • To remove the roasted cloves one by one: gently squeeze the clove out of each casing.
      Roasted garlic clove squeezing out of peel.

    Notes

    • Nutrition: The nutrition information is for 1 head garlic plus 1 tablespoon olive oil.
    • Cleaning: You do not need to wash the garlic bulb but do brush off any dirt you find or use a moist paper towel. You will be removing the outer papery layer anyway and this helps eliminate any dirt.
    • To store: Put the roasted garlic in an airtight container, jar or zip-top bag and store in the refrigerator for up to 3 days, or you can also freeze it. For options 1 and 2, you can keep the cloves in the casings when refrigerating.

    Nutrition

    Calories: 165kcal | Carbohydrates: 9g | Protein: 2g | Fat: 14g | Saturated Fat: 2g | Polyunsaturated Fat: 2g | Monounsaturated Fat: 10g | Sodium: 5mg | Potassium: 112mg | Fiber: 1g | Sugar: 0.3g | Vitamin A: 3IU | Vitamin C: 9mg | Calcium: 51mg | Iron: 1mg

    Shirley Temple Punch

    July 22, 2020 by Joss Dyckson 4 Comments

    Sweet, fizzy, and fruity, this Shirley Temple punch will make you feel like you're reliving your childhood. This punch is perfect for children's birthday parties, backyard get-togethers, school activities, youth groups, and even adult parties if you feel like having a non-alcoholic party punch option.

    Shirley temple in glass with maraschino cherries, orange wedges and umbrella.

    Combined with flavorful grenadine syrup, a non-alcoholic cocktail ingredient, this punch will make kids feel like adults and adults feel like kids again. It truly is a staple in American culture and has been for decades.

    I personally adored this virgin drink as a kid and always ordered it when we ate out. I wanted to come up with an easier way to serve it at parties so I turned it into a punch! I serve it every Thanksgiving and both the kids (and adults) drain that punch bowl!

    For more non-alcoholic cocktail ideas, try this Moscow mule mocktail or mojito mocktail.

    [feast_advanced_jump_to]

    Ingredients

    Shirley temple punch ingredients prepped and labeled on white wooden background.
    • grenadine - If you want to avoid unnatural colors and flavors, make your own grenadine syrup. It does taste better; the downside is you aren't going to get that bright red color from the commercial syrup. I retested this recipe with homemade syrup (as you can see in the ingredients pic) and the color is more like a dark cherry than the bright scarlet red you see in the finished pictures. You can also find sugar-free grenadine for a less sugary drink.
    • orange juice - This drink already has plenty of sugar so I use unsweetened orange juice from concentrate.
    • lemon-lime soda - I use 7-Up but you can also use Sprite or the cheaper store brand.
    • ice - Instead of adding ice, another option would be to add frozen fruit (such as frozen cherries) or frozen orange juice cubes directly into the individual glasses when serving. This way there is pretty much no chance of watering-down the drink.

    *Check recipe card for full ingredient amounts.

    Chef's Note: The amount of punch in this large batch recipe fits in my 1.5 gallon/5.6 liter drink dispenser. The servings can be easily adjusted to fit the size of your punch bowl in the recipe card.

    How to Make Shirley Temple Punch

    Ice in glass dispenser.

    Step 1. Add ice. Add the ice to a punch bowl or dispenser.

    Ice, orange juice and 7-Up in glass dispenser.

    Step 2. Add liquids. Pour the orange juice and 7-UP over the ice.

    Shirley temple punch in glass and pitcher with maraschino cherries and orange wedges on the side.

    Step 3. Add grenadine. Add the grenadine and give it a gentle mix.

    Shirley temple in glass with orange wedges and maraschino cherries on brick background.

    Step 4. Serve the Shirley Temple punch. Serve immediately with maraschino cherries as a garnish.

    Joss' Top Tips

    • 🚰 Close the dispenser. Here is my #1 tip if you're using a dispenser. Make sure it is in the closed position before adding the ingredients!
    • ⏱️ Make-ahead. I suggest making it no longer than a few hours head of time because the soda will start to lose its fizz. You can hold off on the ice until just before serving or serve the ice in glasses instead, so that the punch doesn't get watered down.
    • 👦🏻 Get the kids involved. This cherry-red, fizzy, fruity drink has been a staple of birthday parties and school proms for decades. For a fun afternoon project, try inviting your kids to make this drink with you. It's simple to make, requires only a few ingredients, and they'll enjoy stirring in the orange juice and grenadine and watching the punch change colors.
    • 🍒 Get creative with the garnish. If you want to get a little creative, try experimenting with the garnishes. Maraschino cherries are the classic garnish, but try mixing things up with orange slices or lemon wedges. Try using cocktail spears to make the drink seem even more "adult"--in a fun, playful way. Or, top the drink with this grenadine flavored whipped topping.

    Serving Suggestions

    This punch is best when it's served right away, but if you've got an evening celebration planned, it should have no problem chilling in the fridge for a few hours.

    If you're having a large party, you can serve the punch in a massive bowl so you don't have to worry about refilling everyone's glass.

    But for smaller gatherings, try serving the drink in glasses filled with ice and topped with a garnish. This simple touch will elevate the recipe from a fun party drink to a restaurant-quality mocktail.

    Add a splash of white rum or vodka to turn it from mocktail to fruity cocktail (kind of like my Hawaiian Mai Tai).

    Shirley Temple Punch FAQs

    What was in the original Shirley Temple drink?

    The original Shirley Temple consisted of ginger ale and grenadine over ice with a maraschino cherry garnish.

    Why is it called a Shirley Temple cocktail?

    It's named after the child star actress Shirley Temple. Apparently, during a fancy dinner with her parents and others enjoying cocktails, the bartender crafted a special non-alcoholic drink just for Shirley.

    What is a Shirley Temple called when it has alcohol?

    Adding vodka or rum transforms this drink into a 'Dirty Shirley'.

    How long can I store it?

    While the drink will slowly lose its fizz, it will still taste great if consumed within a few days. Keep it covered in the fridge.

    Shirley temple in glass with orange garnish and umbrella.

    ❤️ More Beverages You Will Love

    • Christmas punch in champagne glasses with wooden snowflake decorations.
      Christmas Morning Punch
    • Homemade strawberry milk with straw in jar on cutting board.
      Homemade Strawberry Milk
    • Fall pumpkin party punch in a glass with orange slice garnish.
      Fall Pumpkin Party Punch
    • Brazilian lemonade in glasses with straws and lime wedges.
      Brazilian Lemonade (Limonada Suíça)

    If you tried this Shirley Temple Punch Recipe or any other recipe on my website, please leave a 🌟 star rating and let me know how it went in the 📝 comments below. And please share the recipe!

    📋Recipe

    Shirley temple in glass and dispenser with maraschino cherries and orange wedges.
    Print Pin
    5 from 3 votes

    Shirley Temple Punch

    Sweet, fizzy, and fruity, this Shirley Temple punch will make you feel like you're reliving your childhood. This punch is perfect for children's birthday parties, backyard get-togethers, school activities, youth groups, and even adult parties if you feel like having a non-alcoholic party punch option.
    Course Drinks
    Cuisine American
    Diet Vegetarian
    Prep Time 5 minutes minutes
    Total Time 5 minutes minutes
    Servings 18
    Calories 188kcal
    Author Joss Dyckson

    Equipment

    • Large punch bowl

    Ingredients

    • 6 cups ice cubes
    • 8 cups orange juice
    • 8 cups 7-UP or any brand lemon-lime soda
    • 2 cups grenadine
    • maraschino cherries to garnish
    US Customary - Metric

    Instructions

    • Add the ice to a punch bowl or dispenser.
      6 cups ice cubes
    • Pour the orange juice and 7UP over the ice.
      8 cups orange juice, 8 cups 7-UP
    • Add the grenadine and give it a gentle mix.
      2 cups grenadine
    • Serve with maraschino cherries as a garnish.

    Notes

    • Punch bowl size: The amount of punch in this recipe fits in my 1.5 gallon/5.6 liter drink dispenser. The servings can be easily adjusted to fit the size of your punch bowl.
    • Close the dispenser. Here is my #1 tip if you're using a dispenser. Make sure it is in the closed position before adding the ingredients!
    • Make-ahead tip: You can hold off on the ice until just before serving or serve the ice in glasses instead so that the drink isn't watered down. I suggest making it no longer than a few hours head of time because the soda will start to lose its fizz.
    • Alcoholic version: Adding vodka or rum transforms this drink into a 'Dirty Shirley'.
    • Storage: While the drink will slowly lose its fizz, it will still taste great if consumed within a few days. Keep it covered in the fridge.

    Nutrition

    Calories: 188kcal | Carbohydrates: 46g | Protein: 1g | Fat: 1g | Saturated Fat: 1g | Sodium: 25mg | Potassium: 230mg | Fiber: 1g | Sugar: 36g | Vitamin A: 220IU | Vitamin C: 55mg | Calcium: 19mg | Iron: 1mg

    Grilled Jerk Pork Tenderloin Skewers (Kebabs)

    July 15, 2020 by Joss Dyckson 1 Comment

    Hot, tangy, and full of that classic barbecue flavor, these grilled jerk pork tenderloin skewers (kebabs) are the perfect summertime meal. Throw a set of skewers on the grill while entertaining friends, or offer them at your next birthday party or family get-together.

    Grilled pork skewers on wooden cutting board with salad and jerk sauce on the side.

    If you're looking for a way to spice up your barbecue, these grilled pork skewers offer a unique flavor combination that goes beyond the usual hamburgers and hot dogs.

    The jerk sauce adds a flavorful Jamaican-inspired kick that will make your guests feel like they're in the tropics. It's a potent combination of brown sugar, soy sauce, and spices--not the usual backyard party fare, but a surprising taste sensation that will have your guests asking for more.

    Skewering ensures even cooking and allows the pork to develop a nice char and smoky flavor. The skewers make this dish perfect for entertaining, as you can walk, talk, and eat at the same time!

    It's a convenient option for weeknight dinners or outdoor gatherings. If you love skewered food like me, I also have these melon prosciutto appetizer skewers and grilled mango on skewers.

    [feast_advanced_jump_to]

    Pork Skewer Ingredients

    Grilled pork tenderloin skewer ingredients prepped and labeled.
    • pork tenderloin - Pork tenderloin is a prized, lean and tender cut of meat, ideal for quick grilling.
    • olive oil - For the marinade.
    • prepared jerk sauce - Marinating with the jerk sauce not only adds flavor but also helps to tenderize the meat, resulting in juicy and succulent kebabs. For convenience, I chose to buy a bottle of jerk sauce from the grocery store for this recipe, but nothing beats homemade. If you want to try it for yourself, check out my tutorial for how to make jerk sauce.
    • salt - You can use table salt, pink Himalayan salt or kosher salt to season the pork.

    *Check recipe card for ingredient amounts.

    How to Make These Pork Skewers

    Pork tenderloin cubes in zip-top bag with jerk marinade.

    Step #1. Marinate. Combine chopped pork, ¾ cup jerk sauce, olive oil and some salt in a large zip-top bag. Let it marinate in the refrigerator for at least 4 hours or overnight.

    Raw pork cubes on metal skewers.

    Step #2. Thread the pork. Thread the chopped pork onto skewers and let them sit at room temperature for 20 minutes.

    Jerk pork tenderloin skewers cooking on the grill.

    Step #3. Grill. Preheat outdoor grill to medium-high heat (375ºF-400ºF) and lightly oil the grates. Grill the skewers for 4-5 minutes per side or until browned and cooked through to an internal temperature of 145˚F.

    Grilled jerk pork tenderloin skewers resting on cutting board.

    Step #4. Rest. Remove the pork skewers from the grill, lightly tent with foil and let rest for 3 to 5 minutes.

    Grilled pork skewers on wooden cutting board with salad and jerk sauce and salad on the side.

    Step #5. Serve. Serve with the remaining jerk sauce on the side.

    Chef's Note: Try garnishing with fresh herbs, lemon wedges, or a sprinkle of sesame seeds to enhance the visual appeal.

    Joss' Tips

    • Place the tenderloin in the freezer for 30 minutes before slicing it. This will make it more firm and easier to cut into nice, uniform pieces.
    • Use either tongs or a metal spatula to assist with turning the skewers on the grill.
    • Use an instant read meat thermometer to ensure the pork reaches an internal temperature of 145˚F for food safety purposes.

    Serving Suggestions

    These grilled skewers can be served as both an entrée or part of a larger meal along with more skewered food like these grilled shrimp rosemary skewers. They would also taste amazing with these grilled pineapple slices.

    You can prepare bigger portions if you'd like it to be the main course, or stick with the classic recipe if you're going to toss it on the grill along with some bison steaks and hamburger patties.

    As for drinks, try pairing it with this fruity Fog Cutter cocktail or mango ginger cocktail if you're serving alcohol, both of which contain rum. If you're looking for a non-alcoholic drink, serve up a pitcher of grilled pineapple juice.

    When it comes to leftovers, you can throw the pieces on top of a salad, rice, in a pita or wrap and more.

    Recipe FAQs

    How long does it take to grill pork skewers?

    Over medium-high heat, it takes about 8 to 10 minutes to grill pork skewers, flipping once, plus a 3 minute rest time. The internal temperature should reach 145˚F.

    How do you store the leftovers?

    Remove the pork from the skewers, place them in an airtight container and into the fridge for up to 3 to 4 days.

    Can I use bamboo skewers?

    Yes you can, but make sure to soak them in water for at least 30 minutes or overnight. This will prevent them from burning too quickly and breaking apart on the grill.

    Grilled pork skewers on wooden cutting board with salad and jerk sauce on the side.

    More Pork Recipes You Will Love

    • Tripleta sandwiches and chips.
      Puerto Rican Tripleta Sandwich
    • 4th of July pulled pork sliders on parchment lined serving tray.
      4th of July Pulled Pork Sliders
    • Pork chops with gravy, mushrooms and fresh thyme sprigs.
      Electric Skillet Pork Chops
    • Sausage rolls in puff pastry with sesame seeds.
      How to Make Sausage Rolls

    If you tried this easy, no-hassle Grilled Pork Tenderloin Skewers (Kebabs) Recipe or any other recipe on my website, please leave a 🌟 star rating and let me know how it went in the 📝 comments below. And please share the recipe!

    📋Recipe

    Grilled jerk pork tenderloin skewers on serving board with jerk sauce on the side.
    Print Pin
    5 from 2 votes

    Grilled Pork Tenderloin Skewers (Kebabs)

    Hot, tangy, and full of that classic barbecue flavor, these grilled jerk pork tenderloin skewers (kebabs) are the perfect summertime meal. The jerk sauce adds a flavorful Jamaican-inspired kick that will make your guests feel like they're in the tropics.
    Course Main Course
    Cuisine American, Jamaican
    Prep Time 10 minutes minutes
    Cook Time 8 minutes minutes
    Marinating Time 4 hours hours
    Total Time 4 hours hours 18 minutes minutes
    Servings 4
    Calories 333kcal
    Author Joss Dyckson

    Equipment

    • 4 Metal skewers
    • Outdoor grill
    • Thermometer

    Ingredients

    • 1 ½ pounds pork tenderloin trimmed and cut into 1 ½" to 2" pieces
    • 3 tablespoons olive oil
    • 1 cup jerk sauce divided
    • salt
    US Customary - Metric

    Instructions

    • Combine chopped pork, ¾ cup jerk sauce, olive oil and some salt in a large zip-top bag. Let it marinate in the refrigerator for at least 4 hours or overnight.
    • Thread the chopped pork onto skewers and let them sit at room temperature for 20 minutes.
    • Preheat outdoor grill to medium-high heat (375ºF-400ºF) and lightly oil the grates. Grill the skewers for 4-5 minutes per side or until browned and cooked through to an internal temperature of 145˚F. (A wireless thermometer works great!)
    • Remove the pork skewers from the grill, lightly tent with foil and let rest for 3 to 5 minutes.
    • Serve with more jerk sauce on the side.

    Notes

    • Tip for cutting the pork: Place the tenderloin in the freezer for 30 minutes before slicing it. This will make it more firm and easier to cut into nice, uniform pieces.
    • Garnishes: Try garnishing with fresh herbs, lemon wedges, or a sprinkle of sesame seeds to enhance the visual appeal.
    • Bamboo skewers: You can use wooden skewers, but make sure to soak them in water for at least 30 minutes or overnight. This will prevent them from burning too quickly and breaking apart on the grill.
    • Flipping the skewers: Use either tongs or a metal spatula to assist with turning the skewers on the grill. 
    • How to store leftovers: Remove the pork from the skewers, place them in an airtight container and into the fridge for up to 3 to 4 days.

    Nutrition

    Calories: 333kcal | Carbohydrates: 6g | Protein: 37g | Fat: 19g | Saturated Fat: 4g | Cholesterol: 111mg | Sodium: 270mg | Potassium: 885mg | Fiber: 4g | Sugar: 1g | Vitamin A: 3287IU | Calcium: 47mg | Iron: 4mg

    How to Make Jerk Sauce

    July 8, 2020 by Joss Dyckson 3 Comments

    I'm going to show you how to make jerk sauce from scratch. It's spicy. It's sweet. It's savory. It's the best jerk sauce to add amazing, Caribbean flavors to your meals.

    Jerk sauce in a jar with chili peppers, thyme and garlic on the side.

    When you're having a BBQ and cooking up some chicken or grilling some pork skewers, this easy homemade jerk sauce recipe is a guaranteed hit. This iconic Jamaican recipe works perfect as a marinade or a dipping sauce.

    [feast_advanced_jump_to]

    Jerk Sauce Ingredients

    Jerk sauce ingredients prepped and labeled.
    • scotch bonnet peppers - Scotch bonnets have an amazing fruity, spicy flavor. You can swap the scotch bonnet peppers with peppers that are more mild, like jalapeños, to tone down the heat. If you can't find scotch bonnets, you can substitute with habaneros 1:1 as they have similar heat and flavor.
    • mangoes - Not all jerk recipes use mangoes but they add bright, tropical flavor and I always add them to mine.
    • ground allspice - Allspice is also known as Jamaica pepper or pimento and is an important spice used in Jamaican cuisine.
    • peppercorns - You can use black peppercorns or tricolor peppercorns (a mix of black, pink and white).
    • honey - Use liquid honey for blending into the sauce. You can substitute with agave nectar.
    • brown sugar - I use dark brown sugar.

    *Check recipe card for full ingredient amounts.

    Pro Tip: When chopping the scotch bonnets, you can use gloves to avoid the burning sensation that comes from handling hot peppers.

    Step 1. Add Ingredients to Processor

    Jerk sauce ingredients in food processor.

    Add all of the ingredients to a food processor or blender.

    Step 2: Process

    Jerk sauce prepared in food processor.

    Process the ingredients together until smooth. Adjust the salt and pepper to taste, if needed. If you like more heat, just add more scotch bonnet peppers.

    👩🏻‍🍳Chef's Note: It's okay to leave it a bit chunky if you like! That is my preference but you do you.

    Step 3: Transfer to Jar & Serve

    Jerk sauce on spoon on white plate.

    Transfer to a glass jar and serve immediately or refrigerate.

    Storage Tips

    • You can store your homemade sauce in a covered container for up to 2 weeks in the fridge. 
    • You can also freeze it for up to 6 months. Thaw in the refrigerator.
    • You can use a plastic airtight container, but glass is best because it preserves the flavor better and doesn't transfer odors.

    Serving Suggestions

    • Dip it: Use it as a dipping sauce for vegetables, chicken fingers, chicken wings etc.
    • Marinate: Use it as a sauce or marinade over pork, chicken, seafood or vegetables and rice. I like to make jerk pulled pork or chicken in the slow cooker and make tacos.
    • Alcoholic drinks: For anyone looking for a yummy drink to go with your jerk beef or chicken, I recommend a sweet white wine like a sweet Riesling or my spring white wine sangria.
    • Non-alcoholic options: If you're looking for something alcohol-free, definitely go with this virgin Moscow mule or mojito mocktail. It's a great refreshment for a hot summer evening spent eating some deliciously spicy BBQ.

    Jerk Sauce FAQs

    What is jerk sauce?

    Jerk sauce is a spicy, Caribbean sauce native to Jamaica. It is made with scotch bonnet peppers and other seasonings, including allspice. It is typically served with chicken and pork.

    What does Jamaican jerk sauce taste like?

    Jamaican jerk sauce has quite a bit of heat as well as tastes slightly sweet, salty and smoky. It is full of flavor!

    Why is jerk sauce called jerk sauce?

    The name jerk sauce comes from the style of cooking that was first used by the Indigenous people of the Caribbean, which involved seasoning and slow cooking pork over pimento wood. The word 'jerk' is said to come from a Spanish term for dried meat: 'charqui'. It is pronounced similar to the word jerky.

    Looking to further enhance your cooking skills? Check out How to Roast Garlic: 3 Ways

    Jark sauce in jar and on spoon with peppers, thyme and garlic on side.

    ❤️More Sauce Recipes You Will Love

    • White BBQ sauce dripping from spoon.
      White BBQ Sauce
    • Xo sauce in a jar.
      Easy XO Sauce Recipe
    • Smoky maple burger sauce in glass bottle with a burger and spoon full of sauce on the side.
      Smoky Maple Burger Sauce
    • Honey dill sauce in small jar with mini serving spoon.
      Simple Honey Dill Sauce

    Are you a 🌶 jerk fanatic now? If you tried this recipe tutorial for How to Make Jerk Sauce or any other recipe on my website, please leave a 🌟 star rating and let me know how it went in the 📝 comments below. And please share the recipe!

    📋Recipe

    Jerk sauce in food processor.
    Print Pin
    4.84 from 6 votes

    How to Make Jerk Sauce

    Here I have an easy recipe tutorial for how to make jerk sauce from scratch. This iconic Jamaican jerk recipe works perfect as a marinade or a dipping sauce. It's spicy, sweet and savory!
    Course Sauce
    Cuisine Jamaican
    Diet Vegetarian
    Prep Time 10 minutes minutes
    Total Time 10 minutes minutes
    Servings 6
    Calories 80kcal
    Author Joss Dyckson

    Equipment

    • Food processor

    Ingredients

    • 1 cup fresh mango peeled and chopped (optional)
    • ½ white onion chopped
    • ½ cup green onions chopped
    • 8 garlic cloves peeled
    • 2 scotch bonnet peppers seeded and chopped
    • 2 tablespoons fresh thyme leaves
    • 2 tablespoons dark brown sugar
    • 2 tablespoons honey or agave nectar
    • 2 tablespoons soy sauce
    • 1 ½ tablespoons fresh ginger chopped
    • 1 teaspoon cinnamon powder
    • ½ teaspoon ground allspice
    • 1 teaspoon peppercorns crushed
    • salt to taste
    US Customary - Metric

    Instructions

    • Process all ingredients in a food processor or blender until smooth. It's okay to leave it a bit chunky if you like. Adjust the salt and pepper to taste, if needed.
    • Store in a glass container and refrigerate.
    • Serve as a dipping sauce, marinade, etc.

    Video

    Notes

    • You can swap the scotch bonnet peppers with peppers that are more mild, like jalapeños, to tone down the heat. But if you like more heat, just add more scotch bonnets.
    • If you can't find scotch bonnets, you can substitute with habaneros as they have similar heat and flavor.
    • When chopping the scotch bonnets, you can use gloves to avoid the burning sensation that comes from handling hot peppers.
    • You can store your homemade jerk sauce in a covered container for up to 2 weeks in the fridge. You can use a plastic airtight container, but glass is best because they don't transfer odors and they preserve the flavor better.
    • You can also freeze it for up to 6 months. Thaw in the refrigerator.

    Nutrition

    Calories: 80kcal | Carbohydrates: 20g | Protein: 2g | Fat: 1g | Saturated Fat: 1g | Sodium: 281mg | Potassium: 183mg | Fiber: 2g | Sugar: 14g | Vitamin A: 646IU | Vitamin C: 27mg | Calcium: 57mg | Iron: 1mg

    Brazilian Lemonade (Limonada Suíça)

    July 1, 2020 by Joss Dyckson 2 Comments

    Cool, sweet, and refreshing, Brazilian lemonade aka Limonada Suíça is a tropical-inspired treat that'll make you feel like you're on a hot and sunny vacation.

    Condensed milk might not seem like your typical lemonade ingredient, but it adds a sweetness and creaminess that makes this a lemonade recipe like no other. And the limes round out the flavor profile with a tangy, refreshing kick.

    Brazilian lemonade in glass jars with lime wedges and paper straws.

    This so-called "lemonade" is actually made with limes, which offer a tropical twist to the classic lemonade recipe.

    Whether you're hosting a backyard party, a family get-together, a neighborhood barbecue, or a weekend camping trip, this tangy, refreshing beverage is the perfect complement to your outdoor activities. I love serving it with these grilled shrimp and pineapple skewers.

    It's a simple drink you can make in just a few minutes. Of course, this drink isn't just for summertime; you can whip up a batch of Brazilian lemonade any time you feel like having a taste of the tropics.

    [feast_advanced_jump_to]

    Ingredients

    Brazilian lemonade (limonada suica) ingredients prepped and labeled.
    • fresh limes - Ripe limes will be slightly soft to the touch, on the heavy side and a nice, bright green color.
    • water - I like to chill it ahead of time to help keep the drink cold for serving.
    • sweetened condensed milk - You will find this in a can, usually in the baking aisle or coffee aisle (by the powdered milk) in the grocery store. It's sweet, thick and creamy.
    • sugar - Granulated white sugar is what I use in this recipe.
    • ice cubes - To keep the drink nice and chilled.

    *Check recipe card for ingredient amounts.

    Chef's Note: Make sure you've got lots of ice and extra limes on hand for serving; the ice cubes and cut limes in the pitcher or glass makes the drink more chilled and refreshing on a hot summer day. You could even garnish the drink with a candied lime; it looks amazing.

    How to Make it

    Lime wedges on black cutting board.

    Step 1. Cut the limes. Wash the limes, cut off the tops and bottoms and slice each lime into 8 wedges.

    Woman's hands cutting pith off of lime wedges.

    Step 2. Remove pith. Remove the white pith from the lime wedges with a small knife.

    Lime wedges with pith removed in a row on black board.

    Chef's Note: You want to remove as much of the pith as you can (the white part of the lime) because that part of the lime is very bitter and can transfer to the drink. Some limes have more pith than others.

    Brazilian lemonade in blender.

    Step 3. Blend. Add the lime wedges, water, sugar and sweet condensed milk to a blender and pulse for a few seconds.

    Brazilian lemonade getting strained into glass.

    Step 4. Strain. Strain the liquid through a fine-mesh strainer, pressing on the pulp to extract all of the juice. You don't want to leave any of the lime bits in your drink.

    Brazilian lemonade in glass jars with lime wedges and paper straws, limes in a bowl on the side.

    Step 5. Serve. Serve your Limonada Suíça immediately with a lot of ice and more lime wedges! You can also add extra sweetened condensed milk to taste, if needed.

    Joss' Tips

    Strainer with lime pieces over top of glass with Brazilian lemonade.
    • You don't want to blend the Brazilian lemonade so much that the limes are in tiny pieces. This is why you only want to pulse for a few seconds (see size of lime chunks in picture above). The first time I made this drink, I pulverized the limes and this imparted a very bitter flavor to the drink. It shouldn't taste super bitter, just sweet, creamy and citrusy with a touch of bitterness.
    • If you want to make your Limonada Suíça even more festive, try serving it in individual glasses with a slice of lime and sugar on the rim. I have a recipe for lime sugar rim here.
    • For outdoor entertaining, chill the glasses in the fridge before serving--it'll keep your drinks cold for a longer amount of time.
    • It should be served immediately because it will start to separate a day later and it becomes a tad more bitter, in my experience.

    Brazilian Lemonade (Limonada Suíça) FAQs

    What is Brazilian lemonade?

    It's a Brazilian-style, creamy lemonade that is actually made out of limes, including the peel.

    What else is Brazilian lemonade called?

    It is also called limonada suíça (in Portuguese) or Swiss lemonade. Although it is a Brazilian drink, the name 'Swiss Lemonade' apparently comes from one of the main ingredients: sweetened condensed milk. The label on the can had a picture of a Swiss milkmaid on it.

    Can you add alcohol?

    Absolutely. I suggest white rum or vodka if you want to turn this drink into a cocktail. A coconut flavored rum steps it up a notch!

    Brazilian lemonade in glass jars with lime wedges and paper straws, limes in a bowl on the side.

    More Chilled Beverages to Try

    • Shirley temple in glass and dispenser with maraschino cherries and orange wedges.
      Shirley Temple Punch
    • Hawaiian Mai Tais with umbrellas, straws and mango slices.
      Easy Hawaiian Mai Tai Recipe
    • Iced peach green tea in glass with straw and peach garnish.
      Iced Peach Green Tea
    • Grilled pineapple juice in stemless wine glass with grilled pineapple wedge garnish.
      Grilled Pineapple Juice

    If you tried this Brazilian Lemonade (Limonada Suíça) Recipe or any other recipe on my website, please leave a 🌟 star rating and let me know how it went in the 📝 comments below. And please share the recipe!

    📋Recipe

    Brazilian lemonade in glasses with straws and lime wedges.
    Print Pin
    5 from 1 vote

    Brazilian Lemonade (Limonada Suíça)

    Cool, sweet, and refreshing, Brazilian lemonade (Limonada Suíça) is a tropical-inspired treat that'll make you feel like you're on a hot and sunny vacation.
    Course Drinks
    Cuisine Brazilian
    Diet Vegetarian
    Prep Time 10 minutes minutes
    Total Time 10 minutes minutes
    Servings 4
    Calories 168kcal
    Author Joss Dyckson

    Equipment

    • Blender
    • Fine mesh strainer

    Ingredients

    • 2 limes
    • 3 cups water
    • ½ cup sugar
    • ¼ cup sweetened condensed milk
    • ice cubes
    US Customary - Metric

    Instructions

    • Wash the limes, cut off the tops and bottoms and slice each lime into 8 wedges. Remove the white pith.
    • Add the lime wedges, water, sugar and sweet condensed milk to a blender and pulse for just a few seconds.
    • Strain the liquid through a fine-mesh strainer, pressing on the pulp to extract all of the juice. You don't want to leave any of the lime bits in your drink.
    • Serve immediately with a lot of ice and more lime wedges! You can also add extra sweetened condensed milk to taste, if needed.

    Notes

    • Keep extra limes and ice on hand. Make sure you've got lots of ice and extra limes on hand for serving; the ice cubes and cut limes in the pitcher or glass makes the drink more chilled and refreshing on a hot summer day. You could even garnish the drink with a candied lime; it looks amazing.
    • Bitterness tip: You don't want to blend the drink so much that the limes are in tiny pieces. This is why you only want to pulse for a few seconds. It shouldn't taste super bitter, just sweet, creamy and citrusy with a touch of bitterness. 
    • Serve immediately: It should be served immediately because it will start to separate a day later and it becomes a tad more bitter, in my experience.
    • Chill the glasses: For outdoor entertaining, chill the glasses in the fridge before serving--it'll keep your drinks cold for a longer amount of time.

    Nutrition

    Calories: 168kcal | Carbohydrates: 39g | Protein: 2g | Fat: 2g | Saturated Fat: 1g | Cholesterol: 7mg | Sodium: 34mg | Potassium: 105mg | Fiber: 1g | Sugar: 36g | Vitamin A: 68IU | Vitamin C: 10mg | Calcium: 71mg | Iron: 1mg

    Super Moist Pumpkin Cupcakes

    June 29, 2020 by Joss Dyckson 14 Comments

    These super moist pumpkin cupcakes are frosted with a pumpkin buttercream and chocolate drizzle. They are easy to make with a vanilla cake mix and easy to transport. They are most popular during the fall season, making them a perfect treat for Halloween, Thanksgiving, and autumn-themed parties.

    Pumpkin cupcakes on yellow plate.
    [feast_advanced_jump_to]

    👍 Kid-Approved Pumpkin Cupcakes

    The pumpkin flavor in these cupcakes is subtle yet delightful, with just enough pumpkin purée to give a hint of orange color and a burst of moisture. These easy, moist cupcakes, created by kids, are perfect for birthday parties, gatherings, or simply as a yummy fall dessert to have on hand.

    Previously, I shared my son's summer mango pomegranate soda recipe, showing how I encourage my kids to get creative in the kitchen, from recipe development to food photography. They are always eager to help out!

    This recipe comes from my 8 year old chef. She loves making morning coffee for my husband and I, whipping up eggs on toast, and blending smoothies. She always throws her own ideas at me and so I let her experiment.

    At the time, she was digging pumpkin purée, and what kid doesn't love cupcakes? So, she combined the two, and this pumpkin cupcake recipe was born. I must say, they are incredibly moist and taste amazing!

    If you prefer something more bite-size, check out these pumpkin cake pops. A little less sweet? Try my pumpkin spice muffins. And if you have any leftover, check out this post on what to do with extra pumpkin pie filling/purée.

    🎃 Ingredients

    Moist pumpkin cupcake ingredients labeled.

    These moist pumpkin cupcakes are easy to make, starting with a vanilla cake mix, just like my cake mix cake pops.

    • boxed vanilla cake mix - it should be about 15 ounces/432 grams
    • water - or milk for enhanced flavor and texture
    • vegetable oil - canola oil works well
    • eggs - I use large eggs
    • pumpkin purée - for the cupcake batter and the frosting
    • a tub of buttercream frosting - premade
    • icing sugar - for the frosting
    • chocolate - to decorate (optional)
    • sprinkles - to decorate

    *Check recipe card for ingredient amounts.

    🥣 How to Make Super Moist Pumpkin Cupcakes

    This recipe makes 24 cupcakes.

    Pumpkin cupcake batter in a bowl.

    Step 1. Make the pumpkin batter. Preheat oven to 350°F. Line a muffin tin with baking cups. Add the dry vanilla cake mix to a large bowl. Add the water (or milk), vegetable oil, eggs and pumpkin purée. Mix with an electric hand mixer on medium speed, until smooth.

    Pumpkin cupcake batter in cupcake tray.

    Step 2. Bake and cool. Fill the baking cups equally with the batter. Bake for about 14-15 minutes, or until a toothpick comes out clean from the center. Cool for 10 minutes and then transfer to a wire baking rack. Cool completely.

    Pumpkin buttercream frosting in bowl.

    Step 3. Make the frosting. Mix together the pumpkin purée and buttercream frosting, until smooth. Add enough icing sugar to reach desired consistency.

    Pumpkin cupcakes on yellow plate.

    Step 4. Frost. Frost the cupcakes with the pumpkin buttercream. Melt some chocolate and drizzle it over the cupcakes with a spoon (optional). Decorate with sprinkles.

    Pumpkin cupcake sliced open.

    Step 5. Serve. Serve the moist pumpkin cupcakes!

    ✅ Top Tip

    I like to use a ¼ cup measuring cup to help transfer the batter to the baking cups. I fill the cup to just below the top and this measurement gives you 24 cupcakes that are even in size and evenly baked.

    ❓ Moist Pumpkin Cupcakes FAQs

    How do you store the cupcakes?

    To store, you are going to want to cover the cupcakes with plastic wrap or place in an air-tight container and store in the refrigerator for up to 3 to 4 days.

    Can you freeze them?

    Yes! They can also be frozen for up to 3 months.

    Can you frost them ahead of time?

    They are best if frosted on the day of serving, but this can also be done in advance.

    Pumpkin cupcakes with chocolate drizzle on turquoise patterned background.

    🍂 More Delicious Fall Baked Goods You Need to Try This Season

    • Mini apple pies stacked and one sliced open.
      Mini Apple Pies: A Fall School Snack Recipe
    • Pumpkin naan bread stacked on a decorative plate.
      Pumpkin & Garlic Naan Bread
    • Apple crisp in white dish.
      How to Make Apple Crisp
    • Frosted pumpkin cream cheese bread sliced open.
      Frosted Pumpkin Cream Cheese Bread

    Do your kids show an interest in getting busy in the kitchen? What are some of their creations? If you tried this 🎃🧁 Super Moist Pumpkin Cupcakes Recipe or any other recipe on my website, please leave a 🌟 star rating and let me know how it went in the 📝 comments below. And please share the recipe!

    📋Recipe

    Moist, frosted pumpkin cupcakes on yellow plate.
    Print Pin
    5 from 6 votes

    Super Moist Pumpkin Cupcakes

    These super moist pumpkin cupcakes are frosted with a pumpkin buttercream and chocolate drizzle. They are easy to make with a vanilla cake mix and are popular during the fall season, making them a perfect treat for Halloween, Thanksgiving, and autumn-themed parties.
    Course Dessert
    Cuisine Canadian
    Diet Vegetarian
    Prep Time 15 minutes minutes
    Cook Time 15 minutes minutes
    Total Time 30 minutes minutes
    Servings 24 cupcakes
    Calories 208kcal
    Author Joss Dyckson

    Equipment

    • Muffin tin
    • Electric mixer

    Ingredients

    For the Cupcakes

    • 1 box vanilla cake mix 15 ounces/432 grams
    • ½ cup water or milk
    • ½ cup vegetable oil
    • 3 eggs
    • ½ cup pumpkin purée

    For the Pumpkin Buttercream Frosting

    • ¼ cup pumpkin purée
    • 1 tub buttercream frosting 12 ounces/340 g
    • 1 to 2 cups icing sugar
    • chocolate to decorate--optional
    • sprinkles to decorate
    US Customary - Metric

    Instructions

    For the Cupcakes

    • Preheat oven to 350°F. Line a muffin tin with baking cups.
    • Add the dry vanilla cake mix to a large bowl. Add the water (or milk), vegetable oil, eggs and pumpkin purée. Mix with an electric hand mixer on medium speed, until smooth. Scrape down the sides as needed.
    • Fill the baking cups equally with the batter. This recipe makes 24 cupcakes.
    • Bake for about 14-15 minutes, or until a toothpick comes out clean from the center.
    • Cool for 10 minutes and then transfer to a wire baking rack. Cool completely.
    • Frost the cupcakes with the pumpkin buttercream. Melt some chocolate and drizzle it over the cupcakes with a spoon (optional). Decorate with sprinkles. Serve!

    For the Pumpkin Buttercream Frosting

    • Mix together the pumpkin purée and buttercream frosting, until smooth.
    • Add enough icing sugar to reach desired consistency.

    Notes

    • To store, you are going to want to cover the cupcakes with plastic wrap or place in an air-tight container and store in the refrigerator for up to 3 to 4 days.
    • They can also be frozen for up to 3 months.
    • They are best if frosted on the day of serving, but this can also be done in advance if needed.
    • I like to use a ¼ cup measuring cup to help transfer the batter to the baking cups in the muffin tin. I fill the cup just below the top and this measurement gives you 24 cupcakes that are even in size and evenly baked.

    Nutrition

    Calories: 208kcal | Carbohydrates: 33g | Protein: 2g | Fat: 8g | Saturated Fat: 5g | Cholesterol: 20mg | Sodium: 184mg | Potassium: 42mg | Fiber: 1g | Sugar: 23g | Vitamin A: 1221IU | Vitamin C: 1mg | Calcium: 53mg | Iron: 1mg

    Summer Mango-Pomegranate Soda

    June 24, 2020 by Joss Dyckson 6 Comments

    This kid-created summer mango-pomegranate soda is fruity and refreshing. With ingredients like fresh mangoes, grenadine and fizzy water, this beverage will give you all the summer feels you've been waiting for. All it takes is 3 ingredients and a quick pulse in the blender!

    Summer mango pomegranate soda in glasses with umbrellas.

    As my kids watch me busy in the kitchen on a daily basis, they have become inspired to come up with their own ideas. They have become little foodies with such a curiosity and need to get their hands in the process of recipe development, cooking and of course testing!

    It's really a neat thing to watch and if my kids ask me to help out with the meal, I will always say yes, even if it's just participating in a small way like mixing or pouring. Simply letting your kids watch you cook is a great way for them to learn as well.

    This mango summer soda is perfect for hot summer days when the kids are enjoying the sun, spending time with friends. I also have this mango soup and grilled mango that are ideal for summer!

    [feast_advanced_jump_to]

    Summer Soda Ingredients

    Summer mango pomegranate soda ingredients labeled.
    • mangoes - Fresh and ripe.
    • grenadine - Here is my homemade grenadine recipe or you can pick up a bottle from the grocery store.
    • carbonated water - Such as club soda. You could try using flavored, unsweetened soda water if desired.

    *Check recipe card for ingredient amounts.

    How to Make it

    Mangoes and grenadine in blender.

    Step 1. Blend. Purée the mangoes and grenadine in a blender until smooth.

    Mango pomegranate puree in glass pitcher.

    Step 2. Transfer. Transfer the purée to a pitcher.

    Summer mango pomegranate soda in glass pitcher with stirring spoon.

    Step 3. Stir. Add the club soda and gently stir together until blended.

    Summer mango pomegranate soda in drinking glasses and glass jar.

    Step 4. Serve. Serve immediately in glasses over ice.

    This simple recipe was created by my 6-year-old son (with a little help from Mom for ingredient amounts of course). Another simple recipe is my Shirley Temple punch.

    This is his first creation that we are sharing with all of you. We hope you enjoyed it! He wanted to take his own photo of course! Here it is:

    Summer mango soda in a glass with a mango on the side, wood background.

    Joss' Tips

    • Don't worry about chopping the mango into uniform pieces; it's all getting blended together anyway, so a rough chop is fine.
    • Keep the club soda chilled before making this recipe for best results.
    • This beverage is best served immediately but you can refrigerate it for up to 1 day. The soda will go flat by this time. Give it a mix before pouring again.

    🧁Check out another kid-created recipe: Super Moist Pumpkin Cupcakes

    ❤️More Summer Drinks You Will Love

    • Lemonade in jars with basil and blue straws.
      How to Make Lemonade
    • Blueberry mojito mocktail with fresh mint in cocktail glass.
      Blueberry Mojito Mocktail
    • Mojito mocktail with mint and lime in glass.
      Classic Mojito Mocktail
    • Iced peach green tea in glass with straw and peach garnish.
      Iced Peach Green Tea

    If you tried this 🥭⛱️🌞 Summer Mango-Pomegranate Soda Recipe or any other recipe on my website, please leave a 🌟 star rating and let me know how it went in the 📝 comments below. And please share the recipe!

    📋Recipe

    Summer mango pomegranate soda in glasses with blue umbrellas.
    Print Pin
    5 from 3 votes

    Summer Mango-Pomegranate Soda

    With ingredients like fresh mangoes, grenadine and fizzy water, this summer mango-pomegranate soda beverage will give you all the summer feels you've been waiting for.
    Course Drinks
    Cuisine Canadian
    Prep Time 5 minutes minutes
    Total Time 5 minutes minutes
    Servings 4
    Calories 126kcal
    Author Joss Dyckson

    Equipment

    • Blender

    Ingredients

    • ¾ cup mangoes chopped (about 1 mango)
    • ½ cup grenadine
    • 2 cups carbonated water club soda
    US Customary - Metric

    Instructions

    • Purée the mangoes and grenadine in a blender until smooth.
    • Transfer to a pitcher. Add the club soda and gently stir together until blended.
    • Serve immediately in glasses over ice.

    Notes

    • Don't worry about chopping the mango into uniform pieces; it's all getting blended together anyway, so a rough chop is fine.
    • Keep the club soda chilled before making this recipe for best results.
    • You could try using flavored, unsweetened soda water if desired.
    • This beverage is best served immediately but you can refrigerate it for up to 1 day. The soda will go flat by this time. Give it a mix before pouring again.

    Nutrition

    Calories: 126kcal | Carbohydrates: 31g | Protein: 1g | Fat: 1g | Saturated Fat: 1g | Sodium: 36mg | Potassium: 63mg | Fiber: 1g | Sugar: 23g | Vitamin A: 335IU | Vitamin C: 11mg | Calcium: 9mg | Iron: 1mg

    How to Grill Broccoli

    June 24, 2020 by Joss Dyckson Leave a Comment

    In this recipe I use fresh broccoli as the star of the show and cook it in a way that makes it taste not just good, but absolutely delicious. Check out my easy steps for how to grill broccoli.

    Grilled broccoli on plate on wooden table with tongs.
    [feast_advanced_jump_to]

    ✔️Why Grilling Broccoli Works

    When you cook vegetables by boiling them, much of the flavor gets leached out in the water and the vegetables themselves can turn to mush.

    With this recipe, you'll be able to make broccoli and broccolini on the grill that tastes almost as good as the steak you'll be serving it up beside. With a simple marinade and good technique, you can elevate one of the most despised vegetables out there into a true flavor sensation.

    The key is truly in the cook. When you roast vegetables, they undergo what's called the Maillard reaction. This happens when the sugars and amino acids in food comes in contact with high heat, caramelizing them to deepen their flavor and give them that distinctive brown and burnished color.

    I also have this sheet pan beef and broccoli that is delicious.

    🥦Ingredients

    Grilled broccoli ingredients prepped and labeled.
    • broccoli and broccolini - Although this recipe includes both grilled broccolini and broccoli, you can easily swap one for the other instead of a combo of the two.
    • olive oil - The oil is for the marinade which will help with caramelizing the broccoli and prevent it from sticking to the grill grates.
    • balsamic vinegar - Choose a high quality balsamic for best results.
    • garlic - You can substitute the fresh garlic for a bit of garlic powder but I prefer fresh for this recipe.
    • crushed red pepper flakes - Leave out if you don't like spiciness.
    • sesame seeds (not pictured) - Optional garnish.

    *Check recipe card for ingredient amounts.

    Chefs Note: This grilled broccoli would also taste amazing marinated in jerk sauce if you're not into the balsamic dressing. Here is my tutorial for how to make jerk sauce.

    🔪Instructions

    Broccoli and broccolini getting chopped.

    Step 1. Chop the broccoli and broccolini into smaller individual pieces. For the broccoli crown, chop through the stem and cut it into large florets. You can then slice down into each stem about 1" and use your hands to pull each piece into smaller florets.

    For the broccolini you can just trim ½" of the ends off.

    Pro Tip: Make sure the broccoli florets are large enough that they won't fall through the grill grates.

    Broccoli marinade ingredients.

    Step 2. Make the marinade. In a small bowl, whisk the olive oil, balsamic vinegar, garlic, crushed red pepper flakes, salt and pepper together to make the marinade.

    Marinade pouring over broccoli and broccolini.

    Step 3. Marinate. Place the broccoli pieces into a dish. Drizzle the marinade over the broccoli and toss to coat. Let it sit to marinate for 20 minutes. Reserve the leftover dressing for basting later.

    Broccoli on the grill in tongs.

    Step 4. Add broccoli to grill. Heat an outdoor gas or charcoal grill to medium heat. Remove the broccoli pieces from the marinade and place them on the grill.

    Broccoli on the grill.

    Step 5. Grill. Grill broccoli until fork-tender (around 10 minutes) - flipping them every 2 to 3 minutes and brushing with the reserved dressing as they are grilling.

    Broccoli and broccolini on the grill.

    Chef's Note: Remember to flip them occasionally and brush with the leftover dressing so that they don't get too dry. They are ready when fork-tender and slightly charred.

    Grilled broccolini in tongs on blue plate.

    Step 7. Remove from grill. Transfer the broccoli and broccolini from the grill to a serving dish.

    Grilled broccoli on plate on outdoor wooden table.

    Step 8. Serve. Serve sprinkled with sesame seeds and more red pepper flakes, if desired. I also love a drizzle of Sriracha sauce.

    Top Tip

    Grilled broccoli on grill mat.

    You can also use a grill mat to prevent any broccoli from falling through the grates or sticking and keep the grill grates cleaner.

    🥗What to Serve Grilled Broccoli With

    • Mains: Some of my favorite mains to serve this grilled broccoli with are this Korean kimchi chicken, barbecue pizza and grilled carne asada.
    • Drinks: I have a few summery, cool drinks that would be perfect: lemonade, a blueberry mojito mocktail and this easy homemade strawberry juice.
    • Desserts: Try this strawberry crumble recipe or strawberry ice cream sundae.

    ❓Recipe FAQs

    How long does fresh broccoli take to cook?

    It's going to take about 10 minutes to get it nice and fork-tender.

    Should we boil broccoli before cooking?

    With this method there is no need to boil the broccoli before grilling it, but we are marinating it first.

    Should you wash broccoli before cooking?

    Yes, it is recommended to rinse the broccoli clean just before using it. If you're washing it a day or two in advance, try to get it nice and dry with a salad spinner or clean towel.

    How long can you store leftover grilled broccoli?

    You can store leftover grilled broccoli in an airtight container in the fridge for up to 3 to 5 days.

    Grilled broccoli on plate on outdoor wooden table with red pepper flakes on the side.

    ♨More Delicious Grilled Sides

    • Grilled vegetables (escalivada) on clear, glass plate.
      Escalivada (Grilled Vegetables)
    • Grilled corn on wooden board.
      How to Grill Corn on the Cob
    • Grilled avocado halves stuffed with pico de gallo on cutting board.
      Grilled Stuffed Avocado
    • Grilled cubed mango on wooden skewers.
      Grilled Mango Skewers

    Are you planning to try this grilled broccoli at your next cookout? If you tried this recipe tutorial for 🥦 How to Grill Broccoli or any other recipe on my website, please leave a 🌟 star rating and let me know how it went in the 📝 comments below. And please share the recipe!

    📋Recipe

    Grilled broccoli on plate with tongs.
    Print Pin
    5 from 2 votes

    How to Grill Broccoli

    I have a delicious recipe tutorial for how to grill broccoli and broccolini. This grilled broccoli recipe uses a simple marinade and good technique to elevate a sometimes despised vegetable into a true flavor sensation!
    Course Side Dish
    Cuisine American
    Diet Low Salt, Vegan, Vegetarian
    Prep Time 5 minutes minutes
    Cook Time 10 minutes minutes
    Marinating Time 20 minutes minutes
    Total Time 35 minutes minutes
    Servings 4
    Calories 208kcal
    Author Joss Dyckson

    Equipment

    • Outdoor grill
    • Tongs

    Ingredients

    • 1 crown broccoli
    • 1 bunch broccolini or you can just use broccoli
    • ¼ cup olive oil
    • ¼ cup balsamic vinegar
    • 1 teaspoon garlic minced
    • 1 teaspoon red pepper flakes
    • sesame seeds to garnish
    • salt and pepper to taste
    US Customary - Metric

    Instructions

    • Chop the broccoli into smaller individual pieces (but not so small that they will fall through the grill grates). For the broccolini, just trim the ends by ½".
    • In a small bowl, whisk the olive oil, balsamic vinegar, garlic, crushed red pepper flakes, salt and pepper together to make the marinade.
    • Place the broccoli pieces into a dish. Drizzle the marinade over the broccoli and toss to coat. Let it sit to marinate for 20 minutes. Reserve the leftover dressing for basting later.
    • Heat an outdoor grill to medium heat. Grill broccoli until fork-tender (around 10 minutes) - flipping them every 2 to 3 minutes and brushing with the reserved dressing as they are grilling so they don't get too dry.
    • Transfer the broccoli and broccolini from the grill to a serving dish.
    • Serve sprinkled with sesame seeds and more red pepper flakes, if desired. I also love a drizzle of Sriracha sauce.

    Notes

    • Although this recipe includes both grilled broccolini and broccoli, you can easily swap one for the other instead of a combo of the two.
    • It is recommended to rinse the broccoli clean just before using it. If you're washing it a day or two in advance, try to get it nice and dry with a salad spinner or clean towel.
    • You can also use a grill mat to prevent any broccoli from falling through the grates or sticking and keep the grill grates cleaner.
    • You can store leftover grilled broccoli in an airtight container in the fridge for up to 3 to 5 days.

    Nutrition

    Calories: 208kcal | Carbohydrates: 17g | Protein: 6g | Fat: 14g | Saturated Fat: 2g | Sodium: 87mg | Potassium: 522mg | Fiber: 5g | Sugar: 6g | Vitamin A: 2062IU | Vitamin C: 175mg | Calcium: 110mg | Iron: 2mg

    Easy Skillet S’mores

    June 17, 2020 by Joss Dyckson Leave a Comment

    Want to experience a delicious campsite treat without leaving home? Try my amazing and easy, skillet s'mores recipe to take you back to those nights around the fire enjoying the great outdoors.

    Skillet s'mores stacked on a plate.

    Everyone loves a smoky s'more from time to time, especially when they're out camping. Not everyone can just get up and head for the hills whenever they want, though. Tragically, this makes it seem like s'mores are out of reach.

    That is, until today. This recipe for skillet s'mores will take you back to those great memories and great flavors without leaving home. It's a great way to satisfy that craving when a campfire is out of the question. Another advantage is you can cook multiple s'mores all at once.

    For something a little different, I like to dip them into chocolate instead of sandwiching it between the crackers (I have instructions for both ways). If you love chocolate as much as I do, you'll also love my chocolate caramel bars and gourmet dark chocolate truffles.

    [feast_advanced_jump_to]

    Ingredients

    These simple skillet s'mores require only 3 ingredients:

    • graham crackers - Sweet, flavored crackers made with graham flour--a classic S'more ingredient.
    • dark chocolate - You can also use milk chocolate if preferred.
    • marshmallows - This recipe uses the large marshmallows but the color and flavor is up to you. I've used maple flavor, which is nice. You could also use jumbo marshmallows and then you only need one per skillet s'more.

    *Check recipe card for ingredient amounts.

    How to Make S'mores in a Skillet

    Colored marshmallows on graham crackers.

    Step 1. Melt the marshmallows: Heat a skillet to low on the stove. Place 8 of the graham wafer crackers into the skillet and then add two marshmallows on top of each. Cover the skillet with a lid (or foil if you don't have a lid for your skillet) and cook for 2 to 3 minutes, or until the marshmallows begin to melt.

    Melted marshmallows between graham crackers.

    Step 2. Cover and flip: Place the other 8 crackers on top of the marshmallows, carefully flip them and cook for another minute. Reserve on a baking rack.

    Skillet s'mores cooling on wire rack with bowl of melted chocolate.

    Step 3. Melt the chocolate: Place the chocolate in a glass bowl and melt it in the microwave for 30 seconds. Stir it. Continue microwaving it in 20 second intervals and then stirring each time, until fully melted.

    Pro Tip: The chocolate may not look melted right away, but it becomes smooth when stirring, so make sure not to skip the stirring step.

    Step 4. Dip and serve: Dip the s'mores halfway into the melted chocolate. Place them on a rack and let them sit until the chocolate hardens or enjoy right away!

    S'mores dipped in chocolate on a clear glass plate.

    Tips & Serving Suggestions

    S'mores don't have to be reserved exclusively for the campground. If you follow my convenient skillet recipe for s'mores, you'll be eating some of these tasty treats in no time all from your couch. They can also be made in an electric skillet on low.

    Thanks to the low and even heating this method provides, you won't be left with a hard, ruined marshmallow like you've likely endured when you tried microwaving them in the past. As long as you can keep the heat within the right temperature range (low heat), you shouldn't have to fear burning the marshmallow like you do in a more traditional cooking method.

    If you're looking for a slightly more traditional experience with a slab of chocolate instead of melted, it's perfectly easy to switch things up for that:

    1. Before flipping your s'more, place a square of chocolate on top of the marshmallow and then top with the graham wafer.
    2. Flip it and continue toasting. Just be careful not to walk off as the chocolate might start to melt out the sides of the s'more onto the skillet if you let it go too long.
    3. Once the chocolate is slightly melted, you can take them out of the pan and serve your skillet s'mores.

    Recipe FAQs

    Why are they called S'mores?

    The term "s'more" is derived from the words "some more" because you're definitely going to want some more once you try one.

    Can you use any chocolate for s'mores?

    Sure. While milk chocolate is a classic choice, you can definitely give dark or flavored chocolate a try.

    What is the perfect marshmallow for s'mores?

    For the most part, a marshmallow is a marshmallow, but you can actually find 'campfire' brand marshmallows in the grocery store that are nice and puffy. Jet Puffed marshmallows are also popular for s'mores. In terms of size, I like to use large or jumbo to get a nice amount of that inner marshmallow goo that s'mores are known for.

    Stacked s'mores on a clear glass plate.

    More Skillet Recipes You Will Love

    • Full English breakfast on white plate.
      Electric Skillet Full English Breakfast
    • 2 steaks in an electric skillet with butter and a rosemary sprig on top.
      Electric Skillet Steak
    • Cheesy scalloped potatoes in brown bowls on marble background.
      Electric Skillet Scalloped Potatoes
    • Pork chops with gravy, mushrooms and fresh thyme sprigs.
      Electric Skillet Pork Chops

    If you tried this 🍫🔥 Easy Skillet S'mores Recipe or any other recipe on my website, please leave a 🌟 star rating and let me know how it went in the 📝 comments below. And please share the recipe!

    📋Recipe

    Skillet s'mores with colored marshmallows stacked on plate.
    Print Pin
    5 from 1 vote

    Easy Skillet S'mores Recipe

    Want to experience a delicious campsite treat without leaving home? Try this amazing and easy, skillet s'mores recipe to take you back to those nights around the fire!
    Course Dessert
    Cuisine American
    Prep Time 10 minutes minutes
    Cook Time 5 minutes minutes
    Total Time 15 minutes minutes
    Servings 8 s'mores
    Calories 272kcal
    Author Joss Dyckson

    Equipment

    • Frying pan
    • Baking rack

    Ingredients

    • 16 graham crackers
    • 1 cup dark chocolate broken into pieces
    • 16 large marshmallows can be white or rainbow colored
    US Customary - Metric

    Instructions

    • Heat a skillet to low on the stove. Place 8 of the graham wafer crackers into the skillet and then add two marshmallows on top of each. Cover the skillet with a lid (or foil if you don't have a lid for your skillet) and cook for 2 to 3 minutes, or until the marshmallows begin to melt.
    • Place the other 8 crackers on top of the marshmallows, carefully flip them and cook for another minute. Reserve on a baking rack.
    • Place the chocolate in a glass bowl and melt it in the microwave for 30 seconds. Stir it. Continue microwaving it in 20 second intervals and then stirring each time, until fully melted. (The chocolate may not look melted right away, but becomes smooth when stirring, so make sure not to skip the stirring step.)
    • Dip the s'mores halfway into the melted chocolate. Place them on a rack and let them sit until the chocolate hardens or enjoy right away!

    Notes

    • Marshmallows: This recipe uses the large marshmallows but the color and flavor is up to you. I've used maple flavor, which is nice. You could also use jumbo marshmallows and then you only need one per s'more.
    • Alternative Method: If you're looking for a slightly more traditional experience with a slab of chocolate instead of melted, it's perfectly easy to switch things up for that:
      • Before flipping your s'more, place a square of chocolate on top of the marshmallow and then top with the graham wafer.
      • Flip it and continue toasting. Just be careful not to walk off as the chocolate might start to melt out the sides of the s'more onto the skillet if you let it go too long.
      • Once the chocolate is slightly melted, you can take them out of the pan and serve.

    Nutrition

    Calories: 272kcal | Carbohydrates: 37g | Protein: 4g | Fat: 12g | Saturated Fat: 6g | Cholesterol: 1mg | Sodium: 194mg | Potassium: 206mg | Fiber: 3g | Sugar: 16g | Vitamin A: 9IU | Calcium: 38mg | Iron: 4mg

    4th of July Pulled Pork Sliders

    June 10, 2020 by Joss Dyckson 2 Comments

    Independence Day is right around the corner, which means it is almost time for backyard BBQs, firework shows, and hometown parades. If you are looking for a 4th of July appetizer that will knock it out of the park, check out these delicious, flavorful pulled pork sliders.

    Pulled pork sliders on parchment lined serving tray with 4th of July decorations.

    Pulled pork sliders have become a favored fair at restaurants and breweries across the country because they are mini, savory flavor bombs that don't leave you feeling completely stuffed. They're basically down-sized BBQ pulled pork burgers.

    With only 15 minutes of prep time, this recipe aims to impress without keeping you stuck in the kitchen all day.

    The best part about 4th of July finger foods for a party is that there is something for all taste palettes. These pulled pork sliders pair well with other classic Americana like hot dogs, grilled pork tenderloin skewers and potato salad. I also have this red, white and blue charcuterie board that you can add to the appetizer table.

    [feast_advanced_jump_to]

    Ingredients

    Pulled pork slider ingredients prepped and labeled.
    • boneless pork loin - The best pork cuts for pulled pork in terms of flavor are pork shoulder roast or butt. However, for a leaner option that is easier to shred, I use either boneless pork loin or pork tenderloin for this recipe. You can take your pick based on your personal preference.
    • beer - My first choice for beer in this sauce would be a pale ale (not to be confused with an IPA) but a porter also works great with pulled pork. A porter is a malty, dark beer.
    • slider buns - These are basically mini hamburger buns.
    • lettuce - I like to use iceberg but you can use romaine, arugula, spring mix etc.
    • mayo, apple cider vinegar, cumin and sugar - These ingredients are for the delicious slider sauce that complements the pulled pork flavors really well.
    • red onions - The onions are going to be marinated in the lemon juice, making a delicious topping with an extra punch of flavor.
    • lemon juice - Freshly squeezed, to marinate the onions.

    *Check recipe card for full ingredient amounts.

    Chef's Note: The slider sauce is amazing, but these sliders would also taste great with a homemade white BBQ sauce as an alternative.

    How to Make These Sliders

    Raw pork loin in slow cooker.

    Step 1. Add pork to slow cooker. Place the pork shoulder (or loin) in a slow cooker and season with some salt and pepper.

    Pork loin in slow cooker with BBQ beer sauce.

    Step 2. Make the pork sauce. Combine the BBQ sauce, beer, ketchup and brown sugar in a bowl (Image 1). Pour it over the pork in the slow cooker (Image 2).

    Pork loin with BBQ beer sauce in slow cooker with lid.

    Step 3. Cook. Cover with the lid and cook for 4 to 6 hours on high, until tender.

    Pork loin getting shredded and smothered with BBQ beer sauce in slow cooker.

    Step 4. Shred. Remove the pork from the slow cooker (Image 1) and shred it using two forks on a cutting board (Image 2). Return to slow cooker with all of the cooking juices (Image 3) and mix well (Image 4).

    Slider sauce in jar prep pictures.

    Step 5. Make the slider sauce. Meanwhile, mix all slider sauce ingredients together in a bowl. I like to funnel it into a squeeze bottle for serving. Reserve.

    Red onion slices marinated in lemon juice in jar.

    Step 6. Marinate the onions. Just before serving: place the onion slices in a small bowl with the lemon juice for 20 minutes.

    Pulled pork sliders for 4th of July getting assembled.

    Step 7. Assemble the sliders. Drain the pulled pork from the cooking liquid (but save the liquid for later). Layer the slider buns with the pulled pork, lettuce, onions and slider sauce.

    Pulled pork sliders on serving tray.

    Step 8. Serve. Serve the sliders and enjoy!

    Make Ahead Options

    Sliders are a welcome addition to any BBQ or picnic. If you are headed to a BBQ or party where the grill and kitchen will be busy, this dish is perfect for making ahead.

    • Simply keep the meat warm in the slow cooker, and take along the buns, sauce and toppings separately until they are ready to be served.
    • These sliders also reheat well, so the meat can be prepared a day or two in advance, but no longer than 3 to 4 days total.
    • The slider sauce can be made ahead of time and stored, covered in the fridge, for up to two weeks.

    Recipe Tips

    Pulled pork shoulder sauce pouring from spoon into jar.

    Save the sauce. When you drain the liquid from the pulled pork, be sure to save it. You can add back as much or as little as you like to the shredded pork, but keep in mind that the more liquidy it is, the more soggy the buns will be. Toasting the buns helps too.

    If you're reheating the pulled pork later, you are going to want to use the reserved sauce to remoisten it.

    Pulled pork sliders with 4th of July decorations.

    Add some patriotic decor. Be sure to add some red, white and blue decorations to your finished sliders and/or on the appetizer table.

    If you can find some festive, red or blue plates and napkins, those would be great too!

    Pulled pork sliders on serving tray with 4th of July decor.

    More Delicious Finger Foods to Consider

    • Grilled bacon-wrapped pickles on toothpicks on white dish.
      Grilled Bacon Wrapped Pickles
    • Grilled jalapeño poppers on black serving board.
      How to Grill Jalapeño Poppers
    • Melon prosciutto skewers with toothpicks.
      Melon Prosciutto Skewers (Summer Appetizer)
    • Watermelon sticks on black stone.
      How to Cut a Watermelon (Cubes, Sticks & Triangles)

    If you tried this 🎇 4th of July Pulled Pork Sliders Recipe or any other recipe on my website, please leave a 🌟 star rating and let me know how it went in the 📝 comments below. And please share the recipe!

    📋Recipe

    4th of July pulled pork sliders on parchment lined serving tray.
    Print Pin
    5 from 2 votes

    4th of July Pulled Pork Sliders

    If you want 4th of July appetizers that will knock it out of the park, check out these pulled pork sliders made in a slow cooker. They are so delicious and flavorful--a definite, patriotic crowd favorite!
    Course Appetizer, Main Course, Snack
    Cuisine American
    Prep Time 15 minutes minutes
    Cook Time 4 hours hours
    Total Time 4 hours hours 15 minutes minutes
    Servings 16 sliders
    Calories 268kcal
    Author Joss Dyckson

    Equipment

    • Slow cooker

    Ingredients

    For the Pulled Pork

    • 3 pounds boneless pork shoulder roast trimmed of fat--you can also use boneless pork loin or pork tenderloin
    • 1 cup BBQ sauce
    • ½ cup beer a pale ale beer or porter work well
    • ½ cup ketchup
    • ½ cup brown sugar
    • salt and pepper

    For the Slider Sauce

    • 2 cups mayonnaise
    • 2 tablespoons apple cider vinegar
    • 1 teaspoon cumin
    • 1 teaspoon sugar

    To Serve

    • 1 red onion sliced
    • 1 lemon squeezed
    • iceberg lettuce
    • 16 slider buns mini hamburger buns
    US Customary - Metric

    Instructions

    • Place the pork shoulder (or loin if using) in a slow cooker and season with some salt and pepper.
    • Combine the BBQ sauce, beer, ketchup and brown sugar in a bowl and pour it over the pork in the slow cooker. Cover and cook for 4 to 6 hours on high, until tender.
    • Remove the pork from the slow cooker and shred it using two forks on a cutting board. Return to slow cooker with all of the cooking juices and mix well.
    • Meanwhile, mix all slider sauce ingredients together in a bowl. I like to funnel it into a squeeze bottle for serving. Reserve.
    • Just before serving: marinate the onion slices with the lemon juice in a small bowl for 20 minutes.
    • Drain the pulled pork from the cooking liquid (but save it to remoisten the leftovers). Serve the pulled pork on slider buns with the lettuce, slider sauce and onions.

    Notes

    • You can use boneless pork loin or pork tenderloin for a leaner option but pork shoulder and butt tends to have the best flavor.
    • The pulled pork for these sliders reheats well, so the meat can be prepared a day or two in advance, but no longer than 3 to 4 days total.
    • The slider sauce can be stored covered in the fridge for up to two weeks.
    • Be sure to add some red, white and blue decorations to your finished sliders and/or on the appetizer table. If you can find some festive, red or blue plates and napkins, those would be great too!
    • When you drain the liquid from the pulled pork, be sure to save it. You can add back as much or as little as you like to the shredded pork, but keep in mind that the more liquidy it is, the more soggy the buns will be. Toasting the buns helps too.
    • If you're reheating the pulled pork later, you are going to want to use the reserved sauce to remoisten it.

    Nutrition

    Calories: 268kcal | Carbohydrates: 33g | Protein: 22g | Fat: 5g | Saturated Fat: 1g | Cholesterol: 54mg | Sodium: 295mg | Potassium: 392mg | Fiber: 1g | Sugar: 17g | Vitamin A: 79IU | Vitamin C: 1mg | Calcium: 42mg | Iron: 2mg

    Cuban Lunch Chocolate Bar Recipe

    June 6, 2020 by Joss Dyckson 27 Comments

    Do you remember the Cuban Lunch Chocolate Bar? This classic candy bar has the perfect ratio of chocolate to peanuts and is melt-in-your-mouth delicious! This recipe is very, very close to the original candy bar.

    Cuban lunch bars stacked on wood background.

    Cuban lunch candy bars (I also call them Cuban lunch squares) were one of my dad's favorite chocolate bars when I was growing up, before they disappeared from the shelves.

    I set out to recreate the recipe for my dad, with the help of his memory of this decadent treat. I let him sample each batch of my copycat version until he was satisfied that it tasted like the original Cuban Lunch bar.

    I love trying to copycat recipes, just like I did with this copycat orange Julius recipe. It takes months of effort to get the flavors and textures as close as possible to the real deal.

    Here is the recipe that is now a frequent treat in our home and a gift to my dad every Father's Day. You only need 2 ingredients! I also have this caramel filled chocolate bars recipe that you might like or some more amazing homemade desserts.

    [feast_advanced_jump_to]

    What are Cuban Lunch Chocolate Bars?

    The original Cuban Lunch bars are Canadian chocolate bars that came from Winnipeg, Manitoba. This candy bar was produced in the Paulin factory for over 100 years until 1991.

    A couple from Alberta have recently revived the chocolate bar, making it available on store shelves once again.

    Here are the new Cuban Lunch Chocolate Bars that you can buy today and what the original candy bar actually looked like:

    Original Cuban lunch bars.

    Ingredients

    Cuban lunch chocolate bars ingredients labeled.
    • chocolate bar - Use high quality chocolate--you'll be able to tell the difference. I love the Lindt Swiss Classic dark chocolate (their original) for this recipe, as it isn't very bitter for a dark chocolate - it has 49% minimum cocoa solids. Plus, they come in a very large size.
    • peanuts - Make sure to use Spanish peanuts! They are typically used in candy bars for their smaller size and higher oil content that gives them a more nutty flavor when roasted.

    *Check recipe card for ingredient amounts.

    How to Make Cuban Lunch Bars

    Remove Peanut Skins (Optional)

    Spanish peanuts usually come with skins. It is perfectly fine to leave them on but if you prefer to remove them, follow these easy steps.

    Spanish peanuts on kitchen towel.

    Step 1. Place the peanuts in the middle of a clean kitchen towel.

    Hands holding towel with Spanish peanuts in it.

    Step 2. Fold the towel up over the peanuts and massage it with your hands. This will loosen the skins.

    Spanish peanuts in strainer over kitchen towel.

    Step 3. Grab some sort of strainer that has holes large enough for the skins to go through but not the peanuts. Give them a shake in the strainer and the skins should fall through. You could also blow the skins away, although that can be messy.

    Make the Cuban Lunch Bars

    Chocolate pieces in bowl.

    Step 1. Add the broken chocolate pieces to a double boiler. You can use a metal or heat-proof glass bowl that fits on top of a pot of simmering water.

    Melted chocolate in bowl with spatula.

    Step 2. Melt the chocolate, stirring frequently with a spatula.

    Chef's Note: Alternatively, you can microwave the chocolate in a microwave-safe bowl at 20 second intervals, stirring each time until fully melted.

    Melted chocolate and peanuts in bowl.

    Step 3. Take the bowl of chocolate off the heat. Add the whole and chopped peanuts.

    Melted chocolate combined with peanuts in metal bowl.

    Step 4. Stir the peanuts in and mix well.

    Chocolate and peanuts mixture in candy mold with spoon.

    Step 5. Using a spoon, transfer the chocolate mixture into a candy mold, filling the cavities. If you're using my suggested mold, fill them only about half way up.

    Chocolate and peanuts mixture in candy mold.

    Step 6. Let the chocolate cool and set for at least 2 hours or more, until solid.

    Cuban lunch bars in mold and on plate.

    Step 7. When the chocolate bars are solid, carefully remove them from the mold.

    Cuban lunch bars cut and stacked on wood background.

    Step 8. Serve the Cuban lunch bars!

    Joss' Tips

    Chocolate bar mold.
    • Mold size: You can use any kind of candy mold or even mini cupcake liners but the mold size I use is 11 x 10.1 x 1 inch. The cavity size is 2.9 x 1.9 x 1 inch (mold pictured above). I fill them half way up to get the perfect-sized Cuban lunch bar.
    • Silicone molds: If using a silicone mold, place it on a sheet pan so that you can transfer it easily.
    • Temperature: Try to let the chocolate set in a room that is at a cool room temperature for best results. Hardening the chocolate in a fridge or freezer can cause chocolate bloom.
    • Chocolate bloom: Blooming can occur when chocolate is exposed to moisture and/or heat. Chocolate will become grey in appearance which doesn't look great but is perfectly fine for eating. Make sure your mold is clean and dry to avoid this and follow the storage/temperature instructions.
    • Gift idea: If you are giving them as a gift, you can even wrap them in colored foil squares to make them look like legit chocolate bars.
    • Try something new: Why not try using these chocolate bars to make skillet s'mores? It would make for a nutty twist on the classic. You would just need to make them a bit thinner so they can fit in between the graham crackers.

    Recipe FAQs

    What happened to the Cuban Lunch chocolate bar?

    It disappeared from the shelves when the Paulin factory stopped making the candy bar in 1991 but they are now available once again.

    Why are they called Cuban lunches?

    This is what a soldier's rectangular ration was called. After the war, the Paulin Chambers company decided to create a rectangular chocolate bar and chose this specific term for their innovative treat.

    How do you store the chocolate bars?

    These candy bars can be stored in an airtight container in a cool, dry place for months once they are set. Fridge and freezer storage is not ideal but still an option. I will sometimes store them in the fridge if it's warm in the house. If you are freezing them, first cover well, refrigerate for 24 hours (to avoid temperature shock) and place in a freezer bag.

    Cuban lunch chocolate bars cut open and stacked up.

    ❤️ More Chocolate Recipes You Will Love

    • White chocolate ganache drizzling from spoon into bowl.
      White Chocolate Ganache
    • Chocolate gravy drizzling from spoon over pot.
      Easy Homemade Chocolate Gravy
    • Hot chocolate spoons on serving tray.
      Hot Chocolate Spoons
    • Chocolate covered coffee beans in white dish.
      How to Make Chocolate Covered Coffee Beans

    Did this recipe take you back? If you tried this 🍫 Cuban Lunch Chocolate Bar Recipe or any other recipe on my website, please leave a 🌟 star rating and let me know how it went in the 📝 comments below. And please share the recipe!

    📋Recipe

    Cuban lunch chocolate bars stacked.
    Print Pin
    5 from 13 votes

    Cuban Lunch Chocolate Bar Recipe

    This classic Cuban Lunch chocolate bar has the perfect ratio of chocolate to peanuts and is melt-in-your-mouth delicious! This recipe is very, very close to the original candy bar.
    Course Dessert
    Cuisine Canadian
    Diet Vegan, Vegetarian
    Prep Time 5 minutes minutes
    Cook Time 3 minutes minutes
    Cooling Time: 2 hours hours
    Total Time 2 hours hours 8 minutes minutes
    Servings 12 bars
    Calories 279kcal
    Author Joss Dyckson

    Equipment

    • Candy mold
    • Foil Wrappers (optional)

    Ingredients

    • 16 ounces high quality dark chocolate broken into pieces
    • ¼ cup Spanish peanuts chopped
    • ½ cup Spanish peanuts whole
    US Customary - Metric

    Instructions

    • Melt the chocolate in a double boiler over simmering water, stirring frequently with a spatula. (You can use a metal or heat-proof glass bowl that fits on top of a pot.)
      Alternatively, you can microwave the chocolate in a microwave-safe bowl at 20 second intervals, stirring each time until fully melted.
      16 ounces high quality dark chocolate
    • Take the bowl of chocolate off the heat. Stir in the chopped and whole peanuts. Mix well.
      ¼ cup Spanish peanuts, ½ cup Spanish peanuts
    • Using a spoon, transfer the chocolate mixture into a candy mold, filling the cavities. If you're using my suggested mold below, fill them only about half way up.
    • Let the chocolate cool and set for at least 2 hours or more, until solid.
    • When the chocolate bars are solid, carefully remove them from the mold.
    • Serve and enjoy!

    Notes

    • Mold size: You can use any kind of candy mold or even mini cupcake liners but the mold size I use is 11 x 10.1 x 1 inch. The cavity size is 2.9 x 1.9 x 1 inch. I fill them half way up to get the perfect size chocolate bar.
    • Silicone molds: If using a silicone mold, place it on a sheet pan so that you can transfer it easily.
    • Spanish peanut skins: It is fine to leave the peanut skins, but if you want to remove them first, see post for steps.
    • Chocolate type: I use the large Lindt dark chocolate bars for this recipe as it isn't very bitter for a dark chocolate - it has 49% minimum cocoa solids.
    • Temperature: Try to let the chocolate set in a room that is at a cool room temperature for best results. Hardening the chocolate in a fridge or freezer can cause chocolate bloom.
    • Chocolate bloom: Blooming can occur when chocolate is exposed to moisture and/or heat. Chocolate will become grey in appearance which doesn't look great but is perfectly fine for eating. Make sure your mold is clean and dry to avoid this and follow the storage/temperature instructions.
    • Storage: These candy bars can be stored in an airtight container in a cool, dry place for months once they are set. Fridge and freezer storage is not ideal but still an option. I will sometimes store them in the fridge if it's warm in the house. If you are freezing them, first cover well, refrigerate for 24 hours (to avoid temperature shock) and place in a freezer bag.
    • Gift idea: If you are giving them as a gift, you can even wrap them in colored foil squares to make them look like legit chocolate bars.

    Nutrition

    Calories: 279kcal | Carbohydrates: 19g | Protein: 6g | Fat: 21g | Saturated Fat: 10g | Cholesterol: 1mg | Sodium: 47mg | Potassium: 341mg | Fiber: 5g | Sugar: 9g | Vitamin A: 15IU | Calcium: 37mg | Iron: 5mg

    Raspberry Cheesecake in a Jar (Canada Day Dessert)

    June 3, 2020 by Joss Dyckson 1 Comment

    This single serving raspberry cheesecake in a jar is a simple and fun Canada Day dessert. Buttery graham cracker crust, a sweet and fluffy cream cheese mixture and fresh raspberries are layered into small jars or dessert cups.

    Canada Day raspberry cheesecake in jars with red and white spoons and fresh raspberries on the side.

    Finish them with a short chill in the refrigerator and you've got yourself the perfect, red and white mini dessert for Canada Day!

    I also have these bison sliders, strawberry and whipped cream dessert and a strawberry lime mojito mocktail for more themed food and drink options on your Canada Day menu.

    [feast_advanced_jump_to]

    ❤️ Why You Will Love Them

    • This is an easy, make-ahead Canada Day dessert option if you're worried about being pressed for time on the day-of. It can be prepared up to a few days in advance or on the morning of. This can take a load of stress off and allow you to be prepared for the big day.
    • Another nice thing about this dessert is there is no baking required! The cake just needs a quick chill in the refrigerator. It firms up nicely if you leave it in the fridge overnight. The longer they sit in the fridge, the more firm they will be, so keep that in mind.
    • Cheesecake is always a crowd favorite treat.
    • They are easy to transport, just like my strawberry cheesecake cake pops.

    🍰 Ingredients

    Canada Day raspberry cheesecake in a jar ingredients prepped and labeled.
    • graham cracker crumbs - For the cheesecake crust. If desired, you can substitute with Oreo baking crumbs or chocolate crumbs; they taste great too!
    • butter - You can use salted or unsalted. I personally always have salted on hand and that is what I use. A little bit of salt enhances the flavor of desserts.
    • cream cheese - Make sure it is softened before using in this recipe.
    • granulated sugar - Regular white sugar for sweetening the cheesecake filling. I haven't tried this yet, but maple syrup might be a good substitute for the sugar and it's a classic Canadian ingredient.
    • vanilla extract - Artificial vanilla extract is okay to use here.
    • lemon zest - Freshly grated for a hint of zesty flavor.
    • heavy cream - Heavy cream has a milkfat content between 36-40% which makes a nice and rich whipped cream.
    • fresh raspberries - You can top the cheesecake with whatever fresh, red berries you like, but I prefer raspberries for something a little different - plus they grow all summer long in my backyard, so why not?

    *Check recipe card for ingredient amounts.

    Chef's Note: You can get creative with what to serve the cheesecakes in. I like to use small mason jars (4 ounce jam jars). If you hold off on the toppings when refrigerating, this dessert fits perfectly into a jam jar and can be sealed with the lid.

    But there are so many options for mini dessert cups out there or you can even go beyond that and think outside the box. Shot glasses can also be used for a cheesecake shooter. Just note that the servings and nutrition information will change depending on the size.

    🫐 Topping Tweaks

    Customize this Canada Day dessert with popular berries by province and territory! Naturally sweet berries can be added raw. For berries that aren't as sweet or out of season, they can be sweetened and made into pie fillings or canned before adding them to the cheesecake in a jar.

    Find them at local markets and u-pick farms. You can pick one berry or do a mix!

    An infographic with a list of provinces and 3 of the most popular berries in each.

    🥣 How to Make Cheesecake in a Jar

    Graham cracker crumbs mixed with butter in small bowl.

    Step 1. To make the crust, add the melted butter to the graham cracker crumbs and mix together until moistened.

    Cream cheese mixture getting whipped in bowl.

    Step 2. To make the filling, beat the cream cheese, sugar, vanilla extract and lemon zest together with an electric mixer on medium speed, until smooth.

    Heavy whipping cream whipped in bowl.

    Step 3. In a separate bowl, whip the heavy cream with the mixer until stiff peaks form. Start on low speed and move to medium-high speed as it thickens to avoid splatter.

    No bake cream cheese mixture in bowl.

    Step 4. Slowly add the whipped cream to the cream cheese mixture by folding it in with a spatula or electric mixer on low.

    Graham cracker crumb crust in small jars.

    Step 5. Press the graham crumbs into the bottom of small jars or dessert cups.

    Graham crackers crumbs and cheesecake mixture in jars.

    Step 6. Add the cream cheese mixture.

    Raspberry cheesecake in a jar assembled in small jars.

    Step 7. Top with fresh raspberries, plus a bit more graham cracker crumbs.

    Raspberry cheesecake in a jar with a spoonful of cheesecake.

    Step 8. Refrigerate for at least 1 hour or overnight before serving.

    👩🏻‍🍳 Recipe Tips

    • Hold off on toppings until serving. This dessert can be made 1 to 2 days in advance but hold off on the toppings until serving time.
    • Don't whip the cream for too long. Avoid over-whipping the heavy cream. You want to stop just when stiff peaks form or it will become grainy.
    • Chill the heavy cream but not the cream cheese. Make sure the heavy cream is chilled before whipping but the cream cheese needs to be at room temperature for proper combining.
    • Get rid of lumps. When beating the cream cheese mixture, make sure there are no lumps. If there are, continue beating until soft and smooth.
    • Fold gently. Combine the whipped cream and cream cheese mixture slowly so that you don't deflate the whipped cream.
    • Use a muddler. I find that a cocktail muddler works great for pressing the crumbs into the dessert jars. You can also use the bottom of a cup.
    • Use red and white utensils. I used red and white, small wooden spoons. You can even paint them with little maple leaves to be more Canadian-themed.

    ❓ Cheesecake in a Jar FAQs

    How long can you store the mini cheesecakes in the fridge?

    You can store leftover cheesecakes, covered well in the fridge, for up to 5 to 7 days.

    Can you freeze mini cheesecakes?

    Yes. Cheesecake that has been set in the fridge can be frozen for up to 3 months. Thaw in the refrigerator.

    Canada Day raspberry cheesecake in jars with red and white spoons and fresh raspberries.

    🍁 More Canadian Recipes To Try

    • Cuban lunch chocolate bars stacked.
      Cuban Lunch Chocolate Bar Recipe
    • Raspberry twist cocktail in champagne glasses with lemon twist.
      Raspberry Twist Cocktail
    • Canadian butter tarts on Christmas themed plate.
      Canadian Butter Tarts
    • Honey dill sauce in small jar with mini serving spoon.
      Simple Honey Dill Sauce

    If you tried this 🍁 Canada Day Dessert Recipe: Raspberry Cheesecake in a Jar or any other recipe on my website, please leave a 🌟 star rating and let me know how it went in the 📝 comments below. And please share the recipe!

    📋Recipe

    Canada Day raspberry cheesecake in jars with red and white spoons.
    Print Pin
    5 from 2 votes

    Canada Day Raspberry Cheesecake in a Jar

    This raspberry cheesecake in a jar consists of no-bake, single serving shots of cheesecake topped with raspberries. They are a simple and fun Canada Day dessert idea!
    Course Dessert
    Cuisine Canadian
    Diet Vegetarian
    Prep Time 15 minutes minutes
    Chill Time 1 hour hour
    Total Time 1 hour hour 15 minutes minutes
    Servings 8 mini cheesecakes
    Calories 359kcal
    Author Joss Dyckson

    Equipment

    • Electric mixer
    • Mini dessert cups or jars

    Ingredients

    • 1 ¼ cups graham cracker crumbs
    • ¼ cup butter melted
    • 8 ounces cream cheese at room temperature
    • ½ cup granulated sugar
    • 1 teaspoon vanilla extract
    • ½ tablespoon lemon zest freshly grated
    • 1 cup heavy cream chilled
    • fresh raspberries for topping
    US Customary - Metric

    Instructions

    • To make the crust, add the melted butter to the graham cracker crumbs and mix together until moistened.
    • To make the filling, beat the cream cheese, sugar, vanilla extract and lemon zest together with an electric mixer on medium speed, until smooth.
    • In a separate bowl, whip the heavy cream with the mixer until stiff peaks form. Start on low speed and move to medium-high speed as it thickens to avoid splatter.
    • Slowly add the whipped cream to the cream cheese mixture by folding it in with a spatula or electric mixer on low.
    • Press the graham crumbs into the bottom of shot glasses or small jars. Add the cream cheese mixture and top with fresh raspberries, plus a bit more graham cracker crumbs.
    • Refrigerate for at least 1 hour or overnight before serving.

    Notes

    • You can use any size mini dessert cup for this recipe, but note that the servings and nutrition information will change.
    • I like to use small mason jars (4 ounce jam jars). If you hold off on the toppings when refrigerating, this dessert fits perfectly into a jam jar and can be sealed with the lid.
    • For the cheesecake crust, if desired, you can substitute with Oreo baking crumbs or chocolate crumbs; they taste great too!
    • I find that a cocktail muddler works great for pressing the crumbs into the dessert jars. You can also use the bottom of a glass.
    • This is a great make-ahead dessert option for Canada Day. It can be made 1 to 2 days in advance but hold off on the toppings until serving time.
    • Avoid over-whipping the heavy cream. You want to stop just when stiff peaks form or it will become grainy.
    • Make sure the heavy cream is chilled but the cream cheese needs to be at room temperature for proper combining.
    • When beating the cream cheese mixture, make sure there are no lumps. If there are, continue beating until soft and smooth.
    • Combine the whipped cream and cream cheese mixture slowly so that you don't deflate the whipped cream.
    • You can store leftover cheesecakes, covered in the fridge, for up to 5 to 7 days.
    • Cheesecake can also be frozen for up to 3 months. Thaw in the refrigerator.

    Nutrition

    Calories: 359kcal | Carbohydrates: 25g | Protein: 3g | Fat: 28g | Saturated Fat: 16g | Cholesterol: 88mg | Sodium: 190mg | Potassium: 85mg | Fiber: 1g | Sugar: 17g | Vitamin A: 1003IU | Vitamin C: 1mg | Calcium: 59mg | Iron: 1mg

    British Toad in the Hole Recipe

    May 27, 2020 by Joss Dyckson Leave a Comment

    In this British Toad in the Hole recipe, browned pork sausages are baked within a soft and fluffy Yorkshire pudding batter. Based on just that, you can probably already tell it's going to be exactly what you need if you're craving something cheap, comforting, and deliciously homemade.

    Toad in the hole in a casserole dish and on a plate.

    When I lived in the United Kingdom (where I met my husband), I was exposed to many new and exciting foods like the chicken pasty pie, Full English breakfast, British baked beans and this dish with a peculiar name: Toad in the Hole.

    [feast_advanced_jump_to]

    What is Toad in the Hole?

    If you've never heard of it before, toad in the hole is a traditional British dish consisting of a savory Yorkshire pudding batter baked with bangers (sausages) in it. The toad in the hole origins are a bit murky but generally date somewhere around the mid-18th century, created as a way to have a cheap dinner.

    A slice of toad in the hole on white plate.

    Ingredients

    Toad in the hole ingredients labeled on grey background.
    • flour - just an all-purpose flour will do
    • milk - use regular cows milk (I use whole milk)
    • melted butter - you can also use lard, roasted beef drippings, duck fat or bacon grease
    • mustard powder - this is ground yellow mustard seeds and has a sharp taste (so you don't need a lot)
    • British sausages - or your favorite pork sausages (just make sure they aren't super small or overly large - you want something in the middle)

    *Check recipe card for ingredient amounts.

    More on choosing Your sausages. You can also try using different meats, especially since some of the earliest takes on this dish used beef as their protein of choice. Bangers are English breakfast sausages used in the popular bangers and mash dish. They are typically a combination of pork and seasoned breadcrumbs but can also be made with lamb or beef.

    You can use any pork or beef sausage. I've tried this recipe with wieners and that was a sufficient substitute. It would make sense to use breakfast sausages if serving this dish for breakfast and wieners if serving it for dinner.

    For something a little different, you could try chicken or turkey sausages.

    How to Make Toad in the Hole

    Toad in hole batter in glass bowl.

    Step #1. Prepare batter. In a large bowl, whisk together flour, salt and pepper. Crack the eggs over the flour. Add the milk, melted butter and mustard powder.

    Toad in hole batter in glass bowl with a whisk.

    Step #2. whisk. Whisk until smooth with a hand mixer or whisk.

    Toad in hole batter in glass bowl covered with plastic wrap.

    Step #3. Cover. Cover the bowl with plastic wrap and let it stand for 1 hour.

    Large casserole dish being wiped with paper towel.

    Step #4. Prep casserole dish. Preheat oven to 425ºF (220ºC). Grease a casserole dish with the canola oil and put it in the oven for 5 minutes to preheat it.

    ❤️ Another casserole recipe I think you will love is my cheesy tuna casserole.

    Golden English sausages in frying pan.

    Step #5. Brown sausages. Meanwhile, heat a skillet to medium-high, add a touch of oil and brown the sausages.

    Cooked English pork sausages in white casserole dish.

    Step #6. Transfer sausages. Place browned sausages into the pre-heated baking dish.

    Cooked English pork sausages in white casserole dish with batter.

    Step #7. Bake. Pour the batter into the baking dish, over the sausages. Bake in the preheated oven for about 25 to 30 minutes, until golden and risen.

    👩🏻‍🍳Chef's Note: Try not to open the oven while baking for at least the first 20 minutes or it might not rise properly. Keep an eye on it.

    Toad in the hole in a large casserole dish on baking rack.

    Step #8. Serve. Serve the Toad in the Hole.

    Serving Suggestions

    While toad in the hole is quite good on its own, its real potential shines when you use it as a jumping off point for other elements of a meal. One popular addition would be to serve it with onion gravy, adding an extra punch of flavor and some savory sauce to go with it. You can also serve it with fried onions and peas.

    Storage & Reheating

    • Fridge: In order to store leftovers, you need to let it cool first. Transfer it to a covered container and store in the fridge for up to 3 days.
    • Freezer: You can freeze leftovers for up to 3 months. Make sure to cover it well with plastic wrap and into a freezer bag.
    • Reheat: It can be reheated in the oven from frozen. Cover it with foil and pop it in the oven at 350ºF for about 10 to 15 minutes or until heated through. If desired, you can remove the foil and bake for another 5 minutes to let the Yorkshire pudding get nice and crispy again. If you reheat it in the microwave it can become soggy.

    Pro Tip

    It's important to let the batter rest, so don't skip this step! This allows for the Yorkshire pudding to rise properly and will result in a more airy texture.

    Toad in the Hole FAQs

    What is the difference between American and British toad in the hole?

    While the British toad in the hole consists of sausages baked in a Yorkshire pudding batter, the American version, which is a piece of toast with an egg cooked into the middle, is actually called Toad in a Hole.

    Why is my toad in the hole soggy?

    If you're dealing with a soggy middle, it means it's likely not cooked completely. Another reason is you might be putting too many sausages in the dish.

    How thick should toad in the hole batter be?

    It should be smooth and similar to the consistency of heavy cream.

    A piece of toad in the hole on a white plate.

    ❤️More Cooking Tutorials You Will Love

    • Grilled broccoli on plate with tongs.
      How to Grill Broccoli
    • Corn nuggets on plate with dip.
      How to Make Corn Nuggets
    • Reuben sandwiches stacked on each other with a toothpick.
      How to Make a Reuben Sandwich
    • Grilled red onion rings in bowl on kitchen towel.
      How to Grill Onions (3 Ways)

    If you tried this classic British Toad in the Hole Recipe or any other recipe on my website, please leave a 🌟 star rating and let me know how it went in the 📝 comments below. And please share the recipe!

    📋Recipe

    Toad in the hole in casserole dish.
    Print Pin
    5 from 1 vote

    British Toad in the Hole Recipe

    If you've never heard of it before, toad in the hole is a traditional British dish consisting of a savory Yorkshire pudding batter baked around pork sausages. It's exactly what you need if you're craving something cheap, comforting, and deliciously homemade.
    Course Main Course
    Cuisine British
    Prep Time 5 minutes minutes
    Cook Time 30 minutes minutes
    Resting Time 1 hour hour
    Total Time 1 hour hour 35 minutes minutes
    Servings 4
    Calories 688kcal
    Author Joss Dyckson

    Equipment

    • Casserole Dish (9" x 9" or so)
    • Electric hand mixer

    Ingredients

    • 1 cup flour
    • 1 teaspoon salt
    • ½ teaspoon pepper
    • 2 eggs
    • 1 ¼ cup milk
    • 1 tablespoon butter melted
    • 1 teaspoon mustard powder
    • 1 tablespoon canola oil
    • 5 British sausages pork sausages
    US Customary - Metric

    Instructions

    • In a large bowl, whisk together flour, salt and pepper. Crack the eggs over the flour. Add the milk, melted butter and mustard powder.
      Toad in hole batter in glass bowl.
    • Whisk until smooth with a hand mixer or whisk.
      Toad in hole batter in glass bowl with a whisk.
    • Cover the bowl with plastic wrap and let it stand for 1 hour.
      Toad in hole batter in glass bowl covered with plastic wrap.
    • Preheat oven to 425ºF (220ºC). Grease a casserole dish with the canola oil and put it in the oven for 5 minutes to preheat it.
      Large casserole dish being wiped with paper towel.
    • Meanwhile, heat a skillet to medium-high, add a touch of oil and brown the sausages.
      Golden English sausages in frying pan.
    • Place browned sausages into the pre-heated baking dish.
      Cooked English pork sausages in white casserole dish.
    • Pour the batter into the baking dish, over the sausages. Bake in the preheated oven for about 25 to 30 minutes, until golden and risen. Do not open the oven while baking for at least the first 20 minutes or it might not rise properly. Keep an eye on it.
      Cooked English pork sausages in white casserole dish with batter.
    • Serve the Toad in the Hole.
      Toad in the hole in a large casserole dish on baking rack.

    Notes

    • Serving: One popular addition would be to serve it with onion gravy, adding an extra punch of flavor and some savory sauce to go with it.
    • Pro Tip: It's important to let the batter rest so that the Yorkshire pudding rises properly and has a more airy texture.
    • Fridge storage: In order to store leftovers, you need to let it cool first. Transfer it to a covered container and store in the fridge for up to 3 days.
    • Freezer storage: You can freeze leftovers for up to 3 months. Make sure to cover it well with plastic wrap and into a freezer bag.
    • To Reheat: It can be reheated in the oven from frozen. Cover it with foil and pop it in the oven at 350ºF for about 10 to 15 minutes or until heated through. If desired, you can remove the foil and bake for another 5 minutes to let the Yorkshire pudding get nice and crispy again. If you reheat it in the microwave it can become soggy.

    Nutrition

    Calories: 688kcal | Carbohydrates: 28g | Protein: 30g | Fat: 50g | Saturated Fat: 17g | Cholesterol: 199mg | Sodium: 1467mg | Potassium: 524mg | Fiber: 1g | Sugar: 4g | Vitamin A: 441IU | Vitamin C: 1mg | Calcium: 122mg | Iron: 4mg

    23 Creative & Delectable Marzipan Recipes

    May 25, 2020 by Joss Dyckson 2 Comments

    As you will see from this list, marzipan can be used in various ways to create unique treats or simply eaten all on its own. Some recipes even call for baking it into cookies or using it as a cupcake frosting!

    Marzipan really does lend itself well to creativity. After having browsed through this marzipan recipes list, you may even venture to come up with your own idea.

    Homemade Marzipan with almonds. Isolated.

    Marzipan has a rich, nutty flavor that comes from the ground almonds, combined with a sweet taste from the sugar. This unique combination makes it a favorite for anyone who enjoys nut-based sweets.

    Marzipan can be used in a variety of ways. It can be shaped and molded into decorative shapes (like fruits or flowers), used as a filling for chocolates and pastries, or rolled out to cover cakes.

    While marzipan can be enjoyed year-round, it is particularly popular during the Christmas season and winter months, especially from late fall to early spring.

    Marzipan is also commonly used around Easter. It's used to make the decorative layer on the Simnel cake, a traditional Easter fruitcake (recipe below). It can also be a good wedding treat idea to create edible decorations and to cover cakes.

    One of my favorite marzipan recipes is these marzipan balls. I hope you are able to try at least one or two sweet marzipan recipes on the list. Enjoy!

    [feast_advanced_jump_to]

    What is Marzipan?

    Marzipan is a confectionery paste consisting of finely ground almonds that have been sweetened with powdered sugar or honey and sometimes held together with raw egg whites.

    Some variations will use honey or other binding ingredients in place of the raw egg white. It can be used to decorate cakes because of its pliability, but can also be eaten as-is or coated in chocolate, etc.

    Due to its high sugar content, marzipan has a relatively long shelf life if stored properly, which makes it convenient for bakers and confectioners who want to prepare sweets in advance.

    It is not to be confused with almond paste, which is less sweet and mainly used as a filling.

    Start With a Basic Recipe For Marzipan Paste

    Marzipan can be eaten on its own but it's also used in many different treats. Here are some basic recipes for marzipan from scratch: you can pick from classic, keto or chocolate.

    1
    Marzipan Recipe (Traditional German Recipe)
    Plated Cravings
    Marzipan Recipe (Traditional German Recipe)
    If you've never made marzipan before, this is a good place to start. This easy tutorial tells you exactly how to make basic marzipan with tips and tricks! Make sure to have almond flour on hand - also known as almond meal.
    Get the Basic Marzipan Recipe
    2
    Easy Keto Marzipan
    Hungry for Inspiration
    Easy Keto Marzipan
    Here is another recipe for basic marzipan, but it's keto-friendly! Instead of powdered sugar to sweeten the marzipan, this recipe calls for erythritol and sugar-free almond extract to keep it keto.
    Get the Keto Marzipan Recipe
    3
    Chocolate marzipan discs with chocolate sprinkles stacked.
    Santa Barbara Chocolate
    Easy Chocolate Marzipan
    Elevate your basic marzipan by simply adding some cocoa powder. This recipe shows you how to make the marzipan from scratch, even grinding the almonds yourself. Once the chocolate marzipan has firmed up a bit in the fridge, it is shaped into balls and rolled in chocolate sprinkles; a nice take on marzipan!
    Get the Easy Chocolate Marzipan Recipe

    Use Marzipan in These Recipes

    These marzipan recipes use the sweet confection as their star ingredient. In some of the recipes, you will need the pre-made stuff. You can either purchase marzipan online or in stores or make it from scratch with the recipes previously mentioned above.

    4
    Marzipan ball dusted in icing sugar.
    Marzipan Nut Balls
    You can whip up these marzipan nut balls (one of my favorite marzipan recipes) in only 15 minutes, so they make a great last-minute sweet snack or bite-sized dessert! The added flavors of cinnamon and orange zest are a nice touch.
    Get the Marzipan Nut Balls Recipe
    5
    Hausfreunde Cookies With Caramelised Cashews
    Lavender & Macarons
    Hausfreunde Cookies With Caramelised Cashews
    This recipe uses marzipan as a way to add an extra layer to shortbread cookies. Apricot jam is spread onto each cookie, topped with a marzipan round, dipped in chocolate and then sprinkled with chopped, caramelized cashews. That is a whole lot of yummy in one bite!
    Get the Hausfreunde with Caramelized Cashews Recipe
    6
    Chewy marzipan bars on parchment, slivered almonds in a bowl.
    Sweet & Savoury Pursuits
    Chewy Almond Marzipan Bars
    If you are craving something sweet and chewy, these almond marzipan bars should satisfy! They are topped with toasted almonds to provide a crunchy outer layer, but the inside of these bars is soft and chewy; a great texture combination.
    Get the Chewy Almond Marzipan Bars Recipe
    7
    Marzipan-Stuffed Almond Sugar Cookies
    Love and Olive Oil
    Marzipan-Stuffed Almond Sugar Cookies
    Have you ever tried a stuffed cookie? These sugar cookies are filled with an orange blossom water-scented marzipan paste and rolled in crunchy sliced almonds. Yum!
    Get the Marzipan-Stuffed Almond Sugar Cookies Recipe
    8
    Chocolate chip and marzipan cookies.
    The Sweet and Sour Baker
    Dark Chocolate Marzipan Cookies
    These cookies are loaded with chopped dark chocolate, dark chocolate chips and chunks of marzipan. A sprinkling of sea salt flakes after baking finishes off this decadent treat. Need I say more?
    Get the Dark Chocolate Marzipan Cookies Recipe
    9
    Marzipan Cinnamon Challah
    Dough Eyed
    Marzipan Cinnamon Challah
    This cinnamon marzipan challah is a beautiful 6-strand braided bread filled with a cinnamon-marzipan mixture. The recipe includes step by step photos for this soft and fluffy dessert bread.
    Get the Marzipan Cinnamon Challah Recipe
    10
    2-Ingredient Vegan Marzipan Truffles
    The Loopy Whisk
    2-Ingredient Vegan Marzipan Truffles
    Would you believe these vegan truffles take only 5 minutes to make with 2 ingredients? You begin with pre-made marzipan, shape them into balls and dip into melted chocolate. Chopped toasted almonds and flaked almonds are an optional topping.
    Get the Vegan Marzipan Truffles Recipe
    11
    German Baked Marzipan Bites (Bethmännchen)
    Food and Journeys
    German Baked Marzipan Bites (Bethmännchen)
    These marzipan bites are called 'Bethmännchen' in Germany and there is a little family history story to go with the Christmas treat that you can read on the post. You are basically going to bake some marzipan into cookies and top them with blanched almonds.
    Get the German Baked Marzipan Bites Recipe
    12
    German Poppy Seed Marzipan Cookies (Spritzgebäck)
    Cinnamon and Coriander
    German Poppy Seed Marzipan Cookies (Spritzgebäck)
    These German poppy seed marzipan cookies filled with jam would look so beautiful on the Christmas dessert table. They can be made well ahead of time and actually get more delicious with age.
    Get the German Poppy Seed Marzipan Cookies Recipe
    13
    Marzipan and Cherry Cake
    Charlotte's Lively Kitchen
    Marzipan and Cherry Cake
    Almond and cherry make for a great flavor combination. The marzipan in this recipe is layered in between an almond sponge cake with candied cherries.
    Get the Marzipan Cherry Cake Recipe
    14
    Marzipan Buttercream Frosting
    Charlotte's Lively Kitchen
    Marzipan Buttercream Frosting
    This marzipan buttercream actually turns out quite smooth with some extra blitzing and looks beautiful piped onto cupcakes, mince pies or this Christmas cake with icing.
    Get the Marzipan Buttercream Recipe
    15
    Chocolate Marzipan Truffles
    Daring Gourmet
    Chocolate Marzipan Truffles
    These marzipan chocolate truffles are made with either dark or milk chocolate and drizzled with white chocolate. You could also flip those around and use the white as the base instead. Either way, they look beautiful!
    Get the Chocolate Marzipan Truffles Recipe
    16
    Fig Lemon Marzipan Bundt Cake
    Tin and Thyme
    Fig Lemon Marzipan Bundt Cake
    If you are also a fan of figs, then this marzipan bundt cake is a must try! It is flavored with limoncello - an Italian lemon liqueur and figs. The marzipan is rolled into balls and baked into the cake so that each slice will contain one. Neat idea.
    Get the Fig Lemon Marzipan Bundt Cake Recipe
    17
    Spiced Christmas Cupcakes with Marzipan Frosting
    A Mummy Too
    Spiced Christmas Cupcakes with Marzipan Frosting
    If you are looking for a Christmas marzipan dessert idea, why not try these spiced cupcakes with white-chocolate marzipan frosting? They will certainly give you and your guests some good Christmas feels.
    Get the Spiced Christmas Cupcakes with Marzipan Frosting Recipe
    18
    Raw Christmas Cake Bites & Marzipan Frosting
    Spamella B
    Raw Christmas Cake Bites & Marzipan Frosting
    As you can see by these vegan raw cake bites, marzipan desserts tend to have the look of elegance and style. The marzipan paste is moistened with old fashioned maple syrup and coconut oil, rather than raw egg whites.
    Get the Raw Christmas Cake Bites Recipe
    19
    Valentine's Day mailbox with marzipan candies.
    The Gracious Pantry
    Clean Eating Marzipan Candy
    Instead of giving chocolates on Valentine's Day, you could surprise that special someone with some homemade marzipan heart candies. Find a cute heart candy mold, fill it with some easy homemade marzipan, freeze and pop them out. At this point you could even dip them into chocolate or just get to wrapping them in colored foil paper.
    Get the Clean Eating Marzipan Candy Recipe
    20
    Marzipan truffles with pistachios on wooden background.
    Floating Kitchen
    Ganache-Filled Marzipan Truffles
    These marzipan truffles take it up a notch with some ganache filling and a dark chocolate-pistachio coating. Ooh la la!
    Get the Ganache-Filled Marzipan Truffles Recipe
    21
    Marzipan pyramids on platter, pyramid decoration in background.
    Tikkido
    Marzipan Pyramids
    If you are the super creative type, you can come up with all sorts of marzipan designs - like these marzipan pyramids! The texture of the marzipan looks similar to sand and they can be dusted with gold luster dust for the full effect. They are no-bake and if you don't want to use raw egg whites, this recipe suggests using a few tablespoons of water and brandy instead.
    Get the Marzipan Pyramids Recipe
    22
    Simnel cake on a platter, white background.
    Attachment Mummy
    Simnel Cake
    Simnel cake is an Easter cake with a couple layers of marzipan or almond paste. Marzipan balls are placed around the edge of this cake, giving it a cool presentation.
    Get the Simnel Cake Recipe
    23
    Marzipan fudge roll sliced.
    Aasai Rasai
    Marzipan Fudge Roll
    This fudge roll uses a layer of rose-water flavored marzipan with a layer of chocolate fudge, rolled together and sliced to create a delicious chocolate swirl treat.
    Get the Marzipan Fudge Roll Recipe

    Enjoy!

    As you can see, there are many interesting and tasty ideas out there for using marzipan; either on its own as a sweet treat or in various marzipan recipes.

    💛 You also need to check out these easy passion fruit recipes!

    Marzipan Recipes FAQs

    What nut is used to make marzipan?

    Almonds!

    What is marzipan made of?

    Marzipan is made of a sweetener, like icing sugar or honey, egg white (as a binder) and almond meal (finely ground almonds).

    What does marzipan taste like?

    Marzipan is sweet from the icing sugar and has a nutty taste from the ground almonds.

    Where is marzipan from?

    Marzipan has more than a few potential origins: Persia (Iran), Germany, Spain, France and Italy.

    Where can I buy marzipan?

    You should be able to find it in the baking aisle of the grocery store in tubes or at online stores. You can also make it yourself at home.

    More Recipe Round Ups For Great Ideas

    • Pumpkin pie filling in jar with spoon and Autumn decorations.
      What to Do With Leftover Pumpkin Pie Filling: Tips & Recipes
    • Jalapeño chicken, cornbread muffins and grapefruit cocktail in image collage.
      Over 40 Hot and Spicy Jalapeño Recipes
    • Bunch of fresh cilantro on cutting board.
      40 + Fresh & Zesty Cilantro Recipes
    • Bison recipes collage.
      14 of Our Best Bison Recipes

    If you ❤️enjoyed this 📋 Marzipan Recipes List or any other recipe on my website, please let me know what you thought in the 📝 comments below. And please share the post!

    Marzipan recipes collage with text overlay that says '20+ Marzipan Recipes'.

    Creamy Kimchi Mac and Cheese

    May 20, 2020 by Joss Dyckson 2 Comments

    Spice up your macaroni and cheese with tangy kimchi! This unique recipe for creamy, kimchi mac and cheese is the perfect way to enliven an old favorite. It's a one-pot meal finished in less than 30 minutes, making it great for those busy weeknights! It is the creamiest mac I've ever had.

    Kimchi mac and cheese in a white bowl with a spoon.
    [feast_advanced_jump_to]

    🍝 Kimchi Pasta Details

    Kimchi has found its way into many traditional and less traditional recipes such as my kimchi scrambled eggs, kimchi quesadillas, kimchi carbonara and many more kimchi recipes. It's the perfect ingredient for fusion creations. It seems that the West is waking up to this delicious, probiotic-rich side dish.

    This recipe in particular, combines the comforting, creamy richness of traditional macaroni and cheese with the tangy, spicy kick of kimchi, a staple of Korean cuisine.

    It uses both the kimchi and the kimchi brine to elevate the creamy, cheesy flavors of classic mac and cheese.

    🥘 Ingredients

    Kimchi mac and cheese ingredients prepped and labeled on wooden background.
    • dry elbow pasta - Elbow pasta is also known as macaroni noodles.
    • cheddar cheese - It is best to shred your own cheese because pre-shredded cheese from the store has additional ingredients that are added to prevent it from sticking together, which will alter the texture of your cheese sauce.
    • flour - Flour is used to thicken the sauce.
    • milk - I use whole milk for the cheese sauce but you can also use 2% or 1%.
    • kimchi - Make sure to include the brine for extra flavor. If you are feeling particularly adventurous, you can even make your own kimchi at home!
    • mustard - I usually use classic yellow mustard for this recipe but you can use whole grain if you like.
    • sriracha hot sauce - This is optional. I like to add a little more heat to my kimchi pasta.

    *Check recipe card for ingredient amounts.

    📋 How to Make Kimchi Mac and Cheese

    Cooked macaroni noodles in pot.

    Step 1. Cook the pasta. Prepare the elbow pasta (al dente) according to package instructions. Once done, drain the water and return the pot to the stove over medium heat.

    Macaroni, cheese and kimchi in pot.

    Step 2. Make the cheese sauce. Add the cheddar cheese, flour, milk, kimchi, mustard and sriracha and cook for 3 to 5 more minutes - stirring with a wooden spoon until creamy and cheese is fully melted.

    Kimchi mac and cheese in bowls with spoons on blue-grey background.

    Step 3. Serve the kimchi pasta. Season to taste. Top with a bit more sriracha and kimchi, if desired and serve.

    ✔️ Joss' Tips

    • Chop the kimchi. Chop the kimchi finely for bite-size pieces and make sure to reserve some of the kimchi juice for added umami flavor.
    • Best consistency. If you let the pasta sit for a few minutes in the sauce before serving, it will thicken up a bit and come to its best texture and consistency. But don't wait too long to dig in.
    • Season to taste. Taste and adjust seasoning with salt and pepper. The kimchi and cheese provide a lot of flavor, but a little extra seasoning might be needed.
    • Add a protein. Feel free to add proteins like bacon, ham, or even tofu for a heartier dish.

    🌡️ Storage & Reheating

    • Fridge: For best results, consume your kimchi macaroni and cheese within 4 days. It should be stored in the fridge within 2 hours in an airtight container.
    • Freezer: You can even freeze it for up to 3 months. Just make sure to cool it completely first to avoid ice crystals and cover it well. Thaw it in the fridge overnight.
    • Reheating: Reheat it on the stove over medium/medium-low heat or in the microwave. The pasta may have absorbed most of the creamy sauce while sitting. If that's the case, just add a splash of milk to the pot when you're reheating it.

    ❓ Kimchi Mac FAQs

    What does it taste like?

    Kimchi has a delightfully sour, spicy flavor that pairs wonderfully with this creamy cheddar cheese sauce. This version of kimchi pasta is very, very creamy and cheesy.

    Where can I find kimchi?

    In the past, you may have only seen kimchi in your local Asian market, but these days kimchi is gracing many grocery store shelves. Many farmers/producers are now making it to sell at local Farmer's markets. If you don't mind that it didn't come straight from Korea, then you might as well pick up a jar from the locals.

    As for where to find authentic Korean kimchi, you can look either in the ethnic refrigerated section of your grocery store or at your local Asian market. One of the most common varieties is baechu kimchi, which is made from napa cabbage, but feel free to experiment with any number of varieties your store offers!

    What to serve it with?

    This mac and cheese goes with the your typical dishes like pulled pork burgers, grilled meat, BBQ ribs, this kimchi hot dog recipe, kimchi slaw and cornbread. Grilled broccoli is one of my favorites so give that a try.

    Kimchi mac and cheese in a white bowl and on a spoon.

    ❤️ More Fusion Kimchi Recipes You Will Love

    • Kimchi chowder with corn in bowl.
      Kimchi Chowder
    • Kimchi cream cheese spread in a small black bowl, surrounded by tortilla chips.
      Kimchi Cream Cheese Spread
    • Kimchi omelette on plate with fork.
      Kimchi Omelette
    • Deviled eggs with kimchi, pickled veggies and cilantro on parchment.
      Kimchi Deviled Eggs

    If you tried this 🍝🧀 Creamy Kimchi Mac and Cheese Recipe or any other recipe on my website, please leave a 🌟 star rating and let me know how it went in the 📝 comments below. And please share the recipe!

    📋Recipe

    Kimchi mac and cheese in a bowl.
    Print Pin
    5 from 3 votes

    Creamy Kimchi Mac and Cheese

    Spice up your lunch or dinner with this creamy kimchi mac and cheese! This version of kimchi pasta is very, very creamy and cheesy with a kick of Korean flavor.
    Course Main Course
    Cuisine American, British, Korean
    Diet Vegetarian
    Prep Time 8 minutes minutes
    Cook Time 13 minutes minutes
    Total Time 21 minutes minutes
    Servings 4
    Calories 838kcal
    Author Joss Dyckson

    Equipment

    • Pot

    Ingredients

    • 3 cups dry elbow pasta
    • 3 cups cheddar cheese shredded
    • 2 tablespoons flour
    • 2 cups milk
    • ½ cup kimchi with the brine-no need to drain it
    • 2 tablespoons mustard
    • 2 teaspoons sriracha hot sauce optional
    • salt and pepper to taste
    US Customary - Metric

    Instructions

    • Prepare the elbow pasta (al dente) according to package instructions. Once done, drain the water and return the pot to the stove over medium heat.
      3 cups dry elbow pasta
    • Add the cheddar cheese, flour, milk, kimchi, mustard and sriracha and cook for around 3 to 5 more minutes - stirring with a wooden spoon until creamy and cheese is fully melted. Season to taste with salt and pepper.
      3 cups cheddar cheese, 2 tablespoons flour, 2 cups milk, ½ cup kimchi, 2 tablespoons mustard, 2 teaspoons sriracha hot sauce
    • Top with a bit more sriracha and kimchi, if desired and serve.

    Notes

    • Tip: If you let the pasta sit for a few minutes in the sauce before serving, it will thicken up a bit and come to its best texture and consistency. But don't wait too long to dig in.
    • Protein: Feel free to add proteins like bacon, ham, or even tofu for a heartier dish.
    • Fridge Storage: For best results, consume your kimchi macaroni and cheese within 4 days. It should be stored in the fridge within 2 hours in an airtight container.
    • Freezer Storage: You can even freeze it for up to 3 months. Just make sure to cool it completely first to avoid ice crystals and cover it well. Thaw it in the fridge overnight.
    • Reheating: Reheat it on the stove over medium/medium-low heat or in the microwave. The pasta may have absorbed most of the creamy sauce while sitting. If that's the case, just add a splash of milk to the pot when you're reheating it.

    Nutrition

    Calories: 838kcal | Carbohydrates: 91g | Protein: 40g | Fat: 34g | Saturated Fat: 20g | Polyunsaturated Fat: 2g | Monounsaturated Fat: 9g | Cholesterol: 101mg | Sodium: 734mg | Potassium: 500mg | Fiber: 4g | Sugar: 10g | Vitamin A: 1056IU | Vitamin C: 2mg | Calcium: 777mg | Iron: 2mg

    How to Make Cajun Fries

    May 13, 2020 by Joss Dyckson 1 Comment

    When delivery isn't an option, learn how to make Cajun fries at home. These Cajun fries are easy, crispy, flavorful, and PERFECT with homemade ranch sauce. While I love restaurant French fries, I'd argue these spiced fries bring a higher level of satisfaction being that they are homemade!

    Cajun fries in basket with ranch dip on the side.
    [feast_advanced_jump_to]

    Cajun-Style Oven Fries: Bold Flavor, No Deep Fryer Needed

    Since the potatoes are baked, not fried, you can control the amount of oil used. Love that Cajun zing? Adjust the spice level to your own taste.

    The ranch sauce cuts a cool contrast to these hot-from-your-oven, homemade, spicy fries. They come out crispy and delicious (instead of floppy potato sticks).

    I like to serve them as a snack or alongside mains like a pulled pork BBQ sandwich, blackened chicken sandwich, or grilled bison burgers.

    What are Cajun Fries?

    Cajun fries are simply seasoned French fries tossed with a bold blend of Cajun spices. Cajun cuisine comes from Louisiana and is known for having bold, rustic flavors.

    Ingredients

    Cajun fries ingredients prepped and labeled.
    • potatoes - You can use either Yukon Gold potatoes (yellow) or russet. Yellow potatoes are my absolute favorite but russet are my second choice for Cajun fries. Large potatoes are preferable for making wedges.
    • Cajun spices - These are basically the same spices used to make spicy Cajun blackened chicken, including paprika, garlic powder, cayenne, etc. Here I show you how to make your own blend, but you can also buy it in most grocery stores.

    *Check recipe card for full ingredient amounts.

    How to Make Cajun Fries

    Potato wedges on cutting board.

    Step 1. Slice the potatoes. Cut the potatoes into wedges.

    Potato wedges in bowl of hot water.

    Step 2. Par-boil the potatoes. Pour boiling water over the potato wedges and let them sit until the water cools a bit, about 20 minutes.

    Chef's Note: While I like to make wedges out of the potatoes, you can cut them into thinner sticks if you like, but watch them in the oven because they might be quicker to cook.

    Cajun seasoning in small jar with wooden spoon.

    Step 3. Mix up the Cajun spices. Meanwhile, mix all spices in a bowl. This will be the Cajun seasoning.

    Potato wedges drying in clean kitchen towel.

    Step 4. Dry the potatoes. Use a clean kitchen towel to dry the potatoes and preheat the oven.

    Silicone baking sheet getting oiled with silicone brush.

    Step 5. Prepare the baking sheet. Cover a large baking sheet with foil or a silicone baking mat. Brush it with canola oil.

    Potato wedges in bowl with Cajun seasoning.

    Step 6. Season the wedges. Combine the potatoes with some oil and the Cajun seasoning. Mix well.

    Chef's Note: I like to season the potatoes before baking, not after. The oil helps the seasoning to stick and they will infuse as they cook. If they aren't salty enough for you after baking, just give them another sprinkle right out of the oven.

    Oven baked Cajun fries on baking sheet.

    Step 7. Bake. Layer the potato wedges onto the baking sheet. Do not overlap or they won't cook evenly! Bake until golden and crispy.

    Baked Cajun fries in basket with ranch sauce in the background.

    Step 8. Serve. Serve the Cajun fries with ranch sauce.

    Joss' Top Tip

    Keep a close eye on the fries as they bake-there's a fine line between perfectly crispy-on-the-outside, fluffy-on-the-inside fries and overdone ones with burnt edges!

    🔪 Looking to further enhance your cooking skills? Check out...How to Make Toad in the Hole

    What to Serve Cajun French Fries With

    Now that you know how to make Cajun fries, I'll give you some ideas for what to serve them with:

    • Dips: I love these homemade Cajun fries with ranch sauce, but we also like to mix it up once in a while. Feeling saucy? Ketchup (check out how to make homemade ketchup here), honey mustard, mayonnaise, chipotle pepper sauce and garlic aioli are all excellent pairings for the Cajun spice fries.
    • Toppings: Add some kimchi to your fries for a spicy flavor boost.
    • Mains: Electric skillet hamburgers or fish sticks with sweet mayo dipiping sauce would be perfect with a side of these fries! You can bake them at the same time as frozen chicken fingers for a full, quick and easy meal.

    Recipe FAQs

    Are Cajun fries spicy?

    Yes, they are spicy from the cayenne pepper, but the spice level can vary. They're usually more flavorful than intensely hot, but with homemade fries you can adjust the heat level to your liking!

    What's the difference between Cajun fries and French fries?

    The main difference between Cajun fries and French fries is the seasoning. French fries are typically just salted, while Cajun French fries are seasoned with a more flavorful spice blend.

    Why are they called Cajun fries?

    Because they are coated in a Cajun seasoning.

    How long do leftovers keep in the fridge?

    If you do have leftovers, they can be stored in an airtight container. Keep them in the refrigerator for up to 3 days.

    How do you reheat them?

    To reheat the fries, either lay them out in a single layer on a baking pan and warm up in the oven (400 degrees Fahrenheit for about 8 minutes).

    Or, if you want to get a crispy, crunchy fry crust, heat a teaspoon of oil in a skillet over medium heat. Add the fries, letting them crisp on the bottom completely before flipping them to crisp both sides. Remove the fries from the oil and dry on paper towels.

    Cajun seasoned fries in basket.

    More Easy Cooking Tutorials to Try

    • Cocktail syrups infusing in bottles.
      How to Prepare Cocktail Syrups
    • Cantaloupe on cutting board with knife.
      How to Cut a Cantaloupe into Cubes
    • Taco in a bag with forks and toppings on the side.
      How to Make Walking Tacos (aka Taco in a Bag)
    • Shepherd's pie with a slice missing.
      How to Make Shepherd's Pie (With Lamb)

    If you tried this 📋 recipe tutorial for 🍟 How to Make Cajun Fries or any other recipe on my website, please leave a 🌟 star rating and let me know how it went in the 📝 comments below. And please share the recipe!

    📋Recipe

    Cajun French fries in basket.
    Print Pin
    5 from 2 votes

    Spicy Cajun Fries

    When delivery isn't an option, learn how to make Cajun fries at home. These Cajun fries are easy, crispy, flavorful, and PERFECT with ranch sauce!
    Course Side Dish
    Cuisine American, Cajun
    Diet Vegan, Vegetarian
    Prep Time 10 minutes minutes
    Cook Time 30 minutes minutes
    Resting Time 20 minutes minutes
    Total Time 1 hour hour
    Servings 8
    Calories 185kcal
    Author Joss Dyckson

    Equipment

    • Large sheet pan
    • Large glass bowl

    Ingredients

    • 4 large potatoes Yukon Gold or russet--cleaned
    • 1 tablespoon paprika
    • 1 tablespoon garlic powder
    • 1 tablespoon oregano
    • 1 tablespoon cumin powder
    • 1 ¼ teaspoons salt or to taste
    • 1 teaspoon black pepper
    • 1 teaspoon cayenne pepper
    • 2 tablespoons canola oil
    • ranch sauce for dipping--optional
    US Customary - Metric

    Instructions

    • Cut the potatoes into wedges and place them in a large heat-proof glass bowl. Pour boiling water over the potato wedges and let them sit until the water cools, about 20 minutes.
      4 large potatoes
    • Meanwhile, mix all of the spices in a bowl (this will be the Cajun seasoning). Preheat oven to 450ºF. Drain the potatoes and pat them dry.
    • Cover a large baking sheet with foil or a silicone baking mat. Brush it with canola oil.
    • In a bowl, combine the potatoes with 2 tablespoons of canola oil. Add the Cajun seasoning and toss until the potatoes are evenly coated in spices.
    • Layer the potato wedges onto the baking sheet. Do not overlap.
    • Bake for 20 minutes in the preheated oven. Flip and bake for about 10-20 more minutes, or until golden and crispy. Keep an eye on them.
    • Serve the Cajun fries with ranch sauce.

    Notes

    • Storage: If you do have leftovers, they can be stored in an airtight container. Keep them in the refrigerator for up to 3 days.
    • Reheating method #1: To reheat the fries, either lay them out in a single layer on a baking pan and warm up in the oven (400 degrees Fahrenheit for about 8 minutes).
    • Reheating method #2: Or, heat a teaspoon of oil in a skillet over medium heat. Add the fries, letting them crisp on the bottom completely before flipping them to crisp both sides. Remove the fries from the oil and dry on paper towels.
    • Wedges or sticks: While I like to make wedges out of the potatoes, you can cut them into thinner sticks if you like, but watch them in the oven because they might be quicker to cook.

    Nutrition

    Calories: 185kcal | Carbohydrates: 34g | Protein: 4g | Fat: 4g | Saturated Fat: 0.4g | Polyunsaturated Fat: 1g | Monounsaturated Fat: 2g | Trans Fat: 0.01g | Sodium: 377mg | Potassium: 838mg | Fiber: 5g | Sugar: 2g | Vitamin A: 560IU | Vitamin C: 37mg | Calcium: 44mg | Iron: 2mg

    Iced Peach Green Tea

    May 8, 2020 by Joss Dyckson Leave a Comment

    There are few things better in the summer than a tall glass of iced tea. Sweet, herbaceous, and sure to quench your thirst like nothing else, iced tea really is the sure sign that warm weather is upon us. That said, drinking the same drink all the time can get a little boring. If you're like me, you're always looking for new tastes and flavors to try to spice things up. Enter this iced peach green tea.

    Iced Peach Green Tea in glass with peach wedge garnish.

    This Starbucks copycat peach iced tea drink is infused with fresh peach purée, which adds a juicy, sweet, and slightly tart flavor that complements the green tea beautifully. My daughter is a big fan of Starbucks and can't get enough of this homemade version!

    This deceptively simple recipe packs a fruity punch once you get to sipping it. It's on a completely different level from anything you'd get out of a bottle and more than worth the effort to brew up a pitcher's worth at home.

    It's also a great, summer, make-ahead drink if you're expecting company. You can prep it ahead of time and have it on hand in the fridge to serve over ice when ready.

    I also make a London fog tea latte and matcha latte powdered mix that you might like or check out some more easy and fun drink recipes.

    [feast_advanced_jump_to]

    🍵Iced Peach Green Tea Ingredients

    Big Batch: This recipe makes enough for a whole pitcher of iced tea (about 6 cups).

    Iced peach green tea ingredients labeled.
    • hot water - To steep the tea.
    • green tea bags - Green tea is a type of tea made from the leaves and buds of the Camellia sinensis plant. It typically has a light, fresh, and grassy flavor with a hint of natural sweetness that works well with the peaches.
    • white sugar - You can substitute with honey, simple syrup or agave nectar.
    • peaches - Pick the most ripe and juicy peaches possible!
    • garnishes (optional): Garnishes such as peach slices and mint sprigs on the rim of the glass add an aesthetic appeal. You could even add a sugar rim. Check out how to rim a glass with sugar here.

    *Check recipe card for ingredient amounts.

    🫖How to Make it

    Green tea steeping.

    Step 1. Steep the Tea. Add the hot water to a large measuring glass or glass bowl. Add the green tea bags and let them steep for 5 minutes. Discard the tea bags.

    Sugar pouring into green tea.

    Step 2. Sweeten. Mix in the sweetener until dissolved. Chill in the refrigerator while preparing the peaches.

    Peach purée getting strained in mesh strainer.

    Step 3. Make the Peach Purée. Purée the peaches in a blender or food processor. Strain the peach purée through a fine mesh strainer to make it smoother. You should end up with at least 1 cup of strained peach purée or up to 1 ½ cups.

    Iced peach green tea in glass with fresh peaches on the side.

    Step 4. Combine and Serve. Pour the peach purée and green tea into a pitcher and stir. Refrigerate until chilled, at least 1 hour. Serve in glasses over ice and garnish with peach slices and mint leaves if desired.

    🔆Thirsty for more? Try my Summer Mango-Pomegranate Soda.

    💡Joss' Tips

    • Use Fresh Ingredients. This fruity, chilled drink is as delicious as it is easy to make. The key is to use the best ingredients you can when making it. If your water doesn't taste good, your tea won't taste good. Peaches aren't ripe? That's not going to make some very good juice. Opt for fresh, ripe peaches. The real taste from fresh peaches is going to give you a much better tasting drink.
    • Choose High-Quality Tea: Select high-quality green tea bags for the best flavor. Varieties like Sencha, Gyokuro, or Dragon Well work well.
    • Water Temperature: After you've boiled the water, let it cool a bit to around 160-180°F (70-80°C). Boiling water can make green tea bitter.
    • Steep Time: Don't go over 5 minutes. Over-steeping can also result in a bitter taste.
    • Use Peachy Ice Cubes. If you have any leftover peach purée, pour it into an ice cube tray and freeze it. Use the peach cubes when serving the drink so that it doesn't get watered down with watery ice cubes.

    ❓Recipe FAQs

    What is the caffeine content of peach green tea?

    One cup of green tea contains between 30 and 50 mg of caffeine. One serving of this drink contains between 25 and 41 mg of caffeine.

    How do you store leftover tea?

    You can store your fresh peach iced tea in the fridge for up to 3 days.

    Iced peach green tea in glass with ice, straw and peach garnish.

    🍑More Peach Recipes You Will Love

    • Peach freezer jam in jam jar with the lid off.
      Peach Freezer Jam (Low Sugar)
    • Peach cobbler in electric skillet.
      Electric Skillet Peach Cobbler
    • Peach tarte tatin on marble/wooden serving board.
      Peach Tarte Tatin (Video)
    • Grilled peaches wrapped in prosciutto on serving dish.
      Grilled Prosciutto Wrapped Peaches (With Balsamic)

    If you tried this 🍑 Iced Peach Green Tea Recipe or any other recipe on my website, please leave a 🌟 star rating and let me know how it went in the 📝 comments below. And please share the recipe!

    📋Recipe

    Iced peach green tea in glass with straw and peach garnish.
    Print Pin
    5 from 1 vote

    Iced Peach Green Tea Recipe

    There are few things better in the summer than a tall glass of this fresh, iced peach green tea. It's cold, sweet, fruity and herbaceous.
    Course Drinks
    Cuisine American
    Diet Vegan, Vegetarian
    Prep Time 20 minutes minutes
    Chill Time 1 hour hour
    Total Time 1 hour hour 20 minutes minutes
    Servings 6 cups
    Calories 115kcal
    Author Joss Dyckson

    Equipment

    • Blender
    • Pitcher

    Ingredients

    • 5 cups hot water
    • 5 green tea bags
    • ½ cup sugar or honey or agave nectar
    • 4 peaches peeled, pitted and chopped
    US Customary - Metric

    Instructions

    • Add the hot water to a large measuring glass or glass bowl. Add the green tea bags and let them steep for 5 minutes. Discard the tea bags.
    • Mix in the sweetener until dissolved. Chill in the refrigerator while preparing the peaches.
    • Purée the peaches in a blender or food processor. Strain the peach purée through a fine mesh strainer to make it smoother. You should end up with at least 1 cup of strained peach purée.
    • Pour the peach purée and green tea into a pitcher and stir.
    • Refrigerate until chilled, at least 1 hour. Serve in glasses over ice and garnish with peach slices and mint leaves.

    Notes

    • How to store leftover iced tea: You can store your fresh peach iced tea in the fridge for up to 3 days. Simply serve over ice when ready.
    • Use Juicy Peaches: Choose peaches that are ripe and juicy!
    • Choose High-Quality Tea: Select high-quality green tea bags for the best flavor. Varieties like Sencha, Gyokuro, or Dragon Well work well.
    • Water Temperature: After you've boiled the water, let it cool a bit to around 160-180°F (70-80°C). Boiling water can make green tea bitter.
    • Steep Time: Don't go over 5 minutes. Over-steeping can also result in a bitter taste.
    • Use Peachy Ice Cubes. If you have any leftover peach purée, pour it into an ice cube tray and freeze it. Use the peach cubes when serving the drink so that it doesn't get watered down with watery ice cubes.

    Nutrition

    Calories: 115kcal | Carbohydrates: 30g | Protein: 1g | Fat: 1g | Saturated Fat: 1g | Sodium: 26mg | Potassium: 208mg | Fiber: 2g | Sugar: 29g | Vitamin A: 326IU | Vitamin C: 7mg | Calcium: 16mg | Iron: 1mg

    Bev-Olution Game Plus a Tasty Cocktail Creation

    May 6, 2020 by Joss Dyckson Leave a Comment

    (A social-distancing game - Adults only)

    Bev-Olution is a game that I created for the adults in my family, during this time of social distancing. I wanted a way to connect with them and be entertained, from afar of course. I'm going to explain exactly how to play and give you an example of what my family came up with (recipe below)!

    By the end of it, you will have your own homemade cocktail creation!

    Green cocktail with umbrella.
    [feast_advanced_jump_to]

    Object

    The object of the game is to have some fun and connect while social-distancing! It is for friends and family who are of drinking age. Basically, you are going to take a cocktail recipe and pass it around for each person to make minor adjustments. By the time it gets back to the original person, it will have evolved into your very own group drink creation - good or bad. This is just for fun, so don't get too serious about it! It's a lot of fun to see where it ends up.

    Players: 3+

    Try to get at least 3 people involved. The more the better! Start a group text for photos and comments to be shared.

    Social media with person holding a white smartphone

    Instructions

    1. The first person who starts the game will find a cocktail recipe (we have ideas for you below). They will then:
    2. Remove 1-2 of the main ingredients from the recipe and add 1-2 different ingredients back in. If this changes the directions of the recipe, please make those changes.
    3. Give the cocktail a new name.
    4. Make the cocktail and take a picture of it. Share your photo/recipe in the group text. Tell them the name of it, how it tasted, etc.
    5. Pass the new recipe onto the next person.
    6. Repeat steps 2 to 5 with each person until it gets back to the original person who started the game.
    7. Share the final recipe to everyone in the group chat to see how the drink has evolved!

    Save the final recipe so that when this time of keeping our distance has passed, you can all a have a toast together with your very own beverage creation!

    A Look at Our Game

    Need some inspiration? I will show you what we came up with in my family.

    We started with this cocktail recipe:

    Passion Fruit Mojito

    Passion Fruit & Ginger Mojitos in wine glasses with watermelon swizzle sticks.

    After several transformations, this beverage evolved into:

    Raspberry Twist

    Raspberry twist cocktail in champagne glasses.

    I have to say, it turned out quite yummy!

    Lemon twist cocktail in champagne glass.
    Raspberry twist cocktail in champagne glass with a lemon twist and mint leaf.
    A woman's hand holding a raspberry twist cocktail.

    Check out the final Raspberry Twist Cocktail recipe here!

    Are you ready to get creative? How did your final drink turn out? It might be good, it might be bad. The point is that it will be a challenge that will get everyone talking and laughing. Plus, you'll have a new drink to enjoy together, collectively created by you.

    Remember, this is just for fun! If you can't get your hands on certain ingredients, work with what you do have. These are basic rules that you can adjust to your liking. Let everyone complete it in their own time. We aren't exactly in a hurry. As always, drink responsibly!

    Some cocktails from our recipe box that you can begin with:

    • White Wine Sangria with Fresh Peppermint
    • Brandy Alexander
    • Pumpkin Party Punch
    • Strawberry Slushy Margarita
    • Hibiscus Cosmo
    • Peach Pop Bellini Cocktail
    • Creamy Irish Coffee
    • Glögg Drink

    I would absolutely love to hear how your final creation turned out! How many people were involved? Let us know in the comments.

    Another tasty recipe you might enjoy:

    Iced Peach Green Tea

    Electric Skillet Full English Breakfast

    April 29, 2020 by Joss Dyckson 1 Comment

    I was living in England, quite a few years ago, and was introduced to the wonder that is the Full English Breakfast. There were eggs and sausages, bacon, mushrooms and tomatoes, toast and lovely baked beans in a tomato sauce. With this hearty of a breakfast, we definitely weren't hungry for lunch.

    Full English breakfast on white plate.

    We wanted to continue enjoying this satisfying meal at home, which is why I've made it into an easy, electric skillet recipe.

    I love using the electric skillet for breakfast recipes because it cooks evenly and doesn't heat up the house so much. This recipe is similar to my electric skillet sausage and egg hash but loaded with more breakfast items, so if you're feeling hungry, this is the breakfast for you.

    You can see why this dish is so popular in England. It is tasty, filling and actually quite simple to make at home. You can either use canned beans in tomato sauce from the grocery store or try my delicious homemade British beans recipe here. The Full English is typically served with coffee or tea to top it all off.

    [feast_advanced_jump_to]

    Ingredients

    • bread - pick any kind but white is a classic
    • vegetable oil - or canola or avocado oil
    • breakfast sausages - they are usually made from ground pork and seasoned with pepper, sage, thyme, brown sugar etc.
    • raw bacon strips - I like to go for a classic bacon but back bacon is traditional in a full English breakfast
    • button mushrooms - button mushrooms are classic but you can also use cremini
    • tomatoes
    • baked beans in tomato sauce - canned or homemade

    *Check recipe card for ingredient amounts.

    How to Make Electric Skillet Full English Breakfast

    Full English breakfast on white plate with a fork and tea cup on the side.
    1. Toast bread. Preheat electric skillet to 300ºF. Toast the bread, cut them diagonally and reserve.
    2. Cook. Grease the electric skillet with a bit of oil and add the sausages, bacon, mushrooms and tomatoes. Cook for 10 minutes (until bacon and sausages are fully cooked), flipping them occasionally. Reserve.
    3. Heat beans. Add the beans in tomato sauce to one corner of the skillet (just to heat them through). Reserve.
    4. Cook eggs. Lastly, crack the eggs into the skillet and cook, covered, for 5 minutes - or until desired doneness.
    5. Serve. Serve all together with the toasted bread and some tea if desired.

    Serving Size

    If you plan on having guests or have a large family, you can easily adjust the serving size. I like to use a 16" electric skillet (check out reviews of different electric skillets here) so that I can fit everything in at once. If you have a smaller skillet, you may have to cook it in batches.

    How to Store Leftovers

    If it's not devoured immediately, you can store leftovers in a covered container in the fridge for up to 3 to 4 days. The eggs should only be refrigerated for 1 to 2 days.

    For cleaning info, check out these electric skillet cleaning instructions.

    Full English breakfast on white plate and white backgrouond.

    More Delicious Electric Skillet Recipes to Try

    • Quinoa stir fry in skillet.
      Quinoa Stir Fry (w/ Shrimp & Veggies)
    • Greek lemon chicken thighs and baby potatoes on plate.
      Easy Skillet Greek Lemon Chicken Thighs
    • Veggie nachos on plate.
      Electric Skillet Veggie Nachos
    • Electric Skillet Stuffed Puff Pastry Triangles

    If you tried this Electric Skillet Full English Recipe or any other recipe on my website, please leave a 🌟 star rating and let me know how it went in the 📝 comments below. And please share the recipe!

    📋Recipe

    Full English breakfast on white plate.
    Print Pin
    5 from 2 votes

    Electric Skillet Full English Breakfast

    This electric skillet Full English Breakfast consists of eggs and sausages, bacon, mushrooms and tomatoes, toast and lovely baked beans in a tomato sauce.
    Course Breakfast
    Cuisine American
    Prep Time 10 minutes minutes
    Cook Time 15 minutes minutes
    Total Time 25 minutes minutes
    Servings 2
    Calories 1334kcal
    Author Joss Dyckson

    Equipment

    • Electric Skillet

    Ingredients

    • 2 slices bread
    • 1 tablespoon vegetable oil
    • 4 breakfast sausages
    • 6 slices bacon
    • 6 button mushrooms
    • 2 tomatoes halved
    • 1 cup baked beans in tomato sauce canned or homemade
    • 2 eggs
    US Customary - Metric

    Instructions

    • Preheat electric skillet to 300ºF. Toast the bread, cut them diagonally and reserve.
      2 slices bread
    • Grease the electric skillet with a bit of oil and add the sausages, bacon, mushrooms and tomatoes. Cook for 10 minutes (until bacon and sausages are fully cooked), flipping them occasionally. Reserve.
      1 tablespoon vegetable oil, 4 breakfast sausages, 6 slices bacon, 6 button mushrooms, 2 tomatoes
    • Add the beans in tomato sauce to one corner of the skillet (just to heat them through). Reserve.
      1 cup baked beans in tomato sauce
    • Lastly, crack the eggs into the skillet and cook, covered, for 5 minutes - or until desired doneness.
      2 eggs
    • Serve all together with the toasted bread and some tea if desired.

    Notes

    • If it's not devoured immediately, you can store leftovers in a covered container in the fridge for up to 3 to 4 days.
    • The eggs should only be refrigerated for 1 to 2 days.

    Nutrition

    Calories: 1334kcal | Carbohydrates: 47g | Protein: 60g | Fat: 101g | Saturated Fat: 37g | Cholesterol: 379mg | Sodium: 2617mg | Potassium: 1678mg | Fiber: 10g | Sugar: 6g | Vitamin A: 1432IU | Vitamin C: 22mg | Calcium: 163mg | Iron: 7mg

    How to Make Shepherd's Pie (With Lamb)

    April 22, 2020 by Joss Dyckson 5 Comments

    Today I'm going to show you how to make shepherd's pie using roasted lamb shoulder. This shepherd's pie is rich and savory, hearty and filling, warm and comforting and plenty of other things all wrapped into one.

    Shepherd's pie in white pie dish with a slice pulled out.

    Essentially a meaty, brown gravy topped with mashed potatoes in pie form, the shepherd's pie is one of the best kinds of comfort food ever invented.

    This lamb dish works well anytime of the year, but especially for winter, spring and Easter meals. I like to serve it with this Easter sangria and sometimes a spring pea purée. End it on a sweet note with this easy make-ahead grasshopper pie.

    [feast_advanced_jump_to]

    Difference Between Shepherd's Pie and Cottage Pie

    While the names have historically been used somewhat interchangeably, current culinary terminology sets things straight in the way outlined:

    One thing we get asked a lot in this area is about the meat. Most people think that Shepherd's pie is made of beef, but that is not the case. If it's made with beef, that is called a cottage pie. Traditional shepherd's pie is made from lamb, hence the name, because shepherds take care of sheep.

    Whether you use beef or lamb is the difference, both being delicious but distinct British meat pies with their own flavor profiles worth trying.

    Ingredients

    Shepherd's pie ingredients prepped on grey background.
    Raw lamb shoulder.
    • lamb shoulder - lamb shoulder is rich, juicy and needs to be cooked low and slow so that the meat is nice and tender
    • olive oil - because we are roasting with it you don't need to use extra virgin olive oil which is actually more expensive than regular olive oil
    • yellow potatoes - also called Yukon Gold
    • shredded cheddar cheese - I like to use white old cheddar

    *Check recipe card for full ingredients and amounts.

    Recipe Tweaks

    If you're looking for ways to spice up the recipe, it's a fairly easy affair.

    • Add Veggies: Add more vegetables like carrots, peas or even corn (that puts you on the way to making a variant called Pâté chinois, in fact).
    • Flavor Boost: Cleaning the pan with some added broth or a dry red wine are both great ways to boost the flavor of your shepherd's pie.
    • Use Ground Lamb: You can even switch up the texture by using ground lamb that's simply been fried in a pan and seasoned. This is a big shortcut if you're pressed for time.

    Steps for How to Make Shepherd's Pie With Lamb

    Steps images for how to make shepherds pie with lamb: roasting the lamb, cooking potatoes and onions.

    Step #1. Season the Lamb. In a roasting pan, drizzle the lamb shoulder with olive oil and sprinkle with sea salt (Image 1).

    Step #2. Roast. Roast at 325ºF for 3-4 hours, until the meat is shreddable (Image 2). Let cool.

    Step #3. Boil and Mash the Potatoes. Boil and then mash the potatoes. Add the cheese, butter and salt (Image 3). Reserve 2 cups of the water from boiling the potatoes.

    Step #4. Sauté the Onions. Sauté the onions over medium-low heat with dried rosemary for around 20 minutes (Image 4).

    Steps images for how to make shepherds pie with lamb: assembling the pie.

    Step #5. Shred the Lamb. Shred the roasted lamb using two forks (Image 5).

    Step #6. Complete the Filling. Boil the reserved water from the potatoes and pour it into the cooking tray with the juices from the lamb (Image 6). Pour some of it over the meat to moisten it. Add the onions and season the mixture.

    Step #7. Layer Potato & Filling. Make a layer in the pie plate with half of the potatoes. Add the lamb (Image 7).

    Step #8. Add Final Potato Layer. Cover with the last bit of mashed potatoes and cheddar cheese. Use a fork to make a rim around the pie (Image 8).

    Steps images for how to make shepherds pie with lamb: baking the pie.

    Step #9. Bake the Shepherd's Pie. Bake in a preheated 400ºF oven for about 30 minutes, until golden and bubbly. Let cool for about 10 minutes because it will be quite hot (Image 9).

    Step #10. Serve. Serve the lamb shepherd's pie and enjoy (Image 10)!

    Now you know how to make shepherd's pie from scratch, whenever you fancy. A simple but hearty homemade delight, it offers restaurant-quality taste while keeping things simple and straight to the point like a home cook likes.

    Another delicious lamb recipe you might like is my electric skillet lamb chops!

    Joss' Top Tips

    • Choose Quality Lamb: Try to contact local farmers or go to farmers' markets.
    • Layer Evenly: Spread the mash potato evenly over the lamb filling, trying to avoid gaps where the sauce could bubble through.
    • Broil for Crispiness: For extra browning, finish under the broiler for a few minutes, watching carefully to avoid burning.

    Storage & Reheating

    • Refrigerate: Store any leftovers in the fridge for up to 4 days.
    • Freeze: You can also store the pie in the freezer for up to a few months, well-covered, but let it cool first.
    • Reheat: You can reheat the refrigerated shepherd's pie in a 350ºF oven until heated all the way through or in the microwave. You can reheat the frozen pie directly in the oven. You can also thaw it in the fridge first and then bake--this option will result in more even heating.
    Shepherd's pie on plate and in pie dish.

    More Main Dish Recipes to Consider

    • Pulled pork burger with special sauce on parchment.
      Pulled Pork Burger (with Special Sauce)
    • Kimchi burger with creamy kimchi sauce.
      Korean Kimchi Burgers
    • Tripleta sandwiches and chips.
      Puerto Rican Tripleta Sandwich
    • Blackened chicken breast on plate with lime wedges and cilantro.
      Cajun Blackened Chicken Breast

    If you tried this recipe tutorial for How to Make Shepherd's Pie With Lamb or any other recipe on my website, please leave a 🌟 star rating and let me know how it went in the 📝 comments below. And please share the recipe!

    📋Recipe

    Shepherd's pie with a slice missing.
    Print Pin
    5 from 3 votes

    Shepherd's Pie (With Lamb)

    Essentially a meaty gravy topped with mashed potatoes in pie form, this shepherd's pie with lamb is rich and savory, hearty and filling, warm and comforting and plenty of other things all wrapped into one.
    Course Main Course
    Cuisine British
    Prep Time 20 minutes minutes
    Cook Time 4 hours hours
    Total Time 4 hours hours 20 minutes minutes
    Servings 6
    Calories 779kcal
    Author Joss Dyckson

    Equipment

    • Roasting pan
    • Pie plate

    Ingredients

    • 1 lamb shoulder around 4.5 pounds/2 kilograms
    • ¼ cup olive oil
    • 12 medium yellow potatoes peeled and quartered
    • 1 cup cheddar cheese shredded, divided
    • 2 tablespoons butter divided
    • 1 large yellow onion sliced
    • ½ tablespoon dried rosemary
    • sea salt
    US Customary - Metric

    Instructions

    • Preheat oven to 325ºF. Line a roasting pan with foil and place the lamb shoulder on top. Drizzle the lamb with olive oil and sprinkle with sea salt on both sides.
      1 lamb shoulder, ¼ cup olive oil
    • Roast the lamb for around 3-4 hours in the preheated oven. You'll know it's ready when it smells fantastic, it's golden brown and the meat separates easily from the bone. When it's done, let it cool.
    • When the lamb has been cooking for around 3 hours, begin preparing the pie. First, boil the potatoes in salted water until soft (around 20 minutes). Reserve 2 cups of the water from boiling the potatoes and drain the rest. Mash the potatoes using a fork.
      12 medium yellow potatoes
    • Add ½ cup of shredded cheddar cheese, 1 tablespoon of butter and salt, to taste. Mix well.
    • Heat a skillet to medium-low heat and add the other tablespoon of butter. Sauté the onions with dried rosemary for around 20 minutes, or until starting to brown. Set aside.
      1 large yellow onion, ½ tablespoon dried rosemary
    • When the lamb has cooled, shred the meat with two forks and cut the skin into small pieces.
    • Pour 2 cups of boiling water (you can use the reserved liquid from the potatoes) into the baking tray to remove the grease and all cooking juices from the lamb. Pour some of this liquid over the lamb's meat (just enough to moisten it), and mix it with the onions to complete the filling. Season the filling, to taste.
    • Preheat oven to 400ºF. To make the pie, grease a pie plate with olive oil and cover with ½ of the mashed potatoes. Use your hands to spread it evenly, leaving a bit of a border. Add the lamb filling over top of the potatoes.
    • Cover with the other half of the potatoes and spread it with your hands to cover the shredded lamb. Spread the other ½ cup of shredded cheddar cheese over the pie. Use a fork to make a rim around the pie.
    • Bake for about 30 minutes in the preheated oven - until golden brown and bubbly. Let cool for about 10 minutes.
    • Serve and enjoy!

    Notes

    • Refrigerate: Store any leftovers in the fridge for up to 4 days.
    • Freeze: You can also store the pie in the freezer for up to a few months, well-covered, but let it cool first.
    • Reheat: You can reheat the refrigerated shepherd's pie in a 350ºF oven until heated all the way through or in the microwave. You can reheat the frozen pie directly in the oven. You can also thaw it in the fridge first and then bake--this option will result in more even heating.
    • Choose Quality Lamb: Try to contact local farmers or go to farmers' markets.
    • Layer Evenly: Spread the mash potato evenly over the lamb filling, trying to avoid gaps where the sauce could bubble through.
    • Broil for Crispiness: For extra browning, finish under the broiler for a few minutes, watching carefully to avoid burning.

    Nutrition

    Calories: 779kcal | Carbohydrates: 56g | Protein: 66g | Fat: 33g | Saturated Fat: 13g | Cholesterol: 190mg | Sodium: 369mg | Potassium: 2534mg | Fiber: 11g | Sugar: 1g | Vitamin A: 350IU | Vitamin C: 51mg | Calcium: 314mg | Iron: 19mg

    Cake Pop Maker Puff Pastry Chicken Balls

    April 15, 2020 by Joss Dyckson 1 Comment

    Cake pop makers might seem like a fairly one-note kitchen contraption, but this only applies if you don't think outside the box. Truth be told, there are tons of ways to make use of a cake pop maker that you might not even consider until you try it out, at which point you'll discover some of the most delicious and most convenient takes on recipes that you've ever tasted.

    I've got one of those for you today in the form of easy puff pastry chicken balls.

    Puff pastry chicken balls on blue and white plate.

    A savory-sweet treat made in barely half an hour, these mini chicken balls are the perfect hors d'oeuvre for a party, an easy and delicious appetizer before dinner or just a great snack to have between meals.

    With the convenience of a cake pop maker and the versatility it grants you, you'll be turning out fantastic dishes like nobody's business.

    I also make these cake pop maker falafel, apple chips and cake pop maker shrimp balls that make great snacks as well!

    [feast_advanced_jump_to]

    Ingredients

    • frozen puff pastry dough - You will find it in sheets in the freezer section of the grocery store. Make sure to thaw it in the fridge before beginning this recipe.
    • chicken breast - If you have leftover chicken breast or rotisserie chicken, that works perfectly for this recipe. You are going to want to dice it nice and fine to fit into the mini chicken balls.
    • walnuts - You can substitute with pecans.
    • dried cranberries - These are optional for a bit of sweet and savory flavor, mimicking a juicy roasted chicken with sweet cranberry sauce.
    • Italian seasoning - You can substutite with dried oregano if preferred.

    How to Make Mini Chicken Balls

    Puff pastry chicken ball cut open and dipped in mustard sauce.
    1. Lightly grease the cooking plates of the cake pop maker.
    2. Mix all of the filling ingredients in a bowl.
    3. Unroll the puff pastry sheet out and cut out circles (a bit bigger than the holes of your cake pop maker), You can use a small cup or cookie cutter. Alternatively, you can just cut them into about 24 equal squares with a pizza cutter.
    4. Fill each circle with about one teaspoon of the filling and close it up. Shape them into balls with your hands.
    5. Place them in the preheated cake pop maker and bake for 4 minutes. Flip them over and bake 1 to 2 more minutes, until golden brown all over. (Careful here as the cake pop maker does get hot - you can use heat gloves and a spatula.)
    6. Let the chicken balls cool for a few minutes, as they will be hot in the center. Mix up the sauce ingredients and season, to taste.
    7. Serve them with the sauce.

    Storage & Reheating

    • Store leftovers in an airtight container in the fridge for up to 4 days.
    • They can be reheated in the microwave or a low oven.
    Puff pastry chicken balls arranged on blue and white plate.

    More Cake Pop Maker Recipes to Try

    • Mini pizza bites on black board with marinara sauce.
      Homemade Mini Pizza Bites
    • Mediterranea meatballs with fresh dill pesto on plate.
      Cake Pop Maker Mediterranean Meatballs
    • Chocolate covered donut holes on serving tray.
      Double Chocolate Donut Holes (Video)
    • Spinach egg bites on plate with Greek yogurt.
      Cake Pop Maker Spinach & Mozza Egg Bites

    What's your favorite cake pop maker recipe trick? If you tried this Mini Puff Pastry Chicken Balls Recipe or any other recipe on my website, please leave a 🌟 star rating and let me know how it went in the 📝 comments below. And please share the recipe!

    📋Recipe

    Puff pastry chicken balls on blue and white plate.
    Print Pin
    5 from 2 votes

    Mini Puff Pastry Chicken Balls

    A savory-sweet treat made in only 30 minutes, these cake pop maker mini puff pastry chicken balls are the perfect appetizer or snack!
    Course Appetizer, Snack
    Cuisine American
    Prep Time 20 minutes minutes
    Cook Time 10 minutes minutes
    Total Time 30 minutes minutes
    Servings 24 chicken balls
    Calories 78kcal
    Author Joss Dyckson

    Equipment

    • Cake Pop Maker

    Ingredients

    For the Chicken Balls

    • ½ cup chicken breast cooked and diced
    • ½ cup pears peeled and diced
    • ¼ cup walnuts finely chopped
    • ¼ cup mozzarella cheese finely shredded
    • ¼ cup dried cranberries finely chopped
    • 1 teaspoon Italian seasoning
    • 1 sheet frozen puff pastry dough 8 ounces--thawed

    For the Sauce

    • ¼ cup mustard
    • ½ cup mayo
    • salt and pepper to taste
    US Customary - Metric

    Instructions

    • Lightly grease the cooking plates of the cake pop maker.
    • In a large bowl, combine the chicken breast, pears, walnuts, cheese, dried cranberries and Italian seasoning.
      ½ cup chicken breast, ½ cup pears, ¼ cup walnuts, ¼ cup mozzarella cheese, ¼ cup dried cranberries, 1 teaspoon Italian seasoning
    • Unroll the puff pastry sheet out and cut out circles (a bit bigger than the holes of your cake pop maker), You can use a small cup or cookie cutter. Alternatively, you can just cut them into about 24 equal squares with a pizza cutter.
      1 sheet frozen puff pastry dough
    • Fill each circle with about one teaspoon of the filling and close it up. Shape them into balls with your hands.
    • Place them in the preheated cake pop maker and bake for 4 minutes. Flip them over and bake 1 to 2 more minutes, until golden brown all over. (Careful here as the cake pop maker does get hot - you can use heat gloves and a spatula.)
    • Let the chicken balls cool for a few minutes, as they will be hot in the center. Mix up the sauce ingredients and season, to taste.
      ¼ cup mustard, ½ cup mayo, salt and pepper
    • Serve the puff pastry chicken balls with the dipping sauce.

    Notes

    • Store leftover chicken balls in an airtight container in the fridge for up to 4 days.
    • They can be reheated in the microwave or a low oven.

    Nutrition

    Calories: 78kcal | Carbohydrates: 6g | Protein: 2g | Fat: 5g | Saturated Fat: 1g | Cholesterol: 3mg | Sodium: 37mg | Potassium: 30mg | Fiber: 1g | Sugar: 1g | Vitamin A: 11IU | Vitamin C: 1mg | Calcium: 11mg | Iron: 1mg

    Marzipan Balls

    April 10, 2020 by Joss Dyckson Leave a Comment

    There are plenty of delicious desserts out there that are more than worth the effort to make from scratch. Cakes, cookies, classic apple crisp and pies are all popular but a little typical. Sometimes you want to try something a little bit different. If this sounds like you, I've got the perfect, easy, quick treat for you to try: marzipan balls.

    Marzipan balls dusted in icing sugar.

    When making these delicious marzipan nut balls, be prepared for a real taste sensation. With this simple but effective bite-size dessert, you'll be tempted to try them out frequently. Even though moderation is the name of the game, I wouldn't blame you if you snuck in an extra ball or two.

    [feast_advanced_jump_to]

    What is Marzipan?

    In its most basic form, marzipan is simply the combination of almond flour and sweeteners mixed together into a tacky, moldable, and delicious confection.

    The origin of marzipan is very unclear, but some of the possibilities include Germany, Spain, France, Italy, Persia and China.

    While often used as a kind of decoration to go with other desserts, marzipan is delicious enough to be eaten on its own in many forms. But, it can also be used to create a multitude of delicious marzipan recipes!

    One of the best features of marzipan is how versatile it is. You can easily mix things up by trying different types of nuts, different citrus, or adding some chocolate to your next batch just to see what you like.

    Ingredients

    • egg whites - Because this is a no-bake recipe, it is safest to use pasteurized egg whites, which you can find in the refrigerated section of the grocery store.
    • almond flour - Almond flour, the main ingredient in marzipan, provides that nutty, slightly chewy texture that marzipan is known for. It's simply ground, blanched almonds, which makes it gluten free.
    • nuts - You can use any nuts you want for the coating but they are optional. You could even dip the balls in chocolate first if you wanted to.

    *Check recipe card for full ingredients/amounts.

    How to Make Marzipan Balls

    Marzipan ball dusted in icing sugar in white and purple baking cup.
    1. Mix the almond flour and sugar in a bowl.
    2. Beat the egg whites with an electric hand mixer, until creamy.
    3. Add the egg whites, cinnamon and orange zest to the almond flour mixture. Mix until combined well.
    4. Wet your hands and form 32 balls. Roll each ball in the chopped nuts and place them in mini baking cups.
    5. Dust with powdered sugar.
    6. Serve!

    Marzipan Balls FAQs

    How do you store marzipan balls?

    You can store the marzipan balls in an airtight container in the refrigerator for up to 1 month.

    Can you freeze them?

    Yes! Store them in a freezer bag or airtight container in the freezer for up to 6 months. Thaw in the refrigerator before serving.

    Why is my marzipan too sticky?

    It usually means there is too much moisture from the liquid ingredients. It should be smooth and not clingy. Simply knead in a little extra almond flour until it becomes firm enough to shape but still soft and smooth.

    Marzipan balls dusted in icing sugar in white and purple baking cups with nuts on the side.

    💖 More Delicious Bite-Size Treats to Try

    • Strawberry mochi cut in half.
      Strawberry Mochi
    • Cake pop image collage.
      Over 60 Cake Pop Recipes & Ideas
    • Chocolate covered coffee beans in white dish.
      How to Make Chocolate Covered Coffee Beans
    • Cake mix cake pops in small pails with sprinkles on top.
      How to Make Cake Pops with Cake Mix

    If you tried this Marzipan Balls Recipe or any other recipe on my website, please leave a 🌟 star rating and let me know how it went in the 📝 comments below. And please share the recipe!

    📋Recipe

    Marzipan ball dusted in icing sugar.
    Print Pin
    5 from 1 vote

    Marzipan Balls

    If you want to try something a little bit different for dessert, check out these Marzipan balls, a delicious one-bite sweet treat!
    Course Dessert
    Cuisine German
    Diet Vegetarian
    Prep Time 15 minutes minutes
    Total Time 15 minutes minutes
    Servings 32 balls
    Calories 83kcal
    Author Joss Dyckson

    Equipment

    • Mini baking cups
    • Hand mixer

    Ingredients

    • 2 cups almond flour
    • 1 ½ cups powdered sugar
    • 2 egg whites you can find pasteurized egg whites at the grocery store
    • ½ teaspoon ground cinnamon
    • ½ navel orange zested
    • ¾ cup nuts finely chopped
    • powdered sugar for dusting
    US Customary - Metric

    Instructions

    • Mix almond flour and sugar in a bowl.
      2 cups almond flour, 1 ½ cups powdered sugar
    • In a separate bowl, beat the egg whites with an electric hand mixer until creamy.
      2 egg whites
    • Add the egg whites to the almond flour mixture, along with the cinnamon and orange zest. Mix until well incorporated.
      ½ teaspoon ground cinnamon, ½ navel orange
    • Wet your hands and form 32 balls. Roll each ball in the chopped nuts and place them in mini baking cups.
      ¾ cup nuts
    • Dust with powdered sugar.

    Notes

    Storage information:
    • Wrap the balls in plastic and then place them into an air-tight container.
    • Refrigerator: Up to 1 month.
    • Freezer: Up to 6 months. If you are freezing the marzipan, thaw in refrigerator before serving.

    Nutrition

    Calories: 83kcal | Carbohydrates: 8g | Protein: 2g | Fat: 5g | Saturated Fat: 1g | Sodium: 4mg | Potassium: 23mg | Fiber: 1g | Sugar: 6g | Calcium: 18mg | Iron: 1mg

    Skillet Baked Beans (British Style)

    April 8, 2020 by Joss Dyckson 1 Comment

    This easy recipe for skillet baked beans in tomato sauce creates a flavorful, healthy side dish, from scratch, that tastes like it came straight out of Great Britain.

    British baked beans in bowl with toast on the side.

    It includes a solid amount of vegetables, legumes and a big burst of flavor (much more flavor than store-bought), ready for any meal you want to pair with it - the most common choice being a Full English Breakfast or simply a piece of toast.

    Baking these homemade beans in an electric skillet allows you full control over the temperatures, acting like a frying pan and saucepan all at once. If you don't have one yet, check out some highly-rated electric frying pans here! You can also make this recipe in a regular stove-top skillet.

    [feast_advanced_jump_to]

    Ingredients

    British skillet baked beans ingredients labeled.
    • garlic cloves - chopped
    • balsamic vinegar - Adds tang, a touch of sweetness and some acidity.
    • canned crushed tomatoes - You can substitute with canned diced tomatoes or stewed tomatoes if needed.
    • tomato paste - The tomato paste component adds richness as well as a bit more thickness to the beans.
    • brown sugar - To add a touch of sweetness, depth of flavor and caramelization as the beans slow cook in the skillet. This is completely optional.
    • Worcestershire sauce - You can make this recipe vegetarian by swapping out the Worcestershire sauce with a vegetarian one. But don't leave it out altogether, as it's crucial to the taste of the beans!
    • canned navy beans - Drained and rinsed. These beans actually look white, despite the name.

    *Check recipe card for full ingredient amounts.

    How to Make Skillet Baked Beans (British Style)

    Veggies in electric skillet frying.

    Step 1. Cook vegetables. Preheat electric skillet to 250ºF or medium-low heat for stovetop pan and add the oil. Cook and stir the vegetables and balsamic vinegar for 5 minutes.

    Baked beans tomato sauce in skillet.

    Step 2. Simmer. Add the tomatoes, paste, brown sugar and Worcestershire sauce and mix well. Add 1 cup of water and lower heat to 200ºF (low heat). Cover and simmer for 15 minutes.

    British baked beans in skillet.

    Step 3. Add beans. Add the beans, salt and pepper. Cook for 5 more minutes, stirring often (if you want the sauce to be thicker, cook it a bit longer).

    British beans on toast.

    Step 4. Serve. Serve the British style baked beans over toasted bread with rosemary or add them to a Full English Breakfast.

    Joss' Top Tip

    When preparing these beans, to fast track chopping the veggies, you can throw all the onions, carrots, garlic, and celery into the food processor and pulse them. That way they are cut into tiny bits that blend into the texture of the beans.

    Serving Suggestions

    • If you're not in the mood to assemble a Full English Breakfast, you can serve these British beans on top of toast or with toast points as dippers.
    • The beans can also be served as a side dish for lunch or dinner. Try them with this other classically British dish I think you'll love called toad in the hole.
    • Growing up, my mom always served these beans alongside classic proteins like bison steaks and grilled hamburgers (for best results use my guide for how to cook frozen burgers on the grill).
    • It might sound odd, but you might also like them alongside these vegetarian zucchini crab cakes.

    British Style Skillet Baked Beans FAQs

    How long do leftovers last in the fridge?

    Store the baked beans in an airtight container in the fridge for up to 3 days.

    Can you freeze leftovers?

    Yes! To freeze the beans, let them cool first, transfer to a freezer-safe container and into the freezer for up to 6 months.

    How do you reheat the beans?

    Reheat them in the electric skillet on low heat or in the microwave.

    How are British baked beans different?

    The beans are made without pork or molasses, taste less sweet and are the perfect texture and flavor to serve on toast for breakfast.

    British baked beans in bowl with toast on the side and fresh rosemary.

    Related Skillet Main Dishes to Consider

    • Lamb chops on plate.
      Electric Skillet Lamb Chops
    • Glazed tofu with fresh herbs in bowl.
      Electric Skillet Glazed Tofu
    • Sausage sliced on a small cast iron tray.
      Electric Skillet Sausage
    • Electric Skillet Hamburgers on wooden background with salad on the side.
      Electric Skillet Hamburgers

    If you tried this British Style Skillet Baked Beans Recipe or any other recipe on my website, please leave a 🌟 star rating and let me know how it went in the 📝 comments below. And please share the recipe!

    📋Recipe

    Skillet British beans in tomato sauce.
    Print Pin
    5 from 2 votes

    Skillet Baked Beans (British Style)

    This recipe for skillet baked beans in tomato sauce creates a flavorful, healthy side dish that tastes like it came straight out of Great Britain. Pair it with a Full English Breakfast or simply a piece of toast.
    Course Breakfast, Side Dish
    Cuisine American, British
    Prep Time 10 minutes minutes
    Cook Time 25 minutes minutes
    Total Time 35 minutes minutes
    Servings 6
    Calories 200kcal
    Author Joss Dyckson

    Equipment

    • Electric Skillet

    Ingredients

    • 2 tablespoons canola oil
    • 1 celery stalk chopped
    • 1 yellow onion chopped
    • ½ cup carrots chopped
    • 2 garlic cloves chopped
    • 2 tablespoons balsamic vinegar
    • 2 cups canned crushed tomatoes
    • 3 tablespoons tomato paste
    • 1 tablespoon brown sugar optional
    • 1 tablespoon Worcestershire sauce
    • 1 cup water
    • 2 cups canned navy beans drained and rinsed
    • salt and pepper to taste
    • fresh rosemary to garnish (optional)
    US Customary - Metric

    Instructions

    • Preheat an electric skillet to 250ºF (medium-low heat in a stove-top skillet) and add the canola oil. Add the celery, onion, carrots, garlic and balsamic vinegar. Cook and stir for 5 minutes.
      2 tablespoons canola oil, 1 celery stalk, 1 yellow onion, ½ cup carrots, 2 garlic cloves, 2 tablespoons balsamic vinegar
    • Add the tomatoes, tomato paste, brown sugar and Worcestershire sauce. Stir to mix well.
      2 cups canned crushed tomatoes, 3 tablespoons tomato paste, 1 tablespoon brown sugar, 1 tablespoon Worcestershire sauce
    • Add 1 cup of water and lower the heat to 200ºF (low heat). Cover and simmer for 15 minutes.
    • Add the beans, salt and pepper. Cook for 5 more minutes, stirring often (if you want the sauce to be thicker, cook it a bit longer).
      2 cups canned navy beans
    • Serve over toasted bread with rosemary or add it to a Full English Breakfast.

    Notes

    • Fridge Storage: Store the baked beans in an airtight container in the fridge for up to 3 days.
    • To Freeze: To freeze the beans, let them cool first, transfer to a freezer-safe container and into the freezer for up to 6 months.
    • Reheat: Reheat them in the electric skillet on low heat or in the microwave.
    • Prep Tip: When preparing these beans, to fast track chopping the veggies, you can throw all the onions, carrots, garlic, and celery into the food processor and pulse them. That way they are cut into tiny bits that blend into the texture of the beans.

    Nutrition

    Calories: 200kcal | Carbohydrates: 32g | Protein: 9g | Fat: 5g | Saturated Fat: 0.5g | Polyunsaturated Fat: 2g | Monounsaturated Fat: 3g | Trans Fat: 0.02g | Sodium: 610mg | Potassium: 667mg | Fiber: 7g | Sugar: 9g | Vitamin A: 2083IU | Vitamin C: 12mg | Calcium: 88mg | Iron: 3mg

    Whipped Coffee

    April 3, 2020 by Joss Dyckson 16 Comments

    Thick, creamy, caramel-colored clouds of whipped coffee over a cup of hot milk, it's almost like a reverse latte. If you are a coffee-lover like me, this drink will surely entice you to get out of bed in the morning! Did you know you can whip coffee in the same way you would whip cream? The trick is to use equal parts instant coffee, sugar and hot water.

    The end result is a hot beverage that tastes like it came straight out of a café, much like my Irish Coffee. Read on if you want to try preparing this coffee foam at home.

    [feast_advanced_jump_to]

    What is Whipped Coffee?

    Whipped coffee, also known as Dalgona coffee, is a coffee beverage consisting of instant coffee, water and sugar whipped until thick and foamy and then served over a cup of hot or cold milk. You can also use caramel syrup for coffee instead of white sugar.

    What does Dalgona Coffee Taste Like?

    Dalgona coffee tastes a lot like a café latte once the whipped coffee has been blended into the milk. It has a sweet, creamy, coffee taste.

    If you were to take a sip of the whipped coffee foam on its own, you would get a very strong taste of sweetened coffee, with a whipped-cream-like texture. The drink tastes much better once the two parts are combined, so before giving it a sip, give it a stir.

    A glass of whipped coffee, coffee beans and books in the background.

    As you whip the instant coffee, you will see the color change from dark to a light caramel as the air becomes incorporated into the mix. Within 5 minutes it should become thick and creamy; the consistency you are looking for.

    Are you as intrigued as I have become with this creative coffee beverage? Whipped coffee, also known as 'beaten coffee' or 'Dalgona coffee' has its origins in South Asia where it has long been popular, although you may have only heard of it recently.

    A glass of whipped coffee, coffee beans and books in the background.
    A glass of whipped coffee, coffee beans and books in the background.

    It's an easy and quick way to mix up your coffee routine and it certainly is fun to serve to guests, especially if they've never heard of it!

    You can make it vegan by using your favorite milk alternative. For a summer version, instead of hot milk you can use cold milk with ice and you will have a delicious, cool and refreshing drink.

    You can also try whisking it by hand, but keep in mind that this method will take longer and you may strengthen your biceps while doing so.

    A glass of whipped coffee, coffee beans and books in the background.

    ☕More Hot Beverage Recipes You Will Love

    • 4 colors of coffee beans on wooden board with a mug of coffee on the side.
      How to Roast Coffee Beans
    • Pumpkin spice coffee creamer pouring into glass mug of coffee.
      Homemade Pumpkin Spice Coffee Creamer
    • Matcha latte in mugs with spoon.
      Homemade Vegan Matcha Powder Mix (+ Latte)
    • Gingerbread latte and gingerbread coffee syrup.
      Gingerbread Coffee Syrup (+ Latte)

    Did this ☕whipped coffee rock your world? If you tried this Whipped Coffee Recipe or any other recipe on my website, please leave a 🌟 star rating and let me know how it went in the 📝 comments below. And please share the recipe!

    📋Recipe

    A glass of whipped coffee, coffee beans and books in the background.
    Print Pin
    5 from 7 votes

    Whipped Coffee

    Thick, creamy, caramel-colored clouds of whipped coffee over a cup of hot milk, it's almost like a reverse latte.
    Course Drinks
    Cuisine Indian, Pakistani
    Prep Time 5 minutes minutes
    Total Time 5 minutes minutes
    Servings 2
    Calories 258kcal
    Author Joss Dyckson

    Equipment

    • Hand mixer

    Ingredients

    • 2 tbsp. sugar
    • 2 tbsp. instant coffee powder
    • 2 tbsp. hot water
    • 2 cups hot milk to serve
    US Customary - Metric

    Instructions

    • In a medium or large bowl, add the sugar, instant coffee and hot water.
    • With an electric hand mixer, whip the mixture until it is fluffy and light. It should double in volume (approximately 5 mins.).
    • To serve, spoon a dollop of the whipped coffee over each mug of hot milk and stir.
    • Garnish with cocoa nibs (optional) and enjoy!

    Nutrition

    Calories: 258kcal | Carbohydrates: 38g | Protein: 9g | Fat: 8g | Saturated Fat: 5g | Cholesterol: 24mg | Sodium: 111mg | Potassium: 845mg | Sugar: 27g | Vitamin A: 395IU | Calcium: 297mg | Iron: 1mg

    Easy Sheet Pan Beef and Broccoli

    April 1, 2020 by Joss Dyckson Leave a Comment

    This sheet pan beef and broccoli with teriyaki sauce is a quick and easy dinner recipe for people with fast-paced lifestyles. Sheet pan meals have become a culinary sensation, offering a convenient and flavorful solution for those on the move.

    Beef teriyaki and broccoli in a bowl with chopsticks.

    The ingredients for this recipe are straightforward, and it will be ready to eat in a little over half an hour. This recipe is a perfect choice for when you have had a busy day and need to make a quick dinner just like my ground beef stir fry and lemon basil and chicken pasta.

    I love the addition of roasted broccoli with the beef. I also have a recipe for how to grill broccoli that you might like that gets that same caramelization happening.

    [feast_advanced_jump_to]

    Ingredients

    Sheet pan beef and broccoli ingredients labeled.
    • sirloin steak - Sirloin steak cooks pretty fast and is tender which makes it perfect for this recipe.
    • teriyaki sauce - If you have a bottle on hand from the grocery store, that will work great. You might see two kinds: one a marinade and one a stir fry sauce. If possible, choose the sauce because it's thickened whereas the marinade is watery and not as great for serving over the meat and veggies.
    • broccoli florets - Make sure they aren't overly large so that they cook quickly.
    • green beans - Green beans are an excellent accompaniment to steak and they roast nicely.
    • mushrooms - White button mushrooms or cremini mushrooms both work for this recipe.
    • red bell pepper - You can use green or yellow bell peppers if you prefer but I use red for contrast in color and I enjoy their flavor the best.

    *Check recipe card for ingredient amounts.

    How to Make Sheet Pan Beef and Broccoli

    Raw beef strips in a bowl with teriyaki sauce.

    Step #1. Prep beef. Preheat the oven to 400ºF. Add the beef strips to a bowl with minced garlic, ½ cup teriyaki sauce and a touch of salt.

    Raw beef strips and veggies on sheet pan with teriyaki sauce.

    Step #2. Spread out. Spread the beef and veggies evenly over a lightly greased sheet pan. Pour the remaining teriyaki sauce over the veggies.

    Roasted beef teriyaki, broccoli and other veggies on sheet pan.

    Step #3. Bake. Bake for 15 minutes in the preheated oven. Flip the beef and veggies and bake for 10 more minutes, until roasted and browned.

    Beef and broccoli in bowls with chopsticks.

    Step #4. Serve the beef and broccoli. Add the garnishes and serve with rice, noodles or on its own. Enjoy!

    Joss' Top Tip

    Make sure to get the beef sufficiently coated with the teriyaki sauce in order to ensure the flavor really soaks into the meat. If you have time, you can let it marinate for a few hours in the fridge before cooking.

    Side Dishes

    • It is best served over plain noodles, rice, quinoa, mashed potatoes or simply on its own.
    • If you're serving this dish with brown rice, check out my tutorial for how to cook brown rice on the stove.
    • For barley, a good brown rice substitute, I also demonstrate how to cook barley here.
    • Spring rolls or these Asian dumplings are also amazing!

    Wine Pairing

    If you are looking for a decent wine pairing, beef teriyaki matches well with red wines like Cabernet Sauvignon, Zinfandel, and Merlot.

    Storage

    • Should there be any leftovers, put some rice or noodles into a storage container and pour the remaining beef, vegetables, and sauce on top of it.
    • It can be stored in the fridge for up to 3 to 4 days or in the freezer for up to 2 months.
    • If freezing, thaw in the fridge overnight.
    Beef and broccoli in a black bowl, topped with sesame seeds.

    More Easy Dinner Recipes to Try

    • Skillet British beans in tomato sauce.
      Skillet Baked Beans (British Style)
    • Blackened chicken breast on plate with lime wedges and cilantro.
      Cajun Blackened Chicken Breast
    • Taco in a bag with forks and toppings on the side.
      How to Make Walking Tacos (aka Taco in a Bag)
    • Chicken fried breaded burger on plate.
      Chicken-Fried Breaded Hamburgers

    If you tried this 🥩🥦 Easy Sheet Pan Beef and Broccoli Recipe or any other recipe on my website, please leave a 🌟 star rating and let me know how it went in the 📝 comments below. And please share the recipe!

    📋Recipe

    Beef and broccoli in black bowl.
    Print Pin
    5 from 1 vote

    Easy Sheet Pan Beef and Broccoli

    This sheet pan beef and broccoli with teriyaki sauce is a quick and easy dinner recipe for people with fast-paced lifestyles. Sheet pan meals have become a culinary sensation, offering a convenient and flavorful solution for those on the move.
    Course Main Course
    Cuisine American, Japanese
    Prep Time 10 minutes minutes
    Cook Time 25 minutes minutes
    Total Time 35 minutes minutes
    Servings 4
    Calories 258kcal
    Author Joss Dyckson

    Equipment

    • Sheet pan

    Ingredients

    • 1 pound sirloin steak sliced into thin strips
    • 2 garlic cloves minced
    • 1 cup teriyaki sauce divided
    • 2 cups broccoli florets
    • 1 cup green beans cut into thirds--or in halves if small
    • 1 cup button mushrooms sliced
    • 1 red bell pepper sliced
    • 4 green onions sliced (to garnish)
    • sesame seeds to garnish
    • salt to taste
    US Customary - Metric

    Instructions

    • Preheat oven to 400ºF. Add the beef strips to a bowl with minced garlic and ½ cup teriyaki sauce. Sprinkle with a bit of salt and mix well to coat.
    • Spread the beef and veggies evenly over a lightly greased sheet pan. Drizzle the remaining ½ cup teriyaki sauce over the veggies.
    • Bake for 15 minutes in the preheated oven. Flip the beef and veggies and bake for 10 more minutes, until roasted and browned.
    • Garnish with green onions and sesame seeds. Serve with rice, noodles or on its own and enjoy!

    Notes

    • Make sure to get the beef sufficiently coated with the teriyaki sauce in order to ensure the flavor really soaks into the meat. If you have time, you can let it marinate for a few hours in the fridge before cooking.
    • If you are looking for a decent wine pairing, beef and broccoli teriyaki matches well with red wines like Cabernet Sauvignon, Zinfandel, and Merlot.
    • Should there be any leftovers, put some rice or noodles into a storage container and pour the remaining beef, vegetables, and sauce on top of it. It can be stored in the fridge for up to 3 to 4 days or in the freezer for up to 2 months.
    • If freezing, thaw in the fridge overnight.
    • You might see two kinds of teriyaki in the grocery store: one a marinade and one a stir fry sauce. If possible, choose the sauce because it's thickened whereas the marinade is watery and not as great for serving over the meat and veggies.

    Nutrition

    Calories: 258kcal | Carbohydrates: 19g | Protein: 32g | Fat: 6g | Saturated Fat: 2g | Cholesterol: 69mg | Sodium: 2844mg | Potassium: 891mg | Fiber: 3g | Sugar: 14g | Vitamin A: 1405IU | Vitamin C: 83mg | Calcium: 84mg | Iron: 4mg

    Homemade Chicken Vegetable Lo Mein

    March 25, 2020 by Joss Dyckson Leave a Comment

    If you're anything like me, chicken and vegetable lo mein is a staple when it comes to carry-out. And if you've never attempted to make it at home you're missing out. Don't worry, it's easy: there aren't any weird or complicated ingredients or methods and homemade almost always tastes better.

    Chicken lo mein noodles in red and black bowls.

    This is one of the simplest and easiest take-out meals to mimic at home, and the flavors will pop even more with hand-picked fresh ingredients that go straight from your pan to your plate.

    If you want to know the difference between these lo mein noodles and chow mein noodles, check out my post here. People often confuse them if they're new to Chinese food, but this post does a good job of explaining the differences.

    I also make these mini Chinese pork buns and an easy xo sauce that you might like!

    [feast_advanced_jump_to]

    Homemade Chicken Lo Mein Ingredients

    There's a good chance that you already have most of what you'll need for this recipe on hand. It features egg noodles and chicken breast, with a whole host of bright and flavorful veggies.

    The rich teriyaki sauce is so simple- it has just five ingredients and comes together in one pot within a few minutes.

    Chicken Marinade:

    • 1 tablespoon soy sauce
    • 2 teaspoons rice vinegar
    • 1 ½ teaspoons cornstarch
    • 1 pound chicken breasts - sliced

    For the Sauce:

    • 3 ½ tablespoons soy sauce
    • 3 tablespoons teriyaki sauce
    • 2 tablespoons sesame oil
    • 2 teaspoons fresh ginger - grated
    • 1 teaspoon garlic - minced

    For the Stir Fry:

    • ½ pound Chinese egg noodles
    • 1 teaspoon sesame oil
    • 2 tablespoons vegetable oil
    • ½ onion - sliced
    • 2 cups cabbage - shredded
    • 1 red bell pepper - sliced
    • 1 cup mushrooms - sliced

    To Serve:

    • ½ cup scallions - chopped (to garnish)
    • sesame seeds - to garnish

    Recipe Tweaks

    Remember, this whole dish can be ready in no time, and even the kiddos will want to dig into it, making it a perfect weeknight dinner. And the best part about this dish is the versatility.

    • If you don't want chicken or don't have any on hand, swap it out for steak or shrimp.
    • And if you don't have egg or wheat noodles, you can wing it with rice noodles.
    • If you want to add a little more flavor to the finishing touch, you can lightly toast your sesame seeds in a pan over medium heat before sprinkling them over your masterpiece.
    • For a spicy kick, add some sriracha.

    How to Make Chicken Vegetable Lo Mein

    1. Marinate the chicken. Place the marinade ingredients in a medium bowl and whisk together until the cornstarch dissolves. Add the chicken pieces. Mix the chicken with the marinade to coat. Let it marinate for 30 minutes.
    2. Make the sauce. Whisk together all sauce ingredients in a small saucepan. Heat over medium heat until it starts to bubble (a few minutes). Take it off the heat and set aside.
    3. Cook the noodles. Cook the egg noodles according to package instructions. Drain and toss with 1 teaspoon sesame oil so that they don't stick. Set aside.
    4. Fry. In a deep skillet or wok, heat the vegetable oil to medium-high heat. Fry the chicken pieces in the wok until browned and cooked through - reserve. Add the vegetables to the wok and sauté for about 5 minutes - so they are tender but crispy.
    5. Toss together. Return the chicken to the wok. Add the noodles and sauce - toss to combine.
    6. Serve. Serve garnished with sesame seeds and sliced scallions.
    Chicken lo mein noodles in black and red bowl with chop sticks.

    Joss' Tips

    • Marinade Time: Marinate the chicken for at least 15 minutes to tenderize and flavor it or for the full 30 minutes if you have time.
    • Thin Cuts: Slice the chicken thinly for quick cooking. Cut the vegetables into thin, uniform pieces so they cook evenly and quickly.
    • High Heat: Cooking vegetables on high heat ensures that everything cooks quickly and retains a good, tender-crisp texture.
    • Avoid Overcrowding: If your pan is small, cook the chicken and vegetables in batches to avoid steaming them.
    • Fresh Noodles: If you can find fresh lo mein noodles, they often have a better texture than dried ones.

    Storage & Reheating

    • Storage: Cover and store leftovers up to 4 days in the fridge.
    • Reheating: Reheat in the pan or microwave.

    Chicken Vegetable Lo Mein FAQs

    What is chicken lo mein made of?

    Chicken lo mein is a dish consisting of Chinese noodles, pieces of chicken, a range of stir fried vegetables and a delicious sauce.

    Can you use spaghetti noodles for lo mein?

    While it's traditional to use Chinese egg noodles for lo mein, you can absolutely use spaghetti noodles if you like. Just make sure to cook them according to the package directions.

    What is a substitute for lo mein noodles?

    Besides spaghetti noodles, you could also substitute with rice noodles, udon noodles, linguini, soba noodles or any noodles that are similar. You could even use zucchini 'noodles'.

    Chicken lo mein noodles in red and black bowls with chop sticks and sauce on the side.

    More Asian Take Out Dish Recipes to Try

    • Crunchy chow mein noodle dish on white plate.
      Electric Skillet Chow Mein Noodles
    • Beef and broccoli in black bowl.
      Easy Sheet Pan Beef and Broccoli
    • Kimchi dumplings arranged on plate with dipping sauce.
      Kimchi Dumplings
    • Bok choy stir fry in frying pan.
      Bok Choy Stir Fry

    If you tried this 🍜 Homemade Chicken Vegetable Lo Mein Recipe or any other recipe on my website, please leave a 🌟 star rating and let me know how it went in the 📝 comments below. And please share the recipe!

    📋Recipe

    Chicken and vegetable lo mein in red bowl with chopsticks.
    Print Pin
    5 from 1 vote

    Homemade Chicken Vegetable Lo Mein

    This chicken and vegetable lo mein is one of the easiest take-out meals to mimic at home, and the flavors will pop even more with hand-picked fresh ingredients that go straight from your pan to your plate.
    Course Main Course
    Cuisine Chinese
    Prep Time 10 minutes minutes
    Cook Time 18 minutes minutes
    Marinating Time 30 minutes minutes
    Total Time 58 minutes minutes
    Servings 4
    Calories 551kcal
    Author Joss Dyckson

    Equipment

    • Wok or frying pan
    • Colander

    Ingredients

    Chicken Marinade

    • 1 tablespoon soy sauce
    • 2 teaspoons rice vinegar
    • 1 ½ teaspoons cornstarch
    • 1 pound chicken breasts sliced thinly

    For the Sauce

    • 3 ½ tablespoons soy sauce
    • 3 tablespoons teriyaki sauce
    • 2 tablespoons sesame oil
    • 2 teaspoons fresh ginger grated
    • 1 teaspoon garlic minced

    For the Stir Fry

    • ½ pound Chinese egg noodles
    • 1 teaspoon sesame oil
    • 2 tablespoons vegetable oil
    • ½ yellow onion sliced
    • 2 cups cabbage shredded
    • 1 red bell pepper sliced
    • 1 cup mushrooms sliced

    To Serve

    • ½ cup scallions chopped (to garnish)
    • sesame seeds to garnish
    US Customary - Metric

    Instructions

    • Place the marinade ingredients in a medium bowl and whisk together until the cornstarch dissolves. Add the chicken pieces. Mix the chicken with the marinade to coat. Let it marinate for 30 minutes.
    • Whisk together all sauce ingredients in a small saucepan. Heat over medium heat until it starts to bubble (a few minutes). Take it off the heat and set aside.
    • Cook the egg noodles according to package instructions. Drain and toss with 1 teaspoon sesame oil so that they don't stick. Set aside.
    • In a deep skillet or wok, heat the vegetable oil to medium-high heat. Fry the chicken pieces in the wok until browned and cooked through - reserve.
    • Add the vegetables to the wok and sauté for about 5 minutes--so they are tender but crispy.
    • Return the chicken to the wok. Add the noodles and sauce - toss to combine.
    • Serve garnished with sesame seeds and sliced scallions.

    Notes

    • Storage: Up to 4 days in the fridge.
    • Reheating: Reheat in the pan or microwave.
    • Can you use spaghetti noodles? While it's traditional to use Chinese egg noodles for lo mein, you can absolutely use spaghetti noodles if you like. Just make sure to cook them according to the package directions.
    • More noodle substitutes: Besides spaghetti noodles, you could also substitute with rice noodles, linguini, udon noodles, soba noodles or any noodles that are similar. You could even use zucchini 'noodles'.
    • Marinade Time: Marinate the chicken for at least 15 minutes to tenderize and flavor it or for the full 30 minutes if you have time.
    • High Heat: Cooking vegetables on high heat ensures that everything cooks quickly and retains a good, tender-crisp texture.
    • Avoid Overcrowding: If your pan is small, cook the chicken and vegetables in batches to avoid steaming them.
    • Fresh Noodles: If you can find fresh lo mein noodles, they often have a better texture than dried ones.
    • Thin Cuts: Slice the chicken thinly for quick cooking. Cut the vegetables into thin, uniform pieces so they cook evenly and quickly.

    Nutrition

    Calories: 551kcal | Carbohydrates: 52g | Protein: 37g | Fat: 22g | Saturated Fat: 9g | Cholesterol: 120mg | Sodium: 1509mg | Potassium: 874mg | Fiber: 4g | Sugar: 7g | Vitamin A: 1160IU | Vitamin C: 56mg | Calcium: 57mg | Iron: 3mg

    Maple Bacon Cake Pops

    March 18, 2020 by Joss Dyckson Leave a Comment

    This is my take on some amazing maple bacon cake pops that break down the barrier between breakfast and dessert, now even easier to make with the invention of the convenient cake pop maker.

    Maple bacon cake balls on plates with a jar of maple syrup on the side.
    [feast_advanced_jump_to]

    About These Maple Cake Pops

    Cake pops/cake balls may be the perfect dessert in the same way crispy bacon may be the perfect breakfast food. With thinking like that, it's a wonder more people haven't tried mixing them together.

    Not only is bacon great in savory foods like this bacon butty sandwich, the amazing mixture of sweet, salty, smoky, and savory works amazingly in these maple bacon cake balls as well.

    While it might be an overwhelming combination in a more substantial dessert, the bite-sized properties of the cake ball make it an ideal vehicle for this terrific treat for your taste buds.

    Plus, the cake pop maker makes this recipe even easier. Check out the best cake pop maker options here if you don't already have one in your kitchen, as well as how to make cake pops with a cake pop maker.

    Ingredients

    • vanilla cake mix from a box - Vanilla cake is probably your best option here for making a quick maple base but you could try to mix things up with another type of dessert. Chocolate cake for example, since who would ever pass up chocolate and bacon? Maybe even a marbled cake combining the vanilla maple and chocolate.
    • maple syrup - Opt for pure maple syrup.
    • bacon strips - You can go with your favorite or whatever you have on hand but I personally like thick cut.

    *Check recipe card for full ingredients and amounts.

    How to Make Maple Bacon Cake Balls

    • Make the batter. Whisk the cake ball ingredients together to form a batter. Plug in the cake pop maker to preheat it.
    • Bake. Working quickly, use a teaspoon to transfer the batter to the cake pop maker holes to just below the top (so that they don't overflow when baking). Close the lid and bake them for around 4 minutes, or until baked through. Repeat with the rest of the batter.
    • Make icing. Mix all icing ingredients until creamy. Cover and reserve.
    • Cook the bacon. Cook bacon strips in a skillet at medium temperature until golden brown on both sides. (You could even grill the bacon strips for extra smoky flavor.) Remove excess grease and cut them into tiny squares. Add them to a bowl with ½ tbsp. maple syrup and mix well to coat.
    • Coat. Drizzle the icing over the cake balls and top with the glazed bacon bits. Insert treat sticks into the center of the cake balls, if desired. Serve.
    Maple bacon cake balls in bowl.

    Chef's Note: If you're a little daring and just can't satisfy your sweet tooth, you could also try dipping the cake balls in icing instead of just drizzling it on.

    Storage Notes

    • Fridge: Because these cake balls have a meat-based topping, they should be stored in the fridge in an airtight container for up to 4 to 5 days.
    • Freezer: They can be frozen for up to 2 to 3 months. Thaw in the fridge.
    Maple bacon cake balls in bowl covered in maple frosting and glazed bacon bits.

    ❤️ More Cake Pop Maker Recipes You Will Love

    • Puff pastry chicken balls on blue and white plate.
      Cake Pop Maker Puff Pastry Chicken Balls
    • Black Forest cake balls stacked on plate.
      Black Forest Cake Balls
    • Falafel on black plate with fresh dill.
      Cake Pop Maker Mini Falafel Bites
    • Mini shrimp ball with a bite taken out of it in hand.
      Cake Pop Maker Mini Shrimp Balls

    If you tried this Maple Bacon Cake Pops Recipe or any other recipe on my website, please leave a 🌟 star rating and let me know how it went in the 📝 comments below. And please share the recipe!

    📋Recipe

    Maple bacon cake pops on plate.
    Print Pin
    5 from 1 vote

    Maple Bacon Cake Pops

    These amazing maple bacon cake pops break down the barrier between breakfast and dessert. They are made easy by using the convenient cake pop maker. You can also leave the treat sticks out and serve them as cake balls.
    Course Breakfast, Dessert
    Cuisine American
    Prep Time 15 minutes minutes
    Cook Time 15 minutes minutes
    Total Time 30 minutes minutes
    Servings 24 cake pops
    Calories 40kcal
    Author Joss Dyckson

    Equipment

    • Cake Pop Maker
    • Frying pan

    Ingredients

    For the cake balls

    • 6 ½ ounces vanilla cake mix from a box
    • 2 tablespoons maple syrup
    • 1 egg
    • 2 ½ tablespoons vegetable oil
    • ⅓ cup water

    For the icing

    • ¼ cup powdered sugar
    • 2 tablespoons maple syrup

    Topping

    • 3 bacon strips
    • ½ tablespoon maple syrup
    US Customary - Metric

    Instructions

    • Plug in a cake pop maker to preheat it. Whisk the cake ball ingredients together to form a batter.
    • Working quickly, use a teaspoon to transfer the batter to the cake pop maker holes to just below the top (so that they don't overflow when baking). Close the lid and bake them for around 4 minutes, or until baked through. Repeat with the rest of the batter.
    • Mix all icing ingredients until creamy. Cover and reserve.
    • Cook bacon strips in a skillet at medium temperature until golden brown on both sides. Remove excess grease and cut them into tiny squares. Add them to a bowl with ½ tbsp. maple syrup and mix well to coat.
    • Drizzle the icing over the cake balls and top with the glazed bacon bits. Insert treat sticks into the center of the cake balls, if desired. Serve.

    Notes

    • Fridge storage: Because these cake balls have a meat-based topping, they should be stored in the fridge in an airtight container for up to 4 to 5 days.
    • Freezer storage: They can be frozen for up to 2 to 3 months. Thaw in the fridge.

    Nutrition

    Calories: 40kcal | Carbohydrates: 3g | Protein: 1g | Fat: 3g | Saturated Fat: 2g | Trans Fat: 1g | Cholesterol: 9mg | Sodium: 21mg | Potassium: 14mg | Sugar: 3g | Vitamin A: 11IU | Calcium: 4mg | Iron: 1mg
    « Previous Page
    Next Page »
    Joss Dyckson author photo.

    Hi, I'm Joss!

    I am the creator and editor of In the Kitch. I am inviting you on this food journey with me to learn, grow and bring out that inner chef in you. I hope to inspire you to get creative in your own kitchen!

    More about me →

    Patriotic Recipes

    • 4th of July themed charcuterie board on red plate with red, white and blue stars.
      4th of July Charcuterie Board
    • Grilled burgers on metal flipper, grill grates in the background.
      How to Grill Frozen Burgers
    • Blueberry mojito mocktail with fresh mint in cocktail glass.
      Blueberry Mojito Mocktail
    • 4th of July pulled pork sliders on parchment lined serving tray.
      4th of July Pulled Pork Sliders
    • Canada Day raspberry cheesecake in jars with red and white spoons.
      Raspberry Cheesecake in a Jar (Canada Day Dessert)
    • Watermelon basil cocktail in wine glass with watermelon swizzle stick.
      Frozen Watermelon Basil Cocktail

    Popular

    • Cake pop frosting in bowl with spatula.
      Cake Pop Frosting & Coating
    • Collage of coffee syrups.
      12 Coffee Syrup Recipes to Upgrade Your Brew
    • Pictures of passion fruit recipes collage.
      16 Easy Passion Fruit Recipes To Make This Summer
    • BBQ buffalo wings in dish with sauce on the side.
      37 Easy and Delicious Electric Skillet Recipes
    • Peanut butter soup in a speckled bowl.
      Peanut Butter Soup
    • Corn tortillas on foil.
      How to Heat Corn Tortillas (3 Ways)

    Footer

    ↑ back to top

    In the Kitch

    • Privacy Policy
    • Terms & Conditions
    • Disclaimer
    • Accessibility Statement

    About

    • About
    • The Team

    Contact

    • Contact

    As an Amazon Associate I earn from qualifying purchases.

    Copyright © 2026 In the Kitch

    Rate This Recipe

    Your vote:


    A rating is required
    A name is required
    An email is required